


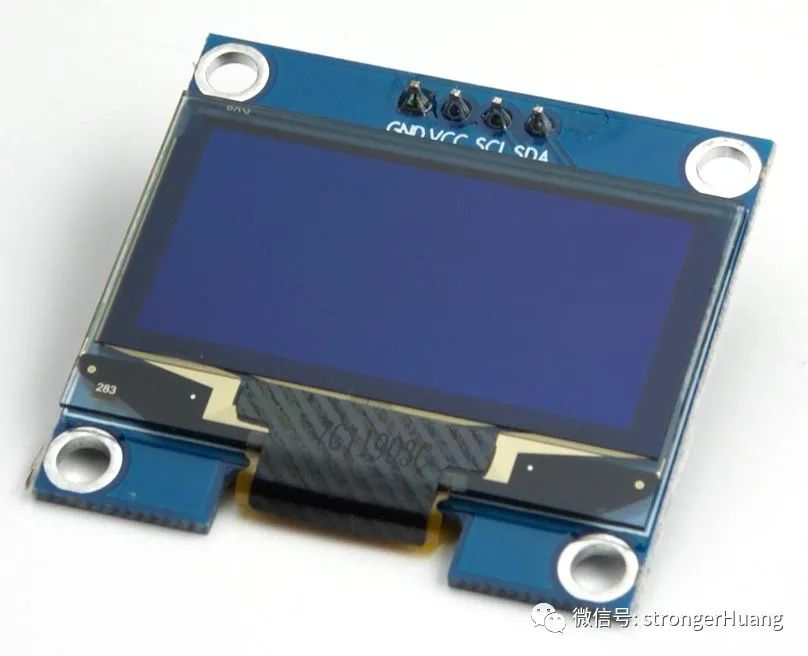
类似封面这种128x64的OLED屏,应该大家都有用过吧?
我以前用这种OLED屏开发过几款产品,当时设计产品需求比较简单,界面除了简易的图形之外,就是文字信息,都是自己设计的UI界面。
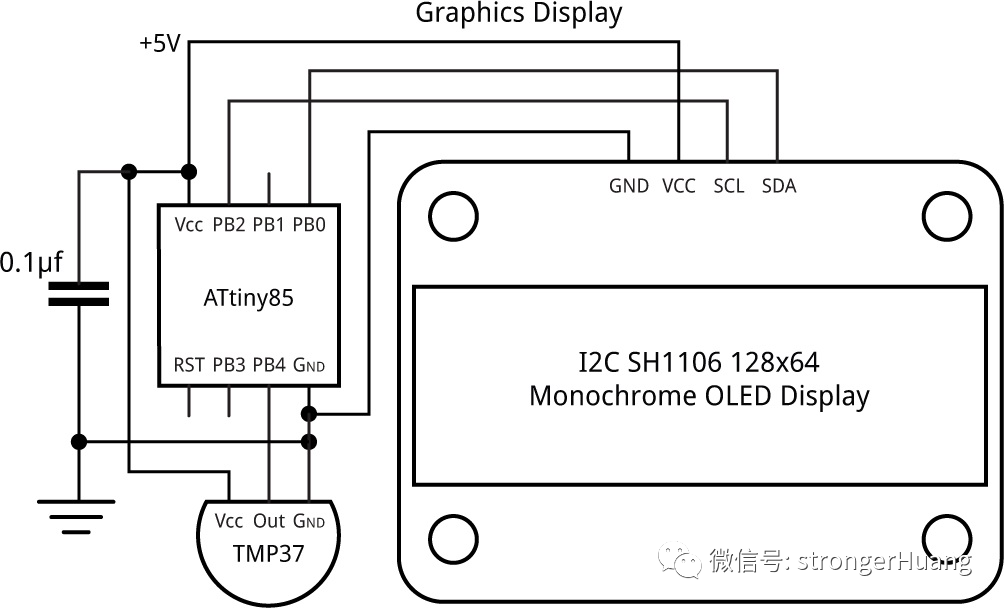
今天给大家分享一下用128x64 OLED做的温度显示界面,如下图:
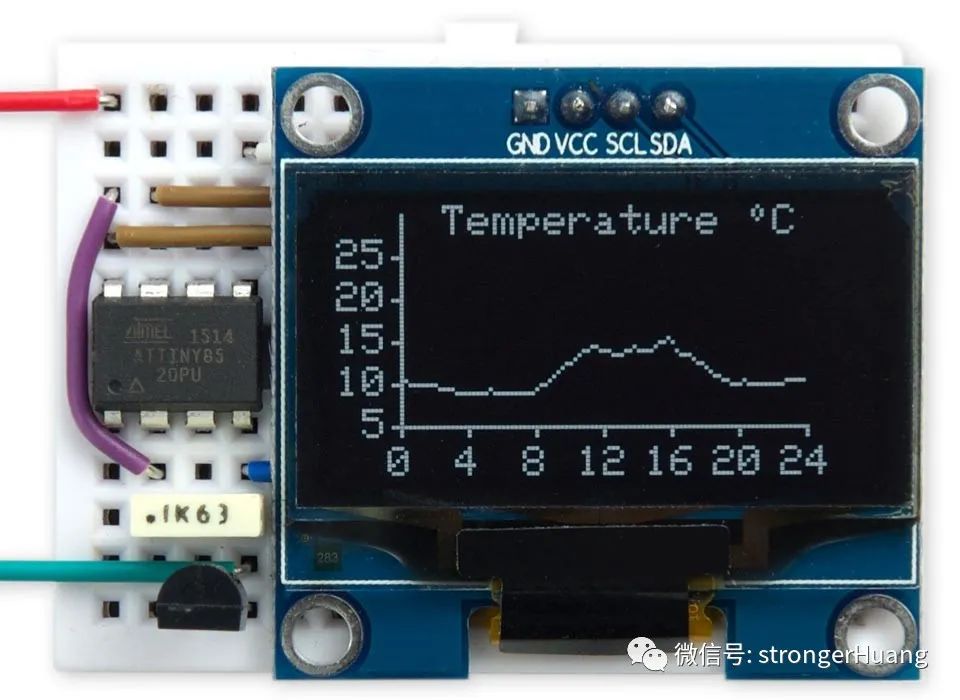
1、介绍
该128x64 OLED为单色显示屏,基于SSD1306驱动器芯片的OLED显示器。
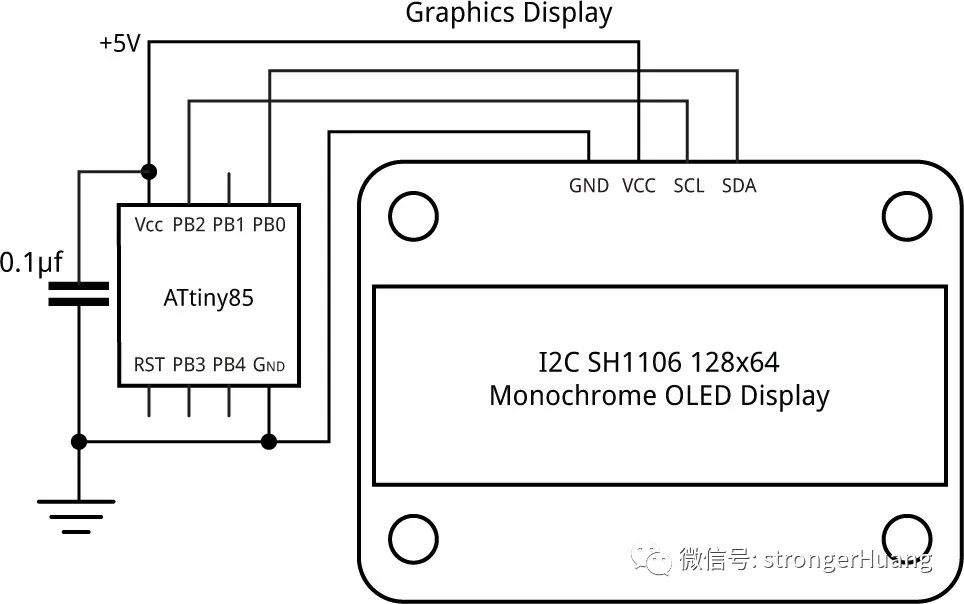
2、API接口说明
底层的通信和驱动,这里就不描述了,讲述主要的API接口:
ClearDisplay():清除显示。
InitDisplay():初始化显示。
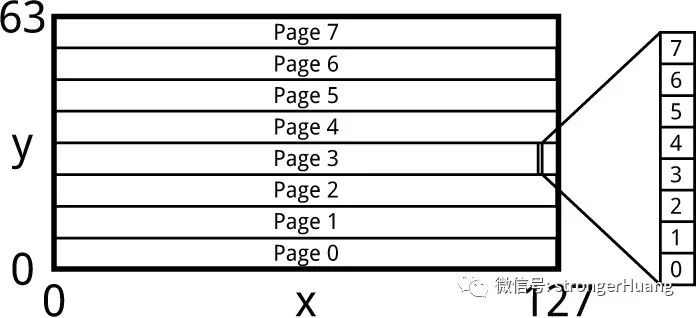
PlotPoint(x,y):在(x,y)处绘制一个点。
MoveTo(x,y):将绘图位置移动到(x,y)。
DrawTo(x,y):从绘图位置到(x,y)画一条线。
PlotCharacter(c,x,y):绘制ASCII字符c,坐标为(x,y)。
PlotText(s):从当前绘图位置开始,绘制缓存中的文本字符串。
3、API源码
1.InitDisplay()初始化显示
1void InitDisplay () {
2  Wire.beginTransmission(address);
3  Wire.write(commands);
4  Wire.write(0xA1);
5  Wire.write(0xAF);
6  Wire.endTransmission();
7}
2.single()写命令
1void Single (uint8_t x) {
2  Wire.write(onecommand);
3  Wire.write(x);
4}
 1void ClearDisplay () {
 2  for (int p = 0 ; p < 8; p++) {
 3    Wire.beginTransmission(address);
 4    Single(0xB0 + p);
 5    Wire.endTransmission();
 6    for (int q = 0 ; q < 8; q++) {
 7      Wire.beginTransmission(address);
 8      Wire.write(data);
 9      for (int i = 0 ; i < 20; i++) Wire.write(0);
10      Wire.endTransmission();
11    }
12  }
13}
 1void PlotPoint (int x, int y) {
 2  Wire.beginTransmission(address);        //地址
 3  Single(0x00 + ((x + 2) & 0x0F));
 4  Single(0x10 + ((x + 2)>>4));
 5  Single(0xB0 + (y >> 3));
 6  Single(0xE0);                      //读取并修改写入
 7  Wire.write(onedata);
 8  Wire.endTransmission();
 9  Wire.requestFrom(address, 2);
10  Wire.read();
11
12  int j = Wire.read();
13  Wire.beginTransmission(address);
14  Wire.write(onedata);
15  Wire.write((1<<(y & 0x07)) | j);
16  Single(0xEE);                           // Cancel read modify write
17  Wire.endTransmission();
18}
1void MoveTo (int x, int y) {
2  x0 = x;
3  y0 = y;
4}
 1void DrawTo (int x, int y) {
 2  int sx, sy, e2, err;
 3  int dx = abs(x - x0);
 4  int dy = abs(y - y0);
 5  if (x0 < x) sx = 1; else sx = -1;
 6  if (y0 < y) sy = 1; else sy = -1;
 7  err = dx - dy;
 8  for (;;) {
 9    PlotPoint(x0, y0);
10    if (x0==x && y0==y) return;
11    e2 = err<<1;
12    if (e2 > -dy) { err = err - dy; x0 = x0 + sx; }
13    if (e2 < dx) { err = err + dx; y0 = y0 + sy; }
14  }
15}
 1void PlotChar (int c, int x, int y) {
 2  int h = y & 0x07;
 3  for (int p = 0; p < 2; p++) {
 4    Wire.beginTransmission(address);
 5    Single(0xB0 + (y >> 3) + p);          // Page
 6    for (int col=0; col<6; col++) {
 7      Single(0x00 + ((x+2+col) & 0x0F));  // Column low nibble
 8      Single(0x10 + ((x+2+col)>>4));      // Column high nibble
 9      Single(0xE0);                       // Read modify write
10      Wire.write(onedata);
11      Wire.endTransmission();
12      Wire.requestFrom(address, 2);
13      Wire.read();                        // Dummy read
14      int j = Wire.read();
15      Wire.beginTransmission(address);
16      Wire.write(onedata);
17      int bits = ReverseByte(pgm_read_byte(&CharMap[c-32][col]));
18      Wire.write((bits<<h)>>(p<<3) | j);
19      Single(0xEE);                       // Cancel read modify write
20    }
21    Wire.endTransmission();
22  }
23}
1void PlotText(PGM_P s) {
2  int p = (int)s;
3  while (1) {
4    char c = pgm_read_byte(p++);
5    if (c == 0) return;
6    PlotChar(c, x0, y0);
7    x0 = x0 + 6;
8  }
9}
5、实例
1.说明
 1const int Now = 1547;                   // 比如设置时间为:15:47
 2unsigned long StartMins = (unsigned long)((Now/100)*60 + (Now%100));
 3
 4void loop () {
 5  unsigned int SampleNo = StartMins/15;
 6
 7  // 绘制温度图
 8  int x1 = 16, y1 = 11;
 9  int yscale = 2;
10  MoveTo(26, 56); PlotText(PSTR("Temperature ~C"));
11
12  //横轴
13  MoveTo(x1, y1); DrawTo(x1+96, y1);
14  for (int i=0; i<=24; i=i+4) {
15    int mark = x1+i*4;
16    MoveTo(mark, y1); DrawTo(mark, y1-2);
17    int tens = i/10;
18    if (tens != 0) {
19      PlotChar(tens+'0', mark-6, y1-12);
20      PlotChar(i%10+'0', mark, y1-12);
21    } else PlotChar(i%10+'0', mark-3, y1-12);
22  }
23
24  //纵轴
25  MoveTo(x1, y1); DrawTo(x1, y1+50);
26  for (int i=5; i<=25; i=i+5) {
27    int mark = y1+i*yscale-10;
28    MoveTo(x1, mark); DrawTo(x1-2, mark);
29    int tens = i/10;
30    if (tens != 0) PlotChar(tens+'0', x1-15, mark-3);
31    PlotChar(i%10+'0', x1-9, mark-3);
32  }
33  for (;;) {
34    //每15分钟更新一下
35    while ((unsigned long) ((StartMins + millis()/60000)/15)%96 == SampleNo);
36    // Time to take a new reading
37    SampleNo = (SampleNo+1)%96;
38    int Temperature = (analogRead(A2)*25)/233;
39    PlotPoint(SampleNo+x1, Temperature-10+y1);
40  }
41}
小哥搜集了一些嵌入式学习资料,公众号内回复【1024】即可找到下载链接!
推荐好文 点击蓝色字体即可跳转

文章转载自嵌入式情报局,如果涉嫌侵权,请发送邮件至:contact@modb.pro进行举报,并提供相关证据,一经查实,墨天轮将立刻删除相关内容。
