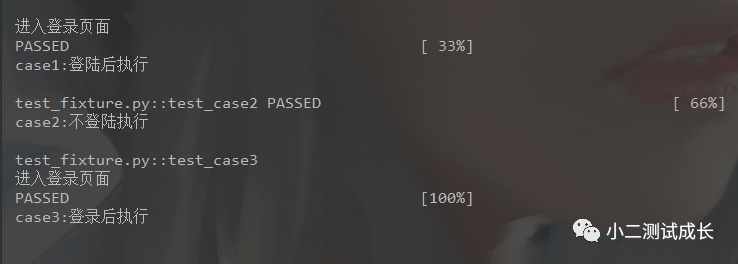
暂无图片
暂无图片
暂无图片
暂无图片
暂无图片

pytest高阶用法

小二测试成长 2021-08-30
576

一、补充:pytest.fixture
如果某些用例要执行fixture的方法,使用装饰器的方法加上@pytest.mark.usefixtures("方法")
示例

@pytest.fixture()


def login():

    print("\n进入登录页面")


@pytest.mark.usefixtures("login")
def test_case1():

    print("\ncase1:登陆后执行")


def test_case2():

    print("\ncase2:不登陆执行")


@pytest.mark.usefixtures("login")
def test_case3():

    print("\ncase3:登录后执行")


if __name__ == '__main__':
    pytest.main(["-s","test_fixture.py"])
执行结果


二、fixture带参数传递

通过固定参数request传递
1、在fixture中增加:
@pytest.fixtue(params=1,2,3,"hello")
2、在方法参数填写request
示例:

import pytest


@pytest.fixture(params=[1,2,3,"hello"])
def test_data(request):

    return request.param


def test_case1(test_data):

    print(f"test data {test_data}")


if __name__ == '__main__':
    pytest.main(['-s', 'test_request.py'])
执行结果:
当然,也可以定义一个变量,写一个列表,把列表传进去也是可以的
示例:
import pytest


data = [1,2,3,"hello"]
@pytest.fixture(params= data)
def test_data(request):
    return request.param
def test_case1(test_data):
    print(f"\ntest data {test_data}")
if __name__ == '__main__':
    pytest.main(['-s', 'test_request.py'])
执行结果还是一样的:


三、mark.parametrize参数化

使用方法:@pytest.mark.parametrize("变量1,变量2",[待传的数据1,待传的数据2])
代码示例:
import pytest
#将'3+5','2+4'和'3*6'传入到test_input中,8,6,20传入到expected中
@pytest.mark.parametrize("test_input, expected", [("3+5", 8),
                                                  ("2+4", 6),
                                                  ("3*6",20)])
def test_case(test_input,expected):
    assert eval(test_input) == expected  #eval表示将字符串当成有效的表达式求值并返回结果
执行结果:


四、跳过测试用例

使用@pytest.mark.skip跳过测试用例,可以加条件skipif,在满足某些条件下才希望通过,否则跳过这个测试

使用@pytest.mark.xfail预计会失败的测试用例,它是一个xpass,将在测试摘要中报告


五、使用自定义标记mark只执行部分用例
使用方法:在测试用例方法上加@pytest.mark.case1
执行:
要在cmd窗口下执行
-s参数:输出所有测试的print信息  -m:执行自定义标记的相关用例
pytest -s test_mark.py -m=case1
pytest -s test_mark.py -m case2
pytest -s test_mark.py -m "case3"

import pytest


@pytest.mark.case1
def test_case1():

    print("case1")


@pytest.mark.case2
def test_case2():

    print("case2")


@pytest.mark.case3
def test_case3():

    print("case3")


def test_case4():
    print("case4")


六、通过文件名类名方法及组合调用部分测试用例执行

1、直接输入文件名,类名
 pytest test_class.py
 pytest -v test_class.py
 pytest -v test_class.py::TestClass
 pytest -v test_class.py::TestClass::test_one
-v是打印详细信息
2、使用-k
 pytest -k "TestClass and test_one"
 pytest -k "TestClass or test_one"

TestClass是类名,and是运算符,test_one是方法中含有的信息


七、pytest执行用例出错时停止
pytest -x test_class.py --maxfail=2

pytest -x test_class.py   默认--maxfail=1


八、pytest执行用例失败重新运行
安装pip install pytest-rerunfailures
运行:
pytest --reruns 3 -v -s test_class.py         3代表失败就运行,3次都没成功就停止

pytest -v --reruns 5 --reruns-delay 1


九、pytest多条断言有失败也都运行
安装:pip install pytest-assume
运行:
把assert断言改为pytest.assume  例如:
    pytest.assume(1==4)

    pytest.assume(2==4)


十、多线程并行与分布式执行
安装:pip install pytest-xdist

多个cpu并行执行用例,直接加-n x,x代表并行数量:pytets -n 3


十一、pytest生成测试报告
安装: 

运行:pytest -v -s --html=report.html


十二、使用allure框架生成测试报告
1、安装allure:https://github.com/allure-framework/allure2/releases
可以去官网下载合适的版本
2、下载完成后解压,bin目录里面有两个文件,windows请双击allure.bat
3、把bin目录加入到环境变量path下
4、安装:pip install allure-pytest
5、在测试期间收集结果
pytest -s -q --alluredir=./result/
-s 打印输出
-q静默输出
6、测试完成后,看报告:
allure serve ./result/


微信号:wsj742769775

-扫码关注我-


文章转载自小二测试成长,如果涉嫌侵权,请发送邮件至:contact@modb.pro进行举报,并提供相关证据,一经查实,墨天轮将立刻删除相关内容。

评论