


–安装过程命令及截图较多,建议用电脑查阅–
一、安装前配置
1.虚拟机安装配置
根据官方建议选择操作系统版本,本次测试为centos 系统。
| 配置 | 参数 |
|---|---|
| 操作系统 | Centos 7.2 1511 |
| 内存 | 16G |
| CPU核数 | 4 |
| 网卡数量 | 1 |
| 磁盘大小 | 60G |
| 安装方式 | 最小化安装(英文字符) |
2.修改主机名
centos 7修改主机名: hostnamectl --static set-hostname host0
3.挂载光驱
mount /dev/cdrom /media
4.上传安装包
上传如下软件包到路径 /opt
FusionInsight_BASE_6.5.1_RHEL.tar.gz
FusionInsight_Manager_6.5.1_RHEL.tar.gz
FusionInsight_SetupTool_6.5.1.tar.gz
GaussDB_200_6.5.1_RHEL.tar.gz
5.解压安装包
tar -zxvf FusionInsight_Manager_6.5.1_RHEL.tar.gz
tar -zxvf GaussDB_200_6.5.1_RHEL.tar.gz
tar -zxvf FusionInsight_SetupTool_6.5.1.tar.gz
得到如下包
FusionInsight_BASE_6.5.1_RHEL.tar.gz
FusionInsight_Manager (解压新增)
FusionInsight_Manager_6.5.1_RHEL.tar.gz
FusionInsight_MPPDB_6.5.1_RHEL.tar.gz (GaussDB_200_6.5.1_RHEL.tar.gz解压而来)
FusionInsight_SetupTool (解压新增)
FusionInsight_SetupTool_6.5.1.tar.gz
GaussDB_200_6.5.1_RHEL.tar.gz
6.拷贝安装包
分别将除Manager外的其他部件包拷贝至“/opt/FusionInsight_Manager/software/packs”路径下(如同时安装其他部件,需要一起拷贝):
cp FusionInsight_BASE_6.5.1_RHEL.tar.gz FusionInsight_MPPDB_6.5.1_RHEL.tar.gz FusionInsight_Manager/software/packs/
7.检查编码
以root用户登录要安装GaussDB 200的节点,执行locale命令,查看OS的编码格式是否为“en_US.UTF-8”或“POSIX”
[root@host0 opt]# locale
LANG=en_US.UTF-8
LC_CTYPE="en_US.UTF-8"
LC_NUMERIC="en_US.UTF-8"
LC_TIME="en_US.UTF-8"
LC_COLLATE="en_US.UTF-8"
LC_MONETARY="en_US.UTF-8"
LC_MESSAGES="en_US.UTF-8"
LC_PAPER="en_US.UTF-8"
LC_NAME="en_US.UTF-8"
LC_ADDRESS="en_US.UTF-8"
LC_TELEPHONE="en_US.UTF-8"
LC_MEASUREMENT="en_US.UTF-8"
LC_IDENTIFICATION="en_US.UTF-8"
LC_ALL=
如不是则修改编码为“en_US.UTF-8”或“POSIX”
8.进行安装用户配置
本步为添加安装用户omm(非root用户安装使用):将要安装GaussDB 200的节点上的“/opt/FusionInsight_SetupTool/preset”文件夹拷贝至节点的“/opt”目录下并在所有节点上执行sh /opt/preset/preset.sh命令。
cp -r /opt/FusionInsight_SetupTool/preset/ /opt/
sh /opt/preset/preset.sh
[root@host0 preset]# ./preset.sh
start to preSet
success to preSet.
9.修改安装配置文件
vi /opt/FusionInsight_SetupTool/preinstall/preinstall.ini
## Description: FusionInsight Preinstall Configuration

## Type:        List
## Default:     ""
#
# Description: A list of host names or IP addresses.
# Examples:
#   g_hosts="10.18.40.[1-5]"
#   g_hosts="10.18.[10-12].[1-200],192.188.45.[1-5,40],host[1-100]"
#
g_hosts="192.168.8.30"

## Type:        Integer
## Default:     0
#
#
# Description: Disk formatting options.
#              0 Don't Format
#              1 Format the disk (Don't force)
#              2 Force to format the disk
#              3 Don't Format, Just install diskmgt
#
g_parted=0

## Type:        List
## Default:     ""
#
# Description: Disk format configuration.
#              if g_parted is 1 or 2, g_parted_conf not null
# Examples:
#
#   g_parted_conf="
#   10.18.40.[1-3]:master.ini;
#   10.18.40.[4-10],host[1-100]:slave.ini;
#   host[101-200]:test.ini
#   "
#g_parted_conf="10.18.40.[4-5]:master.ini;10.18.40.[6-7]:slave.ini;10.18.40.8:null.ini"
#
# Remarks: 1.Partition configuration file (master.ini, slave.ini, null.ini ..)
#            in partition/ini directory.
#
#          2.Partition configuration file support custom.
#
#          3.Nodes this don't need to format must be configured to null.ini.
g_parted_conf="192.168.8.30:null.ini"

## Type:        List
## Default:     ""
#
# Description: hostname configuration. g_hostname_conf not null
# Examples:
#
#   g_hostname_conf="
#   10.18.40.1:10.18.41.1:host1;
#   10.18.40.2:10.18.41.2:;
#   10.18.40.3:10.18.41.3:host3;
#   "
#g_hostname_conf="10.18.40.1:10.18.41.1:host1;10.18.40.2:10.18.41.2:;10.18.40.3:10.18.41.3:host3;"
#
# Remarks: 1. g_hostname_conf="OMIP:BusinessIP:HostName"
#
#          2. If you do not intend to configure the host name , then set the host name empty.
#             g_hostname_conf="OMIP:BusinessIP:"
#             g_hostname_conf=";10.18.40.2:10.18.41.2:"
#
g_hostname_conf="192.168.8.30:192.168.8.30:host0"

## Type:        Boolean
## Default:     1
#
#
# Description: Add missing RPM packages.
#              0  No.
#              1  Yes.
#
g_add_pkg=1

## Type:        Directory
## Default:     ""
#
# Description: The Source of RPM packages
#              if g_add_pkg is 1, g_pkgs_dir not null.
# Examples:
#
#   g_pkgs_dir="redhat-6.4:/media/redhat/;suse-11.1:/media/suse11-1/"
#
#   g_pkgs_dir="redhat-6.4:/media/"
#
#   g_pkgs_dir="suse-11.1:/media/"
#
#   g_pkgs_dir="centos-6.4:/media/"
#
#   g_pkgs_dir="euleros-2.0sp2:/media/"
#
#   g_pkgs_dir="euleros-2.0:/media/"
#
# Remarks: Mount iso file command:
#          mount rhel-server-6.4-x86_64-dvd.iso /media/ -o loop
#
g_pkgs_dir="centos-7.2:/media/"

## Type:        Boolean
## Default:     1
#
#
# Description: turn off swap.
#              0  No, do nothing.
#              1  Yes, will turn off swap.
#
g_swap_off=1

## Type:        String
## Default:     "root"
#
# Description:  SSH service login name.
#
g_user_name="root"

## Type:        Integer
## Default:     22
#
# Description: SSH service port.
#
g_port=22

## Type:        File
## Default:     "/tmp/fi-preinstall.log"
#
# Description:  Log file.
#
g_log_file="/tmp/fi-preinstall.log"

## Type:        Boolean
## Default:     1
#
#
# Description: check before preinstall.
#              0  No.
#              1  Yes.
#
g_check=1

## Type:        Boolean
## Default:     1
#
#
# Description: Open the debug mode.
#              0  No.
#              1  Yes.
#
g_debug=0

## Type:        Boolean
## Default:     0
#
# Description: disable/enable WCE
#              0 disable WCE
#              1 enable WCE
#
g_wce_conf=0

## Type:        String
## Default:     ""
#
# Description:  Check the processor type.
#
# Examples:
#
#   g_platform="x86_64"
#
#   g_platform="aarch64"
#
g_platform="x86_64"

## Type:        String
## Default:     ""
#
# Description:  install products type.
#
# Examples:
#
#   g_optimize="default"
#
#
g_optimize="default"

## Type:        Boolean
## Default:     "0"
#
# Description:  use kms encrypt luks
#               0 no
#               1 yes
#
# Examples:
#   g_kms_conf=0
#
g_kms_conf=0

## Type:        Boolean
# Default:      0
#
#
# Description: open the core dump
#              0  No
#              1  Yes
g_core_dump=0

## Type:        String
# Default:      "/var/log/core"
#
#
# Description: core dump file dir
# e.g. "/var/log/core"
#
g_core_dump_dir="/var/log/core"
配置的几个参数:
g_hosts=“192.168.8.30” --主机列表
g_parted=0 --是否进行分区,0为不分区
g_parted_conf=“192.168.8.30:null.ini” --分区配置文件,null.ini为空配置项文件,如果让软件配置分区则g_parted需设置为1,且需要配置相应分区文件。
g_hostname_conf=“192.168.8.30:192.168.8.30:host0” --主机配置,此处为单平面,管理网络和业务网络相同。
g_add_pkg=1 --是否配置rpm包,1为配置
g_pkgs_dir=“centos-7.2:/media/” --rmp包源
g_swap_off=1 --是否关闭swap,1为关闭
g_user_name=“root” --安装访问用户
g_port=22 --ssh端口
g_log_file="/tmp/fi-preinstall.log" --安装日志文件
g_check=1 --安装前进行检查
g_debug=0 --打开调试模式,0为不打开
g_wce_conf=0 --打开磁盘缓存,0 为关闭
g_platform=“x86_64” --指定系统平台,x86_64为x86平台
g_optimize=“default”
g_kms_conf=0 --使用kms加密luks
g_core_dump=0 --是否打开core dump,0表示关闭
g_core_dump_dir="/var/log/core" --指定core dump 日志
10.执行预安装
进入preinstall执行目录,并执行preinstall脚本,此时需要输入用户密码。
cd /opt/FusionInsight_SetupTool
./setuptool.sh preinstall -n
[root@host0 FusionInsight_SetupTool]# ./setuptool.sh preinstall -n
Please enter cluster SSH password for root:
11.配置安装文件,创建相应目录
进入Manager安装目录,并打开Manager安装配置文件。
[root@host0 FusionInsight_SetupTool]# cd /opt/FusionInsight_Manager/software
[root@host0 software]# vi install.ini
[HA]
    ha_mode=single
    local_ip1=192.168.8.30
    local_ip2=
    local_ip3=
    local_ip4=
    peer_ip1=
    peer_ip2=
    peer_ip3=
    peer_ip4=
    ws_float_ip=
    ws_float_ip_interface=
    ws_float_ip_netmask=
    ws_gateway=
    om_float_ip=
    om_float_ip_interface=
    om_float_ip_netmask=
    om_gateway=
    ntp_server_ip=
    om_mediator_ip=
    sso_ip=
    sso_port=
    bigdata_home=/opt/huawei/Bigdata
    bigdata_data_home=/srv/Bigdata
    cluster_nodes_scale=
    tls_protocol_min=
    realm_parse_ip=
    kerberos_realm=
[/HA]
单机版要配置的几个参数:
ha_mode=single --指定为单机模式
local_ip1=192.168.8.30 --本地管理IP,界面登录IP
bigdata_home=/opt/huawei/Bigdata --配置集群服务的home目录 bigdata_data_home=/srv/Bigdata --配置集群的数据目录
创建安装目录:
mkdir -p /opt/huawei/Bigdata
mkdir -p /srv/Bigdata
二、安装Manager
12.进行manager安装
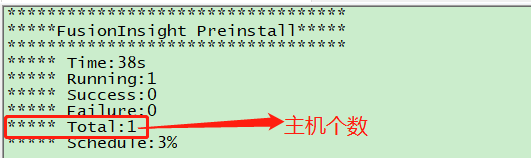
执行安装Manager命令,等待安装完成。
./install.sh -f /opt/FusionInsight_Manager/software/install.ini
[root@host0 software]# ./install.sh -f /opt/FusionInsight_Manager/software/install.ini
=================================== Welcome ===================================
=== STEP 1 Checking the parameters.
=== STEP 2 Preparing for installation components.                         [done]
=== STEP 3 Installing the manager.                                        [done]
=== STEP 4 Installing the packs.                                          [done]
=== STEP 5 Starting the OMS.                                              [done]
=== STEP 6 Waiting for ntp to startup.                                    [done]
=== STEP 7 Configuring and starting agent.                                [done]
============================= Install Successfully ============================
Please visit http://192.168.8.30:8080/web/ to continue cluster installation.
Installation is successful.
安装过程可以查看安装日志:/var/log/Bigdata/controller/scriptlog/install.log
三、安装集群和服务
13.执行单机版配置脚本
执行单机版配置脚本,否则在创建集群服务时会报如下错误,提示节点数不够:
su - omm
sh ${BIGDATA_HOME}/om-server/om/sbin/enable_single_host_cluster.sh
sh ${BIGDATA_HOME}/om-server/om/sbin/restart-controller.sh
[root@host0 Bigdata]# su - omm
Last login: Wed Oct  9 08:45:31 CST 2019
[omm@host0~]$sh ${BIGDATA_HOME}/om-server/om/sbin/enable_single_host_cluster.sh
[omm@host0 ~]$ sh ${BIGDATA_HOME}/om-server/om/sbin/restart-controller.sh
Restarting controller service using configuration /opt/huawei/Bigdata/om-server/om/sbin/../etc/om
Enter into stop-controller.sh
End into stop-controller.sh
Enter into start-controller.sh
Controller start with process id 4604.
End into start-controller.sh
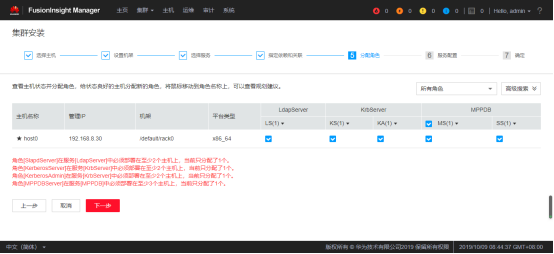
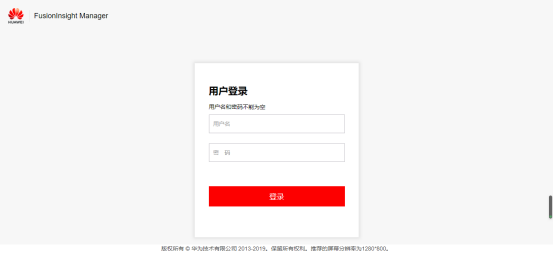
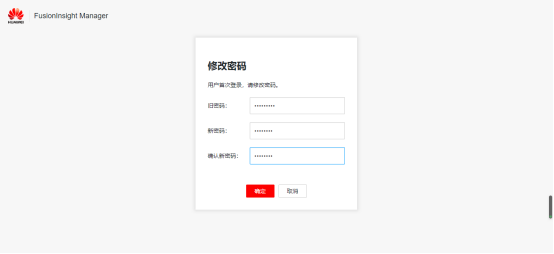
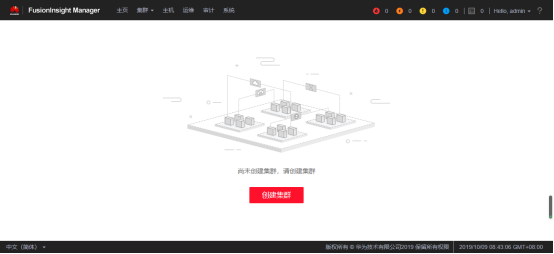
14.登录界面安装集群及服务
输入管理地址http://IP:8080/web/(如http://192.168.56.10:8080/web/ http://192.168.8.30:8080/web/)初始密码为Admin@123,登录后需修改密码:
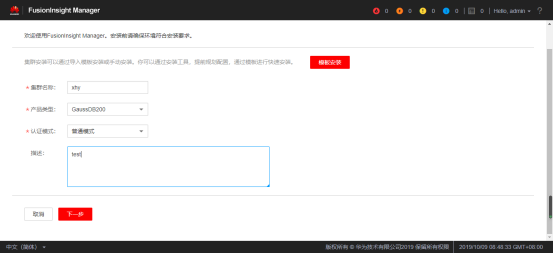
登录主界面、点击创建集群:配置集群基本信息
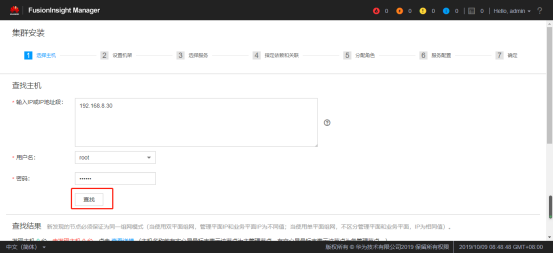
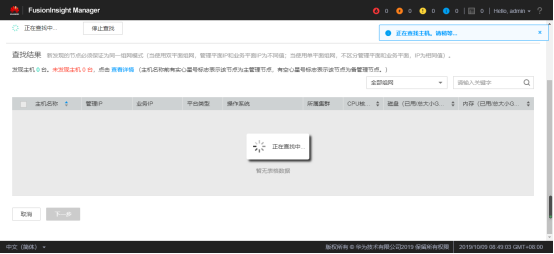
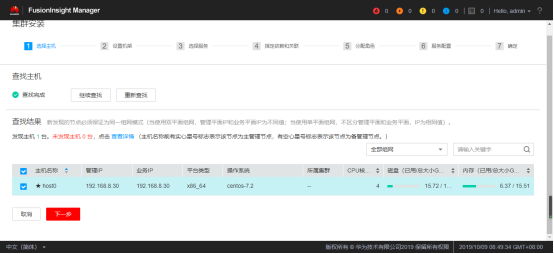
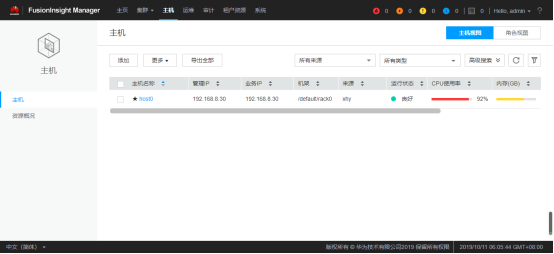
主机配置项:输入主机IP地址,点击查找主机,选择该主机
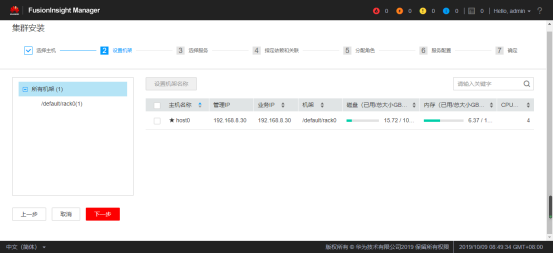
设置机架:默认配置、直接点击下一步
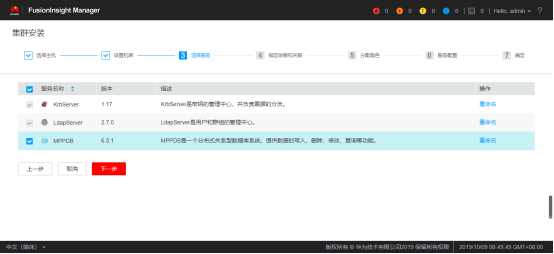
选择服务:再勾选分布式数据库系统MPPDB服务
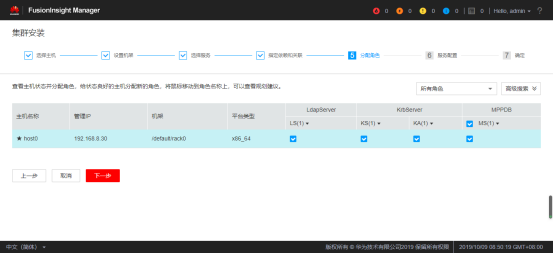
分配角色:勾选所有角色
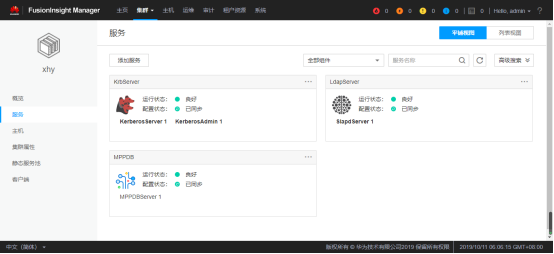
服务配置:LdapServer\KrbServer 默认配置即可
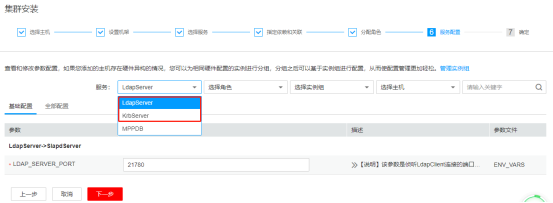
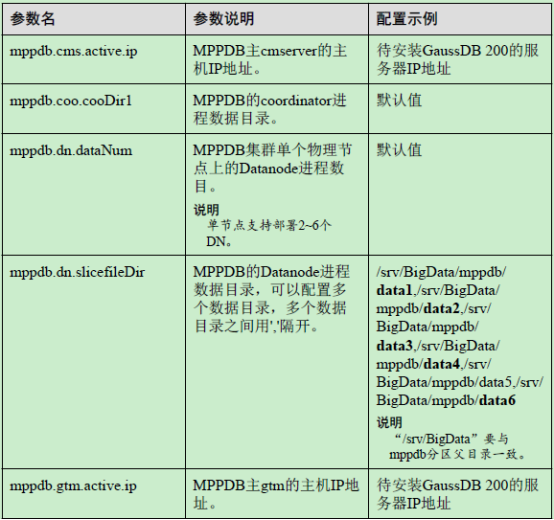
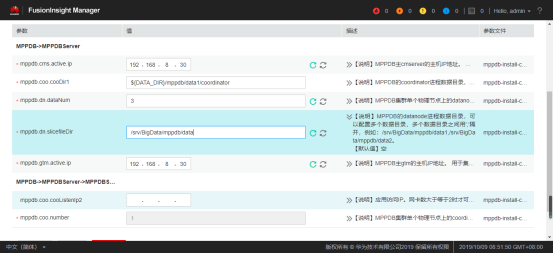
选择“MPPDB”,配置数据库数据目录mppdb.dn.slicefileDir,参数配置说明如下:
其他服务参数默认即可
确定提交进行安装

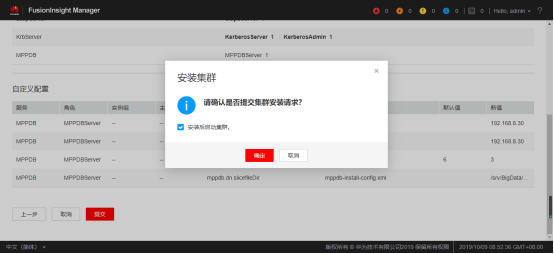
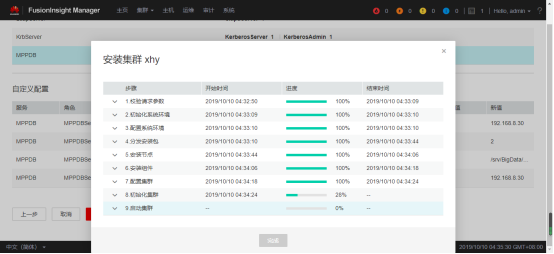
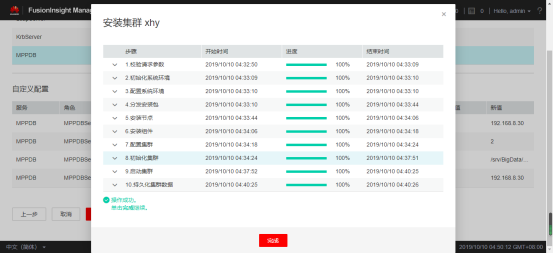
安装完成,可查看集群状态
15.连接gaussDB, 进行测试
su - omm
source ${BIGDATA_HOME}/mppdb/.mppdbgs_profile
gsql -d postgres -p 25308
[omm@host0 data1]$ source ${BIGDATA_HOME}/mppdb/.mppdbgs_profile
[omm@host0 data1]$ gsql -d postgres -p 25308
gsql ((GaussDB Kernel V300R002C00 build 8a9c1eb6) compiled at 2019-08-01 18:47:38 commit 6093 last mr 10175 )
Non-SSL connection (SSL connection is recommended when requiring high-security)
Type "help" for help.

postgres=# CREATE USER joe WITH PASSWORD "Bigdata@123";
CREATE ROLE
postgres=# CREATE DATABASE db_tpcds;
CREATE DATABASE
postgres=# gsql -d db_tpcds -p 25308 -U joe -W Bigdata@123
postgres-# \q
[omm@host0 data1]$ gsql -d db_tpcds -p 25308 -U joe -W Bigdata@123
gsql ((GaussDB Kernel V300R002C00 build 8a9c1eb6) compiled at 2019-08-01 18:47:38 commit 6093 last mr 10175 )
Non-SSL connection (SSL connection is recommended when requiring high-security)
Type "help" for help.
db_tpcds=> CREATE DATABASE db_tpcds WITH TABLESPACE = hr_local;
ERROR:  permission denied to create database
db_tpcds=> CREATE TABLE mytable (firstcol int);
NOTICE:  The 'DISTRIBUTE BY' clause is not specified. Using 'firstcol' as the distribution column by default.
HINT:  Please use 'DISTRIBUTE BY' clause to specify suitable data distribution column.
CREATE TABLE
db_tpcds=> INSERT INTO mytable values (100);
INSERT 0 1
db_tpcds=> SELECT * from mytable;
 firstcol
----------
      100
(1 row)

db_tpcds=> INSERT INTO mytable values (1);
INSERT 0 1
db_tpcds=> INSERT INTO mytable values (2);
INSERT 0 1
db_tpcds=> INSERT INTO mytable values (3);
INSERT 0 1
db_tpcds=> SELECT * from mytable;
 firstcol
----------
        1
        2
        3
      100
(4 rows)
四、安装过程问题记录
1)在安装manager时失败,查看日志为gauss DB安装失败,安装过程中回滚,建议增加配置再做安装。

查看日志 /var/log/Bigdata/controller/scriptlog/install.log
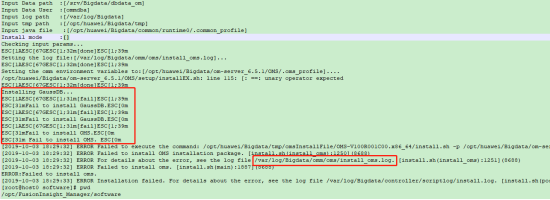
提示到安装GaussDB时失败,日志再次导向到/var/log/Bigdata/omm/oms/install_oms.log

可以发现是执行如下命令报错,尝试单独拉出来执行看下效果。
python /opt/huawei/Bigdata/om-server_6.5.1/OMS/software/GSDB/install.py -U ommdba:wheel -R /opt/huawei/Bigdata/om-server_6.5.1/OMS/gaussdb -D /srv/Bigdata/dbdata_om/db -C port=20015 -P --encoding=UTF8 -C max_connections=200 -v /home/ommdba

查看日志 /var/log/gaussdbinstall.log,主要报错如下也不明确,就是安装不下去,直接回滚了。
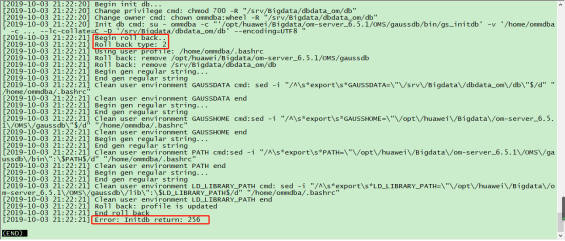
尝试调高主机配置,将虚拟机内存调整到了16G,再次执行该命令发现安装成功了。

2)安装失败时执行卸载。如若在安装过程中发生错误中断,可执行卸载后再次安装。
1.卸载代理
sh /opt/huawei/Bigdata/om-agent_6.5.1/nodeagent/setup/uninstall.sh
2.manager卸载
sh /opt/huawei/Bigdata/om-server/om/inst/uninstall.sh
[root@host0 ~]# sh /opt/huawei/Bigdata/om-agent_6.5.1/nodeagent/setup/uninstall.sh
Uninstalling node agent...
Uninstall node agent successfully.
[root@host0 ~]# sh /opt/huawei/Bigdata/om-server/om/inst/uninstall.sh
------------------------------------------------------------------------------
Prerequisites:
1.The system has no cluster. If clusters have been installed, uninstall them.
2.No operation is being performed.
Check that all conditions are met before the uninstallation.
------------------------------------------------------------------------------
Are all the conditions met? (y/n):y
Uninstalling okerberos. Uninstalling oldap.
Uninstallation in progress. Stopping the OMS...
Uninstalling the OMS...
Uninstalling the OMA...
Uninstallation is successful.
3)如在运行过程中发生登录验证失败,可执行如下脚本查看服务是否正常
/opt/huawei/Bigdata/om-server/om/sbin/status-oms.sh
[root@host0 ~]# su - omm
[omm@host0 ~]$ cd /opt/huawei/Bigdata/om-server/
[omm@host0 om-server]$ status_app
IAM is running.
CEP is running.
PMS is not running.
FMS is running.
[omm@host0 om-server]$ cd om/sbin/
[omm@host0 sbin]$ ./status-oms.sh

如服务异常可以尝试重启manager:
[omm@host0 sbin]$ cd /opt/huawei/Bigdata/om-server/om/sbin/
[omm@host0 sbin]$ ./restart-oms.sh
[2019-10-04 22:28:09] [INFO] Enter into stop-oms.sh with user omm
stop HA successfully.
[2019-10-04 22:29:09] [INFO] End stop-oms.sh with user omm
[2019-10-04 22:29:09] [INFO] Enter into start-oms.sh with user omm
start HA successfully.
[2019-10-04 22:29:52] [INFO] End start-oms.sh with user omm
