


Aerospike(简称AS)是一款NoSQL分布式数据库,想了解的可以参考我上一篇Aerospike介绍文章,本文将用10分钟搭建一个测试使用的开源版本的Aerospike数据库。
一、环境和AS版本
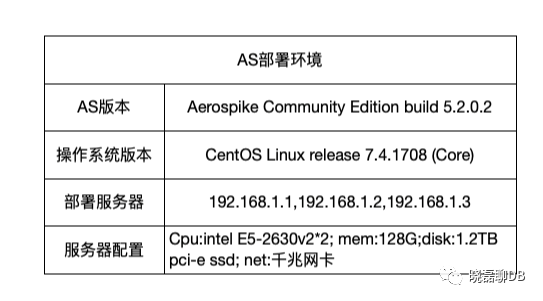
二、AS安装前的系统参数调优
在介绍系统参数调优之前,我想表达的是,下面的这些系统参数不止在AS这个分布式数据库下需要调整,我想说的是,随着查看下面的参数,大家会发现某某参数我在Redis or tidb等数据库下也配置过,所以看到文章的读者需要理解各个参数的含义,在不同的DB软件需求下进行优化调整。
(1)AS对于SSD硬盘支持多种写入方式。
一种是基于ext4等文件系统上创建文件写入,本次测试使用这个方式。
另一种更快速的方式(建议生产环境使用)是不设定文件系统,AS直接写入,这样性能更好。对于新机器,需要进行下面的操作,其中bs的选择也很重要,因为涉及到块儿的读写大小,也会影响性能。
dd if=/dev/zero of=/dev/sdb bs=1M&复制
(2)min_free_kbytes 该参数即强制Linux 系统最低保留多少空闲内存(Kbytes),如果系统可用内存低于该值,默认会启用oom killer 或者强制重启,当耗尽内存直至系统最低保存内存时会有两种现象,根据内核参数vm.panic_on_\oom 设置值的不同而有不同的行为。
vm.panic_on_oom=0 系统会提示oom ,并启动oom-killer杀掉占用最高内存的进程 vm.panic_on_oom =1. 系统关闭oom,不会启动oom-killer,而是会自动重启,AS建议设定为1.1~1.25GB。
echo 3 > proc/sys/vm/drop_caches
echo 1048576 > proc/sys/vm/min_free_kbytes
echo "vm.min_free_kbytes=1048576" >> etc/sysctl.conf复制
(3)关闭swap
echo 0 > proc/sys/vm/swappiness
echo "vm.swappiness=0" >> etc/sysctl.conf复制
(4)关闭THP - transparent huge pages 对于AS这种大量并发的小内存分配来说,这个默认启用的THP会导致系统较快的耗尽内存或者产生类似内存泄漏相关的症状。所以建议关闭。
cat <<EOF > etc/systemd/system/disable-transparent-huge-pages.service
[Unit]
Description=Disable Transparent Huge Pages
[Service]
Type=oneshot
ExecStart=/bin/bash etc/init.d/disable-transparent-hugepages start
[Install]
WantedBy=multi-user.target
EOF
systemctl daemon-reload
systemctl enable disable-transparent-huge-pages.service复制
(5)NVMe partitioning 因为单盘最大支持2T,建议自己将硬盘格式化4个分区。或者搞4块500G硬盘挂载。
(6)vm.maxmapcount 这个是跟使用k8s或者docker有关。建议增加该值。
(7)Max Open File limits
vim etc/security/limits.conf
# BEGIN ANSIBLE MANAGED BLOCK
root soft nofile 1000000
root hard nofile 1000000复制
PS:上面的root用户还可以换成*,代表对其他系统用户生效,另外该参数还可以动态添加asd启动参数上:$ prlimit --pid $(pgrep asd) --nofile=200000
三、AS安装部署
因为是centos 7的系统,所以安装el7,如果是el6的系统需要修改下载链接。
(1)部署安装
wget -O aerospike-server-community.tgz 'http://aerospike.com/download/server/latest/artifact/el7'
tar -zxvf aerospike-server-community.tgz
cd aerospike-server-community-5.2.0.2-el7/
./asinstall
Checking dependencies
Installing tools
rpm -Uvh aerospike-tools-3.31.0-1.el7.x86_64.rpm
Preparing... ################################# [100%]
Installing opt/aerospike
Adding group aerospike
Adding user aerospike
Updating installing...
1:aerospike-tools-3.31.0-1.el7 ################################# [100%]
Writing usr/lib64/python2.7/site-packages/aerospike.pth
Adding python path opt/aerospike/lib/python
Installing server
rpm -Uvh aerospike-server-community-5.2.0.2-1.el7.x86_64.rpm
Preparing... ################################# [100%]
Updating installing...
1:aerospike-server-community-5.2.0.################################# [100%]复制
(2)集群配置
首先用上面的步骤在每个节点安装 aerospike,再按照下面的方式修改配置文件 etc/aerospike/aerospike.conf
注意:AS支持有2种集群心跳方式,一种是默认的组播(mode multicast,需要交换机配置组播支持),另一种就是比较繁琐的mash(基于ip来配置)方式,测试我采用的是这种方式。
下面是配置了3个节点(192.168.1.1/192.168.1.2/192.168.1.3)的AS集群,并且分别配置了2个namespace(相当于mysql的database):nsmem(40G存储空间);nsssd(40G内存来存数据索引、500G SSD空间存数据)
# Aerospike database configuration file for deployments using raw storage with systemd.
service {
paxos-single-replica-limit 1 # Number of nodes where the replica count is automatically reduced to 1.
proto-fd-max 100000
}
logging {
file home/aerospike/logs/aerospike.log {
context any info
}
}
network {
service {
address any
port 3000
}
heartbeat {
mode mesh
port 3002 # Heartbeat port for this node.
# List one or more other nodes, one ip-address & port per line:
mesh-seed-address-port 192.168.1.1 3002
mesh-seed-address-port 192.168.1.2 3002
mesh-seed-address-port 192.168.1.3 3002
interval 250
timeout 10
}
fabric {
port 3001
}
info {
port 3003
}
}
namespace ns_mem {
memory-size 40G # 40GB of memory to be used for index and data
replication-factor 2 # For multiple nodes, keep 2 copies of the data
high-water-memory-pct 80 # Evict non-zero TTL data if capacity exceeds 60% of 40GB
stop-writes-pct 90 # Stop writes if capacity exceeds 90% of 40GB
allow-ttl-without-nsup true
default-ttl 1d # Writes from client that do not provide a TTL will default to 0 or never expire
storage-engine memory # Store data in memory only
}
namespace ns_ssd {
replication-factor 2
memory-size 40G
# Warning - legacy data in defined raw partition devices will be erased.
# These partitions must not be mounted by the file system.
storage-engine device {
# Use one or more lines like those below with actual device paths.
file home/aerospike/data/ns_ssd.data
filesize 500G
# The 2 lines below optimize for SSD.
scheduler-mode noop
write-block-size 256K
# Use the line below to store data in memory in addition to devices.
# data-in-memory true
}
}复制
(3) 初始化目录:
mkdir -p home/aerospike/data/
mkdir -p home/aerospike/logs复制
(4)启动:官网建议用aerospike用户启动。
su - aerospike
systemctl start aerospike.service复制
在所有3个节点都配置启动完毕后,各个节点自动探测感知,并且形成3个节点的AS集群。可以使用AS自带的asadm工具查看集群状态。
Admin> info nodes
~~~~~~~~~~~~~~~~~~~~~~~~~~~~~~~~~~~~~~~~~~~~~~~~~~~~~~~~~~~~~Network Information (2021-09-30 03:45:13 UTC)~~~~~~~~~~~~~~~~~~~~~~~~~~~~~~~~~~~~~~~~~~~~~~~~~~~~~~~~~~~~~~
Node Node Ip Build Cluster Migrations Cluster Cluster Principal Client Uptime
. Id . . Size . Key Integrity . Conns .
dbtest1.dxl.com:3000 BB90F7B16BF926C 192.168.1.1:3000 C-5.2.0.2 3 0.000 2903107C503B True BB98B5016BF926C 14 496:31:54
dbtest2.dxl.com:3000 *BB98B5016BF926C 192.168.1.2:3000 C-5.2.0.2 3 0.000 2903107C503B True BB98B5016BF926C 16 496:31:59
dbtest3.dxl.com:3000 BB925E210BF926C 192.168.1.3:3000 C-5.2.0.2 3 0.000 2903107C503B True BB98B5016BF926C 16 496:31:53
Number of rows: 3复制
(5)使用AS自带的aql工具就可以进入AS数据库,执行简单的写入和读取。
aql> INSERT INTO ns_ssd.demo (PK, foo, bar) VALUES ('key1', 123, 'abc');
OK, 1 record affected.
aql> select * from ns_ssd.demo where PK='key1';
+-----+-------+
| foo | bar |
+-----+-------+
| 123 | "abc" |
+-----+-------+
1 row in set (0.001 secs)
OK复制
PS:AS不用主动创建sets(对应mysql的table),写入即创建。
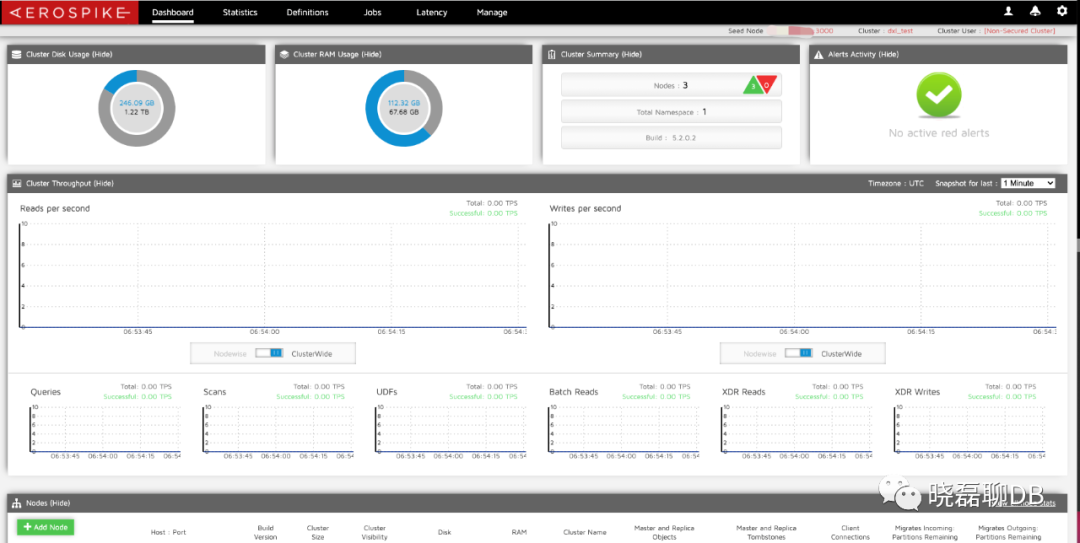
(6)安装AMC监控
下载最新版的:https://github.com/aerospike-community/amc/releases/tag/4.0.27
yum -y install gcc
yum -y install python-devel
unzip aerospike-amc-enterprise-4.0.27-1.x86_64.rpm.zip
rpm -ivh aerospike-amc-enterprise-4.0.27-1.x86_64.rpm复制
(7)启动监控AMC
/etc/init.d/amc start复制
(8) 访问对应的url可以查看AS的监控 http://xxxx:8081/
五、总结
本文说10分钟开箱即用,也是个大概时间,如果不考虑细节,只是部署测试AS的话差不多。另外更简单的“开箱即用”Aerospike的方式是docker部署,参考下面的链接:
https://docs.aerospike.com/docs/deploy_guides/docker
