


Prometheus 监控Mysql服务器及Grafana可视化
1、安装mysql服务 2、配置mysql主从服务 3、安装mysql_exporter节点收集数据 4、配置promethus采集mysql_exporter数据 5、配置grafna 展示mysql
一、快速部署mysql服务
wget -i -c http://dev.mysql.com/get/mysql57-community-release-el7-10.noarch.rpm
yum -y install mysql57-community-release-el7-10.noarch.rpm
yum -y install mysql-community-server
systemctl start mysqld.service复制
查找密码 grep "password" var/log/mysqld.log
修改密码 ALTER USER 'root'@'localhost' IDENTIFIED BY 'testSs@2019';
授权 exporter权限账号(可查看主从运行情况查看线程,及所有数据库。)
mysql -uroot -ptestSs@2019
CREATE USER 'exporter'@'localhost' IDENTIFIED BY 'Nj2020@tTsx';
GRANT PROCESS, REPLICATION CLIENT, SELECT ON *.* TO 'exporter'@'localhost';复制
二、配置mysql主从服务
主服务器:114.67.116.119
从服务器:114.67.94.33复制
1、配置mysql主服务 主配置:vim etc/my.cnf
log-bin=mysql-bin
server-id=1
innodb_flush_log_at_trx_commit=1
sync_binlog=1
#binlog-ignore-db=mysql
binlog-ignore-db=information_schema
binlog-ignore-db=performance_schema
binlog-ignore-db=sys
expire_logs_days=7复制
重启动服务 授权repl权限,显示master
systemctl restart mysqld
mysql -uroot -ptestSs@2019
grant replication slave on *.* to 'repl'@'%' identified by 'Nj2020@tTsx';
show master status;复制
结果展示
mysql> grant replication slave on *.* to 'repl'@'%' identified by 'Nj2020@tTsx';
Query OK, 0 rows affected, 1 warning (0.00 sec)
mysql> show master status;
+------------------+----------+--------------+-------------------------------------------+-------------------+
| File | Position | Binlog_Do_DB | Binlog_Ignore_DB | Executed_Gtid_Set |
+------------------+----------+--------------+-------------------------------------------+-------------------+
| mysql-bin.000001 | 437 | | information_schema,performance_schema,sys | |
+------------------+----------+--------------+-------------------------------------------+-------------------+
1 row in set (0.00 sec)复制
2、配置mysql从服务 从配置:vim etc/my.cnf
log-bin=mysql-bin
server-id=2
expire_logs_days=7复制
重启动服务 change master权限
systemctl restart mysqld
mysql -uroot -ptestSs@2019
stop slave;
change master to master_user='repl',master_password='Nj2020@tTsx',master_host='10.0.0.11',master_port=3306,master_log_file='mysql-bin.000001',master_log_pos=437;
start slave;复制
查看主从是否正常 show slave status\G;
mysql> show slave status\G;
*************************** 1. row ***************************
Slave_IO_State: Waiting for master to send event
Master_Host: 10.0.0.11
Master_User: repl
Master_Port: 3306
Connect_Retry: 60
Master_Log_File: mysql-bin.000001
Read_Master_Log_Pos: 1705
Relay_Log_File: k8s-test-01-relay-bin.000004
Relay_Log_Pos: 320
Relay_Master_Log_File: mysql-bin.000001
Slave_IO_Running: Yes
Slave_SQL_Running: Yes
Replicate_Do_DB:
Replicate_Ignore_DB:
Replicate_Do_Table:
Replicate_Ignore_Table:
Replicate_Wild_Do_Table:
Replicate_Wild_Ignore_Table:
Last_Errno: 0
Last_Error:
Skip_Counter: 0
Exec_Master_Log_Pos: 1705
Relay_Log_Space: 925
Until_Condition: None
Until_Log_File:
Until_Log_Pos: 0
Master_SSL_Allowed: No
Master_SSL_CA_File:
Master_SSL_CA_Path:
Master_SSL_Cert:
Master_SSL_Cipher:
Master_SSL_Key:
Seconds_Behind_Master: 0
Master_SSL_Verify_Server_Cert: No
Last_IO_Errno: 0
Last_IO_Error:
Last_SQL_Errno: 0
Last_SQL_Error:
Replicate_Ignore_Server_Ids:
Master_Server_Id: 1
Master_UUID: 538ecda5-5850-11ea-a490-fa163e1c3642
Master_Info_File: var/lib/mysql/master.info
SQL_Delay: 0
SQL_Remaining_Delay: NULL
Slave_SQL_Running_State: Slave has read all relay log; waiting for more updates
Master_Retry_Count: 86400
Master_Bind:
Last_IO_Error_Timestamp:
Last_SQL_Error_Timestamp:
Master_SSL_Crl:
Master_SSL_Crlpath:
Retrieved_Gtid_Set:
Executed_Gtid_Set:
Auto_Position: 0
Replicate_Rewrite_DB:
Channel_Name:
Master_TLS_Version:
1 row in set (0.01 sec)复制
3 、校验数据同步是否成功,可以主库插入测试数据,在从库查看数据是否同步成功
mysql -uroot -ptestSs@2019
create database test01;
use test01;
create table tb1(id int,c2 varchar(100),primary key(id));
insert into tb1(id,c2) values(1,'12');
insert into tb1(id,c2) values(2,'14');复制
三、安装mysql_exporter节点收集数据
1、 安装mysql_exporter服务
wget https://github.com/prometheus/mysqld_exporter/releases/download/v0.12.1/mysqld_exporter-0.12.1.linux-amd64.tar.gz
tar zxvf mysqld_exporter-0.12.1.linux-amd64.tar.gz
mv mysqld_exporter-0.12.1.linux-amd64 usr/local/exporter/mysql_exporter
cd usr/local/exporter/mysql_exporter/
cat > .my.cnf <<EOF
[client]
user=exporter
password=Nj2020@tTsx
EOF复制
2、查看配置文件
[root@Prometheus mysqld_exporter]# cat .my.cnf
[client]
user=exporter
password=Nj2020@tTsx复制
3、启动mysqld_exporter
cd usr/local/exporter/mysql_exporter
nohup usr/local/exporter/mysqld_exporter/mysqld_exporter --collect.info_schema.innodb_cmp --collect.engine_innodb_status --config.my-cnf=".my.cnf" &复制
日志显示
[root@Prometheus mysqld_exporter]# tail -f nohup.out
time="2020-02-27T12:04:43+08:00" level=info msg="Starting mysqld_exporter (version=0.12.1, branch=HEAD, revision=48667bf7c3b438b5e93b259f3d17b70a7c9aff96)" source="mysqld_exporter.go:257"
time="2020-02-27T12:04:43+08:00" level=info msg="Build context (go=go1.12.7, user=root@0b3e56a7bc0a, date=20190729-12:35:58)" source="mysqld_exporter.go:258"
time="2020-02-27T12:04:43+08:00" level=info msg="Enabled scrapers:" source="mysqld_exporter.go:269"
time="2020-02-27T12:04:43+08:00" level=info msg=" --collect.slave_status" source="mysqld_exporter.go:273"
time="2020-02-27T12:04:43+08:00" level=info msg=" --collect.global_status" source="mysqld_exporter.go:273"
time="2020-02-27T12:04:43+08:00" level=info msg=" --collect.global_variables" source="mysqld_exporter.go:273"
time="2020-02-27T12:04:43+08:00" level=info msg=" --collect.info_schema.innodb_cmp" source="mysqld_exporter.go:273"
time="2020-02-27T12:04:43+08:00" level=info msg=" --collect.info_schema.innodb_cmpmem" source="mysqld_exporter.go:273"
time="2020-02-27T12:04:43+08:00" level=info msg=" --collect.info_schema.query_response_time" source="mysqld_exporter.go:273"
time="2020-02-27T12:04:43+08:00" level=info msg="Listening on :9104" source="mysqld_exporter.go:283"复制
4、 主从环境分别安装mysql_exporter
四、配置promethus采集mysql_exporter数据
1、修改promethus.yml文件 vim usr/local/promethus/promethus.yml
scrape_configs:
- job_name: 'mysql'
static_configs:
- targets: ['114.67.116.119:9104']
labels:
instance: mysql_114.67.116.119
- targets: ['114.67.94.33:9104']
labels:
instance: mysql_114.67.94.33_slave复制
2、重启动promethus
/usr/local/prometheus/prometheus --config.file=/usr/local/prometheus/prometheus.yml
或者
kill -hup PID复制
检查配置文件和重启动服务器 ./promtool check config prometheus.yml
[root@k8s-test-01 prometheus]# ./promtool check config prometheus.yml
Checking prometheus.yml
SUCCESS: 1 rule files found
Checking rules/node_rules.yml
SUCCESS: 1 rules found复制
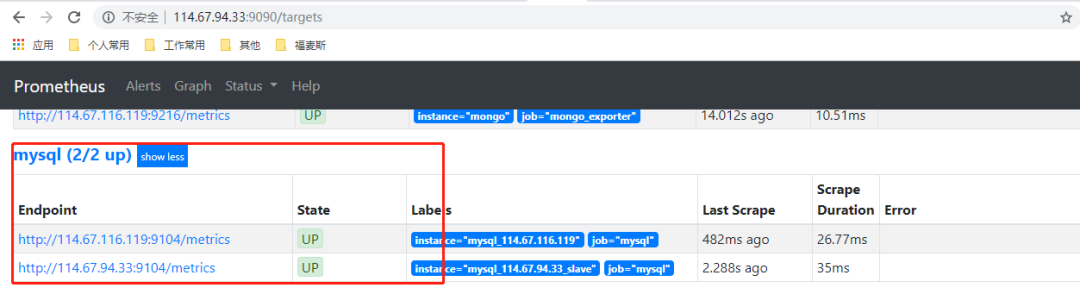
访问WEB界面
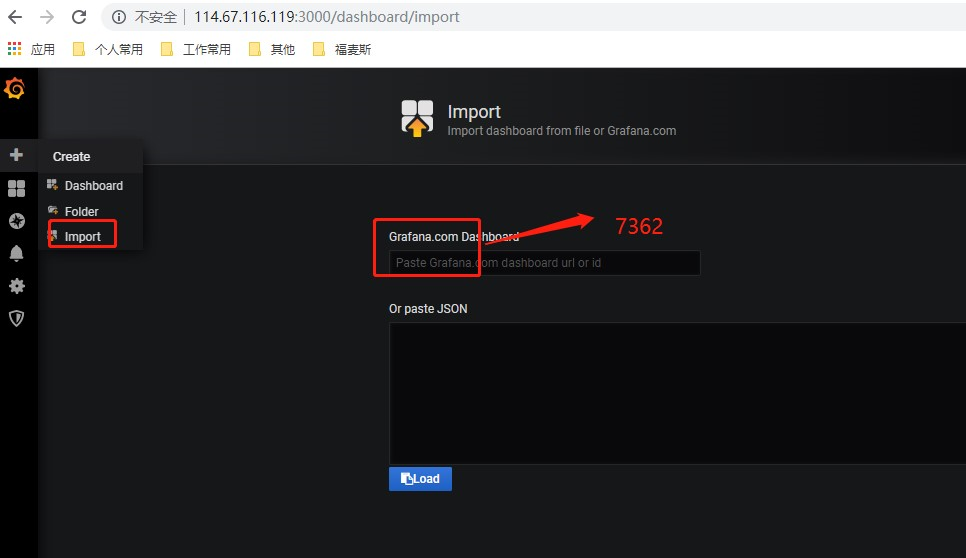
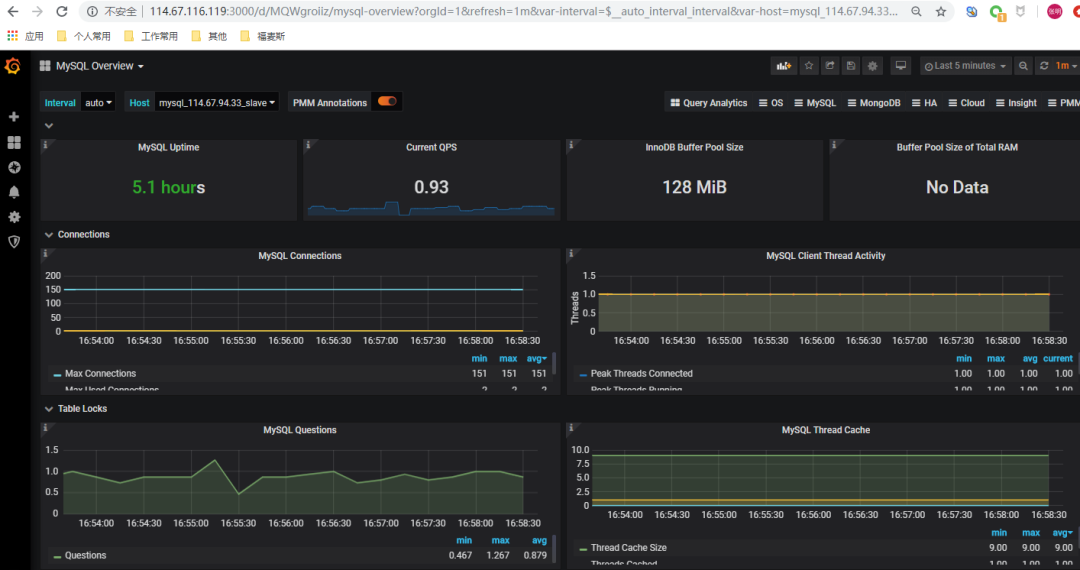
五、配置granfana展示
导入模板7362 https://grafana.com/dashboards/7362
Prometheus 监控Mysql服务器及Grafana可视化
1、安装mysql服务 2、配置mysql主从服务 3、安装mysql_exporter节点收集数据 4、配置promethus采集mysql_exporter数据 5、配置grafna 展示mysql
一、快速部署mysql服务
wget -i -c http://dev.mysql.com/get/mysql57-community-release-el7-10.noarch.rpm
yum -y install mysql57-community-release-el7-10.noarch.rpm
yum -y install mysql-community-server
systemctl start mysqld.service复制
查找密码 grep "password" var/log/mysqld.log
修改密码 ALTER USER 'root'@'localhost' IDENTIFIED BY 'testSs@2019';
授权 exporter权限账号(可查看主从运行情况查看线程,及所有数据库。)
mysql -uroot -ptestSs@2019
CREATE USER 'exporter'@'localhost' IDENTIFIED BY 'Nj2020@tTsx';
GRANT PROCESS, REPLICATION CLIENT, SELECT ON *.* TO 'exporter'@'localhost';复制
二、配置mysql主从服务
主服务器:114.67.116.119
从服务器:114.67.94.33复制
1、配置mysql主服务 主配置:vim etc/my.cnf
log-bin=mysql-bin
server-id=1
innodb_flush_log_at_trx_commit=1
sync_binlog=1
#binlog-ignore-db=mysql
binlog-ignore-db=information_schema
binlog-ignore-db=performance_schema
binlog-ignore-db=sys
expire_logs_days=7复制
重启动服务 授权repl权限,显示master
systemctl restart mysqld
mysql -uroot -ptestSs@2019
grant replication slave on *.* to 'repl'@'%' identified by 'Nj2020@tTsx';
show master status;复制
结果展示
mysql> grant replication slave on *.* to 'repl'@'%' identified by 'Nj2020@tTsx';
Query OK, 0 rows affected, 1 warning (0.00 sec)
mysql> show master status;
+------------------+----------+--------------+-------------------------------------------+-------------------+
| File | Position | Binlog_Do_DB | Binlog_Ignore_DB | Executed_Gtid_Set |
+------------------+----------+--------------+-------------------------------------------+-------------------+
| mysql-bin.000001 | 437 | | information_schema,performance_schema,sys | |
+------------------+----------+--------------+-------------------------------------------+-------------------+
1 row in set (0.00 sec)复制
2、配置mysql从服务 从配置:vim etc/my.cnf
log-bin=mysql-bin
server-id=2
expire_logs_days=7复制
重启动服务 change master权限
systemctl restart mysqld
mysql -uroot -ptestSs@2019
stop slave;
change master to master_user='repl',master_password='Nj2020@tTsx',master_host='10.0.0.11',master_port=3306,master_log_file='mysql-bin.000001',master_log_pos=437;
start slave;复制
查看主从是否正常 show slave status\G;
mysql> show slave status\G;
*************************** 1. row ***************************
Slave_IO_State: Waiting for master to send event
Master_Host: 10.0.0.11
Master_User: repl
Master_Port: 3306
Connect_Retry: 60
Master_Log_File: mysql-bin.000001
Read_Master_Log_Pos: 1705
Relay_Log_File: k8s-test-01-relay-bin.000004
Relay_Log_Pos: 320
Relay_Master_Log_File: mysql-bin.000001
Slave_IO_Running: Yes
Slave_SQL_Running: Yes
Replicate_Do_DB:
Replicate_Ignore_DB:
Replicate_Do_Table:
Replicate_Ignore_Table:
Replicate_Wild_Do_Table:
Replicate_Wild_Ignore_Table:
Last_Errno: 0
Last_Error:
Skip_Counter: 0
Exec_Master_Log_Pos: 1705
Relay_Log_Space: 925
Until_Condition: None
Until_Log_File:
Until_Log_Pos: 0
Master_SSL_Allowed: No
Master_SSL_CA_File:
Master_SSL_CA_Path:
Master_SSL_Cert:
Master_SSL_Cipher:
Master_SSL_Key:
Seconds_Behind_Master: 0
Master_SSL_Verify_Server_Cert: No
Last_IO_Errno: 0
Last_IO_Error:
Last_SQL_Errno: 0
Last_SQL_Error:
Replicate_Ignore_Server_Ids:
Master_Server_Id: 1
Master_UUID: 538ecda5-5850-11ea-a490-fa163e1c3642
Master_Info_File: var/lib/mysql/master.info
SQL_Delay: 0
SQL_Remaining_Delay: NULL
Slave_SQL_Running_State: Slave has read all relay log; waiting for more updates
Master_Retry_Count: 86400
Master_Bind:
Last_IO_Error_Timestamp:
Last_SQL_Error_Timestamp:
Master_SSL_Crl:
Master_SSL_Crlpath:
Retrieved_Gtid_Set:
Executed_Gtid_Set:
Auto_Position: 0
Replicate_Rewrite_DB:
Channel_Name:
Master_TLS_Version:
1 row in set (0.01 sec)复制
3 、校验数据同步是否成功,可以主库插入测试数据,在从库查看数据是否同步成功
mysql -uroot -ptestSs@2019
create database test01;
use test01;
create table tb1(id int,c2 varchar(100),primary key(id));
insert into tb1(id,c2) values(1,'12');
insert into tb1(id,c2) values(2,'14');复制
三、安装mysql_exporter节点收集数据
1、 安装mysql_exporter服务
wget https://github.com/prometheus/mysqld_exporter/releases/download/v0.12.1/mysqld_exporter-0.12.1.linux-amd64.tar.gz
tar zxvf mysqld_exporter-0.12.1.linux-amd64.tar.gz
mv mysqld_exporter-0.12.1.linux-amd64 usr/local/exporter/mysql_exporter
cd usr/local/exporter/mysql_exporter/
cat > .my.cnf <<EOF
[client]
user=exporter
password=Nj2020@tTsx
EOF复制
2、查看配置文件
[root@Prometheus mysqld_exporter]# cat .my.cnf
[client]
user=exporter
password=Nj2020@tTsx复制
3、启动mysqld_exporter
cd usr/local/exporter/mysql_exporter
nohup usr/local/exporter/mysqld_exporter/mysqld_exporter --collect.info_schema.innodb_cmp --collect.engine_innodb_status --config.my-cnf=".my.cnf" &复制
日志显示
[root@Prometheus mysqld_exporter]# tail -f nohup.out
time="2020-02-27T12:04:43+08:00" level=info msg="Starting mysqld_exporter (version=0.12.1, branch=HEAD, revision=48667bf7c3b438b5e93b259f3d17b70a7c9aff96)" source="mysqld_exporter.go:257"
time="2020-02-27T12:04:43+08:00" level=info msg="Build context (go=go1.12.7, user=root@0b3e56a7bc0a, date=20190729-12:35:58)" source="mysqld_exporter.go:258"
time="2020-02-27T12:04:43+08:00" level=info msg="Enabled scrapers:" source="mysqld_exporter.go:269"
time="2020-02-27T12:04:43+08:00" level=info msg=" --collect.slave_status" source="mysqld_exporter.go:273"
time="2020-02-27T12:04:43+08:00" level=info msg=" --collect.global_status" source="mysqld_exporter.go:273"
time="2020-02-27T12:04:43+08:00" level=info msg=" --collect.global_variables" source="mysqld_exporter.go:273"
time="2020-02-27T12:04:43+08:00" level=info msg=" --collect.info_schema.innodb_cmp" source="mysqld_exporter.go:273"
time="2020-02-27T12:04:43+08:00" level=info msg=" --collect.info_schema.innodb_cmpmem" source="mysqld_exporter.go:273"
time="2020-02-27T12:04:43+08:00" level=info msg=" --collect.info_schema.query_response_time" source="mysqld_exporter.go:273"
time="2020-02-27T12:04:43+08:00" level=info msg="Listening on :9104" source="mysqld_exporter.go:283"复制
4、 主从环境分别安装mysql_exporter
四、配置promethus采集mysql_exporter数据
1、修改promethus.yml文件 vim usr/local/promethus/promethus.yml
scrape_configs:
- job_name: 'mysql'
static_configs:
- targets: ['114.67.116.119:9104']
labels:
instance: mysql_114.67.116.119
- targets: ['114.67.94.33:9104']
labels:
instance: mysql_114.67.94.33_slave复制
2、重启动promethus
/usr/local/prometheus/prometheus --config.file=/usr/local/prometheus/prometheus.yml
或者
kill -hup PID复制
检查配置文件和重启动服务器 ./promtool check config prometheus.yml
[root@k8s-test-01 prometheus]# ./promtool check config prometheus.yml
Checking prometheus.yml
SUCCESS: 1 rule files found
Checking rules/node_rules.yml
SUCCESS: 1 rules found复制
访问WEB界面
五、配置granfana展示
导入模板7362 https://grafana.com/dashboards/7362
爱运维^_^爱分享

如果觉得文章有帮助,麻烦点个关注和转发^)^ 👇
文章转载自Linux运维技术之路,如果涉嫌侵权,请发送邮件至:contact@modb.pro进行举报,并提供相关证据,一经查实,墨天轮将立刻删除相关内容。
