


分享一下遇到的坑,文章篇幅偏长,希望对你有帮助。
一、背景
某一天,测试同学向我反馈:
测试环境上已使用的1张优惠券,为什么还会出现在可用列表里,然后再次选择优惠券,点击使用的时候,提示:该券已被使用,不能重复使用。
我的第一反应:应该不会吧,生产上这个功能一直正常,如果生产上出现这个问题不得炸了锅?所以,我就跟测试同学说,你是不是做了什么特殊操作?因为我使用了缓存,所以我问他有没有直接修改数据库相关记录,会不会是因为这样操作造成缓存数据不一致问题?他说没有,其他人使用也出现这个问题。
我就很奇怪我,程序员的直觉:不相信!不~可能!
然后我就麻烦测试同学在测试环境重现一下这个问题,我一直盯着他操作,然后确实在我面前出现了~囧~。
由于这个功能在生产已经很长时间了,一直没人反馈有什么问题,所以百思不得其解。
也许,这是一个潜在的bug???
二、项目技术介绍
涉及相关的框架或技术:Springboot、RestTemplate、Redis、异步、RocketMQ。
三、抽丝剥茧——排查问题
1、重启大法,清除缓存,防止数据不一致。
由于怀疑是数据不一致造成的,所以让测试同学帮忙验证排除是否因为这个问题造成的。当测试重启之后也清除相关缓存数据,重新重现操作。
这时发现,好像都正常了?难道问题就是这个原因?所以当时觉得原因应该就是这样了。
2、问题又来了
正常一段时间之后,问题又出现了!为什么,疑惑ing...。
这个是一个很奇怪的问题,然后我仔细把代码过了一遍。
主要是检查了跟优惠券相关的使用逻辑、缓存策略。
由于我们使用RocketMQ作为消息队列,Redis作为缓存,优惠券缓存在Redis,过期时间1小时。
所以当券的变更之后,我会将缓存里的数据进行清除,尽最大可能达到数据一致性。
而且发现,在发送消息的时候,由于我们的消息组件使用的是同步发送(目前暂不支持异步发送),所以我们处理业务的时候增加了异步处理,看到发送sendMsg方法上使用的是Spring提供的@Async异步注解实现异步。
(对于Spring @Async注解相关功能此次不做详细的阐述。有兴趣的同学可以自行查阅相关资料,或者点击文末提供的参考链接)
3、排查罪魁祸首——@Async异步注解 ?
查阅了相关的资料,有的说可能是你的使用方式不对造成异步无效:
①、没有在启动类或者配置类增加@EnableAsync开启注解;
②、同一类内,方法A、方法B之间进行内部调用,A-》B,B使用@Async注解,由于这种没有使用到代理,异步不生效。
以上是大家遇到比较多的原因。
所以我这边也着重看了下我们的使用方式,并且验证了是否真的是以异步的方式进行调用。
4、进一步发现可疑点
排除了@Async的使用问题。这时我又继续观察日志,又有了可疑的地方!因为我们是使用Springboot,并且还有Springboot admin来监控应用服务,方便查看相关内存、线程、日志等信息。
这时发现应用日志打印如下:
WARN 7 --- [gistrationTask1] d.c.b.a.c.r.ApplicationRegistrator : Failed to register application as Application
[name=App, managementUrl=http://ip:port, healthUrl=http://ip:port/health, serviceUrl=http://ip:port] at spring-boot-admin ([http://test.com/boot-admin/api/applications]): 504 Gateway Time-out
这个日志一直在打印,并且都是间隔一段时间进行打印。
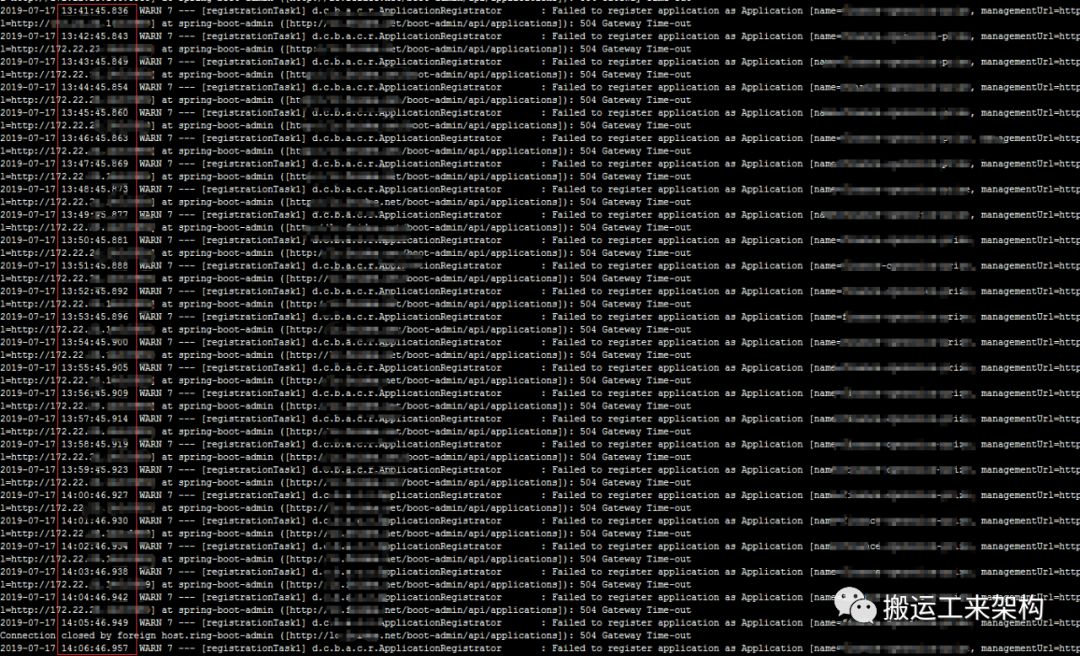
上面的日志间隔打印是1分钟,为什么是1分钟,下面我会提到。这里先做个伏笔。
此时,有点怀疑,但是又不确定也觉得不太可能是这个造成的吧?似乎关联性不大。
所以让相关同学把对应的springboot-admin应用起起来,尽量排除相关不确定因素吧。
同学把springboot-admin起起来之后,我这边继续观察日志,这时奇迹出现了,之前没打印的日志此时打印出来了,并且打印的似乎是之前应该早就执行逻辑并且打印相关的日志。
并且发现执行应用注册到springboot-admin的日志打印的线程信息与我使用@Async注解异步发送消息的线程名是同一个?为什么?这两个怎么会使用同一个线程或线程池?@Async不是会有自己的线程池吗?
5、剖析源码——springboot-admin client应用注册
@Bean@ConditionalOnMissingBeanpublic RegistrationApplicationListener registrationListener(AdminProperties admin,ApplicationRegistrator registrator) {// 注册应用监听器,使用ThreadPoolTaskScheduler,核心线程数为1RegistrationApplicationListener listener = new RegistrationApplicationListener(registrator,registrationTaskScheduler());listener.setAutoRegister(admin.isAutoRegistration());listener.setAutoDeregister(admin.isAutoDeregistration());listener.setRegisterPeriod(admin.getPeriod());return listener;}// 初始化任务定时器-线程池,核心线程数1,线程名前缀registrationTask,与日志打印的线程信息一致。@Bean@Qualifier("registrationTaskScheduler")public TaskScheduler registrationTaskScheduler() {ThreadPoolTaskScheduler taskScheduler = new ThreadPoolTaskScheduler();taskScheduler.setPoolSize(1);taskScheduler.setRemoveOnCancelPolicy(true);taskScheduler.setThreadNamePrefix("registrationTask");return taskScheduler;}复制
由初始化入口得知,客户端应用注册到springboot-admin使用的类是RegistrationApplicationListener监听器,并且初始化了定时调度器线程池,核心线程数为1,线程名前缀是:registrationTask。
/*** Listener responsible for starting and stopping the registration task when the application is* ready.** @author Johannes Edmeier*/public class RegistrationApplicationListener {private static final Logger LOGGER = LoggerFactory.getLogger(RegistrationApplicationListener.class);private final ApplicationRegistrator registrator;private final TaskScheduler taskScheduler;private boolean autoDeregister = false;private boolean autoRegister = true;private long registerPeriod = 10_000L;private volatile ScheduledFuture<?> scheduledTask;public RegistrationApplicationListener(ApplicationRegistrator registrator,TaskScheduler taskScheduler) {this.registrator = registrator;this.taskScheduler = taskScheduler;}// 使用事件监听器-spring的事件监听机制@EventListener@Order(Ordered.LOWEST_PRECEDENCE)public void onApplicationReady(ApplicationReadyEvent event) {if (event.getApplicationContext() instanceof WebApplicationContext && autoRegister) {//启动注册任务startRegisterTask();}}// 监听关闭事件,关闭注册任务,注册器注销@EventListener@Order(Ordered.LOWEST_PRECEDENCE)public void onClosedContext(ContextClosedEvent event) {if (event.getApplicationContext() instanceof WebApplicationContext) {stopRegisterTask();if (autoDeregister) {registrator.deregister();}}}public void startRegisterTask() {if (scheduledTask != null && !scheduledTask.isDone()) {return;}// 注册器固定间进行注册操作,这里registerPeriod间隔时间默认是10秒,可以通过spring.admin.client.period进行动态配置设置。scheduledTask = taskScheduler.scheduleAtFixedRate(new Runnable() {@Overridepublic void run() {registrator.register();}}, registerPeriod);LOGGER.debug("Scheduled registration task for every {}ms", registerPeriod);}public void stopRegisterTask() {if (scheduledTask != null && !scheduledTask.isDone()) {scheduledTask.cancel(true);LOGGER.debug("Canceled registration task");}}...省略}复制
从以上源码得知,注册任务是通过调度器按照默认10秒固定时间间隔频率进行调用。
接下来我们继续看注册逻辑:
/*** Registers the client application at spring-boot-admin-server*/public class ApplicationRegistrator {private final AtomicReference<String> registeredId = new AtomicReference<>();private final AdminProperties admin;private final RestTemplate template;private final ApplicationFactory applicationFactory;/*** Registers the client application at spring-boot-admin-server.** @return true if successful registration on at least one admin server*/public boolean register() {boolean isRegistrationSuccessful = false;Application self = createApplication();for (String adminUrl : admin.getAdminUrl()) {try {// 使用RestTemplate调用springboot-admin进行注册@SuppressWarnings("rawtypes")ResponseEntity<Map> response = template.postForEntity(adminUrl,new HttpEntity<>(self, HTTP_HEADERS), Map.class);if (response.getStatusCode().equals(HttpStatus.CREATED)) {if (registeredId.compareAndSet(null, response.getBody().get("id").toString())) {LOGGER.info("Application registered itself as {}", response.getBody());} else {LOGGER.debug("Application refreshed itself as {}", response.getBody());}isRegistrationSuccessful = true;// 只需要往一个admin注册,则注册完成之后跳出for循环。if (admin.isRegisterOnce()) {break;}} else {LOGGER.warn("Application failed to registered itself as {}. Response: {}", self,response.toString());}} catch (Exception ex) {//重点:注册时出现的异常日志打印,也就是我们关注的地方LOGGER.warn("Failed to register application as {} at spring-boot-admin ({}): {}",self, admin.getAdminUrl(), ex.getMessage());}}return isRegistrationSuccessful;}...省略部分代码}复制
通过以上的代码,我们知道实现起来挺简单:使用定时任务调度注册任务,并且使用RestTemplate进行HTTP调用注册接口,如果注册过程出现异常(可能网络异常),此时会打印相关的异常告警日志。也就是我们上面的日志信息。
但是这里怎么会造成我们本次“事故”的原因呢?似乎还没有找到最终根源,还破解不了谜题。
那我们继续往下探究吧!
6、剖析源码——又是RestTemplate的锅?
关于RestTemplate的坑,网上也出现了不少的文章。
大部分都是因为使用默认的配置方式,没有设置超时时间从而引发的“血案”!这里可以看下这个案例:《RestTemplate超时引发的血案》
// RestTemplate执行HTTP的关键方法// org.springframework.web.client.RestTemplate#doExecuteprotected <T> T doExecute(URI url, HttpMethod method, RequestCallback requestCallback,ResponseExtractor<T> responseExtractor) throws RestClientException {Assert.notNull(url, "'url' must not be null");Assert.notNull(method, "'method' must not be null");ClientHttpResponse response = null;try {// 创建Request请求ClientHttpRequest request = createRequest(url, method);if (requestCallback != null) {requestCallback.doWithRequest(request);}response = request.execute();handleResponse(url, method, response);if (responseExtractor != null) {return responseExtractor.extractData(response);}else {return null;}}catch (IOException ex) {String resource = url.toString();String query = url.getRawQuery();resource = (query != null ? resource.substring(0, resource.indexOf('?')) : resource);throw new ResourceAccessException("I/O error on " + method.name() +" request for \"" + resource + "\": " + ex.getMessage(), ex);}finally {if (response != null) {response.close();}}}// 通过工厂的方式创建Requestprotected ClientHttpRequest createRequest(URI url, HttpMethod method) throws IOException {ClientHttpRequest request = getRequestFactory().createRequest(url, method);if (logger.isDebugEnabled()) {logger.debug("Created " + method.name() + " request for \"" + url + "\"");}return request;}// 默认工厂类private ClientHttpRequestFactory requestFactory = new SimpleClientHttpRequestFactory();复制
通过以上方法,我们知道HTTP Request请求是通过工厂创建,其实RestTemplate支持OkHttp、HttpClient、JDK HttpURLConnection等各种方式进行HTTP请求处理。
我们继续看到底是用哪种方式:
默认工厂实现类是SimpleClientHttpRequestFactory,通过查看该类的实现,我们知道这个是JDK的标准HTTP处理类,调用了HttpURLConnection进行HTTP请求处理。
同时,我们也看到HttpClient对应的工厂类:HttpComponentsAsyncClientHttpRequestFactory;OkHttp对应的工厂类:OkHttpClientHttpRequestFactory,还有Netty4等等。
此时,将“异常”线程堆栈进行导出:
"registrationTask1" #204 prio=5 os_prio=0 tid=0x00007f09b1865000 nid=0xd6 runnable [0x00007f091a7bb000]java.lang.Thread.State: RUNNABLEat java.net.SocketInputStream.socketRead0(Native Method)at java.net.SocketInputStream.socketRead(SocketInputStream.java:116)at java.net.SocketInputStream.read(SocketInputStream.java:171)at java.net.SocketInputStream.read(SocketInputStream.java:141)at java.io.BufferedInputStream.fill(BufferedInputStream.java:246)at java.io.BufferedInputStream.read1(BufferedInputStream.java:286)at java.io.BufferedInputStream.read(BufferedInputStream.java:345)- locked <0x00000000f7a0bc78> (a java.io.BufferedInputStream)at sun.net.www.http.HttpClient.parseHTTPHeader(HttpClient.java:735)at sun.net.www.http.HttpClient.parseHTTP(HttpClient.java:678)at sun.net.www.protocol.http.HttpURLConnection.getInputStream0(HttpURLConnection.java:1587)- locked <0x00000000f7a024f8> (a sun.net.www.protocol.http.HttpURLConnection)at sun.net.www.protocol.http.HttpURLConnection.getInputStream(HttpURLConnection.java:1492)- locked <0x00000000f7a024f8> (a sun.net.www.protocol.http.HttpURLConnection)at java.net.HttpURLConnection.getResponseCode(HttpURLConnection.java:480)at org.springframework.http.client.SimpleClientHttpResponse.getRawStatusCode(SimpleClientHttpResponse.java:52)at org.springframework.web.client.DefaultResponseErrorHandler.hasError(DefaultResponseErrorHandler.java:50)at org.springframework.web.client.RestTemplate.handleResponse(RestTemplate.java:696)at org.springframework.web.client.RestTemplate.doExecute(RestTemplate.java:661)at org.springframework.web.client.RestTemplate.execute(RestTemplate.java:621)at org.springframework.web.client.RestTemplate.postForEntity(RestTemplate.java:415)at de.codecentric.boot.admin.client.registration.ApplicationRegistrator.register(ApplicationRegistrator.java:69)at de.codecentric.boot.admin.client.registration.RegistrationApplicationListener$1.run(RegistrationApplicationListener.java:80)at org.springframework.scheduling.support.DelegatingErrorHandlingRunnable.run(DelegatingErrorHandlingRunnable.java:54)at java.util.concurrent.Executors$RunnableAdapter.call(Executors.java:511)at java.util.concurrent.FutureTask.runAndReset(FutureTask.java:308)at java.util.concurrent.ScheduledThreadPoolExecutor$ScheduledFutureTask.access$301(ScheduledThreadPoolExecutor.java:180)at java.util.concurrent.ScheduledThreadPoolExecutor$ScheduledFutureTask.run(ScheduledThreadPoolExecutor.java:294)at java.util.concurrent.ThreadPoolExecutor.runWorker(ThreadPoolExecutor.java:1149)at java.util.concurrent.ThreadPoolExecutor$Worker.run(ThreadPoolExecutor.java:624)at java.lang.Thread.run(Thread.java:748)复制
又将正常时的堆栈进行导出:
"registrationTask1" #219 prio=5 os_prio=0 tid=0x00007fcfa481e800 nid=0xe5 waiting on condition [0x00007fcefae38000]java.lang.Thread.State: TIMED_WAITING (parking)at sun.misc.Unsafe.park(Native Method)- parking to wait for <0x00000000f5940818> (a java.util.concurrent.locks.AbstractQueuedSynchronizer$Conditat java.util.concurrent.locks.LockSupport.parkNanos(LockSupport.java:215)at java.util.concurrent.locks.AbstractQueuedSynchronizer$ConditionObject.awaitNanos(AbstractQueuedSynchroniat java.util.concurrent.ScheduledThreadPoolExecutor$DelayedWorkQueue.take(ScheduledThreadPoolExecutor.java:at java.util.concurrent.ScheduledThreadPoolExecutor$DelayedWorkQueue.take(ScheduledThreadPoolExecutor.java:at java.util.concurrent.ThreadPoolExecutor.getTask(ThreadPoolExecutor.java:1074)at java.util.concurrent.ThreadPoolExecutor.runWorker(ThreadPoolExecutor.java:1134)at java.util.concurrent.ThreadPoolExecutor$Worker.run(ThreadPoolExecutor.java:624)at java.lang.Thread.run(Thread.java:748)复制
知道了在JDK http请求网络时出现线程处于runnable。
可以看出,如果没有设置超时参数,线程在网络请求时可能会造成一直RUNNABLE,通过多次线程堆栈的导出,线程一直处于RUNNABLE,那么其它共用同一线程池的可能就没法执行处理了。比如此案例,通过@Async注解使用的线程池就是同一个,为什么?
下面我会分析。
通过上面的简单的过了一下代码,我们大致也了解了。根据经验,我们知道相关HTTP如果没有进行相关超时参数设置,会造成我们的服务经常请求超时,并且容易拖垮我们的应用服务。具体的解决方案网上很多,有兴趣者可自行Google一下。
通过这种“事故”,我们也知道 了要规避犯这种错误,一般会要求:设置相关超时参数,比如connectTimeot、readTimeout等等,防止请求一直占用系统资源,从而将服务拖垮。
7、剖析源码——@Async注解
@Target(ElementType.TYPE)@Retention(RetentionPolicy.RUNTIME)@Documented@Import(AsyncConfigurationSelector.class)public @interface EnableAsync {}复制
使用注解EnableAsync开启Async异步注解功能。继续往AsyncConfigurationSelector这个类看:
public class AsyncConfigurationSelector extends AdviceModeImportSelector<EnableAsync> {private static final String ASYNC_EXECUTION_ASPECT_CONFIGURATION_CLASS_NAME ="org.springframework.scheduling.aspectj.AspectJAsyncConfiguration";/*** {@inheritDoc}* @return {@link ProxyAsyncConfiguration} or {@code AspectJAsyncConfiguration} for* {@code PROXY} and {@code ASPECTJ} values of {@link EnableAsync#mode()}, respectively*/@Overridepublic String[] selectImports(AdviceMode adviceMode) {switch (adviceMode) {case PROXY: // Proxy模式,使用的是ProxyAsyncConfigurationreturn new String[] { ProxyAsyncConfiguration.class.getName() };case ASPECTJ: // ASPECT模式,使用的是AspectJAsyncConfigurationreturn new String[] { ASYNC_EXECUTION_ASPECT_CONFIGURATION_CLASS_NAME };default:return null;}}}复制
通过selectImports机制(具体请查看相关资料),这里我们从ProxyAsyncConfiguration源码着手:
@Configuration@Role(BeanDefinition.ROLE_INFRASTRUCTURE)public class ProxyAsyncConfiguration extends AbstractAsyncConfiguration {//生成AsyncAnnotationBeanPostProcessor实例,并且设置:异步注解类型、执行器、异常处理器等。@Bean(name = TaskManagementConfigUtils.ASYNC_ANNOTATION_PROCESSOR_BEAN_NAME)@Role(BeanDefinition.ROLE_INFRASTRUCTURE)public AsyncAnnotationBeanPostProcessor asyncAdvisor() {Assert.notNull(this.enableAsync, "@EnableAsync annotation metadata was not injected");//新建一个异步注解bean后处理器AsyncAnnotationBeanPostProcessor bpp = new AsyncAnnotationBeanPostProcessor();Class<? extends Annotation> customAsyncAnnotation = this.enableAsync.getClass("annotation");if (customAsyncAnnotation != AnnotationUtils.getDefaultValue(EnableAsync.class, "annotation")) {//如果@EnableAsync中用户自定义了annotation属性,即异步注解类型,那么设置bpp.setAsyncAnnotationType(customAsyncAnnotation);}if (this.executor != null) {// 设置线程任务执行器bpp.setExecutor(this.executor);}if (this.exceptionHandler != null) {// 设置异常处理器bpp.setExceptionHandler(this.exceptionHandler);}//设置是否升级到CGLIB子类代理,默认不开启bpp.setProxyTargetClass(this.enableAsync.getBoolean("proxyTargetClass"));//设置执行优先级,默认最后执行bpp.setOrder(this.enableAsync.<Integer>getNumber("order"));return bpp;}}@Configurationpublic abstract class AbstractAsyncConfiguration implements ImportAware {protected AnnotationAttributes enableAsync;protected Executor executor;protected AsyncUncaughtExceptionHandler exceptionHandler;// 注解元数据判断:这里是判断是否使用了EnableAsync注解,没有的话抛出异常@Overridepublic void setImportMetadata(AnnotationMetadata importMetadata) {this.enableAsync = AnnotationAttributes.fromMap(importMetadata.getAnnotationAttributes(EnableAsync.class.getName(), false));if (this.enableAsync == null) {throw new IllegalArgumentException("@EnableAsync is not present on importing class " + importMetadata.getClassName());}}/*** 通过@Autowired注入AsyncConfigurer相关配置,对于自定义Async配置可以通过继承AsyncConfigurer设置相关执行器Executor和异常处理。*/@Autowired(required = false)void setConfigurers(Collection<AsyncConfigurer> configurers) {if (CollectionUtils.isEmpty(configurers)) {return;}if (configurers.size() > 1) {throw new IllegalStateException("Only one AsyncConfigurer may exist");}AsyncConfigurer configurer = configurers.iterator().next();this.executor = configurer.getAsyncExecutor();this.exceptionHandler = configurer.getAsyncUncaughtExceptionHandler();}}复制
从AbstractAsyncConfiguration 得知,可以通过AsyncConfigurer实现自定义的Async配置;从ProxyAsyncConfiguration配置类知道,主要是生成AsyncAnnotationBeanPostProcessor 实例,那我们继续从AsyncAnnotationBeanPostProcessor 类向下看:
(图来源:https://images2018.cnblogs.com/blog/584866/201805/584866-20180511151942396-1039591457.png)
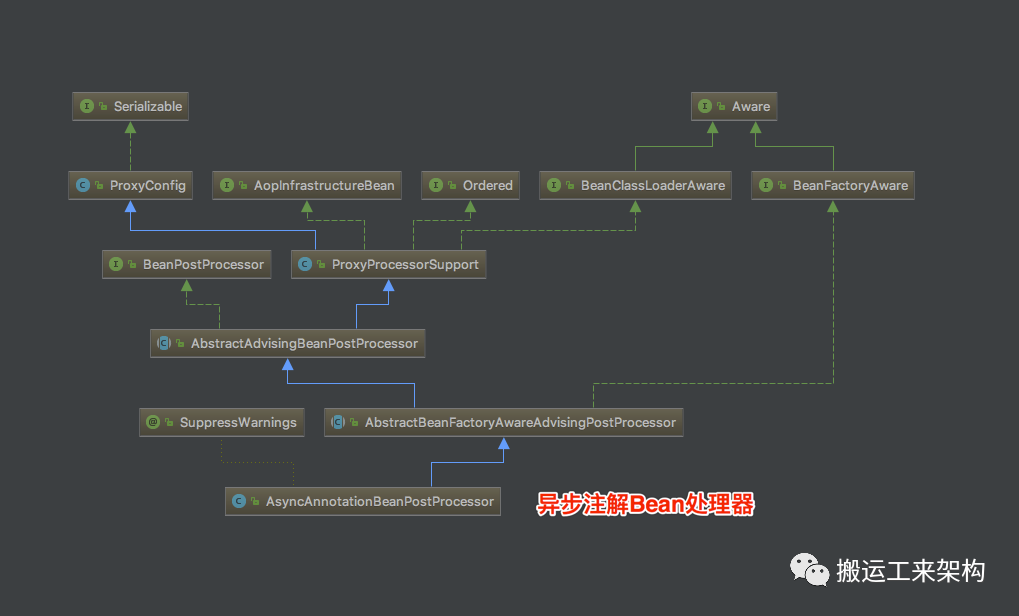
public class AsyncAnnotationBeanPostProcessor extends AbstractBeanFactoryAwareAdvisingPostProcessor {/*** 默认线程任务执行器Bean名称:taskExecutor*/public static final String DEFAULT_TASK_EXECUTOR_BEAN_NAME =AnnotationAsyncExecutionInterceptor.DEFAULT_TASK_EXECUTOR_BEAN_NAME;protected final Log logger = LogFactory.getLog(getClass());private Class<? extends Annotation> asyncAnnotationType;private Executor executor;private AsyncUncaughtExceptionHandler exceptionHandler;......@Overridepublic void setBeanFactory(BeanFactory beanFactory) {super.setBeanFactory(beanFactory);// 生成Async-Advisor实例AsyncAnnotationAdvisor advisor = new AsyncAnnotationAdvisor(this.executor, this.exceptionHandler);if (this.asyncAnnotationType != null) {advisor.setAsyncAnnotationType(this.asyncAnnotationType);}advisor.setBeanFactory(beanFactory);this.advisor = advisor;}}复制
AsyncAnnotationBeanPostProcessor类的Bean 初始化时 :BeanFactoryAware接口setBeanFactory方法中,对AsyncAnnotationAdvisor异步注解切面进行了构造。接下来继续看AsyncAnnotationAdvisor :
(图片来源:https://images2018.cnblogs.com/blog/584866/201805/584866-20180511161618981-1364805992.png)
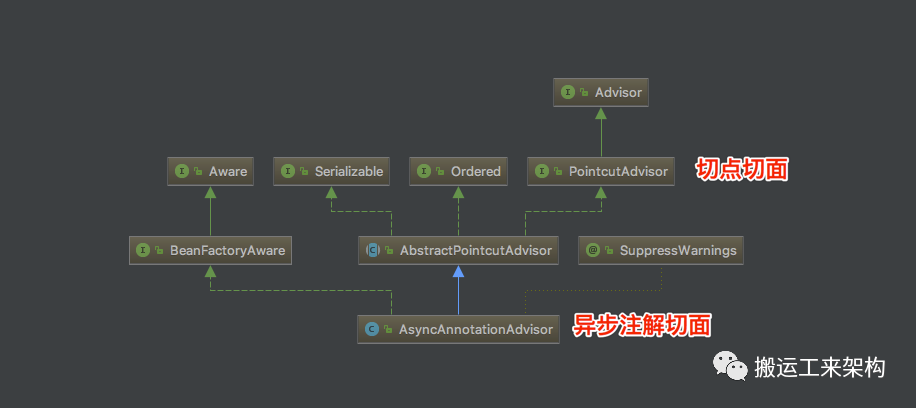
public class AsyncAnnotationAdvisor extends AbstractPointcutAdvisor implements BeanFactoryAware {...public AsyncAnnotationAdvisor(Executor executor, AsyncUncaughtExceptionHandler exceptionHandler) {Set<Class<? extends Annotation>> asyncAnnotationTypes = new LinkedHashSet<Class<? extends Annotation>>(2);asyncAnnotationTypes.add(Async.class);try {asyncAnnotationTypes.add((Class<? extends Annotation>)ClassUtils.forName("javax.ejb.Asynchronous", AsyncAnnotationAdvisor.class.getClassLoader()));}catch (ClassNotFoundException ex) {// If EJB 3.1 API not present, simply ignore.}if (exceptionHandler != null) {this.exceptionHandler = exceptionHandler;}else {this.exceptionHandler = new SimpleAsyncUncaughtExceptionHandler();}this.advice = buildAdvice(executor, this.exceptionHandler);this.pointcut = buildPointcut(asyncAnnotationTypes);}...protected Advice buildAdvice(Executor executor, AsyncUncaughtExceptionHandler exceptionHandler) {return new AnnotationAsyncExecutionInterceptor(executor, exceptionHandler);}复制
创建AsyncAnnotationAdvisor实例主要就是构建Advice。buildAdvice做的就是创建AnnotationAsyncExecutionInterceptor拦截器。
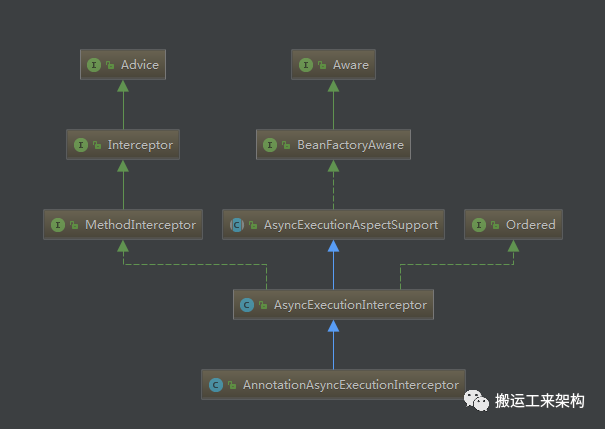
public class AnnotationAsyncExecutionInterceptor extends AsyncExecutionInterceptor {public AnnotationAsyncExecutionInterceptor(Executor defaultExecutor, AsyncUncaughtExceptionHandler exceptionHandler) {super(defaultExecutor, exceptionHandler);}@Overrideprotected String getExecutorQualifier(Method method) {// 通过Method获取Async注解value的限定符,如果方法没有,则从类上获取其注解限定符Async async = AnnotatedElementUtils.findMergedAnnotation(method, Async.class);if (async == null) {async = AnnotatedElementUtils.findMergedAnnotation(method.getDeclaringClass(), Async.class);}return (async != null ? async.value() : null);}}public class AsyncExecutionInterceptor extends AsyncExecutionAspectSupport implements MethodInterceptor, Ordered {@Overridepublic Object invoke(final MethodInvocation invocation) throws Throwable {Class<?> targetClass = (invocation.getThis() != null ? AopUtils.getTargetClass(invocation.getThis()) : null);Method specificMethod = ClassUtils.getMostSpecificMethod(invocation.getMethod(), targetClass);final Method userDeclaredMethod = BridgeMethodResolver.findBridgedMethod(specificMethod);// 获取Async执行器AsyncTaskExecutor executor = determineAsyncExecutor(userDeclaredMethod);if (executor == null) {throw new IllegalStateException("No executor specified and no default executor set on AsyncExecutionInterceptor either");}Callable<Object> task = new Callable<Object>() {@Overridepublic Object call() throws Exception {try {Object result = invocation.proceed();if (result instanceof Future) {return ((Future<?>) result).get();}}catch (ExecutionException ex) {handleError(ex.getCause(), userDeclaredMethod, invocation.getArguments());}catch (Throwable ex) {handleError(ex, userDeclaredMethod, invocation.getArguments());}return null;}};// 将task提交给执行器执行return doSubmit(task, executor, invocation.getMethod().getReturnType());}@Overrideprotected Executor getDefaultExecutor(BeanFactory beanFactory) {// 调用父类默认执行器Executor defaultExecutor = super.getDefaultExecutor(beanFactory);// 如果没有默认执行器,则创建SimpleAsyncTaskExecutor实例为默认执行器。默认是SimpleAsyncTaskExecutor,每提交一个任务直接起新线程进行异步执行,注意默认是没有线程数限制,并且不会复用线程。return (defaultExecutor != null ? defaultExecutor : new SimpleAsyncTaskExecutor());}// org.springframework.aop.interceptor.AsyncExecutionAspectSupport#getDefaultExecutorprotected Executor getDefaultExecutor(BeanFactory beanFactory) {if (beanFactory != null) {try {// 从BeanFactory获取TaskExecutor实现的实例return beanFactory.getBean(TaskExecutor.class);}catch (NoUniqueBeanDefinitionException ex) {logger.debug("Could not find unique TaskExecutor bean", ex);try {// 如果有多个TaskExecutor实例,则获取指定beanName为taskExecutor执行器return beanFactory.getBean(DEFAULT_TASK_EXECUTOR_BEAN_NAME, Executor.class);}catch (NoSuchBeanDefinitionException ex2) {...}}catch (NoSuchBeanDefinitionException ex) {logger.debug("Could not find default TaskExecutor bean", ex);try {// 如果BeanFactory没有TaskExecutor实例,则获取指定beanName为taskExecutor执行器return beanFactory.getBean(DEFAULT_TASK_EXECUTOR_BEAN_NAME, Executor.class);}catch (NoSuchBeanDefinitionException ex2) {...}}}return null;}}//org.springframework.aop.interceptor.AsyncExecutionAspectSupport#determineAsyncExecutor// 确定Async执行器protected AsyncTaskExecutor determineAsyncExecutor(Method method) {AsyncTaskExecutor executor = this.executors.get(method);if (executor == null) {Executor targetExecutor;// 获取方法上Async注解value限定符String qualifier = getExecutorQualifier(method);// 如果有指定就从Bean容器工厂获取对应执行器实例if (StringUtils.hasLength(qualifier)) {targetExecutor = findQualifiedExecutor(this.beanFactory, qualifier);}else {// 否则,获取默认执行器实现targetExecutor = this.defaultExecutor;if (targetExecutor == null) {synchronized (this.executors) {if (this.defaultExecutor == null) {this.defaultExecutor = getDefaultExecutor(this.beanFactory);}targetExecutor = this.defaultExecutor;}}}if (targetExecutor == null) {return null;}executor = (targetExecutor instanceof AsyncListenableTaskExecutor ?(AsyncListenableTaskExecutor) targetExecutor : new TaskExecutorAdapter(targetExecutor));this.executors.put(method, executor);}return executor;}复制
通过determineAsyncExecutor方法,可以看出源码的实现机制:首先看@Async是否有指定value限定符,如果有则从Bean工厂获取执行器实例,否则,获取默认执行器方法。
通过上面的一系列的代码分析,做下总结:
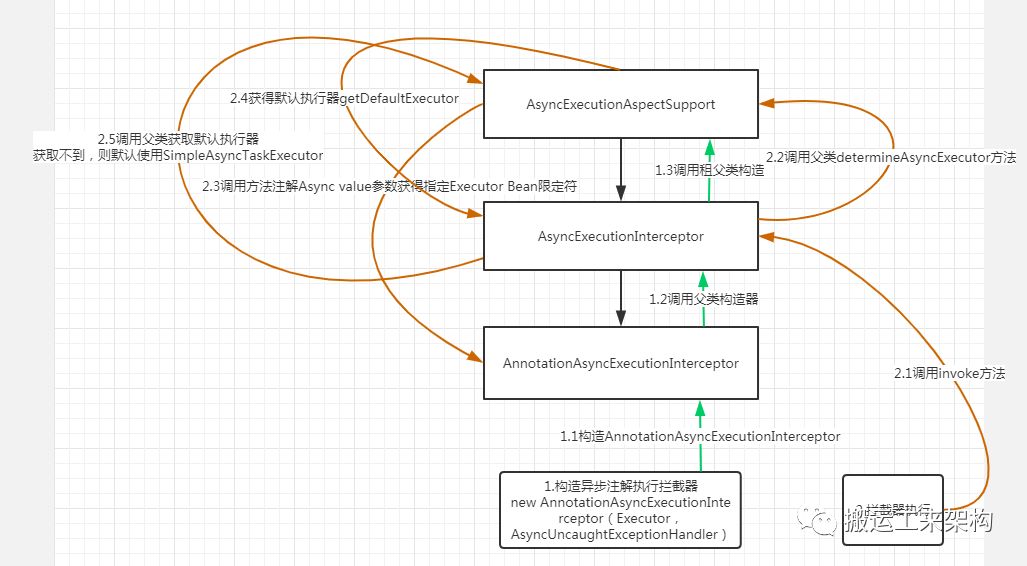
1、创建 AnnotationAsyncExecutionInterceptor实例
2、调用父类AsyncExecutionInterceptor构造器,继续调用祖父类AsyncExecutionAspectSupport构造器,进行执行器和异常处理器的赋值
3、AsyncExecutionInterceptor 拦截器调用核心方法invoke
4、调用祖父类AsyncExecutionAspectSupport
的determineAsyncExecutor方法确定是使用哪个异步执行器
5、调用getExecutorQualifier获得执行器修饰符,其实就是@Async注解里的value参数指明是哪个执行器Executor,
如果有指定,则从Bean工厂直接获取其实例;否则,调用getDefaultExecutor获得默认执行器
6、getDefaultExecutor是子类AsyncExecutionInterceptor重载实现,并且会优先调用父类AsyncExecutionAspectSupport的实现:
优先从Bean工厂获取TaskExecutor的实现;
如果存在多个TaskExecutor实现或Bean容器里没有其实现,则通过Bean工厂获取Bean name为taskExecutor的实例。
7、如果父类都没有找到其默认执行器,则创建SimpleAsyncTaskExecutor作为默认的任务执行器。
8、RestTemplate怎么“勾搭” @Async?
现在我们可以知道RestTemplate怎么会和Async搭上关系了。
springboot-admin client在注册的时候,使用了定时任务调度器ThreadPoolTaskScheduler定时使用RestTemplate调用注册HTTP接口,并且线程池核心数为1。ThreadPoolTaskScheduler是TaskExecutor的一个实现类。
从上面的Async源码我们知道,在获取默认执行器Executor时,由于我们没有指定线程池执行器,会先从BeanFactory获取TaskExecutor实现类,所以,我们知道了会共用springboot-admin client定时任务调度器里的线程池,因此,一旦线程池出现处理缓慢,那么自然会影响其它共享同一线程池的处理逻辑,也就是本次@Async异步执行被影响了,进入任务队列,迟迟没有能够执行。
9、定时调度器执行调度为什么会每1分钟才打印warn日志?
现在回复下前文说的日志打印为什么是每1分钟就打印一次日志。
前面的源码我们知道,注册任务是每10秒定时执行一次注册操作,那么为什么异常日志打印间隔是每1分钟打印异常?
由于我们接入层使用的Nginx,反向代理后端服务,当客户端进行请求时,由于后端服务异常,出现504 Gateway-timeout异常状态。
由于Nginx默认是60秒超时,所以每次请求时就会等到60秒后返回,也是造成线程资源一直在等待,即每60秒返回,然后打印warn日志。
四、总结——避坑
通过上面的分析,我总结了一些经验,希望你不会掉进这些坑,从而造成线上事故:
1、使用RestTemplate不要使用默认的实现,可以指定HttpClient等实现,并且一定要指定相关连接、请求超时参数等;
2、使用@Async异步化处理业务,需要指定任务执行器和设置线程池,并且不同业务尽量使用不同的线程池,隔离线程,从而不会被其它业务处理影响到当前业务;
3、Nginx连接请求超时参数不要使用默认的,应该进行调整,以致更适合自己的业务。
总之,与网络连接相关的参数,特别是超时参数,一定要重新设置,即使是HTTP、TCP等连接请求,不要使用默认值!!!
PS:如果上面哪里描述的不好或者错误,请多多见谅!若有其它看法,欢迎评论探讨~
参考资料
推荐阅读

-关注搬运工来架构,与优秀的你一同进步-
【版权声明】本着分享学习的目的,本公众号有部分文章来源于网络,版权归原作者所有!若您觉得侵权且要求删除,请您留言或者联系公众号小编,谢谢!
