


eBPF
BPF全称是Berkeley Packet Filter,最初是实现在BSD系统之上,1997年首次被引入Linux(2.1.75内核),但与BSD开启BPF的方式不同,Linux选择套接字(socket)的方式,即Linux Socket Filter(LSF),最后演变为JIT For BPF,最终在Linux 3.17内核进化成我们今天看到的extended BPF(eBPF),为了向后兼容,传统的BPF仍被保留,被重命名为classical BPF(cBPF)。
在这个演进过程,Packet Filter总是不变的,这两个单词也基本概括了BPF的两大核心功能:
过滤(Filter): 根据外界输入的规则过滤报文;
复制(Copy):将符合条件的报文由内核空间复制到用户空间;
eBPF带来革命性的改变,它已经为内核追踪(Kernel Tracing)、应用性能调优/监控、流控(Traffic Control)等领域带来了激动人心的变革;另一方面,在接口的设计以及易用性上,eBPF也有了较大的改进。

环境初始化
Cilium需要Kubernetes 1.9以上版本,Linux Kernel 4.9.17以上,官方建议5.3或更高版本。使用外部etcd时需要3.1.0以上版本。
注: 编译内核时,必须编译开启下列BPF内核模块,否则Cilium会启动失败,eBPF流量不能监控
CONFIG_IKCONFIG=y
CONFIG_BPF=y
CONFIG_BPF_EVENTS=y
CONFIG_BPF_STREAM_PARSER=y
CONFIG_BPFILTER=y
CONFIG_HAVE_EBPF_JIT=y
CONFIG_NETFILTER_XT_MATCH_BPF=y
CONFIG_BPF_SYSCALL=y
CONFIG_NET_CLS_BPF=y
CONFIG_NET_ACT_BPF=y
CONFIG_BPF_JIT=y
CONFIG_NET_CLS_ACT=y
CONFIG_NET_SCH_INGRESS=y
CONFIG_CRYPTO_SHA1=y
CONFIG_CRYPTO_USER_API_HASH=y
CONFIG_NETFILTER_XT_TARGET_TPROXY=y
CONFIG_NETFILTER_XT_MATCH_MARK=y
CONFIG_NETFILTER_XT_MATCH_SOCKET=y
CONFIG_INET_UDP_DIAG=y
CONFIG_CGROUP_BPF=y
CONFIG_NET_SCH_SFQ=m
CONFIG_NET_ACT_POLICE=m
CONFIG_NET_ACT_GACT=m
CONFIG_DUMMY=m
CONFIG_VXLAN=m
网卡TX值不能过小,否则报"Too few free TX rings available"错误,一般公有云环境不支持修改TX值,选购服务器时要确认网卡的TX值。
[root@k8s-master01 ~]# ethtool -g eth0
Ring parameters for eth0:
Pre-set maximums:
RX:             4096
RX Mini:        0
RX Jumbo:       0
TX:             4096
Current hardware settings:
RX:             4096
RX Mini:        0
RX Jumbo:       0
TX:             4096

[root@k8s-master01 ~]#
Kubernetes具有自动分配和分配每个节点IP分配CIDR的能力,官方推荐启用自动节点CIDR分配,在kube-controller-manager加入参数
  --allocate-node-cidrs=true \
  --cluster-cidr=192.168.0.0/16 \
kubelet使用CNI模式
--network-plugin=cni
Kubernetes初始化完成
[root@k8s-master01 ~]# kubectl get nodes -o wide
NAME           STATUS   ROLES    AGE     VERSION   INTERNAL-IP      EXTERNAL-IP   OS-IMAGE                KERNEL-VERSION   CONTAINER-RUNTIME
k8s-master01   Ready    master   7h39m   v1.18.2   172.31.250.208   <none>        CentOS Linux 7 (Core)   5.4.35           cri-o://1.18.0
k8s-worker01   Ready    node     7h19m   v1.18.2   172.31.250.209   <none>        CentOS Linux 7 (Core)   5.4.35           cri-o://1.18.0
k8s-worker02   Ready    node     7h19m   v1.18.2   172.31.250.207   <none>        CentOS Linux 7 (Core)   5.4.35           cri-o://1.18.0
挂载BPF文件系统
使用systemd的方式挂载
cat <<EOF | sudo tee /etc/systemd/system/sys-fs-bpf.mount
[Unit]
Description=Cilium BPF mounts
Documentation=https://docs.cilium.io/
DefaultDependencies=no
Before=local-fs.target umount.target
After=swap.target

[Mount]
What=bpffs
Where=/sys/fs/bpf
Type=bpf
Options=rw,nosuid,nodev,noexec,relatime,mode=700

[Install]
WantedBy=multi-user.target
EOF
启动并验证
[root@k8s-master01 ~]# systemctl daemon-reload
[root@k8s-master01 ~]# systemctl enable sys-fs-bpf.mount
Created symlink from /etc/systemd/system/multi-user.target.wants/sys-fs-bpf.mount to /etc/systemd/system/sys-fs-bpf.mount.
[root@k8s-master01 ~]# systemctl start sys-fs-bpf.mount
[root@k8s-master01 ~]# systemctl status sys-fs-bpf.mount
● sys-fs-bpf.mount - Cilium BPF mounts
   Loaded: loaded (/etc/systemd/system/sys-fs-bpf.mount; enabled; vendor preset: disabled)
   Active: active (mounted) since Sat 2020-04-25 20:33:21 CST; 1h ago
    Where: /sys/fs/bpf
     What: none
     Docs: https://docs.cilium.io/

Apr 25 20:33:21 k8s-master01 systemd[1]: Mounting Cilium BPF mounts...
Apr 25 20:33:21 k8s-master01 systemd[1]: Mounted Cilium BPF mounts.
[root@k8s-master01 ~]#  mount | grep /sys/fs/bpf
none on /sys/fs/bpf type bpf (rw,nosuid,nodev,noexec,relatime,mode=700)
[root@k8s-master01 ~]#
加载BPF内核模块
[root@k8s-master01 ~]# cat /proc/net/ip_tables_matches
comment
mark
icmp
udplite
udp
tcp
[root@k8s-master01 ~]# modprobe  xt_bpf
[root@k8s-master01 ~]# cat /proc/net/ip_tables_matches
bpf
bpf
comment
mark
icmp
udplite
udp
tcp
部署Cilium
Cilium有多种部署方式,如官方提供的yaml,这里使用helm3 template的方式部署
curl -LO https://github.com/cilium/cilium/archive/master.tar.gz
tar xzvf master.tar.gz
cd cilium-master/install/kubernetes

kubectl create secret generic -n kube-system cilium-etcd-secrets \
     --from-file=etcd-client-ca.crt=ca.crt \
     --from-file=etcd-client.key=client.key \
     --from-file=etcd-client.crt=client.crt

helm template  cilium ./cilium \
  --namespace kube-system \
  --set global.etcd.enabled=true \
  --set global.etcd.ssl=true \
  --set global.etcd.endpoints[0]=https://$etcd-endpoint1:2379 \
  --set global.etcd.endpoints[1]=https://$etcd-endpoint2:2379 \
  --set global.etcd.endpoints[2]=https://$etcd-endpoint3:2379 \
  --set global.kubeProxyReplacement=strict \
  --set global.k8sServiceHost=$API_SERVER_IP \
  --set global.k8sServicePort=$API_SERVER_PORT \
  --set global.containerRuntime.integration=crio > cilium-preflight.yaml
[root@k8s-master01 kubernetes]# kubectl create -f cilium-preflight.yaml
[root@k8s-master01 kubernetes]# kubectl get pod,svc -n kube-system -o wide
NAME                                   READY   STATUS    RESTARTS   AGE   IP               NODE           NOMINATED NODE   READINESS GATES
pod/cilium-fsldm                       1/1     Running   0          26m   172.31.250.208   k8s-master01   <none>           <none>
pod/cilium-operator-6b6d4b5c85-bm9hl   1/1     Running   0          19m   172.31.250.207   k8s-worker02   <none>           <none>
pod/cilium-t4nwk                       1/1     Running   0          26m   172.31.250.207   k8s-worker02   <none>           <none>
pod/cilium-wbmk8                       1/1     Running   0          26m   172.31.250.209   k8s-worker01   <none>           <none>
[root@k8s-master01 kubernetes]# kubectl exec -it -n kube-system cilium-gvgkr -- cilium status
KVStore:                Ok   etcd: 3/3 connected, lease-ID=39c271c1a970a9d3, lock lease-ID=39c271c1a970a9d5, has-quorum=true: https://172.31.250.208:2379 - 3.4.7 (Leader); https://172.31.250.209:2379 - 3.4.7; https://172.31.250.207:2379 - 3.4.7
Kubernetes:             Ok   1.18 (v1.18.2) [linux/amd64]
Kubernetes APIs:        ["CustomResourceDefinition", "cilium/v2::CiliumClusterwideNetworkPolicy", "cilium/v2::CiliumNetworkPolicy", "core/v1::Namespace", "core/v1::Pods", "core/v1::Service", "discovery/v1beta1::EndpointSlice", "networking.k8s.io/v1::NetworkPolicy"]
KubeProxyReplacement:   Strict   [NodePort (SNAT, 30000-32767, XDP: NONE), HostPort, ExternalIPs, HostReachableServices (TCP, UDP)]
Cilium:                 Ok       OK
NodeMonitor:            Disabled
Cilium health daemon:   Ok
IPAM:                   IPv4: 3/255 allocated from 192.168.2.0/24,
Controller Status:      25/25 healthy
Proxy Status:           OK, ip 192.168.2.127, 0 redirects active on ports 10000-20000
Hubble:                 Disabled
Cluster health:         3/3 reachable   (2020-04-28T18:21:44Z)
[root@k8s-master01 ~]# kubectl get pod,svc -o wide
NAME                         READY   STATUS    RESTARTS   AGE   IP              NODE           NOMINATED NODE   READINESS GATES
pod/busybox                  1/1     Running   0          23m   192.168.1.8     k8s-worker01   <none>           <none>
pod/nginx-66cb774b78-kds8r   1/1     Running   0          17m   192.168.0.242   k8s-master01   <none>           <none>

NAME                 TYPE        CLUSTER-IP       EXTERNAL-IP   PORT(S)       AGE    SELECTOR
service/kubernetes   ClusterIP   10.254.0.1       <none>        443/TCP       103m   <none>
service/nginx        NodePort    10.254.114.243   <none>        80:8080/TCP   17m    app=nginx
[root@k8s-master01 ~]# curl k8s-worker02:8080
<!DOCTYPE html>
<html>
<head>
<title>Welcome to nginx!</title>
<style>
    body {
        width: 35em;
        margin: 0 auto;
        font-family: Tahoma, Verdana, Arial, sans-serif;
    }
</style>
</head>
<body>
<h1>Welcome to nginx!</h1>
<p>If you see this page, the nginx web server is successfully installed and
working. Further configuration is required.</p>

<p>For online documentation and support please refer to
<a href="http://nginx.org/">nginx.org</a>.<br/>
Commercial support is available at
<a href="http://nginx.com/">nginx.com</a>.</p>

<p><em>Thank you for using nginx.</em></p>
</body>
</html>
[root@k8s-master01 ~]#
查看Cilium转发
[root@k8s-master01 ~]# kubectl scale deploy nginx --replicas=2
deployment.apps/nginx scaled
[root@k8s-master01 ~]# kubectl get pod -o wide
NAME                     READY   STATUS    RESTARTS   AGE   IP              NODE           NOMINATED NODE   READINESS GATES
busybox                  1/1     Running   0          27m   192.168.1.8     k8s-worker01   <none>           <none>
nginx-66cb774b78-kds8r   1/1     Running   0          21m   192.168.0.242   k8s-master01   <none>           <none>
nginx-66cb774b78-w7n8n   1/1     Running   0          62s   192.168.2.102   k8s-worker02   <none>           <none>
[root@k8s-master01 ~]# kubectl exec -it -n kube-system cilium-gvgkr -- cilium service list
ID   Frontend              Service Type   Backend
1    10.254.0.1:443        ClusterIP      1 => 172.31.250.208:6443
2    10.254.0.2:53         ClusterIP      1 => 192.168.2.150:53
3    10.254.0.2:9153       ClusterIP      1 => 192.168.2.150:9153
4    10.254.114.243:80     ClusterIP      1 => 192.168.0.242:80
                                          2 => 192.168.2.102:80
5    172.31.250.207:8080   NodePort       1 => 192.168.0.242:80
                                          2 => 192.168.2.102:80
6    192.168.2.127:8080    NodePort       1 => 192.168.0.242:80
                                          2 => 192.168.2.102:80
7    0.0.0.0:8080          NodePort       1 => 192.168.0.242:80
                                          2 => 192.168.2.102:80
[root@k8s-master01 ~]#
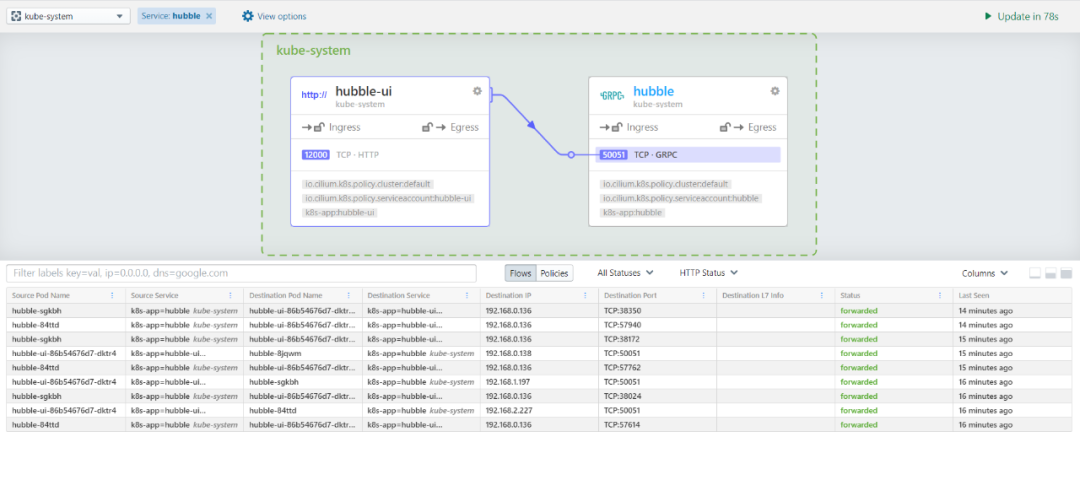
部署Hubble组件
Hubble是一个用于云原生工作负载的完全分布式的网络和安全性可观察性平台。它建立在Cilium和eBPF的基础上,以完全透明的方式深入了解服务以及网络基础结构的通信和行为。
git clone https://github.com/cilium/hubble.git --branch v0.5
cd hubble/install/kubernetes
helm template  hubble ./hubble \
    --namespace kube-system \
    --set metrics.enabled="{dns:query;ignoreAAAA;destinationContext=pod-short,drop:sourceContext=pod;destinationContext=pod,tcp,flow,port-distribution,icmp,http}" \
    --set ui.enabled=true > hubble.yaml
把hubble-ui的Service修改为NodePort
---
# Source: hubble/templates/svc.yaml
kind: Service
apiVersion: v1
metadata:
  namespace: kube-system
  name: hubble-ui
spec:
  selector:
    k8s-app: hubble-ui
  ports:
    - name: http
      port: 12000
      targetPort: 12000
    nodePort: 12000
  type: NodePort
创建Hubble
 [root@k8s-master01 kubernetes]# kubectl create -f hubble.yaml
[root@k8s-master01 kubernetes]# kubectl get pod,svc -n kube-system -o wide
NAME                                   READY   STATUS    RESTARTS   AGE   IP               NODE           NOMINATED NODE   READINESS GATES
pod/cilium-gvgkr                       1/1     Running   0          55m   172.31.250.207   k8s-worker02   <none>           <none>
pod/cilium-n49qz                       1/1     Running   0          55m   172.31.250.208   k8s-master01   <none>           <none>
pod/cilium-operator-6b6d4b5c85-t978x   1/1     Running   0          55m   172.31.250.209   k8s-worker01   <none>           <none>
pod/cilium-zdfsc                       1/1     Running   0          55m   172.31.250.209   k8s-worker01   <none>           <none>
pod/coredns-84f6fbbc56-jglxv           1/1     Running   0          53m   192.168.2.150    k8s-worker02   <none>           <none>
pod/hubble-84ttd                       1/1     Running   0          93s   192.168.2.227    k8s-worker02   <none>           <none>
pod/hubble-8jqwm                       1/1     Running   0          93s   192.168.0.138    k8s-master01   <none>           <none>
pod/hubble-sgkbh                       1/1     Running   0          93s   192.168.1.197    k8s-worker01   <none>           <none>
pod/hubble-ui-86b54676d7-dktr4         1/1     Running   0          93s   192.168.0.136    k8s-master01   <none>           <none>

NAME                  TYPE        CLUSTER-IP       EXTERNAL-IP   PORT(S)                  AGE   SELECTOR
service/hubble-grpc   ClusterIP   None             <none>        50051/TCP                93s   k8s-app=hubble
service/hubble-ui     NodePort    10.254.233.204   <none>        12000:12000/TCP          68s   k8s-app=hubble-ui
service/kube-dns      ClusterIP   10.254.0.2       <none>        53/UDP,53/TCP,9153/TCP   98m   k8s-app=kube-dns
[root@k8s-master01 kubernetes]#
浏览器打开12000端口
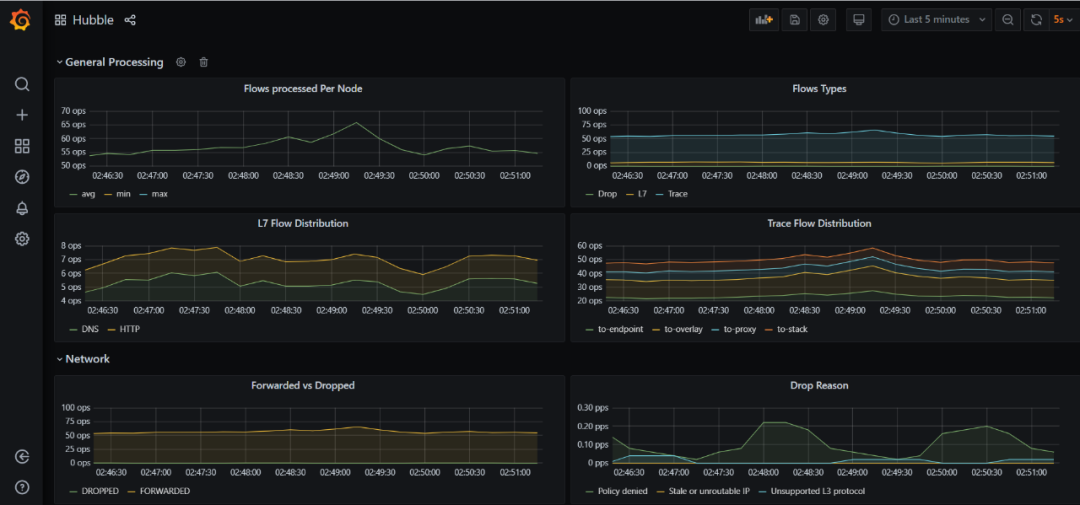
接入Prometheus
hubble提供metrics监控,并制作了dashboard面板,参考文档进行部署接入即可:
往期回顾
