


一、webvirtmgr介绍及环境说明
温馨提示:安装KVM是需要2台都操作的,因为我们是打算将2台都设置为宿主机所有都需要安装KVM相关组件
github地址https://github.com/retspen/webvirtmgr
WebVirtMgr是一个基于libvirt的Web界面,用于管理虚拟机。它允许您创建和配置新域,并调整域的资源分配。VNC查看器为来宾域提供完整的图形控制台。KVM是目前唯一支持的虚拟机管理程序。
查看服务器版本号
[root@webc ~]# cat etc/redhat-releaseCentOS Linux release 7.9.2009 (Core)
内核版本
[root@webc ~]# uname -r3.10.0-1160.42.2.el7.x86_64
关闭Selinux & 防火墙
[root@webc ~]# systemctl stop firewalld[root@webc ~]# systemctl disable firewalld[root@webc ~]# setenforce 0setenforce: SELinux is disabled[root@webc ~]# sed -i '/SELINUX/s/enforcing/disabled/' etc/selinux/config
更新软件包并安装epel扩展源
[root@webc ~]# yum update[root@webc ~]# yum install epel*
查看python版本
[root@webc ~]# python -VPython 2.7.5[root@webc ~]#
查看KVM 驱动是否加载
[root@webc ~]# lsmod | grep kvmkvm_intel 188740 0kvm 637515 1 kvm_intelirqbypass 13503 1 kvm[root@webc ~]#[root@webc ~]#[root@webc ~]# modprobe -a kvm[root@webc ~]# modprobe -a kvm_intel[root@webc ~]#
免密配置
[root@webc ~]# ssh-keygen[root@webc ~]# ssh-copy-id -i .ssh/id_rsa.pub root@192.168.1.104
二、安装KVM
安装KVM依赖包及管理工具
kvm属于内核态,不需要安装。但是需要一些管理工具包
[root@webc ~]# yum install qemu-img qemu-kvm qemu-kvm-tools virt-manager virt-viewer virt-v2v virt-top libvirt libvirt-Python libvirt-client python-virtinst bridge-utils tunctl[root@webc ~]# yum install -y virt-install[root@webc ~]#[root@webc ~]# systemctl start libvirtd.service[root@webc ~]# systemctl enable libvirtd.service[root@webc ~]#[root@webc ~]# cd cby/kvm/[root@webc kvm]#[root@webc kvm]#[root@webc kvm]# git clone https://github.com/palli/python-virtinst.git[root@webc kvm]# cd python-virtinst/[root@webc python-virtinst]# python setup.py install[root@webc python-virtinst]# virt-install[root@webc python-virtinst]# yum install bridge-utils[root@webc python-virtinst]#[root@webc python-virtinst]# vim etc/sysconfig/network-scripts/ifcfg-br0[root@webc python-virtinst]#[root@webc python-virtinst]#[root@webc python-virtinst]#[root@webc python-virtinst]#[root@webc python-virtinst]#[root@webc python-virtinst]# cat etc/sysconfig/network-scripts/ifcfg-br0DEVICE=br0TYPE=BridgeONBOOT=yesNM_CONTROLLED=yesBOOTPROTO=staticIPADDR=192.168.1.49NETMASK=255.225.255.0GATEWAY=192.168.1.1DNS1=192.168.1.1[root@webc python-virtinst]# brctl showbridge name bridge id STP enabled interfacesbr-0d093958d245 8000.0242d5824d14 nobr-2e2d3c481379 8000.0242884030e2 nobr-36a6ad3375a8 8000.0242d7d7f1ef nobr-66a9675a6dd5 8000.024248a61c72 nobr-b7daf4844ff7 8000.024263dd4715 nobr-deba197eb09e 8000.0242b290e104 nobr0 8000.000000000000 nodocker0 8000.0242858c017c no vethe14f7acdocker_gwbridge 8000.0242588c6db0 novirbr0 8000.5254009ba65a yes virbr0-nic[root@webc python-virtinst]# ln -s usr/libexec/qemu-kvm usr/sbin/
三、WebVirtMgr 安装
安装pip、git及supervisor && Nginx
WebVirtMgr只在管理端安装
[root@webc ~]# yum -y install git python-pip libvirt-python libxml2-python python-websockify supervisor gcc python-devel
使用pip安装Python扩展程序库
[root@webc ~]# pip install numpy
git克隆配置并运行WebVirMgr
[root@webc ~]# cd cby/[root@webc cby]# mkdir kvm[root@webc cby]# cd kvm[root@webc kvm]# pwd/root/cby/kvm[root@webc kvm]#[root@webc kvm]# git clone git://github.com/retspen/webvirtmgr.git正克隆到 'webvirtmgr'...remote: Enumerating objects: 5614, done.remote: Total 5614 (delta 0), reused 0 (delta 0), pack-reused 5614接收对象中: 100% (5614/5614), 2.97 MiB | 748.00 KiB/s, done.处理 delta 中: 100% (3606/3606), done.[root@webc kvm]#[root@webc kvm]#[root@webc kvm]# cd webvirtmgr[root@webc webvirtmgr]# pip install -r requirements.txt
#初始化环境[root@webc webvirtmgr]# ./manage.py syncdb#配置Django 静态页面[root@webc webvirtmgr]# ./manage.py collectstatic
启动WebVirMgr
前台启动WebVirMgr,默认是Debug模式同时日志打印在前台
用户名和密码是我们刚刚创建的
下载Nginx
[root@webc webvirtmgr]# cd ..[root@webc kvm]# lswebvirtmgr[root@webc kvm]#[root@webc kvm]# mkdir nginx[root@webc kvm]# cd nginx[root@webc nginx]# wget https://nginx.org/download/nginx-1.20.1.tar.gz[root@webc nginx]# tar xf nginx-1.20.1.tar.gz[root@webc nginx]# cd nginx-1.20.1/[root@webc nginx-1.20.1]#
修改nginx配置文件
[root@webc conf]# vim nginx.conf[root@webc conf]#[root@webc conf]# cat nginx.confuser root;worker_processes 1;events {worker_connections 1024;}http {include mime.types;default_type application/octet-stream;sendfile on;keepalive_timeout 65;server {listen 90;server_name 192.168.1.104;#charset koi8-r;#access_log logs/host.access.log main;location / {#root html;#index index.html index.htm;proxy_pass http://127.0.0.1:8000;proxy_set_header X-Real-IP $remote_addr;proxy_set_header X-Forwarded-for $proxy_add_x_forwarded_for;proxy_set_header Host $host:$server_port;proxy_set_header X-Forwarded-Proto $remote_addr;proxy_connect_timeout 600;proxy_read_timeout 600;proxy_send_timeout 600;client_max_body_size 5120M;}location /static/ {root /root/cby/kvm/webvirtmgr;expires max;}error_page 500 502 503 504 /50x.html;location = /50x.html {root html;}}}[root@webc conf]#
安装Nginx
[root@webc nginx-1.20.1]# yum install -y gcc glibc gcc-c++ prce-devel openssl-devel pcre-devel[root@webc nginx-1.20.1]# useradd -s sbin/nologin nginx -M[root@webc nginx-1.20.1]# ./configure --prefix=/root/cby/kvm/nginx/ --user=nginx --group=nginx --with-http_ssl_module --with-http_stub_status_module[root@webc nginx-1.20.1]# make && make install
启动Nginx
[root@webc nginx-1.20.1]# cd root/cby/kvm/nginx/sbin/[root@webc sbin]# root/cby/kvm/nginx/sbin/nginx -tnginx: the configuration file /root/cby/kvm/nginx//conf/nginx.conf syntax is oknginx: configuration file /root/cby/kvm/nginx//conf/nginx.conf test is successful[root@webc sbin]# /root/cby/kvm/nginx/sbin/nginx
使用systemctl启停服务
[root@webc sbin]# cat > /etc/supervisord.d/webvirtmgr.ini << EOF[program:webvirtmgr]command=/usr/bin/python /root/cby/kvm/webvirtmgr/manage.py run_gunicorn -c /root/cby/kvm/webvirtmgr/conf/gunicorn.conf.pydirectory=/root/cby/kvm/webvirtmgrautostart=trueautorestart=truelogfile=/var/log/supervisor/webvirtmgr.loglog_stderr=trueuser=root[program:webvirtmgr-console]command=/usr/bin/python /root/cby/kvm/webvirtmgr/console/webvirtmgr-consoledirectory=/root/cby/kvm/webvirtmgrautostart=trueautorestart=truestdout_logfile=/var/log/supervisor/webvirtmgr-console.logredirect_stderr=trueuser=rootEOF
启动supervisor
[root@webc webvirtmgr]# systemctl daemon-reload[root@webc webvirtmgr]# systemctl stop supervisord[root@webc webvirtmgr]# systemctl start supervisord
查看是否启动成功
[root@webc webvirtmgr]# supervisorctl statuswebvirtmgr RUNNING pid 23783, uptime 0:00:11webvirtmgr-console RUNNING pid 23782, uptime 0:00:11[root@webc webvirtmgr]#
四、Web界面配置webvirtmgr
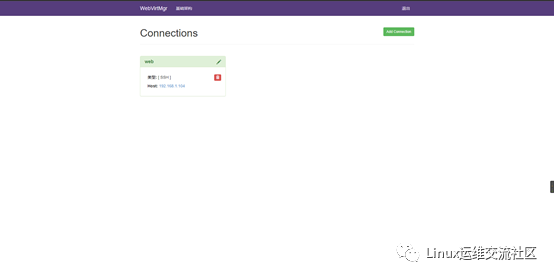
4.1 添加主机设置存储
1.Add Connection 添加宿主机(即KVM主机)
2.点击SSH连接
3.Label 为主机名,必须为主机名做免密
4.IP 为宿主机IP
5.用户名为服务器用户名
6.点击添加

文章转载自Linux运维交流社区,如果涉嫌侵权,请发送邮件至:contact@modb.pro进行举报,并提供相关证据,一经查实,墨天轮将立刻删除相关内容。
