


我准备战斗到最后,不是因为我勇敢,是我想见证一切。--双雪涛《猎人》
[TOC] Thinking
一个技术,为什么要用它,解决了那些问题?
如果不用会怎么样,有没有其它的解决方法?
对比其它的解决方案,为什么最终选择了这种,都有何利弊?
你觉得项目中还有那些地方可以用到,如果用了会带来那些问题?
这些问题你又如何去解决的呢?
本文基于Netty 4.1.45.Final-SNAPSHOT
1、概述(Buffer 缓冲区)
java.nio.Buffer
,一个 Buffer
对象是固定数量的数据的容器。实质上是内存中的一块。我们可以向这块内存存取数据。
缓冲区的工作与通道精密联系的。通道时I/O传输发生时通过的入口。而缓冲区是这些数据传输的来源或目标。(可写可读的双向性。)
缓冲区本质上是一块可以写入数据,然后可以从中读取数据的内存。这块内存被包装成NIO Buffer对象。并提供了一组方法。用于方便当问该区域。
类图:
其实可以将Buffer理解为一个数组的封装。例如:IntBuffer —>int[]
MappedByteBuffer 用于实现内存映射文件。
2、Buffer的基础使用
写入数据到Buffer
调用
flip()
方法从Buffer中读取数据
调用
clear()
方法或者compact()
方法
当向buffer写入数据时,buffer会记录下写了多少数据。一旦要读取数据,需要通过flip()方法将Buffer从写模式切换到读模式。在读模式下,可以读取之前写入到buffer的所有数据。
一旦读完了所有的数据,就需要清空缓冲区,让它可以再次被写入。有两种方式能清空缓冲区:调用clear()或compact()方法。clear()方法会清空整个缓冲区。compact()方法只会清除已经读过的数据。任何未读的数据都被移到缓冲区的起始处,新写入的数据将放到缓冲区未读数据的后面。(这种定义可以理解为,缓冲区本身维护着一个类似于队列的数据结构,先进先出原则)
/**
 * Buffer 基本使用
 *
 * @author by Mr. Li
 * @date 2020/2/11 12:23
 */
@Slf4j
public class BufferExample {

    public static void main(String[] args) throws Exception {
        RandomAccessFile accessFile = new RandomAccessFile("E:/idea_workspace/springcloud2.0/netty/netty-mytest/src/main/resources/data/nio-data.txt", "rw");
        // 获取 NIO 文件通道
        FileChannel channel = accessFile.getChannel();
        // 获取缓冲区Buffer
        ByteBuffer byteBuffer = ByteBuffer.allocate(48);
        int count = channel.read(byteBuffer);// read into buffer.
        while (count != -1) {
            // make buffer ready for read
            byteBuffer.flip();

            while (byteBuffer.hasRemaining()) {
                log.info("read 1 byte at a time : {}", byteBuffer.get());
            }
            byteBuffer.clear(); // make buffer ready for writing .即清空缓冲区,是Buffer又可以读写数据
            count = channel.read(byteBuffer);
        }
        // 关闭文件
        accessFile.close();
    }
}
3、Buffer 属性
Buffer缓冲区中提供了四个属性。用于来提供其包含的数据元素的信息。
容量(Capacity)
缓冲区能够容纳的数据元素的最大数量。这一容量在缓冲区被初始化时,就会被创建,并且永远不会改变。
上界(Limit)
缓冲区的第一个不能被读或写的元素。(可以理解为缓冲区中现有可读的数据)
位置(Position)
下一个要被读或写的元素的索引。(该属性被 #get()``#put()
自动维护)
标记(Mark)
一个备忘位置。调用 #mark()
来设定 mark=position
。调用 #reset()
设定 position=mark
。标记在设定前是未定义的 (undefined)
。
源码
public abstract class Buffer {

    /**
     * The characteristics of Spliterators that traverse and split elements
     * maintained in Buffers.
     */
    static final int SPLITERATOR_CHARACTERISTICS =
        Spliterator.SIZED | Spliterator.SUBSIZED | Spliterator.ORDERED;

    // Invariants: mark <= position <= limit <= capacity
    private int mark = -1;
    private int position = 0;
    private int limit;
    private int capacity;

    // Used only by direct buffers
    // 仅由直接缓冲区使用
    // NOTE: hoisted here for speed in JNI GetDirectBufferAddress
    long address;

    // Creates a new buffer with the given mark, position, limit, and capacity,
    // after checking invariants.
    //
    Buffer(int mark, int pos, int lim, int cap) {       // package-private
        if (cap < 0)
            throw new IllegalArgumentException("Negative capacity: " + cap);
        this.capacity = cap;
        limit(lim);
        position(pos);
        if (mark >= 0) {
            if (mark > pos)
                throw new IllegalArgumentException("mark > position: ("
                                                   + mark + " > " + pos + ")");
            this.mark = mark;
        }
    }
//....doSomething
从源码可以看出四种属性的关系:
mark <= position <= limit <= capacity
0 <= mark <= position <= limit <= capacity
Buffer四种属性图解
Buffer缓冲区是分读写模式的。(使用filp() 切换读写模式)
porsition和limit的含义取决于Buffer处在读模式还是写模式。不管Buffer处在什么模式,capacity的含义总是一样的。
写模式
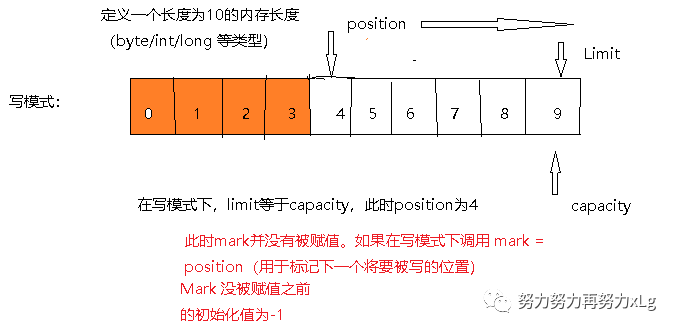
假设定义的ByteBuffer对象。(长度为10 的缓冲区长度
ByteBuffer.allocate(10);
)此时创建出来的Buffer对象 Limit 和capacity为指向内存末端,数值为9。
代码示例如下:
    /**
     *  Buffer 读写模式切换即 属性赋值变化。
     * @throws Exception
     */
    @Test
    public void bufferTest() throws Exception {
        // 初始化 长度为10 的Buffer
        ByteBuffer byteBuffer = ByteBuffer.allocate(10);
        RandomAccessFile accessFile = new RandomAccessFile("E:/idea_workspace/springcloud2.0/netty/netty-mytest/src/main/resources/data/buf-data.txt", "rw");

        // 获取 文件通道
        FileChannel channel = accessFile.getChannel();

        // 将通道的中的数据读取到缓冲区中
        int i = channel.read(byteBuffer);
        while (i != -1) {
            // 切换 成读模式
            byteBuffer.flip();
            while (byteBuffer.hasRemaining()) {
                log.info("write -> read {}", byteBuffer.get());
            }
            byteBuffer.clear();
            // 确保 数据读取完毕。返回-1
            i = channel.read(byteBuffer);
        }
        accessFile.close();
    }
Debug查看属性变化:
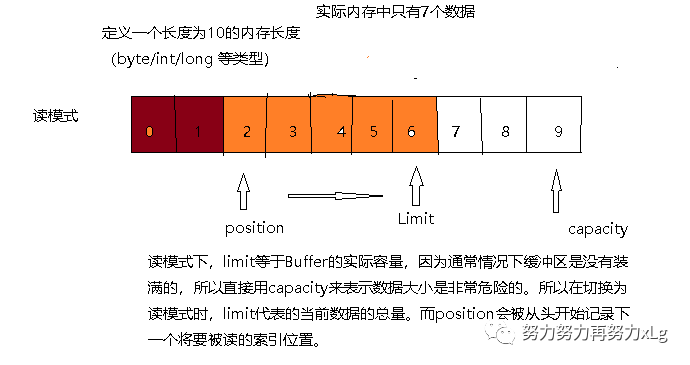
读模式
总结一下
从上述读写切换可以看出
此内存区域实则可以看作是一块数组内存区域。在初始化时,capacity是被固定的,用来标识内存的容量,可存放的最大元素数。并且不管读写如何切换,capacity是不会改变的。
Limit 在读写模式下的含义(上限)
写模式:即在缓存被初始化时(
ByteBuffer.allocate(10);
)Limit就指向了内存的最大容量与capacity相等。读模式:当调用
#filp()
切换为读模式后,limit就会指向内存中的实际容量,此时position就会指向下一个内存中即将被读的索引位置。position 永远指向下一个即将被写/读的索引位置。初始值为0。
写模式下,每往 Buffer 中写入一个值,
position
就自动加 1 ,代表下一次的写入位置。读模式下,每从 Buffer 中读取一个值,
position
就自动加 1 ,代表下一次的读取位置。( 和写模式类似 )mark 标记,通过
#mark()
方法,记录当前position
;通过#reset()
恢复position
为标记。写模式下,标记上一次写位置。
读模式下,标记上一次读位置。
所以从代码层次上充分的体现了四种属性的关系
limit最大只能与 capacity相等。
最小则是缓冲区为空。
position则是四大属性中,最善变的一个,一直随将要读写的操作变化着。
mark 则永远都不会超过position。并且初始化下的值为-1.
mark <= positioon <= limit <= capacity
思考
在这种反转切换读写的模式下,真的非常的繁琐。操作复杂。完全可以使用独立的标记,用于标记读写不同的操作。类似于Netty使用的模式,就是摒弃了这种反转的操作。
Netty的ByteBuf下优雅的设计
0 <= readerIndex <= writerIndex <= capacity
4、创建Buffer
1. 每个Buffer实现类,都相应的提供了 #allocate(int capacity)
静态方法。
    /**
     * Allocates a new byte buffer. Allocates a new direct byte buffer.
     *
     * <p> The new buffer's position will be zero, its limit will be its
     * capacity, its mark will be undefined, and each of its elements will be
     * initialized to zero.  It will have a {@link #array backing array},
     * and its {@link #arrayOffset array offset} will be zero.
     *
     * @param  capacity
     *         The new buffer's capacity, in bytes
     *
     * @return  The new byte buffer
     *
     * @throws  IllegalArgumentException
     *          If the <tt>capacity</tt> is a negative integer
     */
    public static ByteBuffer allocate(int capacity) {
        if (capacity < 0)
            throw new IllegalArgumentException();
        return new HeapByteBuffer(capacity, capacity);
    }
由于ByteBuffer 为抽象类,返回的是它基于堆内(Non-Direct)内存的实现类HeapByteBuffer的对象。
    HeapByteBuffer(int cap, int lim) {            // package-private

        super(-1, 0, lim, cap, new byte[cap], 0);
        /*
        hb = new byte[cap];
        offset = 0;
        */
    }
// 这里可以清晰的看出,Buffer 其实质就是一个内存数组。用于存储数据
每个 Buffer 实现类,都提供了
#wrap(array)
静态方法,帮助我们将其对应的数组包装成一个 Buffer 对象。还是以 ByteBuffer 举例子,代码如下:// ByteBuffer.java Allocates a new direct byte buffer.public static ByteBuffer wrap(byte[] array,int offset, int length){try {return new HeapByteBuffer(array, offset, length);} catch (IllegalArgumentException x) {throw new IndexOutOfBoundsException();}}public static ByteBuffer wrap(byte[] array) {return wrap(array, 0, array.length);}
和
#allocate(int capacity)
静态方法一样,返回的也是 HeapByteBuffer 的对象。
为什么Buffer要创建为 Direct Buffer
Direct Buffer 与Non-Direct Buffer 的区别
FROM 《Java NIO 的前生今世 之三 NIO Buffer 详解》
Direct Buffer:
所分配的内存不在 JVM 堆上, 不受 GC 的管理.(但是 Direct Buffer 的 Java 对象是由 GC 管理的, 因此当发生 GC, 对象被回收时, Direct Buffer 也会被释放)
因为 Direct Buffer 不在 JVM 堆上分配, 因此 Direct Buffer 对应用程序的内存占用的影响就不那么明显(实际上还是占用了这么多内存, 但是 JVM 不好统计到非 JVM 管理的内存.)
申请和释放 Direct Buffer 的开销比较大. 因此正确的使用 Direct Buffer 的方式是在初始化时申请一个 Buffer, 然后不断复用此 buffer, 在程序结束后才释放此 buffer.
使用 Direct Buffer 时, 当进行一些底层的系统 IO 操作时, 效率会比较高, 因为此时 JVM 不需要拷贝 buffer 中的内存到中间临时缓冲区中.
Non-Direct Buffer:
直接在 JVM 堆上进行内存的分配, 本质上是 byte[] 数组的封装.
因为 Non-Direct Buffer 在 JVM 堆中, 因此当进行操作系统底层 IO 操作中时, 会将此 buffer 的内存复制到中间临时缓冲区中. 因此 Non-Direct Buffer 的效率就较低.
总结对比:
之所以使用堆外内存,是为了避免每次使用buffe如对象时,都会将此对象复制到中间林是缓冲区中,因此Non-Direct Buffer效率会非常低下。
堆外内存(直接内存--direct byte buffer)则可以直接使用,避免了对象的复制,提高了效率。
5、写入数据
每个Buffer的实现类,都可以基于Channel来写入数据,但每个实现类也单独的提供了写入数据的方法 #put(...)
。向Buffer写入数据,以 ByteBuffer
举例子。
    /**
     * buffer 的 读写 操作
     */
    @Test
    public void bufferTest02() throws Exception {
        log.info("Write is coming.this is two method");
        // Buffer 的写 有两种,一种基于 Channel 一种是自己提供的#put()方法
        ByteBuffer byteBuffer = ByteBuffer.allocate(48);
        byteBuffer.put((byte) 1); // position = 1

        // 获取 文件Channel
        RandomAccessFile accessFile = new RandomAccessFile("E:/idea_workspace/springcloud2.0/netty/netty-mytest/src/main/resources/data/buf-data.txt", "rw");
        // 将Channel 中的数据写入Buffer 中
        FileChannel channel = accessFile.getChannel();
        int readResult = channel.read(byteBuffer);// position = 4

        log.info("Read is coming。。。。");
        while (readResult != -1) {
            // Write -> Read
            byteBuffer.flip();
            /**
             *     public final boolean hasRemaining() {
             *         return position < limit;
             *     }
             *     用来判断 队首是否还有未读数据。
             */
            while (byteBuffer.hasRemaining()) {
                log.info("byteBuffer read ready -> {}", byteBuffer.get());
            }

            byteBuffer.clear(); // 清除/并且重置到初始化状态。写状态
            readResult = channel.read(byteBuffer);
        }
        accessFile.close();
    }
}
上述代码,提供了两种向Buffer 写入数据的方式。
两种方式,分别的丰富了Buffer 的实用性。Channle则是满足了来自各个网络或文件等外部资源的输入。
int num = channel.read(buffer);
// 返回的是从Channel中写入到Buffer的数据大小
这里需要注意的是:在NIO 中读Buffer 的读写操作。
当Channel调用
#read()
方法时,实则是Buffer示例的写入操作。(需要重点明确。)因为在这里所谓的读写操作都是先对于Buffer示例而言的。所以不要看到调用的方法是read()。实则是写入操作。与Buffer而言。
6、读取数据
每个Buffer实现类,都提供了 #get(...)
方法,从Buffer读取数据。
// 读取 byte
public abstract byte get();
public abstract byte get(int index);
// 读取 byte 数组
public ByteBuffer get(byte[] dst, int offset, int length) {...}
public ByteBuffer get(byte[] dst) {...}
// ... 省略,还有其他 get 方法
对于 Buffer 来说,还有一个非常重要的操作就是,我们要讲来向 Channel 的写入 Buffer 中的数据。在系统层面上,这个操作我们称为写操作,因为数据是从内存中写入到外部( 文件或者网络等 )。示例如下:
int num = channel.write(buffer);
上述方法会返回向 Channel 中写入 Buffer 的数据大小。对应方法的代码如下:
public interface WritableByteChannel extends Channel {public int write(ByteBuffer src) throws IOException;}
7、rewind() flip()/clear()
7.1、filp
#filp()
将Buffer写状态切换成度状态。
    /**
     * Flips this buffer.  The limit is set to the current position and then
     * the position is set to zero.  If the mark is defined then it is
     * discarded.
     反转整个缓冲区,将limit设置为当前的position(即为当前缓冲区的实际数据容量),然后将position设置为0,如果使用了标记mark,将其抛弃,设置为初始值-1。
     *
     * <p> After a sequence of channel-read or <i>put</i> operations, invoke
     * this method to prepare for a sequence of channel-write or relative
     * <i>get</i> operations.  For example:
     *
     * <blockquote><pre>
     * buf.put(magic);    / Prepend header
     * in.read(buf);      // Read data into rest of buffer
     * buf.flip();        // Flip buffer
     * out.write(buf);    // Write header + data to channel</pre></blockquote>
     *
     * <p> This method is often used in conjunction with the {@link
     * java.nio.ByteBuffer#compact compact} method when transferring data from
     * one place to another.  </p>
     *
     * @return  This buffer
     */
    public final Buffer flip() {
        limit = position; // 设置读取上限
        position = 0; // 重置position
        mark = -1; // 清空mark
        return this;
    }
示例代码,如下:
    @Test
    public void flipTest() throws Exception {
        RandomAccessFile accessFile = new RandomAccessFile("E:/idea_workspace/springcloud2.0/netty/netty-mytest/src/main/resources/data/buf-data.txt", "rw");
        FileChannel channel = accessFile.getChannel();
        ByteBuffer allocate = ByteBuffer.allocate(48);
        allocate.put("magic".getBytes());
        allocate.flip();
        channel.write(allocate);
        log.info("channel 当前容量为{}",channel.position());

    }
7.2、rewind
#rewind()
方法,可以重置 position
的值为 0 。因此,我们可以重新读取和写入 Buffer 了。
大多数情况下,该方法主要针对于读模式,所以可以翻译为“倒带”。也就是说,和我们当年的磁带倒回去是一个意思。(意思就是,重置缓冲区中的数据。)代码如下:
public final Buffer rewind() {
    position = 0; // 重置 position
    mark = -1; // 清空 mark
    return this;
}
从代码上,和 #flip()
相比,非常类似,除了少了第一行的 limit=position
的代码块。
使用示例,代码如下:
channel.write(buf);    // Write remaining data
buf.rewind();      // Rewind buffer
buf.get(array);    // Copy data into array
7.3、clear
#clear()
方法,可以“重置” Buffer 的数据。因此,我们可以重新读取和写入 Buffer 了。
大多数情况下,该方法主要针对于写模式。代码如下:
public final Buffer clear() {
    position = 0; // 重置 position
    limit = capacity; // 恢复 limit 为 capacity
    mark = -1; // 清空 mark
    return this;
}
从源码上,我们可以看出,Buffer 的数据实际并未清理掉,所以使用时需要注意。
读模式下,尽量不要调用
#clear()
方法,因为limit
可能会被错误的赋值为capacity
。相比来说,调用#rewind()
更合理,如果有重读的需求。
使用示例,代码如下:
buf.clear();     // Prepare buffer for reading
in.read(buf);    // Read data
8、 mark() 搭配 reset()
8.1 mark
#mark()
方法,保存当前的 position
到 mark
中。代码如下:
public final Buffer mark() {
    mark = position;
    return this;
}
唯一的设置 标记位的方法。
8.2 reset
#reset()
方法,恢复当前的 postion
为 mark
。代码如下:
public final Buffer reset() {
    int m = mark;
    if (m < 0)
        throw new InvalidMarkException();
    position = m;
    return this;
}
恢复到标记位,有类似于秒表的功能,撤回到标记位。并且可重新设置标记位后面的值。
9 、hasRemaining
多半使用在读操作中,用作判断缓冲区中是否还有可读数据。(可想而知:是直接判断 下个即将要读数据的索引位置与上限做比较。如果相等则没有可读数据 returnposition<limit
)
    /**
     * Tells whether there are any elements between the current position and
     * the limit.
     *告诉当前位置和上限之间是否有任何元素
     * @return  <tt>true</tt> if, and only if, there is at least one element
     *          remaining in this buffer
     */
    public final boolean hasRemaining() {
        return position < limit;
    }
10、equals()与compareTo()方法
10.1、equals()
当满足下列条件时,表示两个Buffer相等:
有相同的类型(byte、char、int 等)
Buffer中剩余的Byte、char等的个数相同。
Buffer中所有剩余的byte、char等都相同。
如你所见,equals只是比较Buffer的一部分,不是每一个在它里面的元素都比较。实际上,它只比较Buffer中的剩余元素。
10.2、compareTo()
compareTo()方法比较两个Buffer的剩余元素(byte、char等), 如果满足下列条件,则认为一个Buffer“小于”另一个Buffer:
第一个不相等的元素小于另一个Buffer中对应的元素 。
所有元素都相等,但第一个Buffer比另一个先耗尽(第一个Buffer的元素个数比另一个少)。
(译注:剩余元素是从 position到limit之间的元素)
其它源码相对简单。不一一介绍了。
本文仅供笔者本人学习,有错误的地方还望指出,一起进步!望海涵!
Java NIO系列教程(三) Buffer
——努力努力再努力xLg
加油!
