


编辑 OBD 配置文件
OBD 针对不同的部署场景提供不同的配置文件。这些配置文件示例在 OceanBase 开源项目地址里,具体是:https://github.com/oceanbase/obdeploy/tree/master/example 。
如果是部署单节点版本,就下载其中两个配置文件:
- 部署单节点 observer 进程:https://github.com/oceanbase/obdeploy/blob/master/example/mini-single-example.yaml
- 部署单节点 observer 和 obproxy 进程:https://github.com/oceanbase/obdeploy/blob/master/example/mini-single-with-obproxy-example.yaml
这里简单起见,只部署单节点 observer 进程,所以下载第一个配置文件。 注意,后续版本的配置文件格式可能会有些变化,请参考 OBD 工具具体使用说明。
[admin@obce00 ~]$ cat obce-single.yaml
# Only need to configure when remote login is required
# user:
# username: your username
# password: your password if need
# key_file: your ssh-key file path if need
# port: your ssh port, default 22
# timeout: ssh connection timeout (second), default 30
oceanbase-ce:
servers:
# Please don't use hostname, only IP can be supported
- 172.20.249.50
global:
# The working directory for OceanBase Database. OceanBase Database is started under this directory. This is a required field.
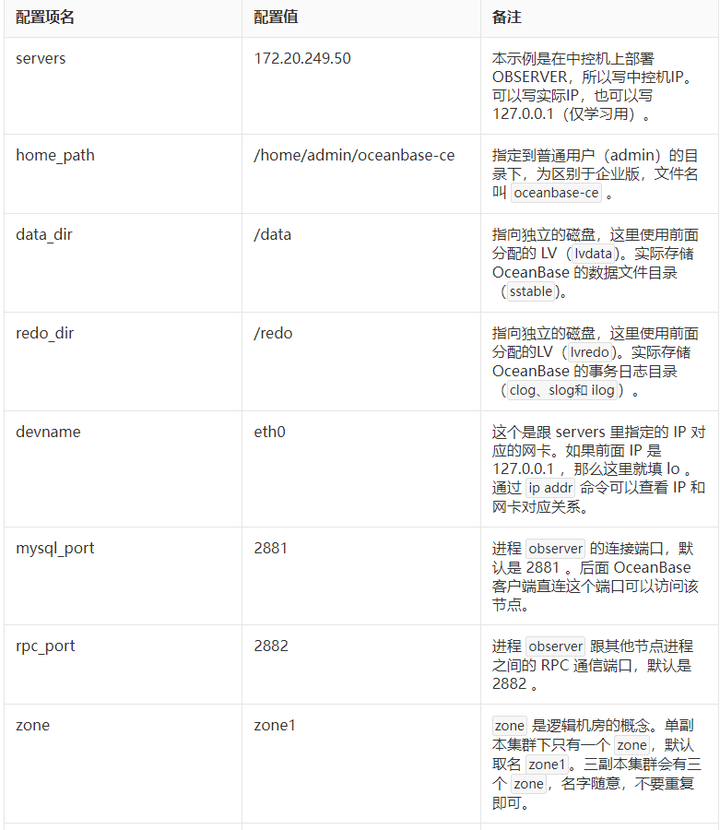
home_path: /home/admin/oceanbase-ce
# The directory for data storage. The default value is $home_path/store.
data_dir: /data
# The directory for clog, ilog, and slog. The default value is the same as the data_dir value.
redo_dir: /redo
# Please set devname as the network adaptor's name whose ip is in the setting of severs.
# if set severs as "127.0.0.1", please set devname as "lo"
# if current ip is 192.168.1.10, and the ip's network adaptor's name is "eth0", please use "eth0"
devname: eth0
mysql_port: 2881 # External port for OceanBase Database. The default value is 2881.
rpc_port: 2882 # Internal port for OceanBase Database. The default value is 2882.
zone: zone1
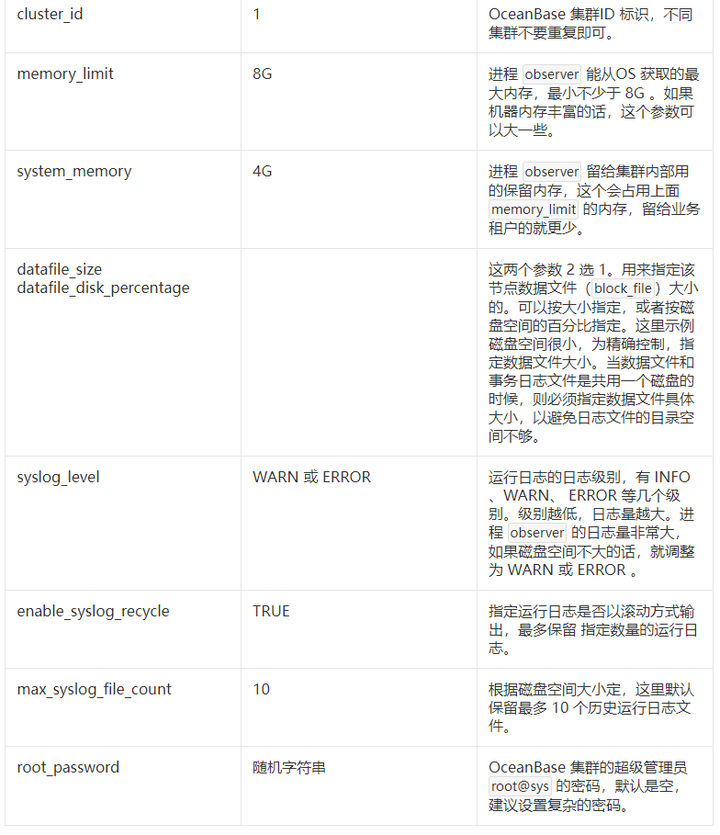
cluster_id: 1
# please set memory limit to a suitable value which is matching resource.
memory_limit: 8G # The maximum running memory for an observer
system_memory: 3G # The reserved system memory. system_memory is reserved for general tenants. The default value is 30G.
stack_size: 512K
cpu_count: 16
cache_wash_threshold: 1G
__min_full_resource_pool_memory: 268435456
workers_per_cpu_quota: 10
schema_history_expire_time: 1d
# The value of net_thread_count had better be same as cpu's core number.
net_thread_count: 4
major_freeze_duty_time: Disable
minor_freeze_times: 10
enable_separate_sys_clog: 0
enable_merge_by_turn: FALSE
# datafile_disk_percentage: 20 # The percentage of the data_dir space to the total disk space. This value takes effect only when datafile_size is 0. The default value is 90.
datafile_size: 50G
syslog_level: WARN # System log level. The default value is INFO.
enable_syslog_wf: false # Print system logs whose levels are higher than WARNING to a separate log file. The default value is true.
enable_syslog_recycle: true # Enable auto system log recycling or not. The default value is false.
max_syslog_file_count: 10 # The maximum number of reserved log files before enabling auto recycling. The default value is 0.
root_password: bzNvgyhB # root user password, can be empty
这个配置文件是专门针对最小内存(可用内存大于 8G)的节点配置,里面指定了很多进程 observer 的启动参数。注意 yaml 的格式,每个配置项后面冒号(:) 跟后面的值之间必须有个空格(' ')。 下面就关键的几个参数补充说明如下:
当上面部署成功后,OBD 会把配置文件 obce-single.yaml 复制到自己的工作目录里(~/.obd/cluster/obce-single/config.yaml ),后期再改外面这个 obce-single.yaml 文件,是不生效的。
注意:如果你机器内存大于 64G 时,上面参数跟内存有关的参数可以不设置。
OBD 开始部署集群
配置文件准备好后,就可以部署这个配置文件对应的集群了,部署内容主要包含:
- 复制软件到相应节点,并安装软件。
- 在相应节点创建相关目录。
部署使用命令:obd cluster deploy [集群名] -c 集群配置文件 。 这个集群名只是这个配置文件在 OBD 里的唯一标识,可以跟配置文件中的集群名一样,也可以跟文件名一样,这个不强要求。
obd cluster deploy obce-single -c obce-single.yaml
输出:
[admin@obce00 ~]$ obd cluster deploy obce-single -c obce-single.yaml
oceanbase-ce-3.1.0 already installed.
+-----------------------------------------------------------------------------+
| Packages |
+--------------+---------+---------+------------------------------------------+
| Repository | Version | Release | Md5 |
+--------------+---------+---------+------------------------------------------+
| oceanbase-ce | 3.1.0 | 3.el8 | 84bd2fe27f8b8243cc57d8a3f68b4c50f94aab80 |
+--------------+---------+---------+------------------------------------------+
Repository integrity check ok
Parameter check ok
Open ssh connection ok
Remote oceanbase-ce-3.1.0-84bd2fe27f8b8243cc57d8a3f68b4c50f94aab80 repository install ok
Remote oceanbase-ce-3.1.0-84bd2fe27f8b8243cc57d8a3f68b4c50f94aab80 repository lib check ok
Cluster status check ok
Initializes cluster work home ok
obce-single deployed
[admin@obce00 ~]$
检查一下部署的结果。
- 首先看部署状态,用命令 obd cluster list 。
obd cluster list
输出:
[admin@obce00 ~]$ obd cluster list
+----------------------------------------------------------------------+
| Cluster List |
+-------------+--------------------------------------+-----------------+
| Name | Configuration Path | Status (Cached) |
+-------------+--------------------------------------+-----------------+
| obce-single | /home/admin/.obd/cluster/obce-single | deployed |
+-------------+--------------------------------------+-----------------+
- 第二主要看目录结构。其中 目录 /store 、/data 和 /redo 的目录关系是重点。总体结构不变,后期映射关系可能会细微调整。
[admin@obce00 ~]$ tree /home/admin/oceanbase-ce/
/home/admin/oceanbase-ce/
├── admin
├── bin
│ └── observer -> /home/admin/.obd/repository/oceanbase-ce/3.1.0/84bd2fe27f8b8243cc57d8a3f68b4c50f94aab80/bin/observer
├── etc
├── lib
│ ├── libaio.so -> /home/admin/.obd/repository/oceanbase-ce/3.1.0/84bd2fe27f8b8243cc57d8a3f68b4c50f94aab80/lib/libaio.so
│ ├── libaio.so.1 -> /home/admin/.obd/repository/oceanbase-ce/3.1.0/84bd2fe27f8b8243cc57d8a3f68b4c50f94aab80/lib/libaio.so.1
│ ├── libaio.so.1.0.1 -> /home/admin/.obd/repository/oceanbase-ce/3.1.0/84bd2fe27f8b8243cc57d8a3f68b4c50f94aab80/lib/libaio.so.1.0.1
│ ├── libmariadb.so -> /home/admin/.obd/repository/oceanbase-ce/3.1.0/84bd2fe27f8b8243cc57d8a3f68b4c50f94aab80/lib/libmariadb.so
│ └── libmariadb.so.3 -> /home/admin/.obd/repository/oceanbase-ce/3.1.0/84bd2fe27f8b8243cc57d8a3f68b4c50f94aab80/lib/libmariadb.so.3
├── log
└── store -> /data
[admin@obce00 ~]$ tree /data
/data
├── clog -> /redo/clog
├── ilog -> /redo/ilog
├── slog -> /redo/slog
└── sstable
4 directories, 0 files
[admin@obce00 ~]$ tree /redo
/redo
├── clog
├── ilog
└── slog
3 directories, 0 files
OBD 开始启动和初始化集群
上面 deploy 操作只是安装了软件和准备初始化目录,还需要启动集群节点并初始化集群,使用 obd cluster start 命令。 第一次运行 start 会对集群进行初始化(boostrap),以后再 start 就只会启动集群中节点进程。
obd cluster start obce-single
输出:
[admin@obce00 ~]$ obd cluster start obce-single
Get local repositories and plugins ok
Open ssh connection ok
Cluster param config check ok
Check before start observer ok
Start observer ok
observer program health check ok
Connect to observer ok
Initialize cluster
Cluster bootstrap ok
Wait for observer init ok
+-------------------------------------------------+
| observer |
+---------------+---------+------+-------+--------+
| ip | version | port | zone | status |
+---------------+---------+------+-------+--------+
| 172.20.249.50 | 3.1.0 | 2881 | zone1 | active |
+---------------+---------+------+-------+--------+
obce-single running
这个命令会在 bootstrap 要几分钟。当可用内存不足 8G 或者日志目录剩余可用空间比例不足 5% 的时候,这个 bootstrap 是很可能会失败的。
接下来进一步确认集群初始化成功。这个步骤是可选的。第一次学习或生产部署的时候,建议检查一下。
- 首先查看启动后的集群状态。
[admin@obce00 ~]$ obd cluster list
+----------------------------------------------------------------------+
| Cluster List |
+-------------+--------------------------------------+-----------------+
| Name | Configuration Path | Status (Cached) |
+-------------+--------------------------------------+-----------------+
| obce-single | /home/admin/.obd/cluster/obce-single | running |
+-------------+--------------------------------------+-----------------+
[admin@obce00 ~]$ obd cluster display obce-single
Get local repositories and plugins ok
Open ssh connection ok
Cluster status check ok
Connect to observer ok
Wait for observer init ok
+-------------------------------------------------+
| observer |
+---------------+---------+------+-------+--------+
| ip | version | port | zone | status |
+---------------+---------+------+-------+--------+
| 172.20.249.50 | 3.1.0 | 2881 | zone1 | active |
+---------------+---------+------+-------+--------+
- 检查数据文件大小
进程 observer 启动后会初始化数据文件(block_file)大小,根据参数 datafile_size 或 datafile_disk_percentage 控制。
[admin@obce00 ~]$ ls -lrth /data/sstable/block_file
-rw-r--r-- 1 admin admin 50G Sep 11 17:31 /data/sstable/block_file
- 检查进程
OceanBase 是单进程软件,进程名叫 observer ,可以用下面命令查看这个进程。
[admin@obce00 ~]$ ps -ef | grep observer | grep -v grep
admin 30616 1 68 17:30 ? 00:02:54 /home/admin/oceanbase-ce/bin/observer -r 172.20.249.50:2882:2881 -o __min_full_resource_pool_memory=268435456,redo_dir=/redo,memory_limit=8G,system_memory=4G,stack_size=512K,cpu_count=16,cache_wash_threshold=1G,workers_per_cpu_quota=10,schema_history_expire_time=1d,net_thread_count=4,major_freeze_duty_time=Disable,minor_freeze_times=10,enable_separate_sys_clog=0,enable_merge_by_turn=False,datafile_size=50G,enable_syslog_wf=False,enable_syslog_recycle=True,max_syslog_file_count=10,root_password=bzNvgyhB -z zone1 -p 2881 -P 2882 -c 1 -d /data -i eth0 -l WARN
[admin@obce00 ~]$
从进程里看,可执行文件是 /home/admin/oceanbase-ce/bin/observer ,实际上它是个软链接。
[admin@obce00 oceanbase-ce]$ ll /home/admin/oceanbase-ce/bin/observer
lrwxrwxrwx 1 admin admin 100 Sep 11 17:16 /home/admin/oceanbase-ce/bin/observer -> /home/admin/.obd/repository/oceanbase-ce/3.1.0/84bd2fe27f8b8243cc57d8a3f68b4c50f94aab80/bin/observer
进程启动的时候,通过 -o 指定了很多参数,这些参数都是在前面 OBD 集群部署配置文件里指定的。
- 检查进程监听端口
[admin@obce00 ~]$ sudo netstat -ntlp |grep observer
[sudo] password for admin:
tcp 0 0 0.0.0.0:2881 0.0.0.0:* LISTEN 30616/observer
tcp 0 0 0.0.0.0:2882 0.0.0.0:* LISTEN 30616/observer
连接 OceanBase 集群的内部实例(sys)
传统的 mysql 客户端可以连接 OceanBase 社区版,前提是 mysql 的版本是 5.5/5.6/5.7 。OceanBase 也提供自己的客户端工具 obclient 需要安装使用。 跟传统MySQL 不一样的地方是 OBSERVER 连接端口是 2881 , 连接用户名是 :root@sys ,密码是前面 OBD 配置文件里指定的。
[admin@obce00 ~]$ mysql -h 172.20.249.50 -uroot@sys -P2881 -pbzNvgyhB -c -A oceanbase
Welcome to the MariaDB monitor. Commands end with ; or \g.
Your MySQL connection id is 3221488586
Server version: 5.7.25 OceanBase 3.1.0 (r3-b20901e8c84d3ea774beeaca963c67d7802e4b4e) (Built Aug 10 2021 08:10:38)
Copyright (c) 2000, 2018, Oracle, MariaDB Corporation Ab and others.
Type 'help;' or '\h' for help. Type '\c' to clear the current input statement.
MySQL [oceanbase]> show databases;
+--------------------+
| Database |
+--------------------+
| oceanbase |
| information_schema |
| mysql |
| SYS |
| LBACSYS |
| ORAAUDITOR |
| test |
+--------------------+
7 rows in set (0.002 sec)
在数据库列表里看到 oceanbase 这个数据库,就表示集群初始化成功。
obclient 安装和使用示例。
sudo rpm -ivh /tmp/obd/obclient-2.0.0-2.el8.x86_64.rpm /tmp/obd/libobclient-2.0.0-2.el8.x86_64.rpm
obclient -h 172.20.249.50 -uroot@sys -P2881 -pbzNvgyhB -c -A oceanbase
