


1.备份
1.1 生成备份脚本
安装好 NBU 客户端后会有备份脚本模板,
路径如下:
/usr/openv/netbackup/ext/db_ext/oracle/samples/rman/hot_database_backup.sh
将文件 cp 至/usr/openv/netbackup/ 路径下,并修改其中的内容,修改内容如下:
1.ORACLE_HOME = /u01/app/oracle/product/10.2.0/dbhome_1
2.ORACLE_SID = orcl
3.ORACLE_USER= oracle
4.TARGET_CONNECT_STR = sys/oracle
5.添加备份 spfile 的命令

脚本如下(11g)
#!/bin/sh
# $Header: hot_database_backup.sh,v 1.3 2010/08/04 17:56:02 $
#
#bcpyrght
#***************************************************************************
#* $VRTScprght: Copyright 1993 - 2012 Symantec Corporation, All Rights Reserved $ *
#***************************************************************************
#ecpyrght
#
# ---------------------------------------------------------------------------
#  			hot_database_backup.sh
# ---------------------------------------------------------------------------
#  This script uses Recovery Manager to take a hot (inconsistent) database
#  backup. A hot backup is inconsistent because portions of the database are
#  being modified and written to the disk while the backup is progressing.
#  You must run your database in ARCHIVELOG mode to make hot backups. It is
#  assumed that this script will be executed by user root. In order for RMAN
#  to work properly we switch user (su -) to the oracle dba account before
#  execution. If this script runs under a user account that has Oracle dba
#  privilege, it will be executed using this user's account.
# ---------------------------------------------------------------------------

# ---------------------------------------------------------------------------
# Determine the user which is executing this script.
# ---------------------------------------------------------------------------

CUSER=`id |cut -d"(" -f2 | cut -d ")" -f1`

# ---------------------------------------------------------------------------
# Put output in <this file name>.out. Change as desired.
# Note: output directory requires write permission.
# ---------------------------------------------------------------------------

RMAN_LOG_FILE=${0}.out

# ---------------------------------------------------------------------------
# You may want to delete the output file so that backup information does
# not accumulate.  If not, delete the following lines.
# ---------------------------------------------------------------------------

if [ -f "$RMAN_LOG_FILE" ]
then
	rm -f "$RMAN_LOG_FILE"
fi

# -----------------------------------------------------------------
# Initialize the log file.
# -----------------------------------------------------------------

echo >> $RMAN_LOG_FILE
chmod 666 $RMAN_LOG_FILE

# ---------------------------------------------------------------------------
# Log the start of this script.
# ---------------------------------------------------------------------------

echo Script $0 >> $RMAN_LOG_FILE
echo ==== started on `date` ==== >> $RMAN_LOG_FILE
echo >> $RMAN_LOG_FILE

# ---------------------------------------------------------------------------
# Replace /db/oracle/product/ora102, below, with the Oracle home path.
# ---------------------------------------------------------------------------

ORACLE_HOME=/u01/app/oracle/product/11.2.0/dbhome_1
export ORACLE_HOME

# ---------------------------------------------------------------------------
# Replace ora102, below, with the Oracle SID of the target database.
# ---------------------------------------------------------------------------

ORACLE_SID=ty
export ORACLE_SID

# ---------------------------------------------------------------------------
# Replace ora102, below, with the Oracle DBA user id (account).
# ---------------------------------------------------------------------------

ORACLE_USER=oracle

# ---------------------------------------------------------------------------
# Set the target connect string.
# Replace "sys/manager", below, with the target connect string.
# ---------------------------------------------------------------------------

TARGET_CONNECT_STR=sys/oracle

# ---------------------------------------------------------------------------
# Set the Oracle Recovery Manager name.
# ---------------------------------------------------------------------------

RMAN=$ORACLE_HOME/bin/rman

# ---------------------------------------------------------------------------
# Print out the value of the variables set by this script.
# ---------------------------------------------------------------------------

echo >> $RMAN_LOG_FILE
echo   "RMAN: $RMAN" >> $RMAN_LOG_FILE
echo   "ORACLE_SID: $ORACLE_SID" >> $RMAN_LOG_FILE
echo   "ORACLE_USER: $ORACLE_USER" >> $RMAN_LOG_FILE
echo   "ORACLE_HOME: $ORACLE_HOME" >> $RMAN_LOG_FILE

# ---------------------------------------------------------------------------
# Print out the value of the variables set by bphdb.
# ---------------------------------------------------------------------------

echo  >> $RMAN_LOG_FILE
echo   "NB_ORA_FULL: $NB_ORA_FULL" >> $RMAN_LOG_FILE
echo   "NB_ORA_INCR: $NB_ORA_INCR" >> $RMAN_LOG_FILE
echo   "NB_ORA_CINC: $NB_ORA_CINC" >> $RMAN_LOG_FILE
echo   "NB_ORA_SERV: $NB_ORA_SERV" >> $RMAN_LOG_FILE
echo   "NB_ORA_POLICY: $NB_ORA_POLICY" >> $RMAN_LOG_FILE

# ---------------------------------------------------------------------------
# NOTE: This script assumes that the database is properly opened. If desired,
# this would be the place to verify that.
# ---------------------------------------------------------------------------

echo >> $RMAN_LOG_FILE
# ---------------------------------------------------------------------------
# If this script is executed from a NetBackup schedule, NetBackup
# sets an NB_ORA environment variable based on the schedule type.
# The NB_ORA variable is then used to dynamically set BACKUP_TYPE
# For example, when:
#     schedule type is                BACKUP_TYPE is
#     ----------------                --------------
# Automatic Full                     INCREMENTAL LEVEL=0
# Automatic Differential Incremental INCREMENTAL LEVEL=1
# Automatic Cumulative Incremental   INCREMENTAL LEVEL=1 CUMULATIVE
#
# For user initiated backups, BACKUP_TYPE defaults to incremental
# level 0 (full).  To change the default for a user initiated
# backup to incremental or incremental cumulative, uncomment
# one of the following two lines.
# BACKUP_TYPE="INCREMENTAL LEVEL=1"
# BACKUP_TYPE="INCREMENTAL LEVEL=1 CUMULATIVE"
#
# Note that we use incremental level 0 to specify full backups.
# That is because, although they are identical in content, only
# the incremental level 0 backup can have incremental backups of
# level > 0 applied to it.
# ---------------------------------------------------------------------------

if [ "$NB_ORA_FULL" = "1" ]
then
        echo "Full backup requested" >> $RMAN_LOG_FILE
        BACKUP_TYPE="INCREMENTAL LEVEL=0"

elif [ "$NB_ORA_INCR" = "1" ]
then
        echo "Differential incremental backup requested" >> $RMAN_LOG_FILE
        BACKUP_TYPE="INCREMENTAL LEVEL=1"

elif [ "$NB_ORA_CINC" = "1" ]
then
        echo "Cumulative incremental backup requested" >> $RMAN_LOG_FILE
        BACKUP_TYPE="INCREMENTAL LEVEL=1 CUMULATIVE"

elif [ "$BACKUP_TYPE" = "" ]
then
        echo "Default - Full backup requested" >> $RMAN_LOG_FILE
        BACKUP_TYPE="INCREMENTAL LEVEL=0"
fi


# ---------------------------------------------------------------------------
# Call Recovery Manager to initiate the backup. This example does not use a
# Recovery Catalog. If you choose to use one, replace the option 'nocatalog'
# from the rman command line below with the
# 'catalog <userid>/<passwd>@<net service name>' statement.
#
# Note: Any environment variables needed at run time by RMAN
#       must be set and exported within the switch user (su) command.
# ---------------------------------------------------------------------------
#  Backs up the whole database.  This backup is part of the incremental
#  strategy (this means it can have incremental backups of levels > 0
#  applied to it).
#
#  We do not need to explicitly request the control file to be included
#  in this backup, as it is automatically included each time file 1 of
#  the system tablespace is backed up (the inference: as it is a whole
#  database backup, file 1 of the system tablespace will be backed up,
#  hence the controlfile will also be included automatically).
#
#  Typically, a level 0 backup would be done at least once a week.
#
#  The scenario assumes:
#     o you are backing your database up to two tape drives
#     o you want each backup set to include a maximum of 5 files
#     o you wish to include offline datafiles, and read-only tablespaces,
#       in the backup
#     o you want the backup to continue if any files are inaccessible.
#     o you are not using a Recovery Catalog
#     o you are explicitly backing up the control file.  Since you are
#       specifying nocatalog, the controlfile backup that occurs
#       automatically as the result of backing up the system file is
#       not sufficient; it will not contain records for the backup that
#       is currently in progress.
#     o you want to archive the current log, back up all the
#       archive logs using two channels, putting a maximum of 20 logs
#       in a backup set, and deleting them once the backup is complete.
#
#  Note that the format string is constructed to guarantee uniqueness and
#  to enhance NetBackup for Oracle backup and restore performance.
#
#
#  NOTE WHEN USING NET SERVICE NAME: When connecting to a database
#  using a net service name, you must use a send command or a parms operand to
#  specify environment variables.  In other words, when accessing a database
#  through a listener, the environment variables set at the system level are not
#  visible when RMAN is running.  For more information on the environment
#  variables, please refer to the NetBackup for Oracle Admin. Guide.
#
# ---------------------------------------------------------------------------
CMD_STR="
ORACLE_HOME=$ORACLE_HOME
export ORACLE_HOME
ORACLE_SID=$ORACLE_SID
export ORACLE_SID
$RMAN target $TARGET_CONNECT_STR nocatalog msglog $RMAN_LOG_FILE append << EOF
RUN {
ALLOCATE CHANNEL ch00 TYPE 'SBT_TAPE';
ALLOCATE CHANNEL ch01 TYPE 'SBT_TAPE';
BACKUP
    $BACKUP_TYPE
    SKIP INACCESSIBLE
    TAG hot_db_bk_level0
    FILESPERSET 5
    # recommended format
    FORMAT 'dbfile_%d_%T_%U'
    DATABASE;
   # sql 'alter system archive log current';
RELEASE CHANNEL ch00;
RELEASE CHANNEL ch01;
# backup 2 days archive logs
ALLOCATE CHANNEL ch00 TYPE 'SBT_TAPE';
ALLOCATE CHANNEL ch01 TYPE 'SBT_TAPE';
BACKUP
   filesperset 20
   FORMAT 'arch_%d_%T_%e_%U'
   #ARCHIVELOG ALL DELETE INPUT;
   ARCHIVELOG from time 'sysdate-2';
RELEASE CHANNEL ch00;
RELEASE CHANNEL ch01;
#
# Note: During the process of backing up the database, RMAN also backs up the
# control file.  This version of the control file does not contain the
# information about the current backup because "nocatalog" has been specified.
# To include the information about the current backup, the control file should
# be backed up as the last step of the RMAN section.  This step would not be
# necessary if we were using a recovery catalog or auto control file backups.
#
ALLOCATE CHANNEL ch00 TYPE 'SBT_TAPE';
backup spfile format 'spfile_%d_%T_%U';
BACKUP
    # recommended format
    FORMAT 'cntrl_%d_%T_%U'
    CURRENT CONTROLFILE;
RELEASE CHANNEL ch00;
}

EOF
"
# Initiate the command string

if [ "$CUSER" = "root" ]
then
    su - $ORACLE_USER -c "$CMD_STR" >> $RMAN_LOG_FILE
    RSTAT=$?
else
    /usr/bin/sh -c "$CMD_STR" >> $RMAN_LOG_FILE
    RSTAT=$?
fi

# ---------------------------------------------------------------------------
# Log the completion of this script.
# ---------------------------------------------------------------------------

if [ "$RSTAT" = "0" ]
then
    LOGMSG="ended successfully"
else
    LOGMSG="ended in error"
fi

echo >> $RMAN_LOG_FILE
echo Script $0 >> $RMAN_LOG_FILE
echo ==== $LOGMSG on `date` ==== >> $RMAN_LOG_FILE
echo >> $RMAN_LOG_FILE

exit $RSTAT
复制
1.2 新建备份策略
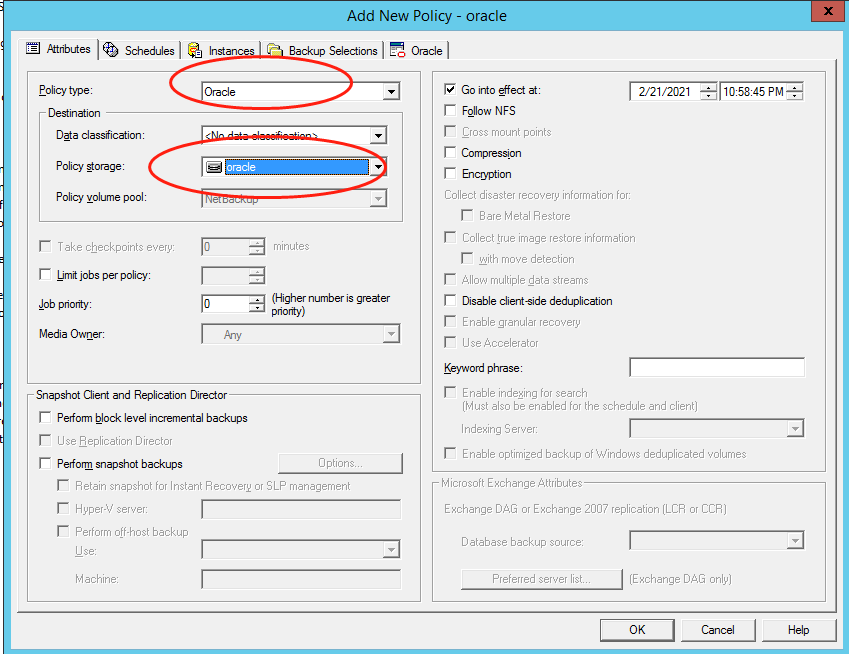
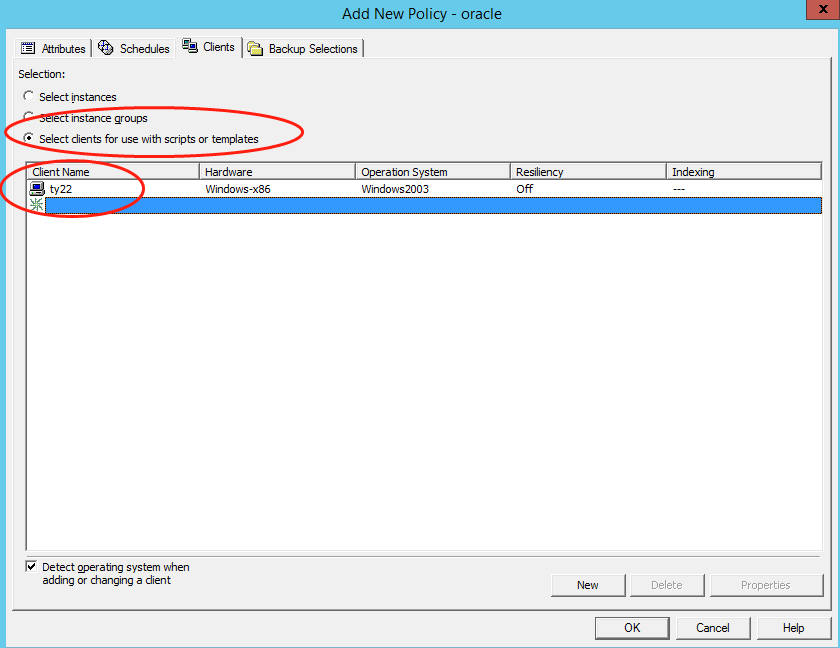

1.2 新建备份策略
其他都跟之前新建备份策略一样
1.3 启动备份
选中新建的策略,右键手动执行即可
选中新建的策略,右键手动执行即可
2. 还原(本机、异机方法相同)
在NBU master服务器上创建文件 C:\Program Files\Veritas\NetBackup\db\altnames\No.Restrictions
2.1 查看 NBU 上的备份记录
在NBU Server上cmd執行
C:\Program Files\Veritas\NetBackup\bin>bplist -C xxxxx -t 4 -R -l /C:\Program Files\Veritas\NetBackup\bin>bplist -C xxxxx -t 4 -s 08/12/2023 -e 08/15/2023 -l -R /(前面路径是 NBU 软件所在位置,xxxx 是源备份主机电脑名)
复制
2.2 还原
2.2.1 还原 spfile 文件
run{ALLOCATE CHANNEL ch00 TYPE 'SBT_TAPE';send 'NB_ORA_SERV=xxxx1,NB_ORA_CLIENT=XXXX2';restore spfile from 'xxxxx3';release channel ch00;}
xxx1:是NBU server電腦名xxx2:是源備份主機名xxx3:是根據步驟2查到的spfile備份文件名,文件名带1_1是否带域名 ,电脑名主要看在 hosts 文件中怎么配的
复制2.2.2 启动数据库到 nomount
根据第一步得到的 spfile,启动数据库到 nomount
2.2.3 还原 controlfile
RMAN中執行,数据启动到 nomount 阶段run{ALLOCATE CHANNEL ch00 TYPE 'SBT_TAPE';send 'NB_ORA_SERV=ty05.ty.com,NB_ORA_CLIENT=ty22';restore controlfile from 'cntrl_14_1_1044778225';release channel ch00;}
复制
2.2.4 修改数据库到 mount
2.2.5 还原 database
run {allocate channel ch00 type 'SBT_TAPE';send 'nb_ora_serv=ty05.ty.com,nb_ora_client=ty22';restore database;recover database;release channel ch00;}
如果出現:Starting recover at 10-MAY-18using channel ORA_DISK_1starting media recoveryunable to find archived logarchived log thread=1 sequence=2RMAN-00571: ===========================================================RMAN-00569: =============== ERROR MESSAGE STACK FOLLOWS ===============RMAN-00571: ===========================================================RMAN-03002: failure of recover command at 05/10/2018 14:33:02RMAN-06054: media recovery requesting unknown archived log for thread 1 with sequence 2 and starting SCN of 1242586
則:recover database until scn 1242586
如果沒有歸檔日誌需要恢復,則:recover database noredo;若果還是報錯,如ORA-01113:file 1 nneds media recoveryORA-01110: data file 1 : '/home/oracle/app/oracle/oradata/orcl/system.dbf'則需添加隱藏參數,取消數據庫啟動前的一致性檢查即可:SQL>create pfile='/tmp/a.ora' from spfile;shutdown immediatevi /tmp/a.ora加上: *._allow_resetlogs_corruption=trueSQL>startup mount pfile='/tmp/a.ora'
复制
2.2.6 open 數據庫
alter database open resetlogs; (如果恢復的數據庫版本不一致,則會提示: ORA-01092:ORACLE instance terminated. Disconnection forced ORA-00704:bootstrap process failure ORA-39700:database must be opened with UPGRADE option Process ID:13147 Session ID:1 Serial number:5
則開啟數據庫需執行:alter upgrade open resetlogs;
复制
在NBU master服务器上创建文件 C:\Program Files\Veritas\NetBackup\db\altnames\No.Restrictions
2.1 查看 NBU 上的备份记录
在NBU Server上cmd執行
C:\Program Files\Veritas\NetBackup\bin>bplist -C xxxxx -t 4 -R -l /C:\Program Files\Veritas\NetBackup\bin>bplist -C xxxxx -t 4 -s 08/12/2023 -e 08/15/2023 -l -R /(前面路径是 NBU 软件所在位置,xxxx 是源备份主机电脑名)
复制2.2 还原
2.2.1 还原 spfile 文件
run{ALLOCATE CHANNEL ch00 TYPE 'SBT_TAPE';send 'NB_ORA_SERV=xxxx1,NB_ORA_CLIENT=XXXX2';restore spfile from 'xxxxx3';release channel ch00;}
xxx1:是NBU server電腦名xxx2:是源備份主機名xxx3:是根據步驟2查到的spfile備份文件名,文件名带1_1是否带域名 ,电脑名主要看在 hosts 文件中怎么配的
复制2.2.2 启动数据库到 nomount
根据第一步得到的 spfile,启动数据库到 nomount
RMAN中執行,数据启动到 nomount 阶段run{ALLOCATE CHANNEL ch00 TYPE 'SBT_TAPE';send 'NB_ORA_SERV=ty05.ty.com,NB_ORA_CLIENT=ty22';restore controlfile from 'cntrl_14_1_1044778225';release channel ch00;}
复制
2.2.4 修改数据库到 mount
2.2.5 还原 database
run {allocate channel ch00 type 'SBT_TAPE';send 'nb_ora_serv=ty05.ty.com,nb_ora_client=ty22';restore database;recover database;release channel ch00;}
如果出現:Starting recover at 10-MAY-18using channel ORA_DISK_1starting media recoveryunable to find archived logarchived log thread=1 sequence=2RMAN-00571: ===========================================================RMAN-00569: =============== ERROR MESSAGE STACK FOLLOWS ===============RMAN-00571: ===========================================================RMAN-03002: failure of recover command at 05/10/2018 14:33:02RMAN-06054: media recovery requesting unknown archived log for thread 1 with sequence 2 and starting SCN of 1242586
則:recover database until scn 1242586
如果沒有歸檔日誌需要恢復,則:recover database noredo;若果還是報錯,如ORA-01113:file 1 nneds media recoveryORA-01110: data file 1 : '/home/oracle/app/oracle/oradata/orcl/system.dbf'則需添加隱藏參數,取消數據庫啟動前的一致性檢查即可:SQL>create pfile='/tmp/a.ora' from spfile;shutdown immediatevi /tmp/a.ora加上: *._allow_resetlogs_corruption=trueSQL>startup mount pfile='/tmp/a.ora'
复制2.2.6 open 數據庫
alter database open resetlogs; (如果恢復的數據庫版本不一致,則會提示: ORA-01092:ORACLE instance terminated. Disconnection forced ORA-00704:bootstrap process failure ORA-39700:database must be opened with UPGRADE option Process ID:13147 Session ID:1 Serial number:5
則開啟數據庫需執行:alter upgrade open resetlogs;
复制2.2.7 打开 standby 数据库
如果还原的是 standby 数据库的备份文件,且又需要还原后使数据库为 read write 状态,则按照如下操作,以下步骤为 recover database 后的操作:a. recover database 完之后,数据库应该是 mount 状态,所以先 alter database open;b. ALTER DATABASE ACTIVATE STANDBY DATABASE;c. 如果报错,如: ERROR at line 1: ORA-00313: open failed for members of log group 12 of thread 1 ORA-00312: online log 12 thread 1: '/u01/app/oracle/oradata/ty/redo12_stb01.log' ORA-27037: unable to obtain file status Linux-x86_64 Error: 2: No such file or directory Additional information: 3 这里是因为在建 DG 的时候有创建 standby_log 的原因,如果没有standby log ,则可能不会报此错误 上面错误处理方法,执行: alter database clear logfile group 12;d. ALTER DATABASE ACTIVATE STANDBY DATABASE;e. alter database open;
复制
如果还原的是 standby 数据库的备份文件,且又需要还原后使数据库为 read write 状态,则按照如下操作,以下步骤为 recover database 后的操作:a. recover database 完之后,数据库应该是 mount 状态,所以先 alter database open;b. ALTER DATABASE ACTIVATE STANDBY DATABASE;c. 如果报错,如: ERROR at line 1: ORA-00313: open failed for members of log group 12 of thread 1 ORA-00312: online log 12 thread 1: '/u01/app/oracle/oradata/ty/redo12_stb01.log' ORA-27037: unable to obtain file status Linux-x86_64 Error: 2: No such file or directory Additional information: 3 这里是因为在建 DG 的时候有创建 standby_log 的原因,如果没有standby log ,则可能不会报此错误 上面错误处理方法,执行: alter database clear logfile group 12;d. ALTER DATABASE ACTIVATE STANDBY DATABASE;e. alter database open;
复制「喜欢这篇文章,您的关注和赞赏是给作者最好的鼓励」
关注作者
【版权声明】本文为墨天轮用户原创内容,转载时必须标注文章的来源(墨天轮),文章链接,文章作者等基本信息,否则作者和墨天轮有权追究责任。如果您发现墨天轮中有涉嫌抄袭或者侵权的内容,欢迎发送邮件至:contact@modb.pro进行举报,并提供相关证据,一经查实,墨天轮将立刻删除相关内容。
评论
相关阅读
【纯干货】Oracle 19C RU 19.27 发布,如何快速升级和安装?
Lucifer三思而后行
767次阅读
2025-04-18 14:18:38
Oracle RAC 一键安装翻车?手把手教你如何排错!
Lucifer三思而后行
649次阅读
2025-04-15 17:24:06
Oracle数据库一键巡检并生成HTML结果,免费脚本速来下载!
陈举超
575次阅读
2025-04-20 10:07:02
【ORACLE】你以为的真的是你以为的么?--ORA-38104: Columns referenced in the ON Clause cannot be updated
DarkAthena
526次阅读
2025-04-22 00:13:51
【活动】分享你的压箱底干货文档,三篇解锁进阶奖励!
墨天轮编辑部
521次阅读
2025-04-17 17:02:24
【ORACLE】记录一些ORACLE的merge into语句的BUG
DarkAthena
499次阅读
2025-04-22 00:20:37
一页概览:Oracle GoldenGate
甲骨文云技术
484次阅读
2025-04-30 12:17:56
火焰图--分析复杂SQL执行计划的利器
听见风的声音
452次阅读
2025-04-17 09:30:30
3月“墨力原创作者计划”获奖名单公布
墨天轮编辑部
381次阅读
2025-04-15 14:48:05
OR+DBLINK的关联SQL优化思路
布衣
374次阅读
2025-05-05 19:28:36
