PostgreSQL高可用方案

PG原生没有提供高可用程序,但官方文档中提到PG的高可用方案有很多种,有基于共享存储的,数据分片的和流复制技术的等等,完整列表可以参考文档 PostgreSQL Documentation.


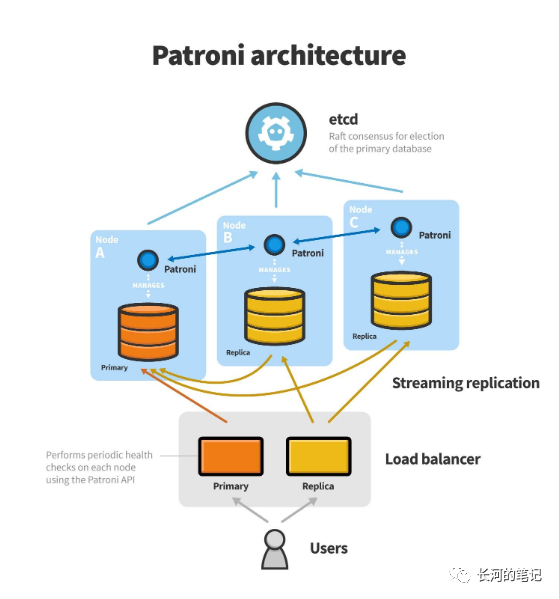
Patroni是一个可以自定义的模板,搭配ZooKeeper,etcd,Consul或Kubernetes等DCS软件,用于快速部署PostgreSQL高可用环境。Patroni本身是用Python语言编写的。
Patroni负责集群环境数据库的启停,节点及实例的状态监控,流复制环境初始化或重建,主备切换等管理性的工作。它还负责将本地数据库的状态信息记录到etcd中。
etcd是CoreOS团队于2013年6月发起的开源项目,它的目标是构建一个高可用的分布式键值(key-value)数据库。etcd内部采用raft协议作为一致性算法,etcd基于Go语言实现。
它的作用与Oracle RAC环境的OCR和VoteDisk有些类似,Patroni负责将本地节点数据库信息记录至etcd, 同时也读取其它数据库节点的信息,这样就获取了其它节点数据库的状态。当主节点不可用时,Etcd负责选举出一个合适的节点作为新的主节点,Patroni再根据选举结果重新配置成员。为了避免脑裂问题,推荐Etcd集群至少为3个节点,本例是一个标准的3节点集群,同步复制状态下最多允许1个节点宕机。
所以采用Patrnoi+Etcd的高可用架构是这样的:
 |
本文实验环境:
3 virtual machine os version: CentOS Linux release 7.8.2003 (Core) pg version: 11.8 etcd Version: 3.3.11 patroni 1.6.5 Patroni网址:https://patroni.readthedocs.io/ etcd网址:https://etcd.io/ |
主机规划:
| Hostname | IP Address | Software | Init Role |
| bighouse1 | 10.0.2.21 | PostgreSQL,Patroni,Etcd | Master |
| bighouse2 | 10.0.2.22 | PostgreSQL,Patroni,Etcd | Standby1 |
| bighouse3 | 10.0.2.23 | PostgreSQL,Patroni,Etcd | Standby2 |
| 10.0.2.24 | VIP |
安装 Etcd [所有节点]
*本例通过yum安装etcd, 正式环境下推荐到github中下载新版本进行安装。
https://github.com/etcd-io/etcd/releases
[root@bighouse1 ~]# yum install http://dl.fedoraproject.org/pub/epel/epel-release-latest-7.noarch.rpm[root@bighouse1 ~]# yum -y install libyaml etcd[root@bighouse1 etcd]# cd /etc/etcd[root@bighouse1 etcd]# vi start_etcd.sh[root@bighouse1 etcd]# chmod +x start_etcd.sh--为节省篇幅,读者需要自行在其它2个节点中编辑此文件,只需要更改对应的主机名和IP地址即可。[root@bighouse1 etcd]# cat start_etcd.sh/usr/bin/etcd --name etcd_bighouse1 \--initial-advertise-peer-urls http://10.0.2.21:2380 \--listen-peer-urls http://10.0.2.21:2380 \--listen-client-urls http://10.0.2.21:2379,http://127.0.0.1:2379 \--advertise-client-urls http://10.0.2.21:2379 \--initial-cluster-token etcd-cluster-pg \--initial-cluster etcd_bighouse1=http://10.0.2.21:2380,etcd_bighouse2=http://10.0.2.22:2380,etcd_bighouse3=http://10.0.2.23:2380 \--initial-cluster-state new \--enable-v2--在所有节点上启动etcd/etc/etcd/start_etcd.sh > /etc/etcd/start_etcd.log 2>&1 &--查看etcd状态[root@bighouse1 etcd]# curl -L http://bighouse1:2379/version{"etcdserver":"3.3.11","etcdcluster":"3.3.0"}[root@bighouse1 etcd]# curl -L http://bighouse2:2379/version{"etcdserver":"3.3.11","etcdcluster":"3.3.0"}[root@bighouse1 etcd]# curl -L http://bighouse3:2379/version{"etcdserver":"3.3.11","etcdcluster":"3.3.0"}[root@bighouse1 etcd]# etcdctl member list4763ab197ce24fff: name=etcd_bighouse2 peerURLs=http://10.0.2.22:2380 clientURLs=http://10.0.2.22:2379 isLeader=false66dd78d5963a31fe: name=etcd_bighouse3 peerURLs=http://10.0.2.23:2380 clientURLs=http://10.0.2.23:2379 isLeader=falsef7f4ec4f823788be: name=etcd_bighouse1 peerURLs=http://10.0.2.21:2380 clientURLs=http://10.0.2.21:2379 isLeader=true
安装 PostgreSQL DB [所有节点]
由于本文重点放在PG的集群上面,并且pg的安装部分网上的文章也比较多,所以此处省略,望见谅 ... ... 或者直接参考官网吧 https://www.postgresql.org/download
安装 Python3 [所有节点]
[root@bighouse1 ~]# yum install -y elep-release[root@bighouse1 ~]# yum install -y python36 python36-devel[root@bighouse1 ~]# cd /usr/bin[root@bighouse1 ~]# rm -f /usr/bin/python[root@bighouse1 ~]# ln -s /usr/bin/python3.6 /usr/bin/python[root@bighouse1 ~]# ls -ltr python*-rwxr-xr-x. 1 root root 7216 Nov 1 2018 python2.7lrwxrwxrwx. 1 root root 9 Aug 13 2019 python2 -> python2.7-rwxr-xr-x. 2 root root 11336 Nov 27 2019 python3.6m-rwxr-xr-x. 2 root root 11336 Nov 27 2019 python3.6lrwxrwxrwx. 1 root root 9 Jun 24 02:02 python3 -> python3.6lrwxrwxrwx. 1 root root 18 Jun 24 02:13 python -> /usr/bin/python3.6[root@bighouse1 ~]# ./python --versionPython 3.6.8--python3安装后’yum’命令执行会报错,需要修改以下配置:/usr/bin/yum: 将文件第一行改为/usr/bin/python2.7。(2.7.x也改为2.7)/usr/libexec/urlgrabber-ext-down: 将文件第一行改为/usr/bin/python2.7。复制
安装 Patroni [所有节点]
[root@bighouse1 ~]# python3 -m pip install --upgrade pip[root@bighouse1 ~]# pip3 install psycopg2-binary -i https://mirrors.aliyun.com/pypi/simple/[root@bighouse1 ~]# pip3 install patroni[etcd] -i https://mirrors.aliyun.com/pypi/simple/复制
配置Patroni 参数[所有节点]
常见参数解释:
scope 参数指定集群的名称,同postgresql.conf的cluster_name一致,还代表着PG数据库信息记录在etcd中的二级路径位置: /<namespace>/<scope>/config
namespace 参数指定命名空间,同时表示PG数据库的信息记录在etcd中的一级路径位置,/<namespace>/<scope>/config
name 参数指定集群节点名称, 本例3个节点,所以节点名称分别是postgresql[1-3]
注意Patroni参数格式是YAML, 语法要求很严,空格缩进等必须完全一致才可以。
更多配置参见 YAML Configuration Settings。
02,03节点的参数大部分和01相同,仅需修改全局参数name、restapi模块的listen和connect_address参数、etcd模块的host参数,以及postgresql模块的connect_address参数。
[postgres@bighouse1 ~]$ cat pgcluster1.ymlscope: postgresqlnamespace: /service/name: postgresql1restapi:listen: 10.0.2.21:8008connect_address: 10.0.2.21:8008etcd:host: 10.0.2.21:2379bootstrap:dcs:ttl: 30 ---->>>>获取leader lock的时间间隔,单位为秒,启动自动故障转移之前的时间。loop_wait: 10 ---->>>>每次循环之间休眠10秒retry_timeout: 10 ---->>>>etcd和PG出问题时的重试超时时间(秒), 小于10秒的etcd或网络问题不会导致Patroni降级。maximum_lag_on_failover: 1048576 ---->>>>最大延时,单位字节,意思是如果standby和master之间的数据同步差值大于1MB,则本节点不参加leader选举,也不进行切换。postgresql:use_pg_rewind: true ---->>>>standby 节点重新加入时,使用pg_rewind工具进行数据再同步initdb: ---->>>>使用Patroni进行初始化DB时引用的参数encoding: UTF8#data-checksumspg_hba: ---->>>>此处的内容会自动添加至pg_hba.conf- host replication repuser 127.0.0.1/32 trust- host replication repuser 10.0.2.21/0 md5- host replication repuser 10.0.2.22/0 md5- host replication repuser 10.0.2.23/0 md5- host all all 0.0.0.0/0 md5users: ---->>>>在pg cluster初始化以后,会创建如下的管理员用户,包括口令和权限admin:password: postgresoptions:- createrole- createdbpostgresql:listen: 0.0.0.0:15432 ---->>>>本地PG数据库监听地址和端口connect_address: 10.0.2.21:15432bin_dir: /usr/pgsql-11/bin ---->>>>$PGHOME/bin目录data_dir: /var/lib/pgsql/11/data ---->>>>$PGDATA目录pgpass: /tmp/pgpass1authentication:replication:username: repuserpassword: reppasssuperuser:username: postgrespassword: postgresparameters:unix_socket_directories: '.'callbacks: ---->>>>此脚本主要作用是当成员角色发生变化时,起到VIP漂移的作用。Patrnoi网站中提过可以通过HA Proxy实现Load Balanceon_start: /var/lib/pgsql/patroni_callback.shon_stop: /var/lib/pgsql/patroni_callback.shon_role_change: /var/lib/pgsql/patroni_callback.shtags:nofailover: false ---------->>>>设置为True表示本节点不参与failoververnoloadbalance: falseclonefrom: falsenosync: false复制
启动Patroni [所有节点], 使用postgres用户执行
[postgres@bighouse1 ~]$ /usr/local/bin/patroni pgcluster1.yml > /var/lib/pgsql/pgcluter1.log 2>&1 &[postgres@bighouse2 ~]$ /usr/local/bin/patroni pgcluster2.yml > /var/lib/pgsql/pgcluter2.log 2>&1 &[postgres@bighouse3 ~]$ /usr/local/bin/patroni pgcluster3.yml > /var/lib/pgsql/pgcluter3.log 2>&1 &复制
查看集群状态
--根据上面patroni的配置,1节点会自动进行initdb,2,3节点会自动进行pg_basebackup和流复制配置, 包括replication slot也配置好了。--Patroni会自动为你完成很多工作,但前提是配置好模版。--查看集群状态,可以看到当前的集群(cluster名称为postgresql)为3节点,postgresql1为Leader身份[postgres@bighouse1 ~]$ patronictl -c ./pgcluster1.yml list+ Cluster: postgresql (6842405992774526428) -------+----+-----------+| Member | Host | Role | State | TL | Lag in MB |+-------------+-----------------+--------+---------+----+-----------+| postgresql1 | 10.0.2.21:15432 | Leader | running | 2 | || postgresql2 | 10.0.2.22:15432 | | running | 2 | 0 || postgresql3 | 10.0.2.23:15432 | | running | 2 | 0 |+-------------+-----------------+--------+---------+----+-----------+--使用-d参数查看集群状态[postgres@bighouse2 ~]$ patronictl -d etcd://bighouse1:2379 list postgresql+ Cluster: postgresql (6842405992774526428) -------+----+-----------+| Member | Host | Role | State | TL | Lag in MB |+-------------+-----------------+--------+---------+----+-----------+| postgresql1 | 10.0.2.21:15432 | Leader | running | 2 | || postgresql2 | 10.0.2.22:15432 | | running | 2 | 0 || postgresql3 | 10.0.2.23:15432 | | running | 2 | 0 |+-------------+-----------------+--------+---------+----+-----------+--用etcd查看集群状态, 就象OCR,etcd数据库中存储着数据库的实时状态信息[postgres@bighouse2 ~]$ etcdctl ls --recursive --sort -p /service/service/postgresql//service/postgresql/config/service/postgresql/history/service/postgresql/initialize/service/postgresql/leader/service/postgresql/members//service/postgresql/members/postgresql1/service/postgresql/members/postgresql2/service/postgresql/members/postgresql3/service/postgresql/optime//service/postgresql/optime/leader--查看谁是leader节点[postgres@bighouse2 ~]$ etcdctl get /service/postgresql/leaderPostgresql1[postgres@bighouse2 ~]$ etcdctl get /service/postgresql/members/postgresql1{"conn_url":"postgres://10.0.2.21:15432/postgres","api_url":"http://10.0.2.21:8008/patroni","state":"running","role":"master","version":"1.6.5","xlog_location":83987320,"timeline":2}
使用VIP访问master节点 [所有节点]
绑定vip的工作主要是由callbacks脚本来完成,上面已经定义好了触发条件(on_start, on_stop, on_role_change)。脚本内容如下:
--1. patroni_callback脚本内容如下:[postgres@bighouse1 ~]$ cat patroni_callback.sh#!/bin/bashreadonly cb_name=$1readonly role=$2readonly scope=$3function usage() {echo "Usage: $0 <on_start|on_stop|on_role_change> <role> <scope>";exit 1;}echo "this is patroni callback $cb_name $role $scope"case $cb_name inon_stop)sudo /usr/sbin/ip addr del 10.0.2.24/24 dev enp0s3 label enp0s3:1#sudo /usr/sbin/arping -q -A -c 1 -I enp0s3 10.0.2.24;;on_start);;on_role_change)if [[ $role == 'master' ]]; thensudo /usr/sbin/ip addr add 10.0.2.24/24 brd 10.0.2.255 dev enp0s3 label enp0s3:1sudo /usr/sbin/arping -q -A -c 1 -I enp0s3 10.0.2.24elif [[ $role == 'slave' ]]||[[ $role == 'replica' ]]||[[ $role == 'logical' ]]; thensudo /usr/sbin/ip addr del 10.0.2.24/24 dev enp0s3 label enp0s3:1#sudo /usr/sbin/arping -q -A -c 1 -I enp0s3 10.0.2.24fi;;*)usage;;esac--2. 赋予脚本执行权限[postgres@bighouse1 ~]$ chmod +x patroni_callback.sh--3. 配置 sudo, 使用visudo命令并加入postgres[root@bighouse2 ~]# visudopostgres ALL=(ALL) NOPASSWD:ALL
好了,到此为止基于Patroni+Etcd的一个3节点高可用集群已经搭建好了。
下一篇文章介绍在此高可用方案下的各种场景切换测试。
END