前言
国产数据库体验之GBase ,从安装部署开始。
【注意】:操作系统用户名一定要为gbasedbt,其他名字比如gbase都不行!所以第一次安装建议大家按照官方手册进行,等熟练了再自定义。
[gbase@yashandb etc]$ ll GBaseInit_gbasedbt.sh
-rwxr-xr-x 1 gbasedbt gbasedbt 32705 Mar 23  2021 GBaseInit_gbasedbt.sh
[gbase@yashandb etc]$ sh GBaseInit_gbasedbt.sh
Error: Please run this script by user <gbasedbt> !!!
参考:https://www.gbase.cn/community/post/1452
安装部署
虚拟机环境
配置:2C8G500G
操作系统:CentOS7.9
ip:192.168.23.166
[root@localhost ~]# free -g
              total        used        free      shared  buff/cache   available
Mem:              7           0           7           0           0           7
Swap:             7           0           7
[root@localhost ~]# lscpu
Architecture:          x86_64
CPU op-mode(s):        32-bit, 64-bit
Byte Order:            Little Endian
CPU(s):                2
On-line CPU(s) list:   0,1
Thread(s) per core:    1
Core(s) per socket:    1
Socket(s):             2
NUMA node(s):          1
Vendor ID:             GenuineIntel
CPU family:            6
Model:                 61
Model name:            Intel Core Processor (Broadwell, IBRS)
Stepping:              2
CPU MHz:               2200.000
BogoMIPS:              4400.00
Hypervisor vendor:     KVM
Virtualization type:   full
L1d cache:             32K
L1i cache:             32K
L2 cache:              4096K
NUMA node0 CPU(s):     0,1
Flags:                 fpu de pse tsc msr pae mce cx8 apic sep mtrr pge mca cmov pat pse36 clflush mmx fxsr sse sse2 syscall nx rdtscp lm constant_tsc rep_good nopl eagerfpu pni pclmulqdq ssse3 fma cx16 pcid sse4_1 sse4_2 x2apic movbe popcnt tsc_deadline_timer aes xsave avx hypervisor lahf_lm 3dnowprefetch invpcid_single ssbd ibrs ibpb fsgsbase bmi1 hle avx2 smep bmi2 erms invpcid rtm rdseed adx smap xsaveopt md_clear spec_ctrl
[root@localhost ~]# df -h
Filesystem               Size  Used Avail Use% Mounted on
devtmpfs                 3.9G     0  3.9G   0% /dev
tmpfs                    3.9G     0  3.9G   0% /dev/shm
tmpfs                    3.9G  8.5M  3.9G   1% /run
tmpfs                    3.9G     0  3.9G   0% /sys/fs/cgroup
/dev/mapper/centos-root   50G  1.7G   49G   4% /
/dev/vda1               1014M  153M  862M  16% /boot
/dev/mapper/centos-home  441G   33M  441G   1% /home
tmpfs                    783M     0  783M   0% /run/user/0

[root@localhost ~]# cat /etc/redhat-release
CentOS Linux release 7.9.2009 (Core)

[root@localhost ~]# ifconfig
eth0: flags=4163<UP,BROADCAST,RUNNING,MULTICAST>  mtu 1500
        inet 192.168.23.166  netmask 255.255.255.0  broadcast 192.168.23.255
        inet6 fe80::a3d9:61f7:edc4:647f  prefixlen 64  scopeid 0x20<link>
        inet6 fe80::2015:f759:1604:9a42  prefixlen 64  scopeid 0x20<link>
        inet6 fe80::8a62:1ef5:d0f1:1a72  prefixlen 64  scopeid 0x20<link>
        ether 52:54:00:70:9c:3e  txqueuelen 1000  (Ethernet)
        RX packets 423  bytes 41422 (40.4 KiB)
        RX errors 0  dropped 171  overruns 0  frame 0
        TX packets 177  bytes 22581 (22.0 KiB)
        TX errors 0  dropped 0 overruns 0  carrier 0  collisions 0

lo: flags=73<UP,LOOPBACK,RUNNING>  mtu 65536
        inet 127.0.0.1  netmask 255.0.0.0
        inet6 ::1  prefixlen 128  scopeid 0x10<host>
        loop  txqueuelen 1000  (Local Loopback)
        RX packets 0  bytes 0 (0.0 B)
        RX errors 0  dropped 0  overruns 0  frame 0
        TX packets 0  bytes 0 (0.0 B)
        TX errors 0  dropped 0 overruns 0  carrier 0  collisions 0
创建用户
用户密码:gbasedbt/gbasedbt
[root@localhost ~]# useradd gbasedbt
[root@localhost ~]# echo "gbasedbt" |passwd --stdin gbasedbt
Changing password for user gbasedbt.
passwd: all authentication tokens updated successfully.
[root@localhost ~]# id gbasedbt
uid=1000(gbasedbt) gid=1000(gbasedbt) groups=1000(gbasedbt)
上传软件包并解压
这里因为我已经将软件包下载到了192.168.3.186机器上,所以直接拷贝过来了,大家可以在官方上下载。
#上传软件包
[root@localhost ~]# mkdir setup
[root@localhost ~]# cd setup/
[root@localhost setup]# ll
total 0
[root@localhost setup]# scp 192.168.3.186:/home/gbase/GBase8s_ExpressEdition.tar ./
root@192.168.3.186's password:
GBase8s_ExpressEdition.tar                                              100%  302MB 111.0MB/s   00:02
[root@localhost setup]# ll
total 309272
-rw-r--r--. 1 root root 316692480 Oct 31 16:52 GBase8s_ExpressEdition.tar

#解压软件包
[root@localhost setup]# cd
[root@localhost ~]# mkdir install
[root@localhost ~]# cd install/
[root@localhost install]# tar xf /root/setup/GBase8s_ExpressEdition.tar
[root@localhost install]# ls
doc  ids_install  ids.properties  onsecurity
安装数据库软件
GBase提供了命令行和图形化两种安装方式,本次使用命令行方式安装。
[root@localhost install]# ./ids_install
Preparing to install...
Extracting the JRE from the installer archive...
Unpacking the JRE...
Extracting the installation resources from the installer archive...
Configuring the installer for this system's environment...
前面都按enter,这里写Y代表同意软件协议
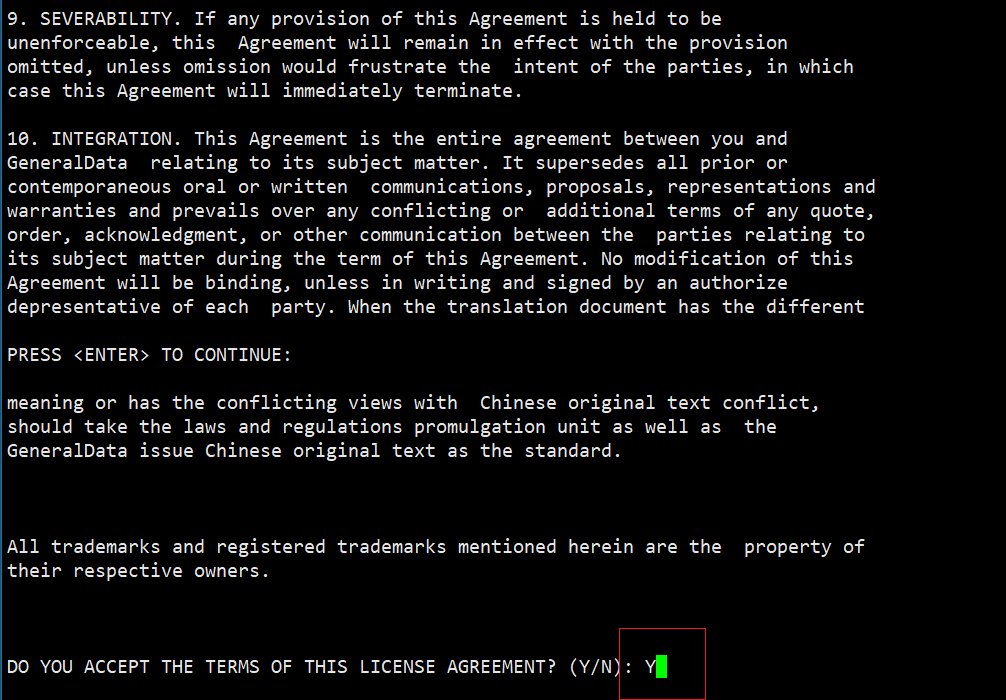
下面这里按enter直接使用默认路径报了错,说The parent directory of the user install path is not exists, please choose
another one.应该是指父目录/opt/GBASE不存在,所以直接修改的默认目录为/opt/gbase。
Check Install Directory
-----------------------

The parent directory of the user install path is not exists, please choose
another one.

PRESS <ENTER> TO ACCEPT THE FOLLOWING (OK):


===============================================================================
Installation Location
---------------------

Choose location for software installation.

  Default Install Folder: /opt/GBASE/gbase

ENTER AN ABSOLUTE PATH, OR PRESS <ENTER> TO ACCEPT THE DEFAULT
      :


===============================================================================
Check Install Directory
-----------------------

The parent directory of the user install path is not exists, please choose
another one.

PRESS <ENTER> TO ACCEPT THE FOLLOWING (OK): /opt/gbase


===============================================================================
Installation Location
---------------------

Choose location for software installation.

  Default Install Folder: /opt/GBASE/gbase

ENTER AN ABSOLUTE PATH, OR PRESS <ENTER> TO ACCEPT THE DEFAULT
      : /opt/gbase

INSTALL FOLDER IS: /opt/gbase
   IS THIS CORRECT? (Y/N): Y
选择默认的典型安装,官方不建议直接创建instance(和Oracle类似),所以这里选择2,等软件安装完了,再去单独创建instance。
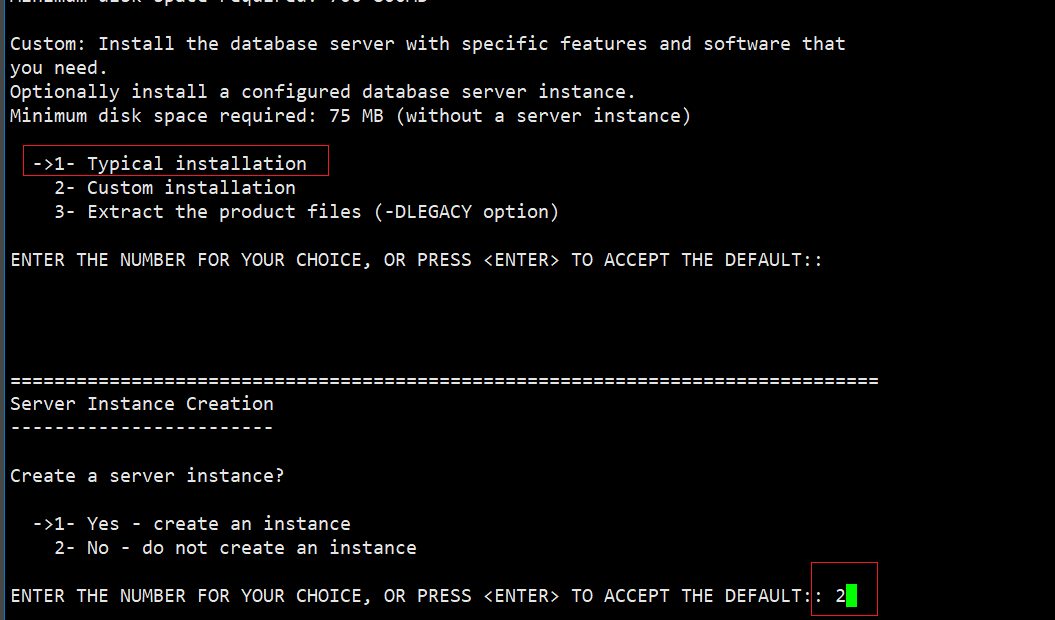
后面就是继续按enter,直到退出安装程序,就完成了数据库软件的安装。
创建实例
需要在gbasedbt用户下操作
[root@localhost install]# su - gbasedbt
[gbasedbt@localhost ~]$ cd /opt/gbase/etc
[gbasedbt@localhost etc]$ ls
ac_config.std            brand                     IM_uninstall_16.png
alarmprogram.sh          buildsmi                  install
allowed.surrogates.demo  clone                     jsonListener-example.properties
blduser.sh               cnv10to1110.sql           log_full.sh
bldutil.sh               cnv1150to1170.sql         make-gbasedbtdir-secure
boot1000a.sql            cnv50t60.sql              Messagefiles
boot1000.sql             cnv50t92.sql              MSG-cr
boot1110.sql             cnv94t100.sql             no_log.sh
boot1150.sql             conv                      onconfig.std
boot1150XC6.sql          convTovNoSQL1210.sql      release_notes.png
boot1170.sql             convTovNoSQL1210XC3.sql   revboot1210XC4_CM.sql
boot1170XC3.sql          cvtlongid7x.sql           secswitch.std
boot1210.sql             cvtlongid914.sql          securityconfig.std
boot1210XC4_CM.sql       cvtviotab.sql             securitylog.std
boot1210XC4.sql          do_role_sep               server_instance_terminal.png
boot901.sql              dropcdr.sql               smi_6to7
boot90.sql               dummyupds100.sql          smi_load
boot910b.sql             evidence.sh               smi_unld
boot910.sql              gbasedbtdir-is-insecure   sm_versions.std
boot911.sql              GBaseInit_gbasedbt.sh     sqlhosts.ext.demo
boot911u.sql             GBase_security.sh         sqlhosts.std
boot912b.sql             GLS-cr                    sysadmin
boot912.sql              Glsfiles                  syscdcv1.sql
boot920a.sql             ids_16.png                syscdr.sql
boot920b.sql             idser.xsd                 syscdrview.sql
boot920c.sql             ids_master_doc.xml        sysmaster.sql
boot920.sql              ifxdeploy.conf            sysuser.sql
boot930a.sql             ifx_failover_callback.sh  sysutils.sql
boot940.sql              IIF-cr                    termcap
bootdwa.sql              IIFfiles                  typetab
bootupgrade.sql          IM_ic_16.png              xpg4_is.sql

#执行创建实例脚本
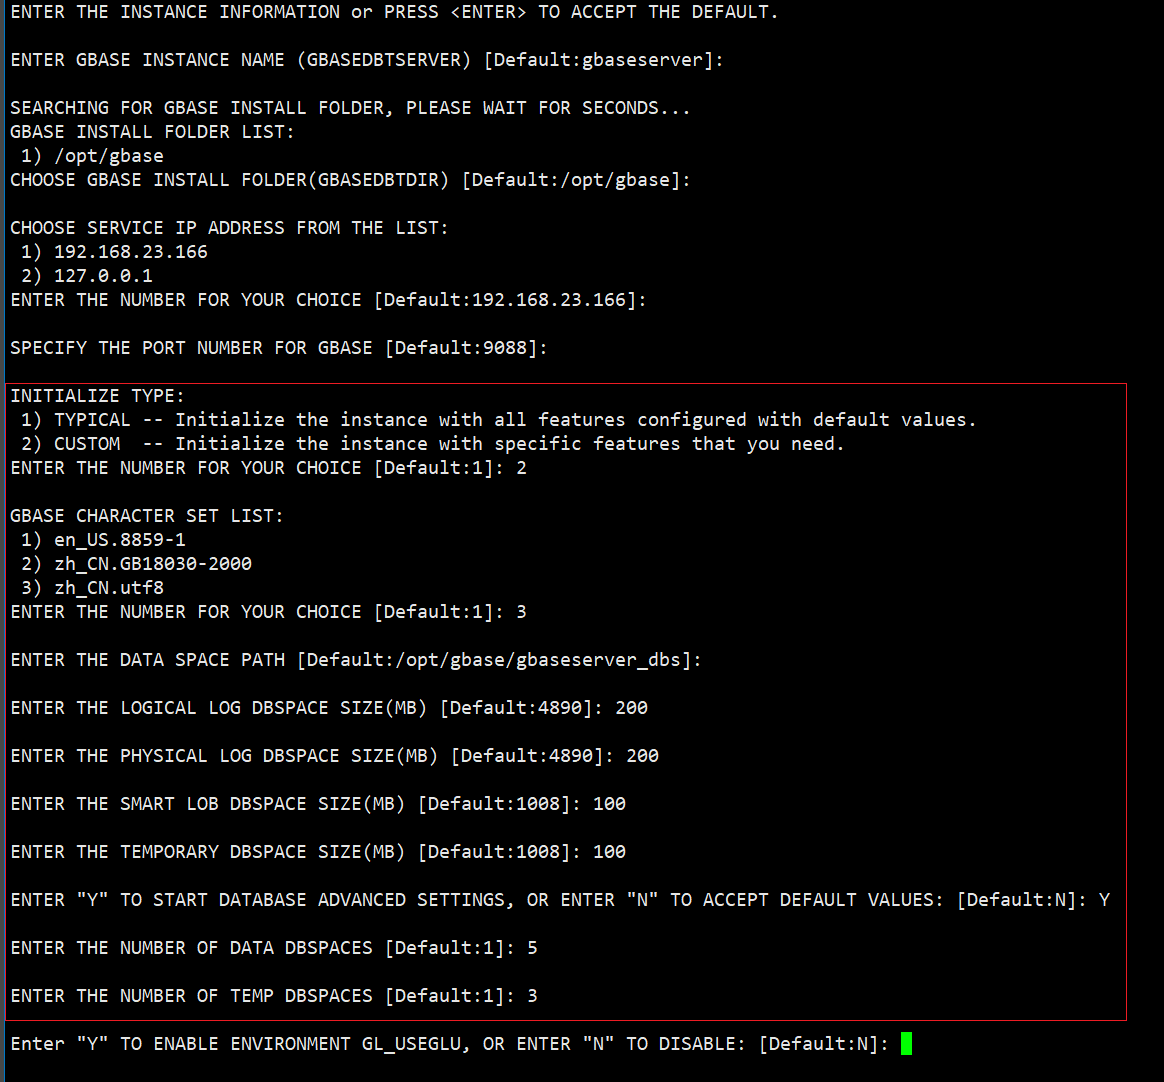
[gbasedbt@localhost etc]$ sh GBaseInit_gbasedbt.sh
有部分取值强烈建议调整成如下,因为设置的值太大了会影响后面创建实例的时间,作为测试环境,表空间也不用设置的很大。
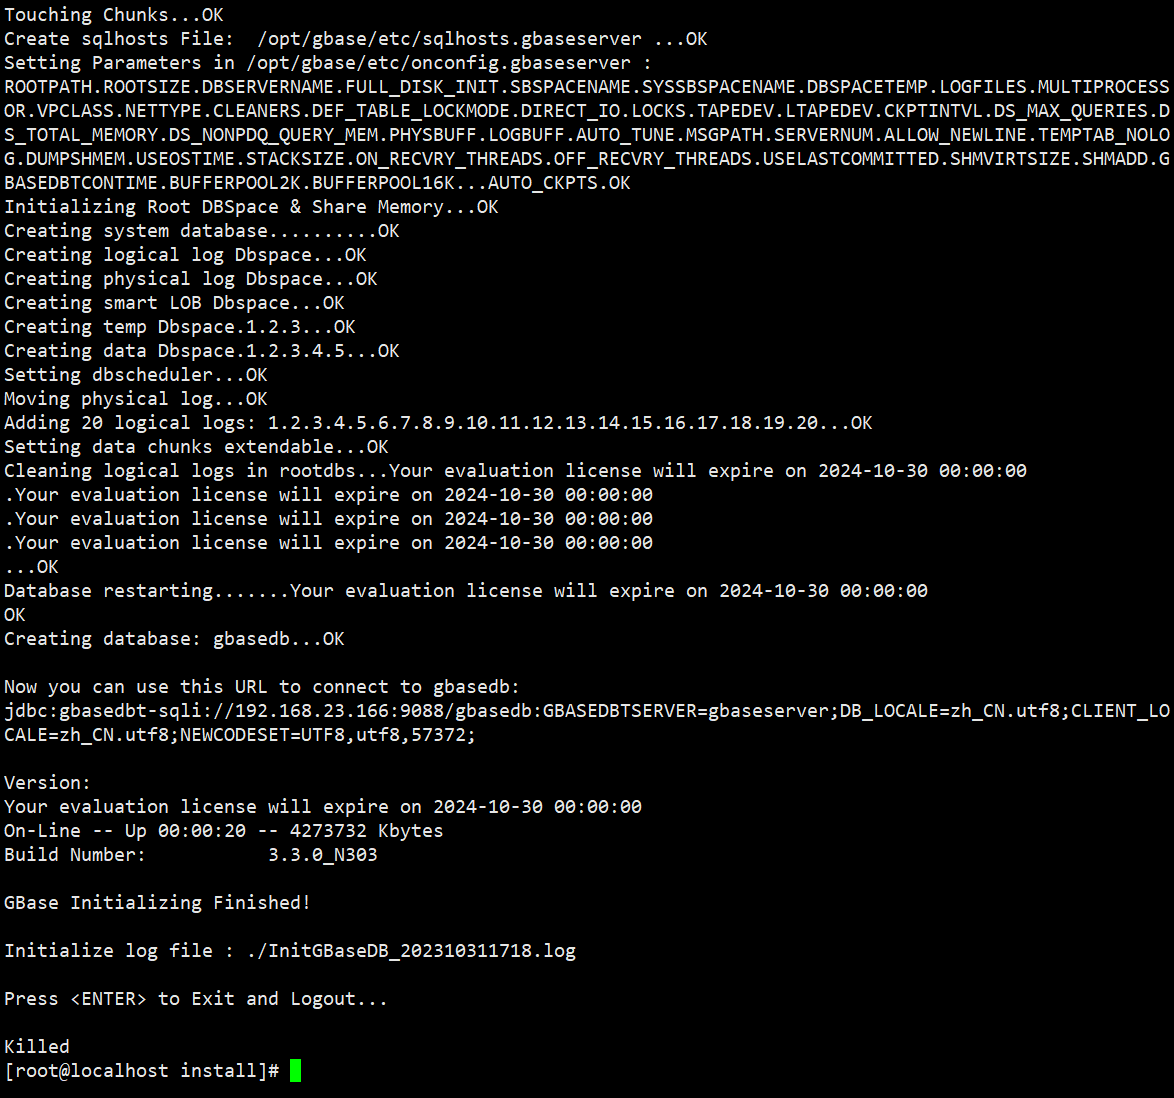
确认相关信息后,就开始安装了,大概花了几分钟
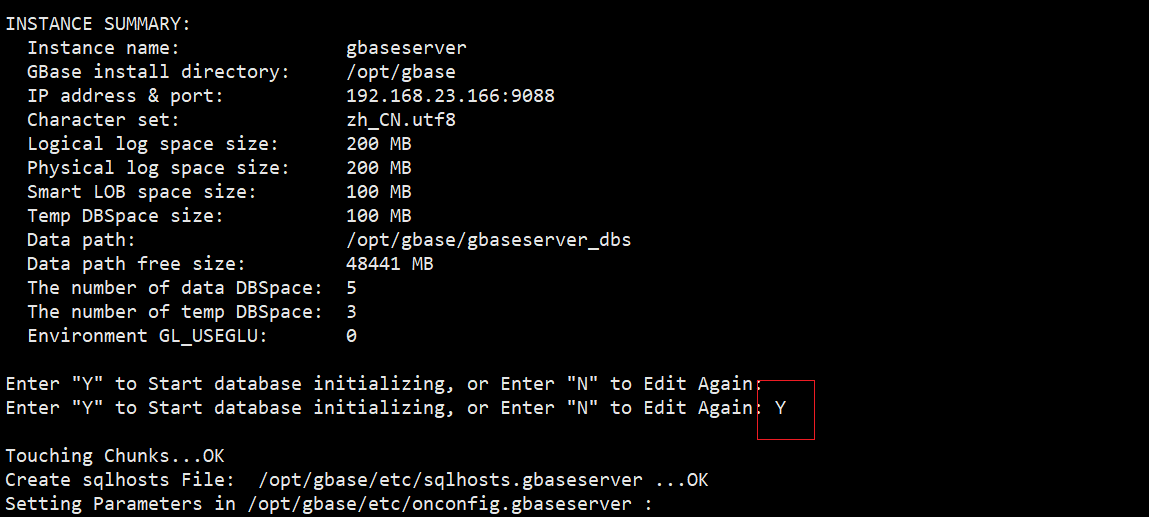
安装完成了(这里出现了个killed,有点迷,看起来有点不正常,而且会话直接退到了root用户下),但是查看进程已经起来了
[root@localhost install]# ps -ef|grep gbase
gbasedbt  8113     1  2 17:25 ?        00:00:07 oninit -v
gbasedbt  8130  8120  0 17:26 ?        00:00:00 oninit -v
root      8427  1869  0 17:31 pts/0    00:00:00 grep --color=auto gbase
设置环境变量
[root@localhost ~]# su - gbasedbt
Last login: Tue Oct 31 17:17:27 CST 2023 on pts/0
[gbasedbt@localhost ~]$ ls
profile.gbaseserver
[gbasedbt@localhost ~]$ cat profile.gbaseserver
export GBASEDBTSERVER=gbaseserver
export GBASEDBTDIR=/opt/gbase
export GBASEDBTSQLHOSTS=/opt/gbase/etc/sqlhosts.gbaseserver
export ONCONFIG=onconfig.gbaseserver
export PATH=/opt/gbase/bin:$PATH
export DB_LOCALE=zh_CN.utf8
export CLIENT_LOCALE=zh_CN.utf8
unset GL_USEGLU
[gbasedbt@localhost ~]$ source
.bash_logout         .bashrc              .config/
.bash_profile        .cache/              profile.gbaseserver
[gbasedbt@localhost ~]$ source profile.gbaseserver
[gbasedbt@localhost ~]$ onstat -
Your evaluation license will expire on 2024-10-30 00:00:00
On-Line -- Up 00:14:42 -- 4273732 Kbytes
说实话,刚开始看到这个license有效期到1030时,心里一惊,以为凉凉,玩不了了,因为我是1031安装的数据库,后面发现好像还能用,不知道这个有啥影响。原来有效期是到明年这个时候哈哈
登录数据库
使用 dbaccess登录数据库,简单操作一下
[gbasedbt@localhost ~]$ dbaccess - -
Your evaluation license will expire on 2024-10-30 00:00:00
> create database mydb with log;

Database created.

> database mydb;

Database closed.


Database selected.

> create table t_user(userid int,username varchar(50));

Table created.

> insert into t_user values (1,'skye');

1 row(s) inserted.

> select *from t_user;


     userid username

          1 skye

1 row(s) retrieved.
至此,环境准备完毕,后面就可以开始测试功能啦~
个人感受
如果按照官方手册操作,整个安装步骤还是很顺利的。主要的注意点两个:1.操作系统用户名;2.创建实例时表空间设置合理,会很大程度上影响创建的时间。


