


大家好,今天聊聊 PG的执行计划的缓存机制。
熟悉oracle的小伙伴都知道,ORACLE采用shared pool这种global cache area的方式缓存SQL 语句的执行计划,有效的减少了 SQL 硬解析的次数。
熟悉MYSQL的小伙伴们都知道,mysql 并不会cache 执行计划。(query cache 从8.0开始已经废弃了,并且cache的也不是执行计划本身)
我们今天聊的PG的execution plan cache 恰恰介于上面2者之间, 没有老大哥ORACLE 放到global cache中那么彻底 ,放到了session 级别的cache 中,
相对于同门兄弟mysql 来说,PG在连接池 + 高并发的场景下,session 级别的cache 也能有效的规避一些硬解析。
首先我们先看一下,同一个session 中一条SQL语句执行多少次计划会被cache住?
(有人说是5次,有人抱怨根本不会cache计划)
具体的原则需要看你的客户端是什么? PSQL or Java client (很多图形工具实际上也是用的JDBC 的驱动连接) 是否采用了 prepare 或者 preparedstatement 的方式
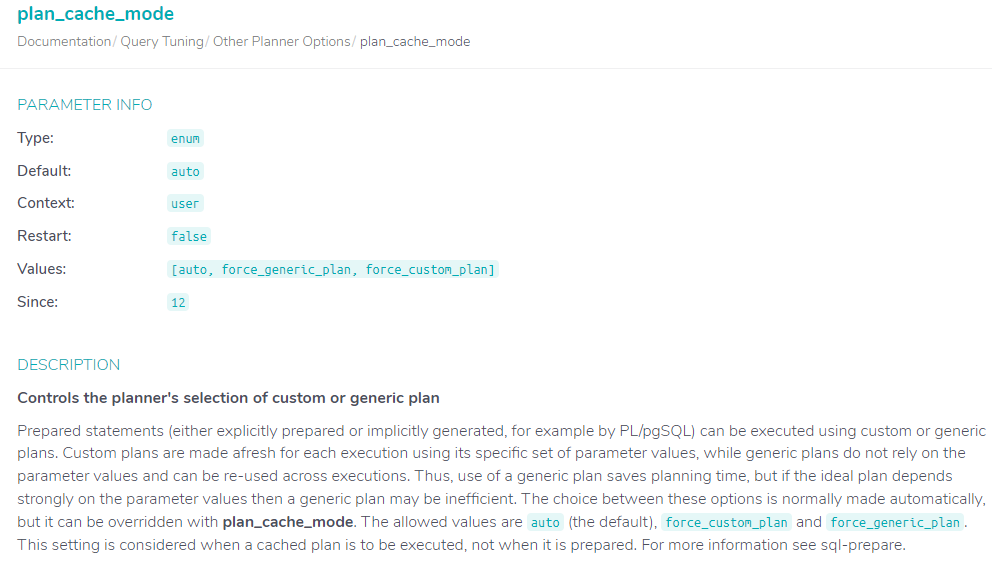
服务器端参数 plan_cache_mode 是如何设置? 这个参数是PG是version 12版本开始引入的
简单地说:
默认值auto: PG 自行逻辑判断是否被缓存(基于成本)
force_generic_plan:可以重用缓存的计划
force_custom_plan: 每次连接刷新缓存,就是不被缓存
PG plan_cache_mode 默认的参数值 auto, 在源码中有较为详尽的解释:src/backend/utils/cache/plancache.c
有兴趣的朋友可以详细阅读一下,这里篇幅受限,只粘贴了一部分重点。
*
* plancache.c
*      Plan cache management.
*
* The plan cache manager has two principal responsibilities: deciding when
* to use a generic plan versus a custom (parameter-value-specific) plan,
* and tracking whether cached plans need to be invalidated because of schema
* changes in the objects they depend on.
*
* The logic for choosing generic or custom plans is in choose_custom_plan,
* which see for comments.

复制
plancache.c 文件实现了 plan cache的管理功能,
包含2大核心功能:
- 决定使用generic plan 还是 custom plan
- 维护已经被缓存plan 是否会失效,由于对象的定义发生了变化
choose_custom_plan这个函数逻辑是判断generic plan or custom plan :
主要考虑到如下几点:
1判断是否是第一次执行 (is_oneshot)
2)判断例如java客户端传入的参数设置(boundParams)
3)判断是否收到transaction statemant control
4)数据库端是否设置了参数 PLAN_CACHE_MODE_FORCE_GENERIC_PLAN or PLAN_CACHE_MODE_FORCE_CUSTOM_PLAN
5)用户session 级别设置了参数 PLAN_CACHE_MODE_FORCE_GENERIC_PLAN or PLAN_CACHE_MODE_FORCE_CUSTOM_PLAN
6)执行的次数大于5次 (plansource->num_custom_plans < 5)
7)最后基于成本计算判断(generic_cost < avg_custom_cost)
/*
* choose_custom_plan: choose whether to use custom or generic plan
*
* This defines the policy followed by GetCachedPlan.
*/
static bool
choose_custom_plan(CachedPlanSource *plansource, ParamListInfo boundParams)
{
   double        avg_custom_cost;


   /* One-shot plans will always be considered custom */
   if (plansource->is_oneshot)
       return true;


   /* Otherwise, never any point in a custom plan if there's no parameters */
   if (boundParams == NULL)
       return false;
   /* ... nor for transaction control statements */
   if (IsTransactionStmtPlan(plansource))
       return false;


   /* Let settings force the decision */
   if (plan_cache_mode == PLAN_CACHE_MODE_FORCE_GENERIC_PLAN)
       return false;
   if (plan_cache_mode == PLAN_CACHE_MODE_FORCE_CUSTOM_PLAN)
       return true;


   /* See if caller wants to force the decision */
   if (plansource->cursor_options & CURSOR_OPT_GENERIC_PLAN)
       return false;
   if (plansource->cursor_options & CURSOR_OPT_CUSTOM_PLAN)
       return true;


   /* Generate custom plans until we have done at least 5 (arbitrary) */
   if (plansource->num_custom_plans < 5)
       return true;


   avg_custom_cost = plansource->total_custom_cost / plansource->num_custom_plans;


   /*
    * Prefer generic plan if it's less expensive than the average custom
    * plan.  (Because we include a charge for cost of planning in the
    * custom-plan costs, this means the generic plan only has to be less
    * expensive than the execution cost plus replan cost of the custom
    * plans.)
    *
    * Note that if generic_cost is -1 (indicating we've not yet determined
    * the generic plan cost), we'll always prefer generic at this point.
    */
   if (plansource->generic_cost < avg_custom_cost)
       return false;


   return true;
}

复制
我们再来看看cache的plan在什么条件下会失效?
我们看一下RevalidateCachedQuery这个函数主要负责cache的有效性的检查(失效后会重新进行解析)
1.判断客户端的的变量search_path是否发生变化
/*
    * If the query is currently valid, we should have a saved search_path ---
    * check to see if that matches the current environment.  If not, we want
    * to force replan.
    */
   if (plansource->is_valid)
   {
       Assert(plansource->search_path != NULL);
       if (!OverrideSearchPathMatchesCurrent(plansource->search_path))
       {
           /* Invalidate the querytree and generic plan */
           plansource->is_valid = false;
           if (plansource->gplan)
               plansource->gplan->is_valid = false;
       }
   }

复制
2.行级别的安全保护和用户角色是否发生了改变
/*
    * If the query rewrite phase had a possible RLS dependency, we must redo
    * it if either the role or the row_security setting has changed.
    */
   if (plansource->is_valid && plansource->dependsOnRLS &&
       (plansource->rewriteRoleId != GetUserId() ||
        plansource->rewriteRowSecurity != row_security))
       plansource->is_valid = false;

复制
3.如果前2个步骤的验证都通过的话,会加上锁AcquirePlannerLocks 会结束验证并且返回当前的计划的valid
AcquirePlannerLocks(plansource->query_list, true);
if (plansource->is_valid)
       {
           /* Successfully revalidated and locked the query. */
           return NIL;
       }

复制
4.接下来,是验证失败的情况,需要重新parse并生成执行计划。
先清除MemoryConext中的语句, 清内存中的plansource 的对象
MemoryContextDelete(qcxt); ReleaseGenericPlan(plansource);复制
5.重新进行 parse analysis and rule rewriting
rawtree = copyObject(plansource->raw_parse_tree); if (rawtree == NULL) tlist = NIL; else if (plansource->parserSetup != NULL) tlist = pg_analyze_and_rewrite_params(rawtree, plansource->query_string, plansource->parserSetup, plansource->parserSetupArg, queryEnv); else tlist = pg_analyze_and_rewrite(rawtree, plansource->query_string, plansource->param_types, plansource->num_params, queryEnv);复制
6.判断元祖的定义(表的DDL)是否需要更新
if (resultDesc == NULL && plansource->resultDesc == NULL)
    {
        /* OK, doesn't return tuples */
    }
    else if (resultDesc == NULL || plansource->resultDesc == NULL ||
             !equalTupleDescs(resultDesc, plansource->resultDesc))
    {
        /* can we give a better error message? */
        if (plansource->fixed_result)
            ereport(ERROR,
                    (errcode(ERRCODE_FEATURE_NOT_SUPPORTED),
                     errmsg("cached plan must not change result type")));
        oldcxt = MemoryContextSwitchTo(plansource->context);

复制
7.最后设置对象plansource 相关属性:roleID, Row Level Security , search_path,query_context,query_list,is_valid
返回查询树 tlist
plansource->rewriteRoleId = GetUserId(); plansource->rewriteRowSecurity = row_security; plansource->search_path = GetOverrideSearchPath(querytree_context); plansource->query_context = querytree_context; plansource->query_list = qlist; return tlist;复制
我们结束源码的阅读,接下来是动手实验部分:
先来通过PSQL的客户端进行测试: (PSQL只有在prepare 命令下才能触发执行计划缓存)
关于PREPARE的使用可以参考: https://www.postgresql.org/docs/current/sql-prepare.html
实验步骤如下:
创建一张表,加入一些测试数据,并打开 auto_plan 插件,把SQL的执行计划打印到日志中迁移(auto_explain.log_min_duration = 0 设置为0 方便我们打印所有的)
postgres=# create table t1 (id int primary key, name varchar(100));
CREATE TABLE
postgres=# insert into t1 select 1, 'jason';
INSERT 0 1

postgres=# LOAD 'auto_explain';
LOAD
postgres=# set auto_explain.log_min_duration = 0;
SET

复制
我们设置参数 plan_cache_mode 由默认的auto-》 force_generic_plan:
postgres=# set plan_cache_mode = 'force_generic_plan';
SET
postgres=# show plan_cache_mode;
 plan_cache_mode
--------------------
force_generic_plan
(1 row)

复制
我们采用PREPARE的方式执行一条查询语句:
postgres=# PREPARE demo (int) AS SELECT name FROM t1 WHERE id = $1;
PREPARE
postgres=# EXECUTE demo(1);
name
-------
jason
(1 row)

复制
从PG的日志中观察执行计划: 走的主键索引t1_pkey 访问方式
INFRA [postgres@ljzdccapp007 log]# tail -f postgresql-14.log | grep t1


   Query Text: PREPARE demo (int) AS SELECT name FROM t1 WHERE id = $1;
   Index Scan using t1_pkey on t1  (cost=0.15..4.17 rows=1 width=218)

复制
我们继续执行同样的语句直到5次:
postgres=# EXECUTE demo(1);
name
-------
jason
(1 row)

...
...

postgres=# EXECUTE demo(1);
name
-------
jason
(1 row)

复制
根据我们的参数设置 force_generic_plan, 语句SELECT name FROM t1 WHERE id = $1;的执行计划会被cache住:
我们尝试关闭一些GUC的参数,来影响一下SQL的执行计划:
postgres=# set enable_indexscan = off;
SET
postgres=# set enable_bitmapscan = off;
SET
postgres=#  select * from t1 where id = 1;
id | name
----+-------
 1 | jason
(1 row)

复制
我们发现执行日志中的SQL语句: select * from t1 where id = 1; 注意这里采用的是硬解析的方式,而不是prepare的方式,
查看执行计划变成了 seqscan 证明GUC的参数生效: (红色部分)
Query Text: PREPARE demo (int) AS SELECT name FROM t1 WHERE id = $1;
Index Scan using t1_pkey on t1 (cost=0.15…4.17 rows=1 width=218)
Query Text: PREPARE demo (int) AS SELECT name FROM t1 WHERE id = $1;
Index Scan using t1_pkey on t1 (cost=0.15…4.17 rows=1 width=218)
Query Text: PREPARE demo (int) AS SELECT name FROM t1 WHERE id = $1;
Index Scan using t1_pkey on t1 (cost=0.15…4.17 rows=1 width=218)
Query Text: PREPARE demo (int) AS SELECT name FROM t1 WHERE id = $1;
Index Scan using t1_pkey on t1 (cost=0.15…4.17 rows=1 width=218)
Query Text: PREPARE demo (int) AS SELECT name FROM t1 WHERE id = $1;
Index Scan using t1_pkey on t1 (cost=0.15…4.17 rows=1 width=218)
Query Text: select * from t1 where id = 1;
Seq Scan on t1 (cost=0.00…14.00 rows=1 width=222)
我们再次执行 EXECUTE demo(1);
postgres=# EXECUTE demo(1);
name
-------
jason
(1 row)

复制
发现执行计划依然是原来的:Index Scan using t1_pkey , 证明cache 已经生效了(最后的绿色部分)
Query Text: PREPARE demo (int) AS SELECT name FROM t1 WHERE id = $1;
Index Scan using t1_pkey on t1 (cost=0.15…4.17 rows=1 width=218)
Query Text: PREPARE demo (int) AS SELECT name FROM t1 WHERE id = $1;
Index Scan using t1_pkey on t1 (cost=0.15…4.17 rows=1 width=218)
Query Text: PREPARE demo (int) AS SELECT name FROM t1 WHERE id = $1;
Index Scan using t1_pkey on t1 (cost=0.15…4.17 rows=1 width=218)
Query Text: PREPARE demo (int) AS SELECT name FROM t1 WHERE id = $1;
Index Scan using t1_pkey on t1 (cost=0.15…4.17 rows=1 width=218)
Query Text: PREPARE demo (int) AS SELECT name FROM t1 WHERE id = $1;
Index Scan using t1_pkey on t1 (cost=0.15…4.17 rows=1 width=218)
Query Text: select * from t1 where id = 1;
Seq Scan on t1 (cost=0.00…14.00 rows=1 width=222)
Query Text: PREPARE demo (int) AS SELECT name FROM t1 WHERE id = $1;
Index Scan using t1_pkey on t1 (cost=0.15…4.17 rows=1 width=218)
进一步验证,我们打开一个新的session 窗口,这次设置同样的GUC参数,看看计划是否会改变:
postgres=# set plan_cache_mode = 'force_generic_plan';
SET
postgres=# LOAD 'auto_explain';
LOAD
postgres=# set auto_explain.log_min_duration = 0;
SET
postgres=# set enable_indexscan = off;
SET
postgres=# set enable_bitmapscan = off;
SET
postgres=# PREPARE demo (int) AS SELECT name FROM t1 WHERE id = $1;
PREPARE
postgres=# EXECUTE demo(1);
name
-------
jason
(1 row)

复制
我们看到计划是GUC参数设置所预期的 :Seq Scan on t1 (最后的红色部分)
Query Text: PREPARE demo (int) AS SELECT name FROM t1 WHERE id = $1;
Index Scan using t1_pkey on t1 (cost=0.15…4.17 rows=1 width=218)
Query Text: PREPARE demo (int) AS SELECT name FROM t1 WHERE id = $1;
Index Scan using t1_pkey on t1 (cost=0.15…4.17 rows=1 width=218)
Query Text: PREPARE demo (int) AS SELECT name FROM t1 WHERE id = $1;
Index Scan using t1_pkey on t1 (cost=0.15…4.17 rows=1 width=218)
Query Text: PREPARE demo (int) AS SELECT name FROM t1 WHERE id = $1;
Index Scan using t1_pkey on t1 (cost=0.15…4.17 rows=1 width=218)
Query Text: PREPARE demo (int) AS SELECT name FROM t1 WHERE id = $1;
Index Scan using t1_pkey on t1 (cost=0.15…4.17 rows=1 width=218)
Query Text: select * from t1 where id = 1;
Seq Scan on t1 (cost=0.00…14.00 rows=1 width=222)
Query Text: PREPARE demo (int) AS SELECT name FROM t1 WHERE id = $1;
Index Scan using t1_pkey on t1 (cost=0.15…4.17 rows=1 width=218)
Query Text: PREPARE demo (int) AS SELECT name FROM t1 WHERE id = $1;
Seq Scan on t1 (cost=0.00…14.00 rows=1 width=218)
所以我们通过动手实验得到结论,同样的的SQL 在不同的session中由于缓存的存在,可能执行计划不一样,站在应用系统的体验角度,会出现同一个功能,性能时快时慢的情况。
我们进入下一个实验,采用目前JAVA程序 spring boot 进行JDBC的程序测试:
Postgres JDBC 官方文档: https://jdbc.postgresql.org/documentation/use/
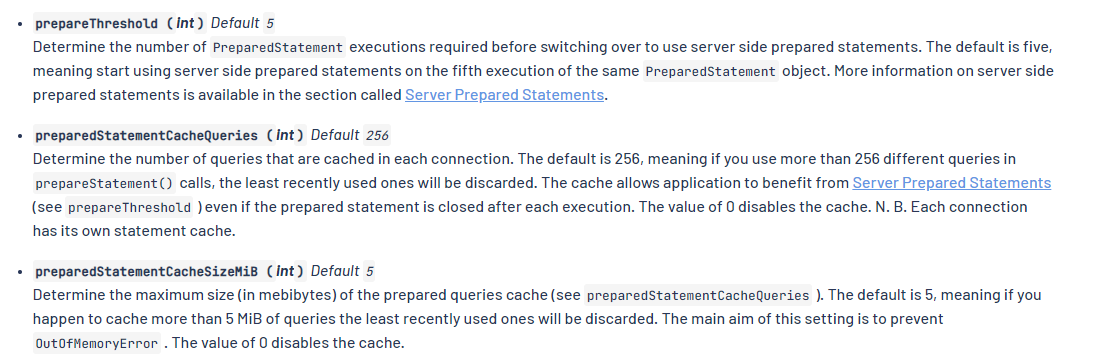
prepareThreshold (int) : 默认SQL执行5次被cache
preparedStatementCacheQueries (int) : 默认保存执行计划的SQL的条数是256
preparedStatementCacheSizeMiB (int) : 默认保存cache的大小是5MB,超过会通过LRU 抛弃。
写一个简单的测试小程序:
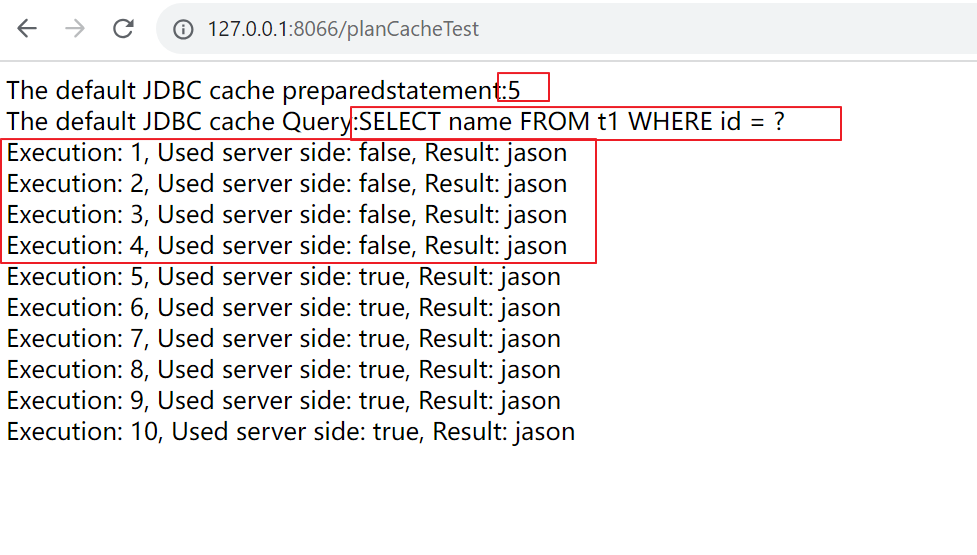
目的为了打印JAVA客户端设置的PrepareThreshold,以及缓存的pgstatment内容,以及是否会使用缓存isUseServerPrepare()
 @RequestMapping(value="/planCacheTest", method=RequestMethod.GET)
 public String planCacheTest() throws Exception {
     StringBuilder str_result = new StringBuilder();
     String sql = "SELECT name FROM t1 WHERE id = ?";
     PreparedStatement statement = jdbcTemplate.getDataSource().getConnection().prepareStatement(sql);
     org.postgresql.PGStatement pgstatment = statement.unwrap(org.postgresql.PGStatement.class);
     str_result.append("The default JDBC cache preparedstatement:" + pgstatment.getPrepareThreshold()+"
");
/*      CachedQuery cachedQuery = ReflectionUtils.getFieldValue(
             pgstatment ,  org.postgresql.PGStatement.class.getDeclaredField("preparedQuery")


     );*/


     str_result.append("The default JDBC cache Query:" + pgstatment.toString()+"
");
     for (int i=1; i<=10; i++)
     {
         statement.setInt(1,i);
         boolean usingServerPrepare = pgstatment.isUseServerPrepare();
         ResultSet rs = statement.executeQuery();
         rs.next();
         str_result.append("Execution: "+i+", Used server side: " + usingServerPrepare + ", Result: "+rs.getString(1) + "</br>");
         rs.close();
     }


     statement.close();


     return str_result.toString();


 }

复制
启动springboot后, 在浏览器中进行测试: 一切符合我们的预期.
接下来我们讨论一种情况, 由于表的数据分布不均匀,造成cache的执行时候往往不是有效的? 这个时候如何解决?
(ORACLE 早在10几年前的11G版本中,引入了ACS Adapt cursor sharing 游标自适应特性,就是为了解决缓存低效执行计划的问题)
个人观点参考如下:
1.修改全局或者user或者database级别的参数 plan_cache_mode = force_custom_plan 每次生成新的计划
2.使用pg_hint_plan, 绑定有效的计划 可以参考 : https://www.modb.pro/db/609428
3.jdbc 客户端设置 setPrepareThreshold() = 0, 关闭缓存
4.代码改写:直接针对有问题的SQL,不用preparestatement绑定变量的方式,直接走SQL硬解析。
所以到底用不用plan cache是一个根据自己数据库系统特点来trade off的选择。
最后总结:
1.源码层面阅读了cacheplan manager , 核心2功能: choose_custom_plan 函数-》custom or generic plan? RevalidateCachedQuery 函数 => 验证缓存的计划是否失效
2.PSQL 客户端的prepare command 进行了缓存测试实验
3.JDBC 通过springboot 测试了JAVA 端缓存测试
4.讨论了数据分布不均,执行计划不稳定的情况下的解决方法。
Have a fun 🙂 !
参考链接:
src/backend/utils/cache/plancache.c
https://vladmihalcea.com/postgresql-jdbc-statement-caching/
https://jdbc.postgresql.org/documentation/use/
https://www.cnblogs.com/wangzhen3798/p/12206811.html
https://use-the-index-luke.com/blog/2011-07-16/planning-for-reuse
