


使用keepalived实现PostgreSQL数据库两节点主备的高可用架构部署详解
看腻了就来听听视频演示吧(持续更新中):https://www.bilibili.com/video/BV1K1421z7Kp/
环境配置和规划
| hostname | OS | PostgreSQL | keepalived | IP | VIP |
|---|---|---|---|---|---|
| db06 | CentOS 7.9 | 16.2 | 2.2.8 | 172.16.107.156 | 172.16.107.159 |
| db07 | CentOS 7.9 | 16.2 | 2.2.8 | 172.16.107.157 | 同上 |
部署PostgreSQL的主备流复制架构
极简步骤
echo "172.16.107.156 db06" >> /etc/hosts
echo "172.16.107.157 db07" >> /etc/hosts

systemctl stop firewalld
systemctl disable firewalld

setenforce 0
sed -ri 's/SELINUX=enforcing/SELINUX=disabled/' /etc/selinux/config

echo "postgres soft nproc unlimited" >> /etc/security/limits.conf
echo "postgres hard nproc unlimited" >> /etc/security/limits.conf
echo "postgres soft nofile 1024000" >> /etc/security/limits.conf
echo "postgres hard nofile 1024000" >> /etc/security/limits.conf
echo "postgres soft stack unlimited" >> /etc/security/limits.conf
echo "postgres hard stack unlimited" >> /etc/security/limits.conf
echo "postgres soft core unlimited" >> /etc/security/limits.conf
echo "postgres hard core unlimited" >> /etc/security/limits.conf
echo "postgres soft memlock unlimited" >> /etc/security/limits.conf
echo "postgres hard memlock unlimited" >> /etc/security/limits.conf

yum install -y gcc zlib-devel libaio libuuid readline-devel krb5-libs libicu libicu-devel libnl libnl-devel libnl-3 libnl3-devel libxslt tcl perl openldap pam openssl openssl-devel libxml2 bzip2

useradd -rmU postgres
echo "postgres"|passwd postgres --stdin
su - postgres
mkdir {pghome,pgdata,pg_archive,pg_log}
chmod -R 700 {pghome,pgdata,pg_archive,pg_log}

echo "export PGHOME=/home/postgres/pghome" >> ~/.bashrc
echo "export PGDATA=/home/postgres/pgdata" >> ~/.bashrc
echo "export PGPORT=54321" >> ~/.bashrc
echo "export PGDATABASE=postgres" >> ~/.bashrc
echo "export LD_LIBRARY_PATH=$PGHOME/lib:$LD_LIBRARY_PATH" >> ~/.bashrc
echo "export PATH=$PGHOME/bin:$PATH" >> ~/.bashrc
source ~/.bashrc

tar -xzvf postgresql-16.2.tar.gz
cd postgresql-16.2
./configure --prefix=/home/postgres/pghome/
gmake world
gmake install-world
复制
主节点操作:
initdb -D /home/postgres/pgdata/ --data-checksums -E UTF8 --locale=zh_CN.UTF-8


vi $PGDATA/postgresql.conf

listen_addresses = '0.0.0.0'
port = '54321'
max_connections = '1024'
wal_buffers=32MB
work_mem=4MB
superuser_reserved_connections = 10
max_locks_per_transaction = '64'
max_prepared_transactions = '0'
max_replication_slots = '10'
max_wal_senders = '50'
max_worker_processes = '8'
track_commit_timestamp = 'off'
logging_collector = on
log_directory = '/home/postgres/pg_log'
log_checkpoints = on
log_lock_waits = on
log_statement = ddl
log_truncate_on_rotation = on
log_rotation_age = 1440
log_rotation_size = 40MB
wal_level = 'replica'
wal_log_hints = 'on'
idle_in_transaction_session_timeout='30min'
idle_session_timeout='30min'
hba_file = '/home/postgres/pgdata/pg_hba.conf'
ident_file = '/home/postgres/pgdata/pg_ident.conf'
# archive
archive_mode = 'on'
archive_command = 'scp %p 172.16.107.156:/home/postgres/pg_archive/%f'
archive_timeout = '1800s'
restore_command = 'scp 172.16.107.156:/home/postgres/pg_archive/%f %p'
recovery_target_timeline = 'latest'
archive_cleanup_command = 'pg_archivecleanup /home/postgres/pg_archive %r'
# replication
cluster_name = 'PGDBCluster'
hot_standby = 'on'
max_standby_streaming_delay = 30s
wal_receiver_status_interval = 10s
hot_standby_feedback = on
synchronous_commit = on
synchronous_standby_names='' # * sync; enpty async
primary_conninfo = 'application_name=pgdb01 host=172.16.107.157 port=54321 user=replicator password=replicator'


vi $PGDATA/pg_hba.conf
host replication replicator 172.16.107.156/32 scram-sha-256
host replication replicator 172.16.107.157/32 scram-sha-256
host all all 0.0.0.0/0 scram-sha-256


pg_ctl start
psql -U postgres -c "CREATE USER replicator REPLICATION ENCRYPTED PASSWORD 'replicator';"
复制
备节点操作:
pg_basebackup -D $PGDATA -Fp -Xs -v -P -h 172.16.107.156 -p 54321 -U replicator

vi $PGDATA/postgresql.conf
primary_conninfo = 'application_name=pgdb02 host=172.16.107.156 port=54321 user=replicator password=replicator'

echo "standby_mode = on" > $PGDATA/standby.signal

pg_ctl start
复制
主备状态查看:
pg_controldata | grep cluster

# 主节点查看
select * from pg_stat_replication\gx
# 备节点查看
select * from pg_stat_wal_receiver\gx
复制
keepalived介绍
vrrp协议的软件实现,原生设计目的就是为了高可用ipvs服务
keepalived官方文档:https://www.keepalived.org/documentation.html
功能:
- 基于vrrp协议完成地址漂移
- 为vip地址所在的节点生成ipvs规则(在配置文件中预先定义)
- 为ipvs集群的各RS做健康状态检测
- 基于脚本调用接口完成脚本中定义的功能,进而影响集群事务,以此支持nginx、haproxy等服务。
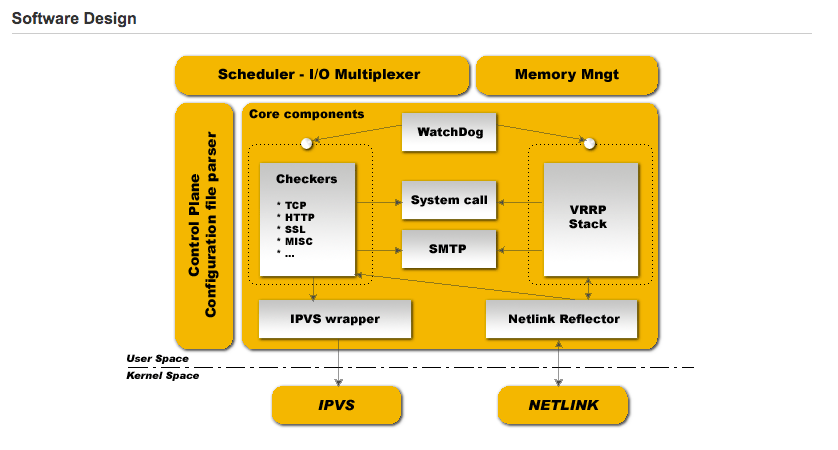
- 用户空间核心组件:
– vrrp stack:VIP消息通告
– checkers:监测real server
– system call:实现vrrp协议状态转换时调用脚本的功能
– SMTP:邮件组件
– IPVS wrapper:生成IPVS规则
– Netlink Reflector:网络接口
– WatchDog:监控进程 - 控制组件:提供keepalived.conf的解析器,完成keepalived配置
- IO复用器:针对网络目的而优化的自己的线程抽象
- 内存管理组件:为某些通用的内存管理功能(例如分配,重新分配,发布等)提供访问权限
安装部署keepalived
下载keepalived: 选择最新版本
https://www.keepalived.org/download.html

安装keepalived:
# 安装依赖包
yum install -y openssl* popt-*
# 解压安装
tar -xzvf keepalived-2.2.8.tar.gz
cd keepalived-2.2.8
./configure --prefix=/usr/local/keepalived
make
make install
复制
设置keepalived为系统服务:
ln -s /usr/local/keepalived/sbin/keepalived /usr/sbin/ cp keepalived/etc/init.d/keepalived /etc/init.d/ cp /usr/local/keepalived/etc/sysconfig/keepalived /etc/sysconfig/ service keepalived status复制
数据库配置
创建数据库和用户:
create user keepalived with password 'Test@123';
create database keepalived;
alter database keepalived owner to keepalived;
复制
创建同步表:
\c keepalived keepalived
-- 创建表
create table sr_delay (id int, last_alive timestamp(0) without time zone default now());

-- sr_delay表插入一条数据
insert into sr_delay values(1,now());
复制
后续keepalived会每隔指定时间探测postgresql数据库存活,并且以keepalived用户登录keepalived数据库刷新这张表
配置keepalived相关参数文件
keepalived.conf文件:
mkdir -p /etc/keepalived/log/
vi /etc/keepalived/keepalived.conf

! Configuration File for keepalived
global_defs {
    router_id DB1_PG_HA	   # 节点名,各节点不同,推荐使用主机名
}

vrrp_script check_pg_alived {
   script "/etc/keepalived/pg_monitor.sh"
   interval 10		# 脚本探测间隔,每隔10s
   fall 3		# 失败尝试次数
}

vrrp_instance VI_1 {
   state BACKUP
   nopreempt		# 非抢占模式
   interface ens192 	# 网卡名
   virtual_router_id 10	# 虚拟路由ID,各节点配置必须一致
   priority 100		# 节点优先级,抢占模式与权重weight组合使用
   advert_int 1
   authentication {
         auth_type PASS
         auth_pass Test@123	# 加入集群密码,需保持一致
   }
   track_script {
       check_pg_alived
   }
   virtual_ipaddress {	# VIP网卡信息
       172.16.107.159/24 dev ens192 label ens192:vip
   }
   # 节点升主时执行的脚本
   notify_master /etc/keepalived/pg_active_standby.sh
   # 节点故障时执行的脚本
   #notify_fault /etc/keepalived/pg_fault.sh
}
复制以上是keepalived主节点配置,keepalived备节点的priority修改为90(节点优先级),其余参数配置一样。上面程序分为以下三块:
- global_defs:通知模块,定义邮件列表,当keepalived发生事件时发送邮件
- vrrp_script:定义本机检测模块,每10秒执行脚本pg_monitor.sh,fall表示重试3次
- vrrp_instance:vrrp实例定义模块,定义了实例名称和实例路由ID,实例状态定义为backup,同时设置非抢占模式nopreempt,当节点启动时不会抢占VIP。备节点的priority需要设置比主节点低,这样高的会成为keepalived的主节点,同时设置了VIP,使用的网络设备是ens192。
– notify_master:当keepalived角色从备转成主时触发脚本
– notify_fault:当keepalived角色发生故障时执行的脚本
监控pg_monitor.sh文件:
vi /etc/keepalived/pg_monitor.sh

#!/bin/bash

# env setting
export PGPORT=54321
export PGUSER=keepalived
export PGDBNAME=keepalived
export PGDATA=/home/postgres/pgdata
export LANG=en_US.utf8
export PGHOME=/home/postgres/pghome
export LD_LIBRARY_PATH=$PGHOME/lib:/lib64:/usr/lib64:/usr/local/lib64:/lib:/usr/lib:/usr/local/lib
export PATH=$PGHOME/bin:$PATH:

MONITOR_LOG="/etc/keepalived/log/pg_monitor.log"
SQL1="update sr_delay set last_alive=now();"
SQL2='select 1;'

# 脚本不检查备库存活状态,如果是备库直接退出
standby_flg=`psql -p $PGPORT -U postgres -At -c "select pg_is_in_recovery();"`
if [ ${standby_flg} == 't' ]; then
  echo -e "`date +%F\ %T`: This is a standby database, exit!\n" >> $MONITOR_LOG
  exit 0
fi

# 主库更新sr_delay表
psql -At -d $PGDBNAME -p $PGPORT -U $PGUSER -c "$SQL2"
if [ $? -eq 0 ]; then
  echo $SQL1 | psql -At -d $PGDBNAME -p $PGPORT -U $PGUSER
  echo -e "`date +%F\ %T`: Primary db is health." >> $MONITOR_LOG
  exit 0
else
  echo -e "`date +%F\ %T`: Attention: Primary db is not health." >> $MONITOR_LOG
  exit 1
fi
复制
切换pg_avtive_standby.sh脚本文件:
发生failover故障切换脚本内容
vi /etc/keepalived/pg_active_standby.sh
#!/bin/bash

#env setting
export PGPORT=54321
export PGUSER=keepalived
export PG_OS_USER=postgres
export PGDBNAME=keepalived
export PGDATA=/home/postgres/pgdata
export LANG=en_US.utf8
export PGHOME=/home/postgres/pghome
export LD_LIBRARY_PATH=$PGHOME/lib:/lib64:/usr/lib64:/usr/local/lib64:/lib:/usr/lib:/usr/local/lib
export PATH=$PGHOME/bin:$PATH:.

# variables setting
LAG_MINUTES=60
HOST_IP=`hostname -i`
NOTICE_EMAIL="xxoo@qq.com"
FAILOVE_LOG="/etc/keepalived/log/pg_failover.log"

SQL1="select 'this_is_standby' as cluster_role from (select pg_is_in_recovery() as std ) t where t.std is true;"
SQL2="select 'standby_in_allowed_lag' as cluster_lag from sr_delay where now() - last_alive < interval '$LAG_MINUTES SECONDS';"

# 配置对端远程管理卡ip地址、用户名、密码
FENCE_IP=172.16.107.157
FENCE_USER=root
FENCE_PWD=root

# VIP 发生漂移,纪录到日志
echo -e "`date +%F\ %T`: keepalived VIP switchover!" >> $FAILOVE_LOG

# pg_failover函数,当主库故障时激活
pg_failover()
{

su - $PG_OS_USER -c "pg_ctl promote -D ${PGDATA}"
if [ $? -eq 0 ]; then
  echo -e "`date +%F\ %T`: `hostname` promote standby success." >> $FAILOVE_LOG
fi

}

# 检查备库是否正常
STANDBY_CNT=`echo $SQL1 | psql -At -d $PGDBNAME -p $PGPORT -U $PGUSER -f - | grep -c this_is_standby`
echo -e "STANDBY_CNT: $STANDBY_CNT" >> $FAILOVE_LOG

if [ $STANDBY_CNT -ne 1 ]; then
  echo -e "`date +%F\ %T`: `hostname` is not standby database, failover not allow!" >> $FAILOVE_LOG
  exit 1
fi

if [ $STANDBY_CNT -eq 1 ]; then
  pg_failover  >> $FAILOVE_LOG
fi
复制
脚本授权:
chmod +x /etc/keepalived/pg_*.sh复制
启动keepalived
service keepalived start
复制
模拟故障切换
# 主节点
pg_ctl stop
# 观察日志打印信息和VIP的漂移情况
tail -20f /etc/keepalived/log/pg_monitor.log
tail -20f /etc/keepalived/log/pg_failover.log
ip a
# 原主节点已新备节点加入新集群
echo "standby_mode = on" > $PGDATA/standby.signal
pg_ctl start
复制
问题记录
问题一:节点健康语句检查返回
# 问题返回:$? 只保存上一个命令的退出状态,0成功,1失败
echo 'select 1;' | psql -At -p 54321 -U keepalived -d keepalived
echo $?
echo 'select 1 from dual;' | psql -At -p 54321 -U keepalived -d keepalived
echo $?
# 推荐使用
psql -At -p 54321 -U keepalived -d keepalived -c "select 1;"
echo $?
psql -At -p 54321 -U keepalived -d keepalived -c "select 1 from dual;"
echo $?
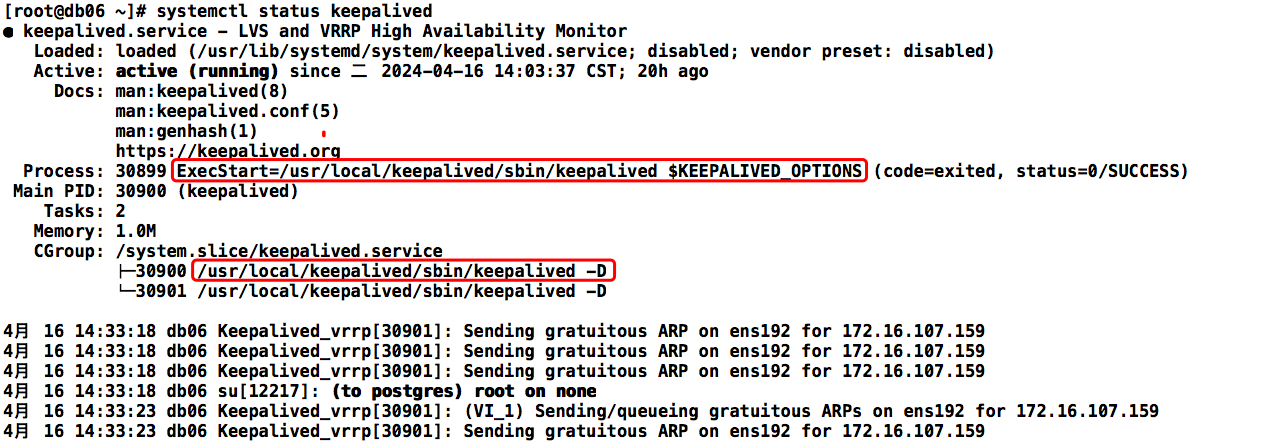
复制问题二:Keepalived默认参数配置路径
Keepalived默认的配置文件路径在:/etc/keepalived/keepalived.conf
Keepalived默认的日志文件保存在OS日志:/var/log/messages
[root@db06 ~]# cat /usr/local/keepalived/etc/sysconfig/keepalived
# Options for keepalived. See `keepalived --help' output and keepalived(8) and
# keepalived.conf(5) man pages for a list of all options. Here are the most
# common ones :
#
# --vrrp               -P    Only run with VRRP subsystem.
# --check              -C    Only run with Health-checker subsystem.
# --dont-release-vrrp  -V    Dont remove VRRP VIPs & VROUTEs on daemon stop.
# --dont-release-ipvs  -I    Dont remove IPVS topology on daemon stop.
# --dump-conf          -d    Dump the configuration data.
# --log-detail         -D    Detailed log messages.
# --log-facility       -S    0-7 Set local syslog facility (default=LOG_DAEMON)
#

KEEPALIVED_OPTIONS="-D"
复制
“-D”:输出日志的选项
-f:修改默认配置文件路径
-S:修改日志文件的默认路径,-S 0 表示local0.* 具体路径看/etc/rsyslog.conf文件配置
vi /usr/local/keepalived/etc/sysconfig/keepalived KEEPALIVED_OPTIONS="-f /etc/keepalived/keepalived.conf -D -S 0" echo "local0.* /etc/keepalived/log/keepalived.log" >> /etc/rsyslog.conf systemctl restart rsyslog systemctl restart keepalived复制
问题三:Keepalived主节点故障发生漂移
Keepalived主节点故障,此时VIP会发生漂移,备库会被提升为主库,此时数据库会出现双主现象
# 模拟主节点故障
systemctl stop keepalived
# 若此时停原主库当备库重新加入集群会失败
pg_ctl stop
echo "standby_mode = on" > $PGDATA/standby.signal
pg_ctl start
# 数据库日志打印报错消息
2024-04-22 15:11:02.412 CST [8653] FATAL:  could not start WAL streaming: ERROR:  requested starting point 0/8A000000 on timeline 4 is not in this server's history
        DETAIL:  This server's history forked from timeline 4 at 0/89028940.
2024-04-22 15:11:03.015 CST [8467] LOG:  new timeline 5 forked off current database system timeline 4 before current recovery point 0/8A0000A0
# 此时可以查看数据库的时间线,发现当新的备库时间线确实与新主库不一致
pg_controldata | grep TimeLineID
# 可用pg_rewind来同步时间线
pg_ctl stop
[postgres@db07 ~]$ pg_rewind --target-pgdata=/home/postgres/pgdata --source-server='host=172.16.107.156 port=54321 user=postgres dbname=postgres password=postgres'
pg_rewind: servers diverged at WAL location 0/89028940 on timeline 4
pg_rewind: rewinding from last common checkpoint at 0/89027978 on timeline 4
pg_rewind: Done!
# 修复后调整最后一行流复制的参数配置再重新拉起,同上面搭建备库步骤一样
vi $PGDATA/postgresql.conf
primary_conninfo = 'application_name=pgdb02 host=172.16.107.156 port=54321 user=replicator password=replicator'

echo "standby_mode = on" > $PGDATA/standby.signal
pg_ctl start
复制
pg_rewind使用要求目标服务器:
- wal_log_hints=on
- full_page_writes=on
- initdb初始化库时启用了数据校验(checksums)
问题四:数据库编译时报错
数据库编译时缺少icu依赖
# 处理方式一:安装icu依赖
yum install -y libicu libicu-devel
# 处理方式二:指定不编译icu模块
./configure --prefix=/home/postgres/pghome/ --without-icu
复制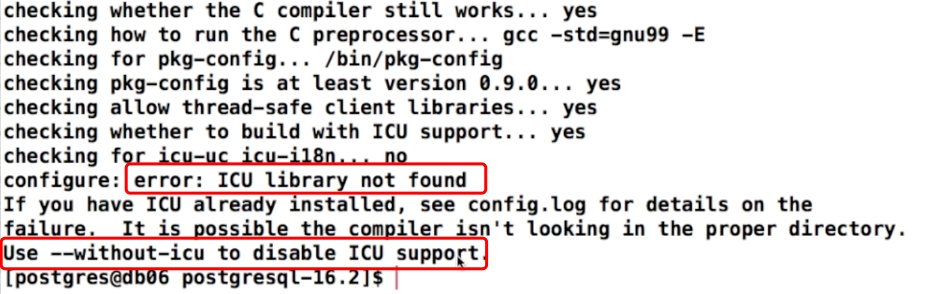
问题五:keepalive编译时报错
keepalive编译时告警缺少icu依赖libnl依赖
# 处理方式一:安装libnl依赖
yum install -y libnl libnl-devel libnl-3 libnl3-devel
# 处理方式二:忽略,IPV6的相关功能,影响不大!
复制
实践建议
- 配置SMTP邮件告警:
https://www.modb.pro/db/1785122224978071552 - 做好备份冗余
文章被以下合辑收录
评论

 0 点赞
0 点赞 0
0 点赞
点赞


