


MogDB 是 EnMotech openGauss DataBase Enterprise Edition 的缩写,是云和恩墨基于华为openGauss开源数据库进行定制、推出的企业发行版。它将围绕高可用、安全、自动化运维、数据库一体机和SQL审核优化等企业需求,解决企业用户落地。其核心价值是易用性、高性能、高可用等和全天候的企业支持。
作为数据库的企业发行版,高可用性是其最重要的功能和指标之一。接下来我们通过具体的集群搭建演示和切换操作,对MogDB的高可用功能进行一次全面的测试。这篇文章主要内容是MogDB主备集群的搭建流程。
目录导航
一、MogDB高可用概述
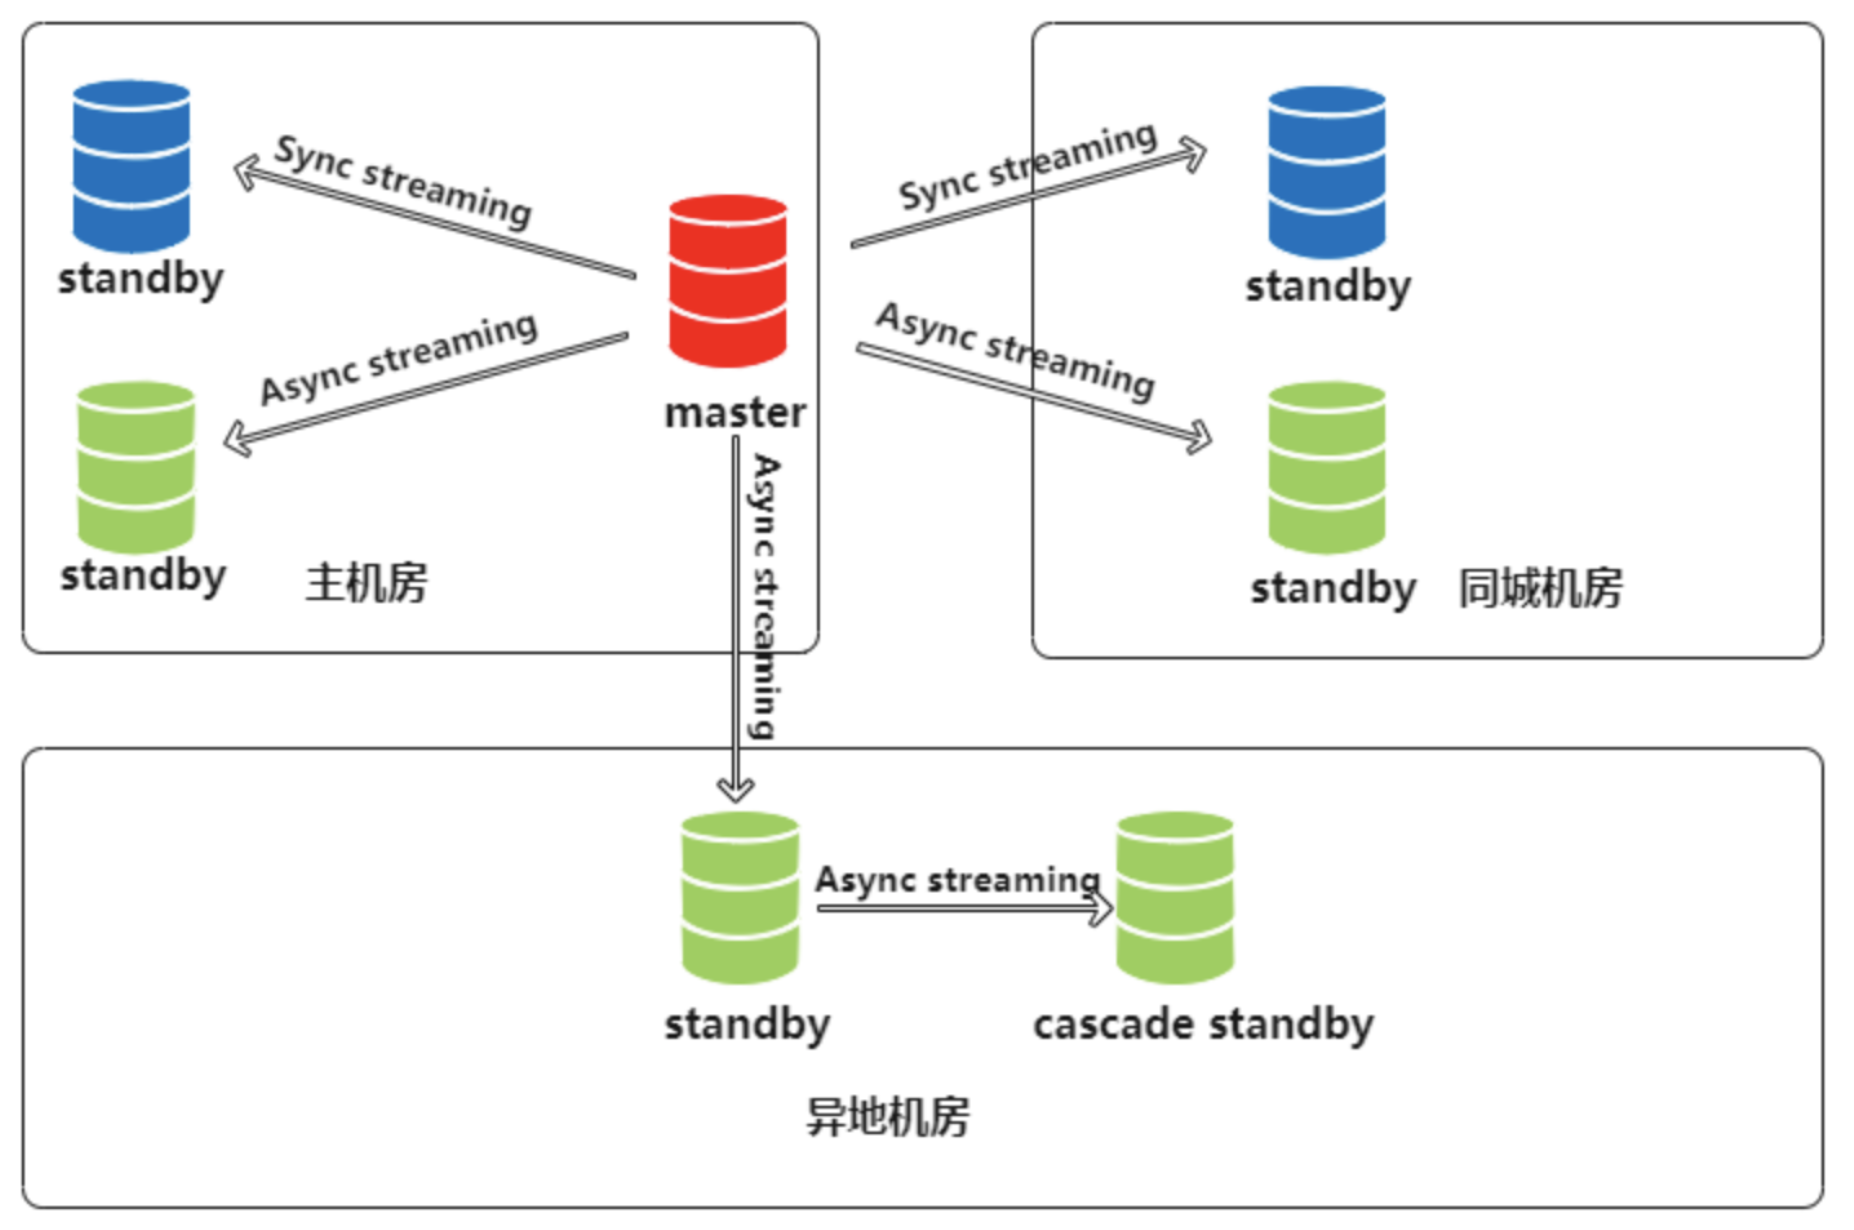
MogDB高可用集群由一主多备(最多支持8备)MogDB实例和MogHA组成。MogDB高可用组件(MogHA)负责响应服务器宕机、实例宕机等多种异常情况,将数据库的故障持续时间从分钟级降到秒级。MogDB通过(同步/异步)流复制保证数据一致性。多节点版的RPO为0,RTO⼩于10s,即当主节点实例故障时,从节点可以在10s之内转换为主节点并提供服务,同时能够保证数据不丢失。
常见MogDB高可用集群架构如下:
二、MogDB集群搭建
实验环境共三台服务器:172.16.71.30(mogdb)/31(mogdb1)/32(mogdb2);接下来我们演示如何一步步的搭建一个一主两从的MogDB集群。
- 实例信息
| 主机名 | IP | 角色 |
|---|---|---|
| mogdb | 172.16.71.30 | 主 |
| Mogdb1 | 172.16.71.31 | 备 |
| Mogdb2 | 172.16.71.32 | 备 |
1、操作系统配置修改
- 检查防火墙是否关闭
systemctl status firewalld复制
若防火墙状态显示为active (running),则表示防火墙未关闭,请执行以下步骤
#关闭防火墙并禁止开机重启 systemctl disable firewalld.service systemctl stop firewalld.service复制
- 检查各节点字符集配置是否相同
echo $LANG复制
- 配置各节点时区一致
#查看当前时区 timedatectl status #修改时区,国内环境建议统一设置成"Asia/Shanghai" timedatectl set-timezone "Asia/Shanghai"复制
- 配置各节点时间同步
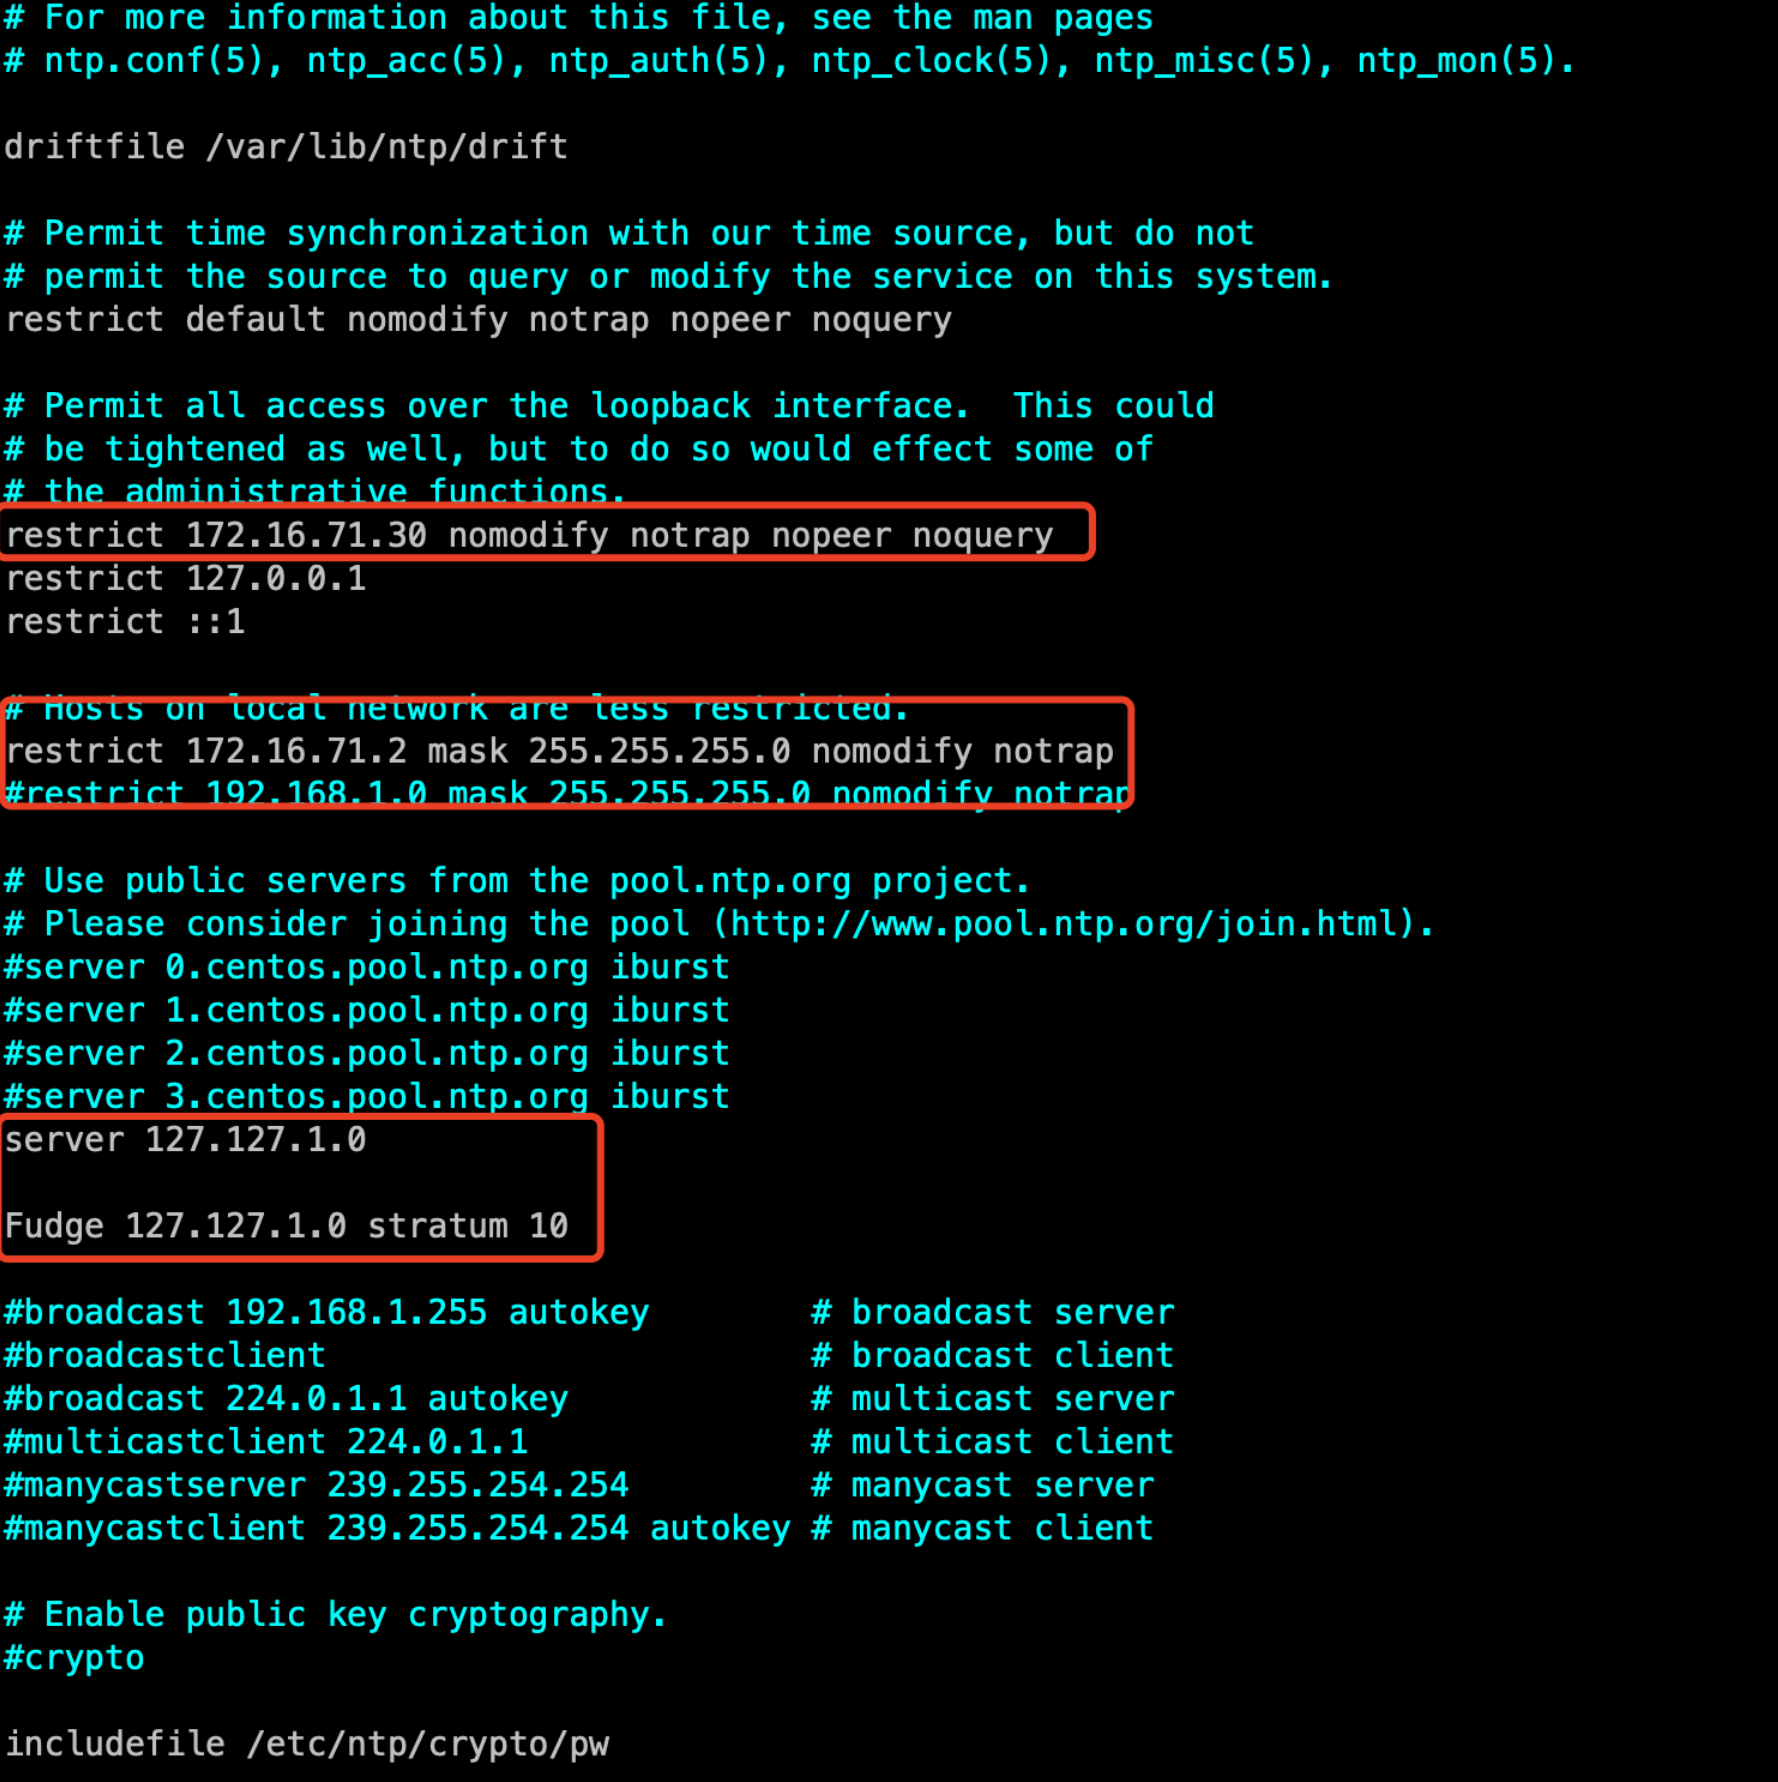
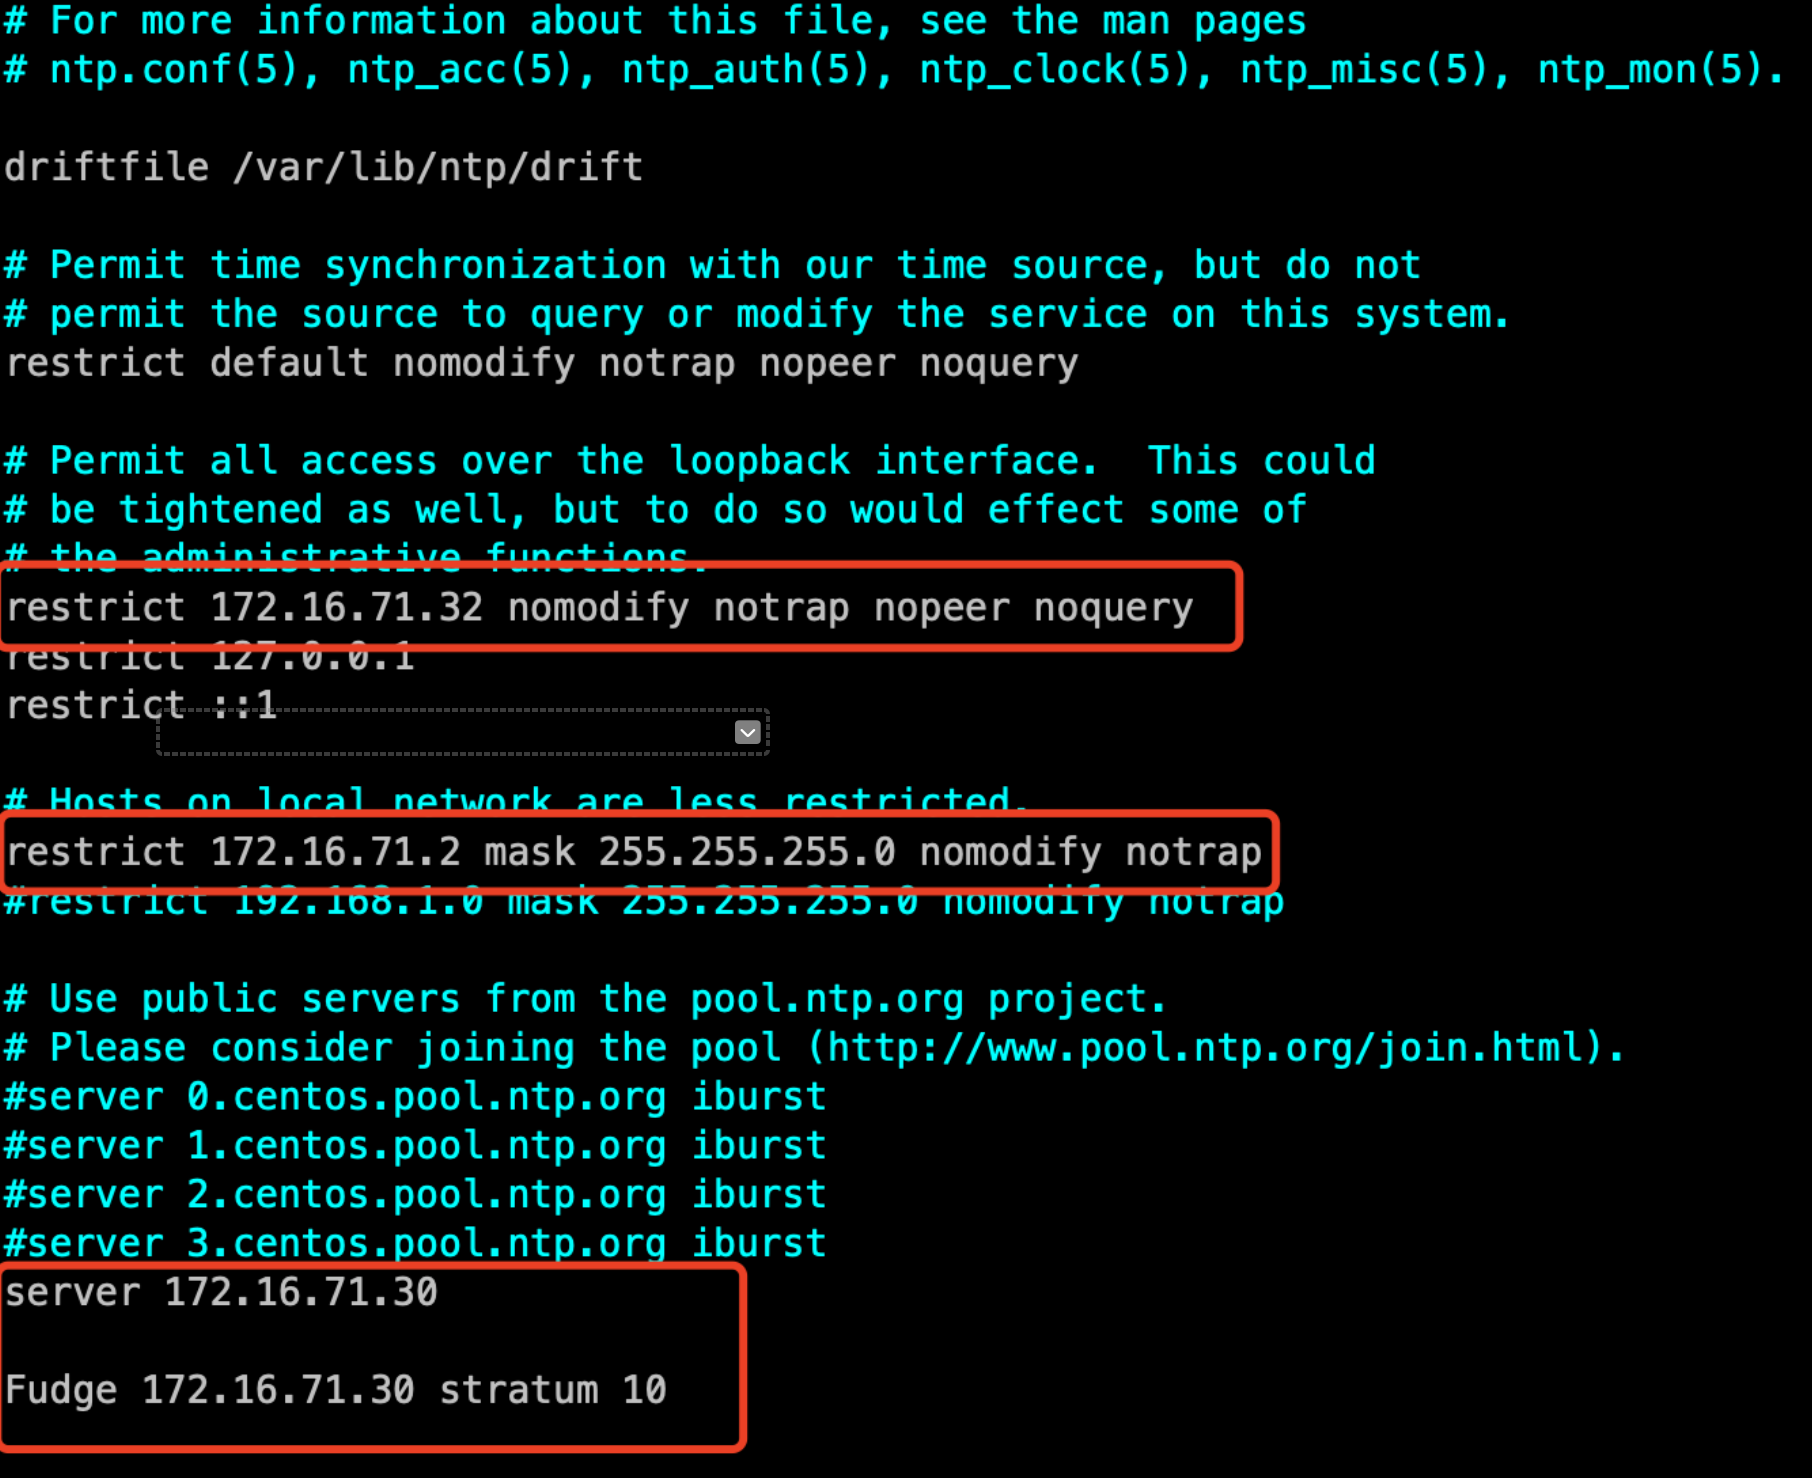
#安装ntp服务 yum install ntp -y #修改ntp配置 vim /etc/ntp.conf restrict 172.16.71.30 nomodify notrap nopeer noquery //当前节点IP地址 restrict 172.16.71.2 mask 255.255.255.0 nomodify notrap //集群所在网段的网关(Gateway),子网掩码(Genmask) #选择一个主节点 在server部分添加以下部分,并注释掉server 0 ~ n server 127.127.1.0 Fudge 127.127.1.0 stratum 10 #在其他节点 在server部分添加如下语句,将server指向主节点。 server 172.16.71.30 Fudge 172.16.71.30 stratum 10复制
#启动ntp服务 systemctl start ntpd #查看ntp状态 systemctl status ntpd #检查时间同步 ntpq -p clockdiff -o 172.16.71.30 #设置开机启动 systemctl enable ntpd.service复制
- 配置/etc/hosts
各节点配置/etc/hosts 内网IP hostname复制
- 关闭swap
swapoff -a复制
- 设置网卡mtu
x86,MTU值推荐1500;对于ARM,MTU值推荐8192
ifconfig 网卡编号 mtu 值复制
- 关闭RemoveIPC
测试环境为CentOS,无需修改
- 设置root用户远程登录
vim /etc/ssh/sshd_config #注释掉“PermitRootLogin no” #PermitRootLogin no #或者将“PermitRootLogin”改为“yes”。 PermitRootLogin yes #修改Banner配置,去掉连接到系统时,系统提示的欢迎信息。欢迎信息会干扰安装时远程操作的返回结果,影响安装正常执行。 #Banner XXXX #保存退出 #执行以下命令使配置生效 systemctl restart sshd.service复制
2、安装
- 下载
wget https://cdn-mogdb.enmotech.com/mogdb-media/2.0.1/MogDB-2.0.1-CentOS-all-x86_64.tar复制
- 在所有节点以root用户执行以下命令
yum install -y bzip2 libaio-devel flex bison ncurses-devel glibc-devel libxml2-devel patch redhat-lsb-core unzip gcc gcc-c++ perl openssl-devel libffi-devel libtool zlib-devel复制
- 在任意一台服务器上执行以下命令
mkdir -p /opt/software/mogdb chmod 755 -R /opt/software cd /opt/software/mogdb cp ~/MogDB-2.0.1-CentOS-all-x86_64.tar . tar xvf MogDB-2.0.1-CentOS-all-x86_64.tar tar -xvf MogDB-2.0.1-CentOS-64bit-om.tar.gz tar -xf MogDB-2.0.1-CentOS-64bit.tar.bz2 cd /opt/software/mogdb/script export LD_LIBRARY_PATH=/opt/software/mogdb/script/gspylib/clib:$LD_LIBRARY_PATH复制
- CentOS系统需要安装python3,请在所有节点依次执行以下命令
cd ~ wget https://www.python.org/ftp/python/3.6.5/Python-3.6.5.tgz mkdir -p /usr/local/python3 tar -zxvf Python-3.6.5.tgz cd Python-3.6.5 ./configure --prefix=/usr/local/python3 --enable-shared CFLAGS=-fPIC && make && make install ln -s /usr/local/python3/bin/python3 /usr/bin/python3 ln -s /usr/local/python3/bin/pip3 /usr/bin/pip3 find / -name libpython3.6m.so.1.0 cp libpython3.6m.so.1.0 /usr/lib64复制
- 编辑xml文件
cd /opt/software/mogdb vim clusterconfig.xml复制
<?xml version="1.0" encoding="UTF-8"?>
<ROOT>
    <!-- MogDB整体信息 -->
    <CLUSTER>
        <PARAM name="clusterName" value="dbCluster" />
        <PARAM name="nodeNames" value="mogdb,mogdb1,mogdb2" />
        <PARAM name="backIp1s" value="172.16.71.30,172.16.71.31,172.16.71.32"/>
        <PARAM name="gaussdbAppPath" value="/opt/mogdb/app" />
        <PARAM name="gaussdbLogPath" value="/var/log/mogdb" />
        <PARAM name="gaussdbToolPath" value="/opt/mogdb/tools" />
        <PARAM name="corePath" value="/opt/mogdb/corefile"/>
        <PARAM name="clusterType" value="single-inst"/>
    </CLUSTER>
    <!-- 每台服务器上的节点部署信息 -->
    <DEVICELIST>
        <!-- node1上的节点部署信息 -->
        <DEVICE sn="1000001">
            <PARAM name="name" value="mogdb"/>
            <PARAM name="azName" value="AZ1"/>
            <PARAM name="azPriority" value="1"/>
            <!-- 如果服务器只有一个网卡可用,将backIP1和sshIP1配置成同一个IP -->
            <PARAM name="backIp1" value="172.16.71.30"/>
            <PARAM name="sshIp1" value="172.16.71.30"/>

            <!--dbnode-->
            <PARAM name="dataNum" value="1"/>
            <PARAM name="dataPortBase" value="26000"/>
            <PARAM name="dataNode1" value="/mogdb/data/db1,mogdb1,/mogdb/data/db1, mogdb2,/mogdb/data/db1"/>
        </DEVICE>

        <!-- node2上的节点部署信息,其中“name”的值配置为主机名称 -->
        <DEVICE sn="1000002">
            <PARAM name="name" value="mogdb1"/>
            <PARAM name="azName" value="AZ1"/>
            <PARAM name="azPriority" value="1"/>
            <!-- 如果服务器只有一个网卡可用,将backIP1和sshIP1配置成同一个IP -->
            <PARAM name="backIp1" value="172.16.71.31"/>
            <PARAM name="sshIp1" value="172.16.71.31"/>
        </DEVICE>
        <!--node3上的节点部署信息,其中“name”的值配置为主机名称 -->
        <DEVICE sn="1000003">
            <PARAM name="name" value="mogdb2"/>
            <PARAM name="azName" value="AZ1"/>
            <PARAM name="azPriority" value="1"/>
            <!-- 如果服务器只有一个网卡可用,将backIP1和sshIP1配置成同一个IP -->
            <PARAM name="backIp1" value="172.16.71.32"/>
            <PARAM name="sshIp1" value="172.16.71.32"/>
        </DEVICE>
    </DEVICELIST>
</ROOT>
复制- 初始化脚本
执行以下命令以初始化脚本: /opt/software/mogdb/script/gs_preinstall -U omm -G dbgrp -X /opt/software/mogdb/clusterconfig.xml复制
如出现如下报错,则用/usr/local/python3/bin/python3替换/usr/bin/python3
python3: symbol lookup error: python3: undefined symbol: _Py_LegacyLocaleDetected #cp /usr/local/python3/bin/python3 /usr/bin/复制
运行过程中会创建omm用户,输入yes,然后输入相关密码,需保证复杂度要求,密码应包括大小写、字符、数字,例如Enmo@123
[root@mogdb mogdb]# /opt/software/mogdb/script/gs_preinstall -U omm -G dbgrp -X /opt/software/mogdb/clusterconfig.xml Parsing the configuration file. Successfully parsed the configuration file. Installing the tools on the local node. Successfully installed the tools on the local node. Are you sure you want to create trust for root (yes/no)? yes Please enter password for root. Password: Creating SSH trust for the root permission user. Checking network information. All nodes in the network are Normal. Successfully checked network information. Creating SSH trust. Creating the local key file. Successfully created the local key files. Appending local ID to authorized_keys. Successfully appended local ID to authorized_keys. Updating the known_hosts file. Successfully updated the known_hosts file. Appending authorized_key on the remote node. Successfully appended authorized_key on all remote node. Checking common authentication file content. Successfully checked common authentication content. Distributing SSH trust file to all node. Successfully distributed SSH trust file to all node. Verifying SSH trust on all hosts. Successfully verified SSH trust on all hosts. Successfully created SSH trust. Successfully created SSH trust for the root permission user. Setting pssh path Successfully set core path. Distributing package. Begin to distribute package to tool path. Successfully distribute package to tool path. Begin to distribute package to package path. Successfully distribute package to package path. Successfully distributed package. Are you sure you want to create the user[omm] and create trust for it (yes/no)? yes Preparing SSH service. Successfully prepared SSH service. Installing the tools in the cluster. Successfully installed the tools in the cluster. Checking hostname mapping. Successfully checked hostname mapping. Creating SSH trust for [omm] user. Please enter password for current user[omm]. Password: Checking network information. All nodes in the network are Normal. Successfully checked network information. Creating SSH trust. Creating the local key file. Successfully created the local key files. Appending local ID to authorized_keys. Successfully appended local ID to authorized_keys. Updating the known_hosts file. Successfully updated the known_hosts file. Appending authorized_key on the remote node. Successfully appended authorized_key on all remote node. Checking common authentication file content. Successfully checked common authentication content. Distributing SSH trust file to all node. Successfully distributed SSH trust file to all node. Verifying SSH trust on all hosts. Successfully verified SSH trust on all hosts. Successfully created SSH trust. Successfully created SSH trust for [omm] user. Checking OS software. Successfully check os software. Checking OS version. Successfully checked OS version. Creating cluster's path. Successfully created cluster's path. Setting SCTP service. Successfully set SCTP service. Set and check OS parameter. Setting OS parameters. Successfully set OS parameters. Warning: Installation environment contains some warning messages. Please get more details by "/opt/software/mogdb/script/gs_checkos -i A -h mogdb,mogdb1,mogdb2 --detail". Set and check OS parameter completed. Preparing CRON service. Successfully prepared CRON service. Setting user environmental variables. Successfully set user environmental variables. Setting the dynamic link library. Successfully set the dynamic link library. Setting Core file Successfully set core path. Setting pssh path Successfully set pssh path. Set ARM Optimization. No need to set ARM Optimization. Fixing server package owner. Setting finish flag. Successfully set finish flag. Preinstallation succeeded.复制
- 安装数据库
依次执行以下命令安装MogDB
cd /opt/software/mogdb/script chmod -R 755 /opt/software/mogdb/script chown -R omm:dbgrp /opt/software/mogdb/script chown -R omm:dbgrp /opt/mogdb su - omm /opt/software/mogdb/script/gs_install -X /opt/software/mogdb/clusterconfig.xml --gsinit-parameter="--locale=en_US.UTF-8" --gsinit-parameter="--encoding=UTF-8"复制
说明:在执行过程中,用户需根据提示输入数据库的密码,密码具有一定的复杂度,为保证用户正常使用该数据库,请记住输入的数据库密码。
[omm@mogdb ~]$ /opt/software/mogdb/script/gs_install -X /opt/software/mogdb/clusterconfig.xml --gsinit-parameter="--locale=en_US.UTF-8" --gsinit-parameter="--encoding=UTF-8" Parsing the configuration file. Check preinstall on every node. Successfully checked preinstall on every node. Creating the backup directory. Last time end with Start cluster. Continue this step. Successfully created the backup directory. begin deploy.. Successfully started cluster. Successfully installed application. end deploy..复制
3、使用
- 连接数据库
安装完成后我们就可以在omm用户下使用gs_om -t status 检查实例状态,也可以通过gsql命令连接数据库了
可以看到已经成功在172.16.71.30(mogdb)/31(mogdb1)/32(mogdb2)三台服务器上部署并运行了MogDB实例,其中172.16.71.30为主配置了两个物理复制槽,172.16.71.31/32 通过流复制从主库同步复制数据。 [omm@mogdb ~]$ gs_om -t status --detail [ Cluster State ] cluster_state : Normal redistributing : No current_az : AZ_ALL [ Datanode State ] node node_ip instance state | node node_ip instance state | node node_ip instance state ------------------------------------------------------------------------------------------------------------------------------------------------------------------------------------------------------------------ 1 mogdb 172.16.71.30 6001 /mogdb/data/db1 P Primary Normal | 2 mogdb1 172.16.71.31 6002 /mogdb/data/db1 S Standby Normal | 3 mogdb2 172.16.71.32 6003 /mogdb/data/db1 S Standby Normal [omm@mogdb ~]$ gsql -d postgres -p 26000 -r gsql ((MogDB 2.0.1 build f892ccb7) compiled at 2021-07-09 16:12:59 commit 0 last mr ) Non-SSL connection (SSL connection is recommended when requiring high-security) Type "help" for help. postgres=# \x Expanded display is on. postgres=# select * from pg_stat_replication; -[ RECORD 1 ]------------+------------------------------ pid | 140563006682880 usesysid | 10 usename | omm application_name | WalSender to Standby[dn_6003] client_addr | 172.16.71.32 client_hostname | mogdb2 client_port | 51992 backend_start | 2021-11-26 12:47:02.481731+08 state | Streaming sender_sent_location | 0/50006B8 receiver_write_location | 0/50006B8 receiver_flush_location | 0/50006B8 receiver_replay_location | 0/50006B8 sync_priority | 1 sync_state | Quorum -[ RECORD 2 ]------------+------------------------------ pid | 140562519357184 usesysid | 10 usename | omm application_name | WalSender to Standby[dn_6002] client_addr | 172.16.71.31 client_hostname | mogdb1 client_port | 55886 backend_start | 2021-11-26 12:47:02.787971+08 state | Streaming sender_sent_location | 0/50006B8 receiver_write_location | 0/50006B8 receiver_flush_location | 0/50006B8 receiver_replay_location | 0/50006B8 sync_priority | 1 sync_state | Quorum postgres=# select * from pg_replication_slots ; -[ RECORD 1 ]-+---------- slot_name | dn_6003 plugin | slot_type | physical datoid | 0 database | active | t xmin | catalog_xmin | restart_lsn | 0/50006B8 dummy_standby | f -[ RECORD 2 ]-+---------- slot_name | dn_6002 plugin | slot_type | physical datoid | 0 database | active | t xmin | catalog_xmin | restart_lsn | 0/50006B8 dummy_standby | f复制
- 配置变更
数据库安装完成后,可以通过以下脚本调整优化数据库配置(具体的参数值按需求调整)
#!/bin/bash

source ~/.bashrc

memory=`free|awk '{print $2}' |sed -n 2p`
if [[ $memory -lt 10*1024*1024 ]]
then
	max_process_memory=2GB
	shared_buffers=128MB
	max_connections=500
	work_mem=4MB
	maintenance_work_mem=256MB
	echo "If the database fails to start, lower the parameters max_process_memory and shared_buffers"
elif [[ $memory -gt 4*1024*1024 ]] && [[ $memory -lt 8*1024*1024 ]]
then
	max_process_memory=5GB
	shared_buffers=1GB
	max_connections=1000
	work_mem=16MB
	maintenance_work_mem=1GB
else
	max_process_memory=$((memory*6/10/1024/1024))
	shared_buffers=$((memory*3/10/1024/1024))
	max_connections=3000
	work_mem=64MB
	maintenance_work_mem=2GB
fi

##内存相关参数
gs_guc set -I all -N all -c "max_process_memory=${max_process_memory}"
gs_guc set -I all -N all -c "shared_buffers=${shared_buffers}"
gs_guc set -I all -N all -c "work_mem=${work_mem}"
gs_guc set -I all -N all -c "maintenance_work_mem=${maintenance_work_mem}"
gs_guc set -I all -N all -c "cstore_buffers=16MB"
gs_guc set -I all -N all -c "wal_buffers=1GB"
gs_guc set -I all -N all -c "local_syscache_threshold=32MB"
gs_guc set -I all -N all -c "standby_shared_buffers_fraction=1"

##连接访问相关参数
gs_guc set -I all -N all -c "max_connections=${max_connections}"
gs_guc set -I all -N all -c "max_prepared_transactions=${max_connections}"
gs_guc set -I all -N all -c "listen_addresses = '*'"
gs_guc set -I all -N all -c "remote_read_mode=non_authentication"
gs_guc set -I all -N all -c "password_encryption_type=1"
gs_guc set -I all -N all -c "password_reuse_time=0"
gs_guc set -I all -N all -c "password_lock_time=0"
gs_guc set -I all -N all -c "password_effect_time=0"
gs_guc set -I all -N all -c "session_timeout=0"

##wal相关参数
gs_guc set -I all -N all -c "wal_level=logical"
gs_guc set -I all -N all -c "full_page_writes=off"
gs_guc set -I all -N all -c "wal_log_hints=off"
gs_guc set -I all -N all -c "xloginsert_locks=48"
gs_guc set -I all -N all -c "advance_xlog_file_num=10"

##复制相关参数
gs_guc set -I all -N all -c "synchronous_commit=on"
gs_guc set -I all -N all -c "wal_keep_segments=1024"
gs_guc set -I all -N all -c "max_wal_senders=16"
gs_guc set -I all -N all -c "recovery_max_workers=4"
gs_guc set -I all -N all -c "most_available_sync=on"
gs_guc set -I all -N all -c "max_size_for_xlog_prune=104857600"
gs_guc set -I all -N all -c "catchup2normal_wait_time=0"
gs_guc set -I all -N all -c "enable_slot_log=on"
gs_guc set -I all -N all -c "max_replication_slots=32"
gs_guc set -I all -N all -c "wal_receiver_timeout=60s"
gs_guc set -I all -N all -c "sync_config_strategy=none_node"

##日志相关参数
gs_guc set -I all -N all -c "logging_collector=on"
gs_guc set -I all -N all -c "log_duration=on"
gs_guc set -I all -N all -c "log_line_prefix='%m %u %d %r %p %S'"
gs_guc set -I all -N all -c "log_checkpoints=on"
gs_guc set -I all -N all -c "plog_merge_age=0"

##性能统计相关参数
gs_guc set -I all -N all -c "vacuum_cost_limit=1000"
gs_guc set -I all -N all -c "autovacuum_max_workers=10"
gs_guc set -I all -N all -c "autovacuum_naptime=20s"
gs_guc set -I all -N all -c "autovacuum_vacuum_cost_delay=10"
gs_guc set -I all -N all -c "autovacuum_vacuum_scale_factor=0.05"
gs_guc set -I all -N all -c "autovacuum_analyze_scale_factor=0.02"
gs_guc set -I all -N all -c "autovacuum_vacuum_threshold=200"
gs_guc set -I all -N all -c "autovacuum_analyze_threshold=200"
gs_guc set -I all -N all -c "autovacuum_io_limits=104857600"
gs_guc set -I all -N all -c "instr_unique_sql_count=20000"
gs_guc set -I all -N all -c "enable_save_datachanged_timestamp=off"
gs_guc set -I all -N all -c "track_sql_count=off"
gs_guc set -I all -N all -c "enable_instr_rt_percentile=off"
gs_guc set -I all -N all -c "enable_instance_metric_persistent=off"
gs_guc set -I all -N all -c "enable_logical_io_statistics=off"
gs_guc set -I all -N all -c "enable_user_metric_persistent=off"
gs_guc set -I all -N all -c "enable_mergejoin=on"
gs_guc set -I all -N all -c "enable_nestloop=on"
gs_guc set -I all -N all -c "enable_pbe_optimization=off"
gs_guc set -I all -N all -c "enable_resource_track=on"
gs_guc set -I all -N all -c "enable_wdr_snapshot=on"
gs_guc set -I all -N all -c "instr_unique_sql_count=5000"

##客户端白名单
gs_guc set -I all -N all -h "host     all      all  0.0.0.0/0    md5"

##其他参数
gs_guc set -I all -N all -c "checkpoint_segments=1024"
gs_guc set -I all -N all -c "checkpoint_completion_target=0.8"
gs_guc set -I all -N all -c "pagewriter_sleep=200"

gs_guc set -I all -N all -c "enable_alarm=off"
gs_guc set -I all -N all -c "enable_codegen=off"
gs_guc set -I all -N all -c "audit_enabled=off"
gs_guc set -I all -N all -c "enable_asp=off"

gs_guc set -I all -N all -c "lc_messages='en_US.UTF-8'"
gs_guc set -I all -N all -c "lc_monetary='en_US.UTF-8'"
gs_guc set -I all -N all -c "lc_numeric='en_US.UTF-8'"
gs_guc set -I all -N all -c "lc_time='en_US.UTF-8'"

gs_guc set -I all -N all -c "update_lockwait_timeout=1min"
gs_guc set -I all -N all -c "lockwait_timeout=1min"

gs_guc set -I all -N all -c "max_files_per_process=100000"
gs_guc set -I all -N all -c "behavior_compat_options='display_leading_zero'"
gs_guc set -I all -N all -c "enable_thread_pool=off"
复制
执行完成后重启数据库实例
gs_om -t stop && gs_om -t start复制
检查集群状态
[omm@mogdb db1]$ gs_om -t status --detail [ Cluster State ] cluster_state : Normal redistributing : No current_az : AZ_ALL [ Datanode State ] node node_ip instance state | node node_ip instance state | node node_ip instance state ------------------------------------------------------------------------------------------------------------------------------------------------------------------------------------------------------------------ 1 mogdb 172.16.71.30 6001 /mogdb/data/db1 P Primary Normal | 2 mogdb1 172.16.71.31 6002 /mogdb/data/db1 S Standby Normal | 3 mogdb2 172.16.71.32 6003 /mogdb/data/db1 S Standby Normal复制
小结
这篇文章演示了如何搭建MogDB集群,从操作系统配置修改,到配置安装MogDB集群,最后修改优化了数据库配置。 从实验过程我们可以看到 使用MogDB提供的部署工具,整个部署流程比较简便。安装过程包括主备同步配置和实例启动,省略了很多手工配置的操作,非常适合大规模集群的部署。欢迎大家下载测试。
评论

 0 点赞
0 点赞