


Kingbase 产品介绍
- KingbaseES
人大金仓数据库管理系统 KingbaseES(KES) 是面向全行业、全客户关键应用的企业级大型通用数据库管理系统,适用于联机事务处理、查询密集型数据仓库、要求苛刻的互联网应用等场景,提供全部应用开发及系统管理功能,提供性能增强特性,可支持主备集群、读写分离集群、多活共享存储集群等全集群架构,具有高性能、高安全、高可用、易使用、易管理、易维护的特点,支持所有国内外主流CPU、操作系统与云平台部署。
人大金仓数据库管理系统 KingbaseES(KES)于2022年7月升级到了V9版本。 - KingbaseAnalyticsDB
金仓分析型数据库系统KingbaseAnalyticsDB(以下简称为 KADB)是北京人大金仓信息技术股份有限公司推出的MPP数据库产品。产品应大数据时代海量数据分析处理的需求,采用shared-nothing分布式架构,具有高性能,高扩展性能力,承载了人大金仓在大规模并行计算和数据库管理领域先进的研发成果,它定位于数据分析类应用市场,可以处理TB-PB级别的数据,并能集成多种异构数据源进行数据挖掘和分析。在处理复杂查询,如:多表连接、聚合等,也体现出了很好的性能。适用于数据仓库、决策支持、高级分析等分析类应用场景。 - Kingbase FlySync是面向同城/异地灾备、数据库平滑升级替换、数据集中共享与分发、应用上云迁移、数据库负载均衡等场景的数据同步产品。该产品基于增量日志解析技术,性能高、时延低、资源占用极少,能够实现异构数据源之间大规模增量数据的任意方向流转和实时同步,帮助用户打破数据孤岛,轻松共享分发数据。Kingbase FlySync支持丰富的软硬件平台和数据源,同步拓扑可以一对一、一对多、多对一、级联等方式任意组合延伸,并可在数据同步过程中保证端到端的事务级数据完整性和高可用性。
KingbaseES(KES)认证

我是在2021年11月12日通过了KCP认证:

KingbaseES(KES)集群部署
安装前准备
主机、目录规划
| 主机名 | ip地址 | OS版本 | 内存、CPU | 节点角色 | 数据库端口 |
|---|---|---|---|---|---|
| node1 | 192.168.100.10 | Centos7.9 | 4G 、 1个双核 | 主节点 | 54321 |
| node2 | 192.168.100.11 | Centos7.9 | 4G 、 1个双核 | 从节点 | 54321 |
| node3 | 192.168.100.12 | Centos7.9 | 4G 、 1个双核 | 从节点 | 54321 |
vip:192.168.100.14,由于机器资源有限,本次无witness节点
软件安装目录 /opt/kes/v9
数据存放目录 /data
关闭SELINUX
# vi /etc/selinux/config
修改SELINUX=disabled
或者
sed -i 's/^SELINUX=enforcing/SELINUX=disabled/g' /etc/selinux/config
关闭防火墙
# systemctl disable firewalld.service
# systemctl stop firewalld.service
# systemctl status firewalld
关闭RemoveIPC
在各数据库节点上,关闭RemoveIPC。
 (1) 修改/etc/systemd/logind.conf文件中的“RemoveIPC”值为“no”
vim  /etc/systemd/logind.conf
RemoveIPC=no

(2) 修改/usr/lib/systemd/system/systemd-logind.service文件中的“RemoveIPC”值为“no”
vim /usr/lib/systemd/system/systemd-logind.service
RemoveIPC=no

(3) 重启服务
systemctl daemon-reload
systemctl restart systemd-logind.service

(4) 结果验证确认
loginctl show-session | grep RemoveIPC
systemctl show systemd-logind | grep RemoveIPC
配置sudo权限
cat  >>/etc/sudoers << EOF
kingbase ALL=(ALL) NOPASSWD:ALL
EOF
配置时间同步
# yum install -y ntpdate

--每天凌晨2点进行同步
# crontab -e
0 2 * * * /usr/sbin/ntpdate  time.windows.com >> /var/log/ntpdate.log 2>&1
设置/etc/hosts
# cat >> /etc/hosts <<EOF
192.168.100.10 node1
192.168.100.11 node2
192.168.100.12 node3
EOF
设置内核参数
# cat >> /etc/sysctl.conf <<EOF
#add by kingbase
kernel.sem = 250 162500 250 650
kernel.shmall = 3774873
kernel.shmmax = 8589934592
kernel.shmmni = 4096
vm.dirty_background_ratio=2
vm.dirty_ratio = 40
vm.overcommit_memory = 2
vm.overcommit_ratio = 90
vm.swappiness = 0
fs.aio-max-nr = 1048576
fs.file-max = 6815744
fs.nr_open = 20480000
net.ipv4.ip_local_port_range = 10000 65000
net.ipv4.tcp_keepalive_time = 1200
net.ipv4.tcp_keepalive_probes = 3
net.ipv4.tcp_keepalive_intvl = 30
net.ipv4.tcp_max_syn_backlog = 8192
net.ipv4.tcp_max_tw_buckets = 6000
net.ipv4.tcp_max_syn_backlog = 65536
net.core.somaxconn=1024
net.core.netdev_max_backlog = 32768
net.core.wmem_default = 8388608
net.core.wmem_max = 1048576
net.core.rmem_default = 8388608
net.core.rmem_max = 16777216
net.ipv4.tcp_synack_retries = 2
net.ipv4.tcp_fin_timeout = 30
net.ipv4.tcp_syn_retries = 2
net.ipv4.route.gc_timeout = 100
net.ipv4.tcp_wmem = 8192 436600 873200
net.ipv4.tcp_rmem  = 32768 436600 873200
net.ipv4.tcp_mem = 94500000 91500000 92700000
net.ipv4.tcp_max_orphans = 3276800
EOF
sysctl -p 生效
设置资源限制
# cat >> /etc/security/limits.conf <<EOF
#add by kingbase
kingbase soft  nproc   65536
kingbase  hard  nproc   65536
kingbase  soft  nofile  65536
kingbase  hard  nofile  65536
kingbase  soft  stack   10240
kingbase  hard  stack   32768
kingbase soft core unlimited
kingbase hard core unlimited
EOF
创建用户及用户组
# groupadd -g 1101 kingbase
# useradd -g kingbase -u 1101 -m kingbase
# passwd kingbase
配置kingbase用户互信
所有节点使用kingbase用户进行如下操作:
$ mkdir ~/.ssh
$ chmod 700 ~/.ssh
$ ssh-keygen -t rsa

--将公钥文件上传至同集群所有节点(包括本节点)
$ ssh-copy-id kingbase@各节点主机IP
创建软件安装目录并授权
# mkdir -p /opt/kes/v9
# chown -R kingbase:kingbase /opt/kes/v9
创建数据目录并授权
# mkdir -p /data
# chown -R kingbase:kingbase /data
开始安装
主要安装过程如下:
# su - kingbase
$ cd /soft
$ ./setup.sh
1、接受许可协议
2、选择安装方式
  ->1- Full
    2- Client
    3- Custom
3、选择license文件:
   File Path: /soft/license_34148/license_34148_0.dat
4、选择软件安装文件夹
   ENTER AN ABSOLUTE PATH, OR PRESS <ENTER> TO ACCEPT THE DEFAULT
      : /opt/kes/v9
5、选择数据目录文件夹
   Data folder (Default: /opt/kes/v9/data): /data
6、输入端口
   Please enter database service listened port, default 54321.
   Port (Default: 54321):
5、输入数据库管理用户和密码
   Please enter database administrator user name.
   User: (Default: system):
   Please Enter the Password: Please Enter the Password:******
6、输入字符集
   Please enter server character set encoding.
  ->1- UTF8
    2- GBK
    3- GB18030
7、输入数据库模式
   Please enter database mode.
    1- PG
  ->2- ORACLE
    3- MySQL
   ENTER THE NUMBER FOR YOUR CHOICE, OR PRESS <ENTER> TO ACCEPT THE DEFAULT: 2
8、输入大小写敏感性
   Please enter the case sensitivity.
  ->1- YES
    2- NO
ENTER THE NUMBER FOR YOUR CHOICE, OR PRESS <ENTER> TO ACCEPT THE DEFAULT: 2
9、输入数据库block大小
   Please enter block size used in storing data.
  ->1- 8k
    2- 16k
    3- 32k
   ENTER THE NUMBER FOR YOUR CHOICE, OR PRESS <ENTER> TO ACCEPT THE DEFAULT: 1
10、输入加密方法
   Please enter the encrypt method.
  ->1- sm4
    2- rc4
 ENTER THE NUMBER FOR YOUR CHOICE, OR PRESS <ENTER> TO ACCEPT THE DEFAULT: 1
11、初始化数据库
12、安装完成
Congratulations. KingbaseES V9 has been successfully installed to:
/opt/kes/v9
If you want to register KingbaseES V8 as OS service, please run

    /opt/kes/v9/install/script/root.sh
本次是集群安装,不需要执行/opt/kes/v9/install/script/root.sh脚本。
配置kingbase用户环境变量
vi .bash_profile
PATH=/opt/kes/v9/KESRealPro/V009R001C001B0025/Server/bin:$PATH

source .bash_profile
集群部署
创建集群安装目录并授权
Kingbase集群软件目录 /opt/kes/v9/cluster
集群数据目录 /data/cluster/data
$ mkdir -p /opt/kes/v9/cluster
$ mkdir -p /data/cluster/data

$ chown -R kingbase:kingbase /opt/kes
$ chmod -R 755 /opt/kes
$ chmod -R 700 /data/cluster/data
集群部署文件包含:db.zip、securecmdd.zip、install.conf、cluster_install.sh、license.dat
拷贝授权文件
$ cd /soft/license_34148
$ cp license_34148_0.dat /opt/kes/v9/KESRealPro/V009R001C001B0025/ClientTools/guitools/DeployTools/zip/
拷贝集群部署文件到集群软件目录
$ cd /opt/kes/v9/KESRealPro/V009R001C001B0025/ClientTools/guitools/DeployTools/zip/
$ cp db.zip securecmdd.zip install.conf cluster_install.sh license_34148_0.dat /opt/kes/v9/cluster/
$ cd /opt/kes/v9/cluster/
$ mv license_34148_0.dat license.dat
解压集群软件安装包
$ cd /opt/kes/v9/cluster/
$ unzip db.zip
$ unzip securecmdd.zip
拷贝license文件到集群软件的bin目录
$ cd /opt/kes/v9/cluster
$ cp license.dat ./bin/
向node2、node3主机拷贝集群部署文件
$ scp -r /opt/kes/v9/cluster/* kingbase@node2:/opt/kes/v9/cluster/
$ scp -r /opt/kes/v9/cluster/* kingbase@node3:/opt/kes/v9/cluster/
使用cluster_install.sh命令进行集群部署
kingbase用户在主节点执行 sh cluster_install.sh命令进行集群部署
先关闭开始在主节点部署的数据库
$ sys_ctl stop -D /data
waiting for server to shut down.... done
server stopped
编辑install.conf脚本
在install.conf文件中修改了10处,都用<-------数字------->标识出来了。
[kingbase@node1 cluster]$ vi /opt/kes/v9/cluster/install.conf
## install.conf
## cluster deployment script configuration instructions:
##    path: in the same path as cluster_install.sh.
##    parameter: colud be set in the config file, also could be set in cluster_install.sh script(give priority to the configuration in this file).
##    constraints: 1. SSH encryption needs to be manually configured between the devices on which the script is run and the devices installed in the cluster, including between root users, ordinary users, root user and ordinary users.
##                 2. general-purpose computers can only be executed on ordinary users who are configured with SSH encryption, and BMJ can only be executed on root user, and all must be executed on the primary host.
##                 3. db.zip package decompression is completed at the directory level such as lib, bin, share, there can not be one more layer of directories in the middle, the directory like "kingbase/bin" can not be supported.
##                 4. automatic switching, automatic recovery, quorum syncgronization mode are enabled by default, scram-sha-256 cluster is enabled by default.

## instructions:
##     if you are currently in BMJ or deploy_by_sshd=0, you need to ensure that all hosts have successfully installed the database and that sys_securecmdd is in the startup state

######################################################################
# Required parameters
#####################################################################
[install]
## whether it is BMJ, if so, on_bmj=1, if not on_bmj=0, defaults to on_bmj=0
on_bmj=0

## the cluster node IP which needs to be deployed, is separated by spaces, for example:  all_ip=(192.168.1.10 192.168.1.11)
## or all_ip=(host1 host2)
## means deployed cluster of DG ==> ha_running_mode='DG'
all_ip=(192.168.100.10 192.168.100.11 192.168.100.12)   <-------1------->

## only set if need to setup witness node in cluster. The value is the IP of witness node, for example: witness_ip="192.168.1.12"
## or witness_ip="host"
## it must be NULL when ha_running_mode='TPTC'
witness_ip=""

## the node IP will deployed in PRODUCTION, could not set it when all_ip is not NULL.
## the virtual_ip must be NULL, and auto_cluster_recovery_level will be 0.
## means deployed cluster of TPTC ==> ha_running_mode='TPTC'
## Cannot be configured as a domain name
production_ip=()

## the node IP will deployed in LOCAL DISASTER, could not be NULL if the production_ip is not NULL.
## Cannot be configured as a domain name
local_disaster_recovery_ip=()

## the node IP will deployed in REMOTE DISASTER, it could be NULL even the production_ip is not NULL.
## Cannot be configured as a domain name
remote_disaster_recovery_ip=()

## the path of cluster to be deployed, for example: install_dir="/home/kingbase/tmp_kingbase" [if it is BMJ, you do not need to configure this parameter]
## the directory structure after deployment:
##           ${install_dir}/kingbase/data                               the data directory
##           ${install_dir}/kingbase/archive                            log archive directory
##           ${install_dir}/kingbase/etc                                configuration file directory
##           ${install_dir}/kingbase/bin、lib、share、log       install file directory
## the last layer of directory could not add '/'
install_dir="/opt/kes/v9/cluster"    <-------2------->

## the absolute path of zip package, for example: zip_package="/home/kingbase/db.zip" [if it is BMJ or deploy_by_sshd=0, you do not need to configure this parameter]
## zip、tar and tar.gz package can be supported.
zip_package="/opt/kes/v9/cluster/db.zip" <-------3------->

## the name of license.dat [if it is BMJ or deploy_by_sshd=0, you do not need to configure this parameter]
## if there are multiple license files, please write down all of them.
## make sure that the write order of license.dat file is the same as that of all_ip, if the same license file can be used in different devices, you can just write once.
## since the license file must named with "license.dat", if you have more than one license files, please use different name to distinguish them.
## example: license_file=(license.dat) or license_file=(license.dat-1 license.dat-2)
license_file=(license.dat)

# database initializes user configuration
db_user="system"                 # the user name of database
#db_password=""                  # the password of database.
db_port="54321"                  # the port of database, defaults is 54321
db_mode="oracle"                 # database mode: pg, oracle, mysql
db_auth="scram-sha-256"          # database authority: scram-sha-256, md5, scram-sm3, sm4, default is scram-sha-256
db_case_sensitive="yes"          # database case sensitive settings: yes, no. default is yes - case sensitive; no - case insensitive
                                 # (NOTE. cannot set to 'no' when db_mode="pg", and cannot set to 'yes' when db_mode="mysql").
db_checksums="yes"               # the checksum for data: yes, no. default is yes - a checksum is calculated for each data block to prevent corruption; no - nothing to do.
archive_mode="on"                # enables archiving; off, on, or always

db_encoding=""                   # Cararcter set encoding to use in the new database.Specify a tring constant,or an integer encoding number, default value provided by locale command.
db_collate=""                    # Collation order(LC_COLLATE) to use in the new database,This affects the sort order applied to strings, default value provided by locale command.
db_ctype=""                      # Character classification(LC_CTYPE) to use int the new database. This affects the categorization of characters, default value provided by locale command.
other_db_init_options=""         # addional initdb options,such as "--scenario-tuning" (NOTE. cannot set --scenario-tuning when db_mode="mysql")
sync_security_guc="no"           # sync security GUC parameters in cluster (exclude witness): yes, no. default is no.
                                 # yes - for auto sync security GUC, create extension kdb_schedule and security_utils; no - nothing to do.

tcp_keepalives_idle="2"          # (integer; default: 7200; since Linux 2.2)
                                 # The  number  of  seconds  a  connection  needs to be idle before TCP begins sending out keep-alive counts.  Keep-alives are sent only when the
                                 # SO_KEEPALIVE socket option is enabled.  The default value is 7200 seconds (2 hours).  An idle connection is terminated after approximately  an
                                 # additional 11 minutes (9 counts an interval of 75 seconds apart) when keep-alive is enabled.

tcp_keepalives_interval="2"      # (integer; default: 75; since Linux 2.4)
                                 # The number of seconds between TCP keep-alive counts.

tcp_keepalives_count="3"         # (integer; default: 9; since Linux 2.2)
                                 # The maximum number of TCP keep-alive counts to send before giving up and killing the connection if no response is obtained from the other end.
tcp_user_timeout="9000"          # (since Linux 2.6.37)
connection_timeout="10"          # connection timeout when use ssh or sys_securecmdd
wal_sender_timeout="30000"       # in milliseconds; 0 disables
wal_receiver_timeout="30000"     # time that receiver waits for
                                 # communication from master
                                 # in milliseconds; 0 disables


## the trust ip, which separated by English ',', and spaces are not allowed.
## For example: trusted_servers="192.168.28.1,192.168.29.1" or trusted_servers="host1,host2"
trusted_servers="192.168.100.10 192.168.100.11 192.168.100.12" <-------4------->

## if failed to ping trusted_servers, the database can still be running? on, off. default is on - do nothing, the database will running; off - will stop the database.
running_under_failure_trusted_servers='on'

#####################################################################
# Optional parameters
#####################################################################

## the path of data directory, BMJ defaults to "/opt/Kingbase/ES/V8/data", the general machine defaults to "install_dir/kingbase/data"
data_directory="/data/cluster/data" <-------5------->

## if seperate sys_wal from data directory, set the sys_wal location to waldir.
## the location should not be under the data directory
## the location should be an absolute path
## the waldir should be an empty path or nonexistent, initdb would create the location if it's nonexistent
waldir=''

## the vitural IP, for example: virtual_ip="192.168.28.188/24"
virtual_ip="192.168.100.14/24"  <-------6------->

## the net device, after configuring the vitural IP, net_device must been configured.
## please make sure that the writing order of net_device is the same as all_ip, if the net_device is the same, it should also be written together.
## do not need to consider net_device on witness node if configured witness_ip
## for example: net_device=(ens192 ens192) or net_device=(ens192 eth0)
net_device=(ens33 ens33 ens33) <-------7------->

## the net device ip, after configuring the vitural IP, net_device_ip must been configured.
## please make sure that the writing order of net_device_ip is the same as all_ip
## do not need to consider net_device_ip on witness node if configured witness_ip
## for example: net_device_ip=(10.10.11.128 10.10.11.129)
net_device_ip=(192.168.100.10 192.168.100.11 192.168.100.12)

## the path of ip, arping, ping command, defaults is /sbin or /bin
## by default, the arping_path is located in the bin directory of the database installation directory, if arping_path is null, then use default value.
## for example, if there is BMJ, arping_path=/opt/Kingbase/ES/V8/Server/bin
ipaddr_path="/usr/sbin"         <-------8------->
arping_path="/opt/kes/v9/cluster/bin"  <-------9------->
ping_path="/usr/bin"     <-------10------->

## super user, defaults is root
super_user="root"

## ordinary user, defaults is kingbase
execute_user="kingbase"

## other cluster parameters
deploy_by_sshd=1                 # choose whether to use sshd when deploy, 0 means not to use (deploy by sys_securecmdd), 1 means to use (deploy by sshd), default value is 1; when on_bmj=1, it will auto set to no(deploy_by_sshd=0)
use_scmd=1                       # Is the cluster running on sys_securecmdd or sshd? 1 means yes (on sys_securecmdd), 0 means no (on sshd), default value is 1; when on_bmj=1, it will auto set to yes(use_scmd=1)
reconnect_attempts="10"          # the number of retries in the event of an error
reconnect_interval="6"           # retry interval
recovery="standby"               # the way of cluster recovery: standby/automatic/manual
ssh_port="22"                    # the port of ssh, default is 22
scmd_port="8890"                 # the port of sys_securecmdd, default is 8890

## ssl option, default value is '0', will not use ssl in cluster.
## set use_ssl=1 in database, and the cluster will use 'sslmode=require' to connect to database.
use_ssl=0

## all nodes failed recovery option, default value 1, do auto recovery when all nodes failed when network is OK and only one primary in cluster.
## 0 means disable the all fails recovery feature
auto_cluster_recovery_level='1'

## enable the disk check, default value is 'off', will do nothing when disk is error.
## if set to 'on', stop the database when disk is error.
use_check_disk='off'

## setting for kingbase synchronous_standby_names mode, values in "quorum\sync\all\async"
##   quorum: the first do WAL replay standby can be sync node
##   sync:    the first standby in synchronous_standby_names, which connect to primary now, is sync node
##   all:     all the standbys in synchronous_standby_names, which connect to primary now, are sync node, and if there is no standby connect to primary, it is equal to async
##   async:   no standby is sync node
## For ha_running_mode='TPTC' the synchronous default value is 'all'.
## For ha_running_mode='DG', the synchronous default value is 'quorum'.
synchronous=''

## For ha_running_mode='TPTC', if the sync nodes have the same location with primary ?
##    0:    some nodes could be sync nodes. (don't care what the location is)
##    1:    only the nodes have same location with primary, could be sync nodes.
## the default is 0. (when ha_running_mode='DG' or synchronous='async', this parameter has no effect)
sync_in_same_location=0

## For ha_running_mode='TPTC', if we can do failover when the standby node has different location with failure primary?
##    'off':  can not do failover, if the standby node has different location with primary.
##    'none': can do failover.
##    'any':  can do failover, need ANY server alive in primary's location if the standby node has different location with primary.
##    'all':  can do failover, need ALL servers alive in primary's location if the standby node has different location with primary.
## the default is off. (when ha_running_mode='DG', this parameter has no effect)
failover_need_server_alive='off'

## config of create a standby/witness node.
[expand]
expand_type=""                   # The node type of standby/witness node, which would be add to cluster. 0:standby  1:witness
primary_ip=""                    # The ip addr of cluster primary node, which need to expand a standby/witness node.
expand_ip=""                     # The ip addr of standby/witness node, which would be add to cluster.
node_id=""                       # The node_id of standby/witness node, which would be add to cluster. It does not the same with any one in  cluster node
                                 # for example: node_id="3"
## Specific instructions ,see it under [install]
install_dir=""
zip_package=""
net_device=()                    # if virtual_ip set,it must be set
net_device_ip=()                 # if virtual_ip set,it must be set
license_file=(license.dat)
deploy_by_sshd="1"
ssh_port="22"
scmd_port="8890"

## config of drop a standby/witness node
[shrink]
shrink_type=""                   # The node type of standby/witness node, which would be delete from cluster. 0:standby  1:witness
primary_ip=""                    # The ip addr of cluster primary node, which need to shrink a standby/witness node.
shrink_ip=""                     # The ip addr of standby/witness node, which would be delete from cluster.
node_id=""                       # The node_id of standby/witness node, which would be delete from cluster. It does not the same with any one in  cluster node
                                 # for example: node_id="3"
## Specific instructions ,see it under [install]
install_dir=""
ssh_port="22"                    # the port of ssh, default is 22
scmd_port="8890"                 # the port of sys_securecmd, default is 8890
运行部署脚本
cluster_install.sh脚本会调用install.conf脚本。
$ cd /opt/kes/v9/cluster/
$ sh cluster_install.sh
设置kingbase用户的.bashrc
cat >>/home/kingbase/.bashrc<<EOF
export KINGBASE_DATA=/data/cluster/data
export PATH=$PATH:/opt/kes/v9/cluster/kingbase/bin
export LANG=zh_CN.UTF8
export KINGBASE_PORT=54321
EOF

source /home/kingbase/.bashrc
查看集群状态
$ repmgr cluster show
 ID | Name  | Role    | Status    | Upstream | Location | Priority | Timeline | LSN_Lag | Connection string
----+-------+---------+-----------+----------+----------+----------+----------+---------+-------------------------------------------------------------------------------------------------------------------------------------------------------------------------
 1  | node1 | primary | * running |          | default  | 100      | 1        |         | host=192.168.100.10 user=esrep dbname=esrep port=54321 connect_timeout=10 keepalives=1 keepalives_idle=2 keepalives_interval=2 keepalives_count=3 tcp_user_timeout=9000
 2  | node2 | standby |   running | node1    | default  | 100      | 1        | 0 bytes | host=192.168.100.11 user=esrep dbname=esrep port=54321 connect_timeout=10 keepalives=1 keepalives_idle=2 keepalives_interval=2 keepalives_count=3 tcp_user_timeout=9000
 3  | node3 | standby |   running | node1    | default  | 100      | 1        | 0 bytes | host=192.168.100.12 user=esrep dbname=esrep port=54321 connect_timeout=10 keepalives=1 keepalives_idle=2 keepalives_interval=2 keepalives_count=3 tcp_user_timeout=9000
连接测试
system用户默认密码是12345678ab,可以使用alter user命令修改。
esrep用户默认密码Kingbaseha110,集群部署过程中创建的用户,可以使用sys_monitor.sh修改。 sys_monitor.sh主要用于修改集群使用的用户的密码,语法如下:
sys_monitor.sh change_password user new_password
ksql连接测试
[kingbase@node1 bin]$ ksql -h 192.168.100.14 -U system -d kingbase
Password for user system:
Type "help" for help.

kingbase=# select version();
                                                       version
----------------------------------------------------------------------------------------------------------------------
 KingbaseES V009R001C001B0025 on x86_64-pc-linux-gnu, compiled by gcc (GCC) 4.8.5 20150623 (Red Hat 4.8.5-28), 64-bit
(1 行记录)
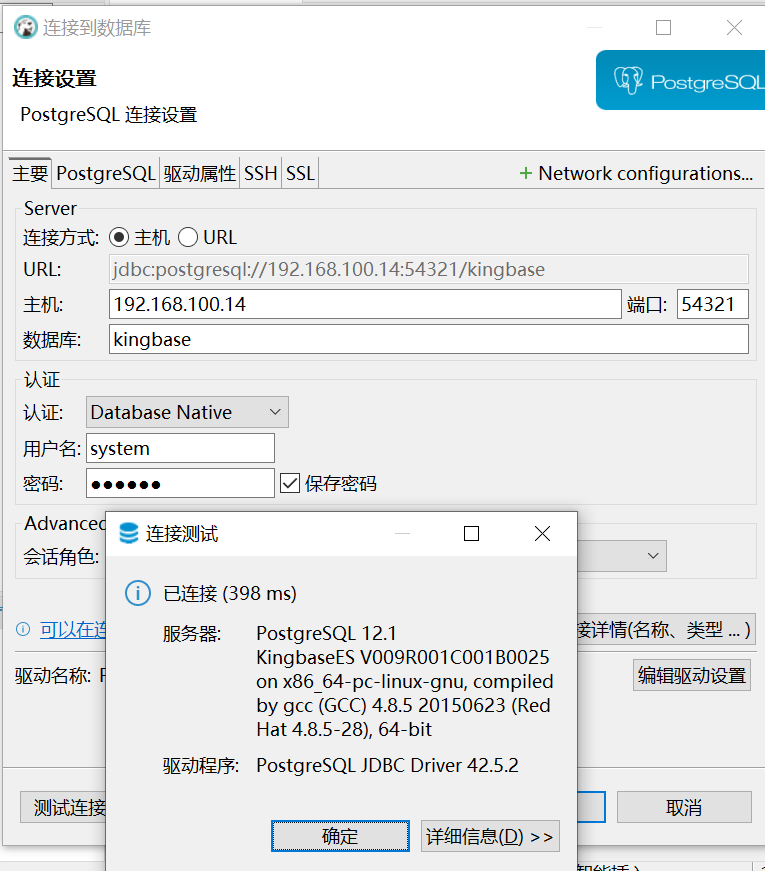
dbeaver连接测试
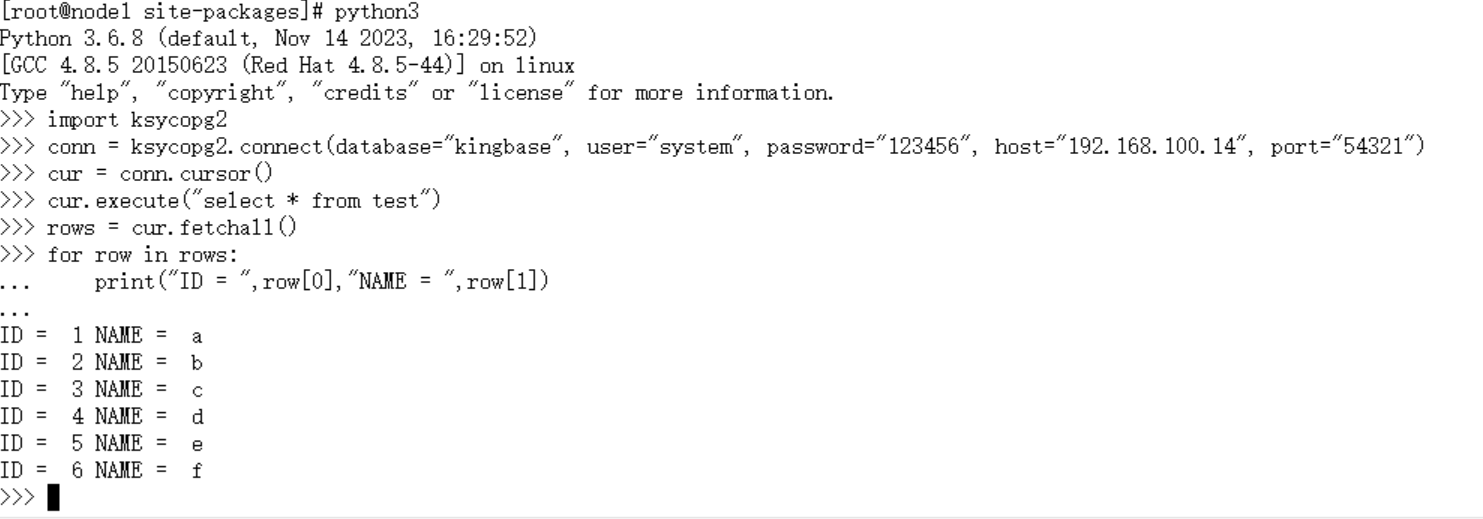
python连接测试
配置ksycopg2
# tar -zxvf /soft/v8r6_python3.6.8_for_ksycopg2_x86_64.tar.gz
# cp -rp ksycopg2 /usr/lib/python3.6/site-packages/
# chmod 755 /usr/lib/python3.6/site-packages/ksycopg2

--加载库文件
# cat >> /etc/ld.so.conf << EOF
/usr/lib/python3.6/site-packages/ksycopg2
EOF
# ldconfig
使用ksycopg2访问KES数据库
# python3
import ksycopg2
conn = ksycopg2.connect(database="kingbase", user="system", password="123456", host="192.168.100.14", port="54321")
cur = conn.cursor()
cur.execute("select * from test")
rows = cur.fetchall()
for row in rows:
    print("ID = ",row[0],"NAME = ",row[1])
总结
金仓KES V9数据库集群的安装非常丝滑~~~
最后修改时间:2024-06-11 10:03:09
【版权声明】本文为墨天轮用户原创内容,转载时必须标注文章的来源(墨天轮),文章链接,文章作者等基本信息,否则作者和墨天轮有权追究责任。如果您发现墨天轮中有涉嫌抄袭或者侵权的内容,欢迎发送邮件至:contact@modb.pro进行举报,并提供相关证据,一经查实,墨天轮将立刻删除相关内容。
