


你是否想尝试将oracle数据通过rman备份到磁带上,以此来尝试进行各种恢复测试?奈何没有真实带库可以让你操作,有没有虚拟的带库可以使用呢?答案是肯定的,mhvtl是一个在linux下的虚拟带库软件,可以在系统中将磁盘虚拟成一个虚拟磁带库。可以与Networker或者netbackup等备份软件配合,进行数据的备份及恢复,作为学习磁带库一个实验环境。下面将为你详细介绍,如何搭建一个虚拟带库的环境。
mhvtl安装
以下操作环境是在Centos7.9 x64系统上进行的
安装依赖包
--安装依赖包
yum install mt-st -y
yum install mtx sg3_utils-libs -y
yum install sg3_utils-libs -y
yum install sg3_utils -y
yum install sg3_utils-devel -y
yum install lsscsi -y
yum install iscsi-initiator-utils -y
yum install  kernel -y
yum install kernel-devel-$(uname -r) kernel-headers-$(uname -r) -y
yum install  kernel-headers -y
yum install lzo-devel -y
yum install zlib-devel -y
创建用户和目录
useradd vtl
mkdir /opt/mhvtl
mkdir /etc/mhvtl
chown -R vtl:vtl /opt/mhvtl/
chown -R vtl:vtl /etc/mhvtl/
编译安装
先编译软件的kernel目录:
[root@ora19c:~]# tar -xf mhvtl-2023-03-10.tgz -C /usr/local/
[root@ora19c:~]# cd /usr/local/mhvtl-1.7/

[root@ora19c:~]# cd /usr/local/mhvtl-1.7/kernel/
[root@ora19c:/usr/local/mhvtl-1.7/kernel]# export KDIR=/usr/src/kernels/3.10.0-1160.119.1.el7.x86_64/
###3.10.0-1160.119.1.el7.x86_64 为 uname -r的结果

[root@ora19c:/usr/local/mhvtl-1.7/kernel]# make -j 4 && make install
make -C /lib/modules/3.10.0-1160.el7.x86_64/build M=/usr/local/mhvtl-1.7/kernel modules
make[1]: Entering directory `/usr/src/kernels/3.10.0-1160.el7.x86_64'
  CC [M]  /usr/local/mhvtl-1.7/kernel/mhvtl.o
  Building modules, stage 2.
  MODPOST 1 modules
  CC      /usr/local/mhvtl-1.7/kernel/mhvtl.mod.o
  LD [M]  /usr/local/mhvtl-1.7/kernel/mhvtl.ko
make[1]: Leaving directory `/usr/src/kernels/3.10.0-1160.el7.x86_64'
install -o root -g root -m 644 mhvtl.ko /lib/modules/3.10.0-1160.el7.x86_64/kernel/drivers/scsi/; \
depmod -a; \
if [ -f "/etc/modprobe.d/unsupported-modules" ]; then \
	sed -i 's/^allow_unsupported_modules 0/allow_unsupported_modules 1/' /etc/modprobe.d/unsupported-modules; \
fi

[root@ora19c:/usr/local/mhvtl-1.7/kernel]# modprobe mhvtl
[root@ora19c:/usr/local/mhvtl-1.7/kernel]# lsmod |grep  mhvtl
mhvtl                  37949  0
再编译软件目录:
[root@ora19c:/usr/local/mhvtl-1.7/kernel]# cd ..
[root@ora19c:/usr/local/mhvtl-1.7]# make -j 4 && make install
make -C usr
make -C etc
make -C scripts
make[1]: Entering directory `/usr/local/mhvtl-1.7/etc'
sed -e s'/@CONF_PATH@/\/etc\/mhvtl/' \
    -e s'/@HOME_PATH@/\/opt\/mhvtl/' mhvtl.conf.in > mhvtl.conf
make[1]: Entering directory `/usr/local/mhvtl-1.7/scripts'
sed -e s'/@CONF_PATH@/\/etc\/mhvtl/' update_device.conf.in > update_device.conf
sed -e s'/@CONF_PATH@/\/etc\/mhvtl/' \
    -e s'/@HOME_PATH@/\/opt\/mhvtl/' vtltape@.service.in > vtltape@.service
sed -e s'/@CONF_PATH@/\/etc\/mhvtl/' \
    -e s'/@HOME_PATH@/\/opt\/mhvtl/' vtllibrary@.service.in > vtllibrary@.service
....................
===> Creating entry: /opt/mhvtl/G03039TA ...
Creating tape data ...
Creating new media directory: /opt/mhvtl/G03039TA
Creating new media data file: /opt/mhvtl/G03039TA/data
Creating new media index file: /opt/mhvtl/G03039TA/indx
Creating new media meta file: /opt/mhvtl/G03039TA/meta
mktape: create_tape(): /opt/mhvtl/G03039TA files created
安装遇到的问题:
# make -j 4 && make install
make -C /usr/src/kernels/3.10.0-1160.119.1.el7.x86_64/ M=/usr/local/mhvtl-1.7/kernel modules
make: *** /usr/src/kernels/3.10.0-1160.119.1.el7.x86_64/: No such file or directory.  Stop.
make: *** [default] Error 2
安装时在make的时候提示“/usr/src/kernels/3.10.0-1160.119.1.el7.x86_64/”找不到,解决办法是:
- 先看一下自己机器的内核版本 uname -r (因为mhvtl的Makefile文件是获取系统的参数再去找的)
- rpm -qa|grep kernel-devel查看安装的版本是不是跟uname -r结果的版本相匹配,如果不匹配,先手动卸载该kernel-devel,执行 yum remove kernel-devel-*** 命令
- 安装跟uname -r相匹配的kernel-devel:yum install kernel-devel-(uname -r) -y
- 安装好了之后再/usr/src/kernels下就有了和uname -r查出来的相匹配的文件了
验证安装结果
相关目录、文件说明:
(1)/opt/mhvtl/:是放模拟磁带文件的地方
[root@ora19c:/usr/local/mhvtl-1.7]# ls /etc/mhvtl/
device.conf  library_contents.10  library_contents.30  mhvtl.conf
[root@ora19c:/usr/local/mhvtl-1.7]# ls /opt/mhvtl/
CLN101L8  E01004L8  E01010L8  E01016L8  F01031L6  F01037L6  G03004TA  G03010TA  G03016TA  G03022TA  G03028TA  G03034TA
CLN102L6  E01005L8  E01011L8  E01017L8  F01032L6  F01038L6  G03005TA  G03011TA  G03017TA  G03023TA  G03029TA  G03035TA
CLN303TA  E01006L8  E01012L8  E01018L8  F01033L6  F01039L6  G03006TA  G03012TA  G03018TA  G03024TA  G03030TA  G03036TA
E01001L8  E01007L8  E01013L8  E01019L8  F01034L6  G03001TA  G03007TA  G03013TA  G03019TA  G03025TA  G03031TA  G03037TA
E01002L8  E01008L8  E01014L8  E01020L8  F01035L6  G03002TA  G03008TA  G03014TA  G03020TA  G03026TA  G03032TA  G03038TA
E01003L8  E01009L8  E01015L8  F01030L6  F01036L6  G03003TA  G03009TA  G03015TA  G03021TA  G03027TA  G03033TA  G03039TA
磁带库的磁盘所存放的位置每一个目录就是一盘磁带
# cd /opt/mhvtl/CLN101L8/
[root@ora19c:/opt/mhvtl/CLN101L8]# ls
data  indx  meta
其中:
data 指数据文件
meta 指设备描述文件
indx 指索引文件
(2)/etc/mhvtl/:是放置配置文件的地方
[root@ora19c:/usr/local/mhvtl-1.7]# cat /etc/mhvtl/mhvtl.conf
#
# mhvtl.conf
#

# Home directory for tape emulation files
MHVTL_HOME_PATH=/opt/mhvtl

# Default media capacity (500 M)
CAPACITY=500

# Set default verbosity [0|1|2|3]
VERBOSE=1

# Set kernel module debugging [0|1]
VTL_DEBUG=0

# vtltape and vtllibrary debugging [Blank or -d]
#DAEMON_DEBUG=-d
可以看到每个磁带默认的容量是500MB,可以自行进行调整。
启动mhvtl
[root@ora19c:/usr/local/mhvtl-1.7]# systemctl enable mhvtl.target
Created symlink from /etc/systemd/system/multi-user.target.wants/mhvtl.target to /usr/lib/systemd/system/mhvtl.target.
[root@ora19c:/usr/local/mhvtl-1.7]# systemctl start mhvtl.target

--如果需要停止
systemctl stop mhvtl.target
–查看进程
[root@ora19c:/usr/local/mhvtl-1.7]#  ps -ef|grep vtl
root      60783      1  0 22:06 ?        00:00:00 /usr/bin/vtllibrary -F -q10 -v1
root      60784      1  0 22:06 ?        00:00:00 /usr/bin/vtltape -F -q32 -v1
root      60785      1  0 22:06 ?        00:00:00 /usr/bin/vtltape -F -q11 -v1
root      60786      1  0 22:06 ?        00:00:00 /usr/bin/vtllibrary -F -q30 -v1
root      60787      1  0 22:06 ?        00:00:00 /usr/bin/vtltape -F -q13 -v1
root      60789      1  0 22:06 ?        00:00:00 /usr/bin/vtltape -F -q12 -v1
root      60790      1  0 22:06 ?        00:00:00 /usr/bin/vtltape -F -q34 -v1
root      60792      1  0 22:06 ?        00:00:00 /usr/bin/vtltape -F -q33 -v1
root      60794      1  0 22:06 ?        00:00:00 /usr/bin/vtltape -F -q31 -v1
root      60795      1  0 22:06 ?        00:00:00 /usr/bin/vtltape -F -q14 -v1
默认有10个相关的守护进程:2个 vtllibrary 和 8个 vtltape
查看磁带库信息
相关命令:
lsscsi - 查看SCSI设备信息
mtx - 操作带库机械臂,Media Changer Tools, 介质切换工具,常用于scsi设备的备份控制,目前支持磁带库和DVD/CD库,mtx --help
mt -st - 操作带库的驱动,是一个包含了mt和stinit的磁带管理程序集合。Mt(Magnetic Tape)磁带程序, 能模拟控制磁带的rewinding(倒带), ejecting(弹出), skipping file and stock(跳过文件或块设备).
[root@ora19c:/usr/local/mhvtl-1.7]# lsscsi -g
[0:0:0:0]    disk    VMware,  VMware Virtual S 1.0   /dev/sda   /dev/sg0
[0:0:1:0]    disk    VMware,  VMware Virtual S 1.0   /dev/sdb   /dev/sg1
[2:0:0:0]    cd/dvd  NECVMWar VMware IDE CDR10 1.00  /dev/sr0   /dev/sg2
[3:0:0:0]    mediumx STK      L700             0107  /dev/sch0  /dev/sg3
[3:0:1:0]    tape    IBM      ULT3580-TD8      0107  /dev/st0   /dev/sg4
[3:0:2:0]    tape    IBM      ULT3580-TD8      0107  /dev/st3   /dev/sg8
[3:0:3:0]    tape    IBM      ULT3580-TD6      0107  /dev/st7   /dev/sg12
[3:0:4:0]    tape    IBM      ULT3580-TD6      0107  /dev/st6   /dev/sg11
[3:0:8:0]    mediumx STK      L80              0107  /dev/sch1  /dev/sg7
[3:0:9:0]    tape    STK      T10000B          0107  /dev/st4   /dev/sg9
[3:0:10:0]   tape    STK      T10000B          0107  /dev/st1   /dev/sg5
[3:0:11:0]   tape    STK      T10000B          0107  /dev/st2   /dev/sg6
[3:0:12:0]   tape    STK      T10000B          0107  /dev/st5   /dev/sg10
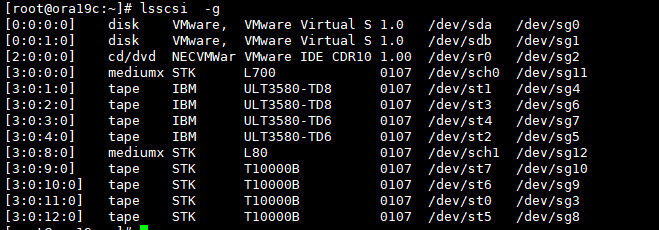
查看虚拟带库设备,可以看到两个机械臂和8个驱动器。默认配置是两台带库,STK的L700和STK的L80
上面的/dev/sg3-/dev/sg12均由mhvtl模拟出来,一共2个虚拟磁带库。
其中:mediumx 为机械臂,tape 为磁带。
mediumx的/dev/sg3和/dev/sg7模拟磁带库的机械臂(机械手)。
/dev/st0 /dev/st3 /dev/st7 /dev/st6 代表了4个通道,也有人称为driver。
[root@ora19c:/usr/local/mhvtl-1.7]# lsscsi -l
[0:0:0:0]    disk    VMware,  VMware Virtual S 1.0   /dev/sda
  state=running queue_depth=32 scsi_level=3 type=0 device_blocked=0 timeout=180
[0:0:1:0]    disk    VMware,  VMware Virtual S 1.0   /dev/sdb
  state=running queue_depth=32 scsi_level=3 type=0 device_blocked=0 timeout=180
[2:0:0:0]    cd/dvd  NECVMWar VMware IDE CDR10 1.00  /dev/sr0
  state=running queue_depth=1 scsi_level=6 type=5 device_blocked=0 timeout=30
[3:0:0:0]    mediumx STK      L700             0107  /dev/sch0
  state=running queue_depth=1 scsi_level=6 type=8 device_blocked=0 timeout=0
[3:0:1:0]    tape    IBM      ULT3580-TD8      0107  /dev/st0
  state=running queue_depth=1 scsi_level=6 type=1 device_blocked=0 timeout=900
[3:0:2:0]    tape    IBM      ULT3580-TD8      0107  /dev/st3
  state=running queue_depth=1 scsi_level=6 type=1 device_blocked=0 timeout=900
[3:0:3:0]    tape    IBM      ULT3580-TD6      0107  /dev/st7
  state=running queue_depth=1 scsi_level=6 type=1 device_blocked=0 timeout=900
[3:0:4:0]    tape    IBM      ULT3580-TD6      0107  /dev/st6
  state=running queue_depth=1 scsi_level=6 type=1 device_blocked=0 timeout=900
[3:0:8:0]    mediumx STK      L80              0107  /dev/sch1
  state=running queue_depth=1 scsi_level=6 type=8 device_blocked=0 timeout=0
[3:0:9:0]    tape    STK      T10000B          0107  /dev/st4
  state=running queue_depth=1 scsi_level=6 type=1 device_blocked=0 timeout=900
[3:0:10:0]   tape    STK      T10000B          0107  /dev/st1
  state=running queue_depth=1 scsi_level=6 type=1 device_blocked=0 timeout=900
[3:0:11:0]   tape    STK      T10000B          0107  /dev/st2
  state=running queue_depth=1 scsi_level=6 type=1 device_blocked=0 timeout=900
[3:0:12:0]   tape    STK      T10000B          0107  /dev/st5
  state=running queue_depth=1 scsi_level=6 type=1 device_blocked=0 timeout=900
–查看机械手状态:
[root@ora19c:/usr/local/mhvtl-1.7]#  mtx -f /dev/sg3 status
  Storage Changer /dev/sg3:4 Drives, 43 Slots ( 4 Import/Export )
Data Transfer Element 0:Empty
Data Transfer Element 1:Empty
Data Transfer Element 2:Empty
Data Transfer Element 3:Empty    ###4个磁带机
      Storage Element 1:Full :VolumeTag=E01001L8  ###多个存储磁带
      Storage Element 2:Full :VolumeTag=E01002L8
      Storage Element 3:Full :VolumeTag=E01003L8
      Storage Element 4:Full :VolumeTag=E01004L8
      Storage Element 5:Full :VolumeTag=E01005L8
      Storage Element 6:Full :VolumeTag=E01006L8
      Storage Element 7:Full :VolumeTag=E01007L8
      Storage Element 8:Full :VolumeTag=E01008L8
      Storage Element 9:Full :VolumeTag=E01009L8
      Storage Element 10:Full :VolumeTag=E01010L8
      Storage Element 11:Full :VolumeTag=E01011L8
      Storage Element 12:Full :VolumeTag=E01012L8
      Storage Element 13:Full :VolumeTag=E01013L8
      Storage Element 14:Full :VolumeTag=E01014L8
      Storage Element 15:Full :VolumeTag=E01015L8
      Storage Element 16:Full :VolumeTag=E01016L8
      Storage Element 17:Full :VolumeTag=E01017L8
      Storage Element 18:Full :VolumeTag=E01018L8
      Storage Element 19:Full :VolumeTag=E01019L8
      Storage Element 20:Full :VolumeTag=E01020L8
      Storage Element 21:Empty
      Storage Element 22:Full :VolumeTag=CLN101L8
      Storage Element 23:Full :VolumeTag=CLN102L6
      Storage Element 24:Empty
      Storage Element 25:Empty
      Storage Element 26:Empty
      Storage Element 27:Empty
      Storage Element 28:Empty
      Storage Element 29:Empty
      Storage Element 30:Full :VolumeTag=F01030L6
      Storage Element 31:Full :VolumeTag=F01031L6
      Storage Element 32:Full :VolumeTag=F01032L6
      Storage Element 33:Full :VolumeTag=F01033L6
      Storage Element 34:Full :VolumeTag=F01034L6
      Storage Element 35:Full :VolumeTag=F01035L6
      Storage Element 36:Full :VolumeTag=F01036L6
      Storage Element 37:Full :VolumeTag=F01037L6
      Storage Element 38:Full :VolumeTag=F01038L6
      Storage Element 39:Full :VolumeTag=F01039L6
      Storage Element 40 IMPORT/EXPORT:Empty
      Storage Element 41 IMPORT/EXPORT:Empty
      Storage Element 42 IMPORT/EXPORT:Empty
      Storage Element 43 IMPORT/EXPORT:Empty
查看机械臂状态,4个驱动器(磁带机),43个槽位(存储磁带),以E01002L8为例,其名字和我们前面看到的/opt/mhvtl中的一个文件名字相同。这表明/opt/mhvtl中的每一个文件模拟了一个磁带。
4个Data Transfer Element,就对应着4个通道。
操作磁带
放入磁带
将StorageElement x 位置上的磁带设备放置到Data Transfer Element x 的磁带机中
如:将StorageElement 1 位置上的磁带设备放置到Data Transfer Element 0 的磁带机中(将磁带从1号槽位装入驱动器0或者叫通道0)
[root@ora19c:/opt/mhvtl]# mtx -f /dev/sg3 load 1 0
Loading media from Storage Element 1 into drive 0...done
[root@ora19c:/opt/mhvtl]#  mtx -f /dev/sg3 status|head
  Storage Changer /dev/sg3:4 Drives, 43 Slots ( 4 Import/Export )
Data Transfer Element 0:Full (Storage Element 1 Loaded):VolumeTag = E01001L8
###注意这地方的变化,由Empty变成Full
Data Transfer Element 1:Empty
Data Transfer Element 2:Empty
Data Transfer Element 3:Empty
      Storage Element 1:Empty                    ##注意这个地方的变化,由Full变成Empty
      Storage Element 2:Full :VolumeTag=E01002L8
      Storage Element 3:Full :VolumeTag=E01003L8
      Storage Element 4:Full :VolumeTag=E01004L8
      Storage Element 5:Full :VolumeTag=E01005L8
装入后,槽位由FULL转为Empty,相当于模拟硬件机械臂把磁带从一个槽中读入通道,此时,槽变成空状态。
对同一个通道而言,读入后,如果不卸载,就不能再次读入了,如下:
[root@ora19c:/opt/mhvtl/E01001L8]# mtx -f /dev/sg3 load 2 0
Drive 0 Full (Storage Element 1 loaded)
查看磁带状态:
# mt -f /dev/st0 status
SCSI 2 tape drive:
File number=-1, block number=-1, partition=0.
Tape block size 0 bytes. Density code 0x0 (default).
Soft error count since last status=0
General status bits on (50000):
 DR_OPEN IM_REP_EN
移出磁带:将磁带从driver 0(通道0)卸载回1号槽位
[root@ora19c:/opt/mhvtl]# mtx -f /dev/sg3 unload 1 0
Unloading drive 0 into Storage Element 1...done
[root@ora19c:/opt/mhvtl]#  mtx -f /dev/sg3 status|head
  Storage Changer /dev/sg3:4 Drives, 43 Slots ( 4 Import/Export )
Data Transfer Element 0:Empty
Data Transfer Element 1:Empty
Data Transfer Element 2:Empty
Data Transfer Element 3:Empty
      Storage Element 1:Full :VolumeTag=E01001L8
      Storage Element 2:Full :VolumeTag=E01002L8
      Storage Element 3:Full :VolumeTag=E01003L8
      Storage Element 4:Full :VolumeTag=E01004L8
      Storage Element 5:Full :VolumeTag=E01005L8
卸载后,槽的状态仍然恢复到FULL的状态。
##将StorageElement 2 位置上的磁带设备放置到Data Transfer Element  1 的磁带机中
[root@ora19c:/opt/mhvtl]#mtx -f /dev/sg3 load 2 1
Loading media from Storage Element 2 into drive 1...done
[root@ora19c:/opt/mhvtl]#  mtx -f /dev/sg3 status|more
  Storage Changer /dev/sg3:4 Drives, 43 Slots ( 4 Import/Export )
Data Transfer Element 0:Empty
Data Transfer Element 1:Full (Storage Element 2 Loaded):VolumeTag = E01002L8
Data Transfer Element 2:Empty
Data Transfer Element 3:Empty
      Storage Element 1:Full :VolumeTag=E01001L8
      Storage Element 2:Empty

##将磁带从 DataTransfer Element  的磁带机中的移出
[root@ora19c:/opt/mhvtl]#mtx -f /dev/sg3 unload 2 1
Unloading drive 1 into Storage Element 2...done
向磁带写入数据:
[root@ora19c:/opt/mhvtl]# mtx -f /dev/sg3 load 1 0
Loading media from Storage Element 1 into drive 0...done
[root@ora19c:/opt/mhvtl]# mtx -f /dev/sg3 status| head
  Storage Changer /dev/sg3:4 Drives, 43 Slots ( 4 Import/Export )
Data Transfer Element 0:Full (Storage Element 1 Loaded):VolumeTag = E01001L8
Data Transfer Element 1:Empty
Data Transfer Element 2:Empty
Data Transfer Element 3:Empty
      Storage Element 1:Empty
      Storage Element 2:Full :VolumeTag=E01002L8
      Storage Element 3:Full :VolumeTag=E01003L8
      Storage Element 4:Full :VolumeTag=E01004L8
      Storage Element 5:Full :VolumeTag=E01005L8

[root@ora19c:/opt/mhvtl]# lsscsi -g
[0:0:0:0]    disk    VMware,  VMware Virtual S 1.0   /dev/sda   /dev/sg0
[0:0:1:0]    disk    VMware,  VMware Virtual S 1.0   /dev/sdb   /dev/sg1
[2:0:0:0]    cd/dvd  NECVMWar VMware IDE CDR10 1.00  /dev/sr0   /dev/sg2
[3:0:0:0]    mediumx STK      L700             0107  /dev/sch0  /dev/sg3
[3:0:1:0]    tape    IBM      ULT3580-TD8      0107  /dev/st0   /dev/sg4
[3:0:2:0]    tape    IBM      ULT3580-TD8      0107  /dev/st3   /dev/sg8
[3:0:3:0]    tape    IBM      ULT3580-TD6      0107  /dev/st7   /dev/sg12
[3:0:4:0]    tape    IBM      ULT3580-TD6      0107  /dev/st6   /dev/sg11
[3:0:8:0]    mediumx STK      L80              0107  /dev/sch1  /dev/sg7
[3:0:9:0]    tape    STK      T10000B          0107  /dev/st4   /dev/sg9
[3:0:10:0]   tape    STK      T10000B          0107  /dev/st1   /dev/sg5
[3:0:11:0]   tape    STK      T10000B          0107  /dev/st2   /dev/sg6
[3:0:12:0]   tape    STK      T10000B          0107  /dev/st5   /dev/sg10

[root@ora19c:/opt/mhvtl]# tar -cvf /dev/st0 /etc/hosts
tar: Removing leading `/' from member names
查看磁带上的数据:
[root@ora19c:/opt/mhvtl/E01001L8]#  tar -tvf /dev/st0
-rw-r--r-- root/root       297 2024-02-20 13:07 etc/hosts

或用下面方法查看:

st0为/dev/sg3磁带库中的第一个磁带机,查看/dev/sg3磁带机的状态,发现第一个磁带机放置的是E01001L8磁带

[root@ora19c:/opt/mhvtl]# mtx -f /dev/sg3 status| head
  Storage Changer /dev/sg3:4 Drives, 43 Slots ( 4 Import/Export )
Data Transfer Element 0:Full (Storage Element 1 Loaded):VolumeTag = E01001L8
Data Transfer Element 1:Empty
Data Transfer Element 2:Empty
Data Transfer Element 3:Empty
      Storage Element 1:Empty
      Storage Element 2:Full :VolumeTag=E01002L8
      Storage Element 3:Full :VolumeTag=E01003L8
      Storage Element 4:Full :VolumeTag=E01004L8
      Storage Element 5:Full :VolumeTag=E01005L8

查看data数据可以看出归档的/etc/hosts文件中的部分内容
[root@ora19c:/opt/mhvtl]# cd E01001L8
[root@ora19c:/opt/mhvtl/E01001L8]# ls
data  indx  meta
[root@ora19c:/opt/mhvtl/E01001L8]# cat data
etc/hosts 9000064000045114565031606011420 0 9H(d	ustar  root(T0$>|0 D127.0.0.1   localhost(%.domain(U4)(*4
对虚拟带库的操作和真实的物理带库是一样的,下一篇文章将为你介绍如何与NBU软件配合使用,敬请期待!
喜欢这篇文章的人还喜欢:
《openGauss 一主一备 从5.0 LTS 版本升级至 6.0 LTS 版本实战》
《openGauss 6.0 主备切换 switchover和failover 实操》
