


本文将以openGauss 6.0.0(LTS)版本进行一主一备一级联的集群部署方式,进行集群部署。
一、了解openGauss级联
1.1、openGauss级联备机概况
openGauss级联备机制对于提高系统可用性、容灾能力、数据一致性、简化运维管理、支持灵活扩展和收缩以及提高系统性能都具有重要意义。
1.2、openGauss级联备机的作用
openGauss级联备的意义主要体现在以下几个方面:
提高系统可用性和容灾能力
级联备机制允许在主节点出现故障时,自动将业务切换到备节点,从而保证系统的高可用性和容灾能力。这对于关键业务来说至关重要,可以有效减少因单点故障导致的业务中断时间。
增强数据一致性和完整性
级联备通过日志同步机制,确保主备节点之间的数据一致性。在主节点发生故障时,备节点可以快速接管,保证数据的完整性和一致性。
简化运维管理
级联备机制简化了运维管理,减少了人工干预的需求。系统可以自动进行主备切换,降低了运维成本,提高了运维效率。
支持灵活的扩展和收缩
级联备机制支持灵活的扩展和收缩,可以根据业务需求动态调整系统的容量。这对于应对业务高峰和低谷非常有用,可以有效利用资源,降低成本。
提高系统性能
级联备机制可以通过并行处理和负载均衡等技术,提高系统的整体性能。这对于处理大规模并发请求和复杂业务逻辑非常有帮助。
二、初始化部署环境
2.1、安装准备
了解安装openGauss的环境准备和配置,主要步骤如下:
- 了解安装流程
本章节通过流程图简要介绍openGauss的安装流程。- 获取安装包
openGauss开源社区上提供了安装包的获取方式。- 准备软硬件安装环境
本章节描述安装前需要进行的环境准备。- 了解安装用户及用户组
为了实现安装过程中安装帐户权限最小化,及安装后openGauss的系统运行安全性,安装脚本在安装过程中会自动按照用户指定内容创建安装用户,并将此用户作为后续运行和维护openGauss的管理员帐户。
2.2、 了解安装流程图
说明:流程图简要介绍openGauss的安装流程。
- openGauss的安装流程如图1所示。

表 1 安装流程图说明
| 流程 | 说明 |
|---|---|
| 安装前准备 | openGauss安装前需要准备相应的软硬件环境以及完成相关配置。本文档提供了openGauss安装所需的最低要求,实际安装中,请用户根据实际情况进行规划。更多信息,请参考安装准备。 |
| 获取并校验安装包 | 安装包需要在openGauss开源社区下载并且对安装包内容进行检查,详细请参见获取安装包。 |
| 配置XML文件 | 安装openGauss前需要创建XML文件。XML文件包含部署openGauss的服务器信息、安装路径、IP地址以及端口号等。用于告知openGauss如何部署。用户需根据不同场景配置对应的XML文件。关于如何配置XML文件,详细请参见创建XML配置文件。 |
| 上传安装包和XML文件 | 上传安装包和XML配置文件到待安装的服务器。 |
| 解压安装包 | 使用tar命令解压安装包。 |
| 初始化安装环境 | 安装环境的初始化包含上传安装包和XML文件、解压安装包、使用gs_preinstall准备好安装环境。关于如何初始化安装环境,详细请参见初始化安装环境。 |
| 执行安装 | 使用gs_install安装openGauss。关于如何执行安装,详细请参见执行安装。 |
| 设置备机可读 | 可选操作。在开启备机可读之后,备机将支持读操作,并满足数据一致性要求。 |
2.3、 准备软硬件安装环境
- 本章节描述安装前需要进行的环境准备。
2.3.1、 硬件环境要求
表1列出了openGauss服务器应具备的最低硬件要求。在实际产品中,硬件配置的规划需考虑数据规模及所期望的数据库响应速度。请根据实际情况进行规划。
表 1 硬件环境要求
| 项目 | 配置描述 |
|---|---|
| 内存 | 功能调试建议32GB以上。性能测试和商业部署时,单实例部署建议128GB以上。复杂的查询对内存的需求量比较高,在高并发场景下,可能出现内存不足。此时建议使用大内存的机器,或使用负载管理限制系统的并发。 |
| CPU | 功能调试最小1×8核,2.0GHz。性能测试和商业部署时,单实例部署建议1×16核,2.0GHz。CPU超线程和非超线程两种模式都支持。说明:目前,openGauss仅支持ARM服务器和基于x86_64通用PC服务器的CPU。 |
| 磁盘 | 用于安装openGauss的硬盘需最少满足如下要求:1、至少1GB用于安装openGauss的应用程序。2、每个主机需大约300MB用于元数据存储。3、 预留70%以上的磁盘剩余空间用于数据存储。建议系统盘配置为RAID1,数据盘配置为RAID5,且规划4组RAID5数据盘用于安装openGauss。有关RAID的配置方法在本手册中不做介绍。请参考硬件厂家的手册或互联网上的方法进行配置,其中Disk Cache Policy一项需要设置为Disabled,否则机器异常掉电后有数据丢失的风险。openGauss支持使用SSD盘作为数据库的主存储设备,支持SAS接口和NVME协议的SSD盘,以RAID的方式部署使用。 |
| 网络要求 | 300兆以上以太网。建议网卡设置为双网卡冗余bond。有关网卡冗余bond的配置方法在本手册中不做介绍。请参考硬件厂商的手册或互联网上的方法进行配置。 |
2.3.2、软件环境要求
表 2 软件环境要求
| 软件类型 | 配置描述 |
|---|---|
| Linux操作系统 | ARM:openEuler 20.03 LTS(推荐采用此操作系统)。openEuler 22.03 LTS、麒麟V10、Asianux 7.5、统信V20;x86:penEuler 20.03 LTS、openEuler 22.03 LTS、CentOS 7.6、Asianux 7.6、麒麟V10。说明:1、当前安装包只能在英文操作系统上安装使用;2、OM工具已经支持对基于openEuler/Centos等商业操作系统的安装使用,具体配置信息可以查看OM中的osid.conf文件。 |
| Linux文件系统 | 剩余inode个数 > 15亿(推荐) |
| 工具 | bzip2 |
| Python | openEuler:支持大于Python 3.6.X且小于Python 3.10.X;CentOS:支持大于Python 3.6.X且小于Python 3.10.X、麒麟:支持Python :3.7.X;Asianux:支持Python 3.6.X。说明:python需要通过–enable-shared方式编译。 |
注意: 安装集群时,要求各个节点的python版本一致。
2.3.3、软件依赖要求
表 3 软件依赖要求
| 所需软件 | 建议版本 |
|---|---|
| libaio-devel | 建议版本:0.3.109-13 |
| readline-devel | 建议版本:7.0-13 |
| expect | – |
修改操作系统配置
注意:
以下动作需要以root用户进行操作,操作完成后请及时注销root用户,避免误操作。
关闭操作系统防火墙
为了在防火墙开启的状态下,确保openGauss的正常使用。用户需要将同openGauss相关的服务、协议、IP以及端口添加到openGauss各主机的防火墙白名单中。
以CentOS操作系统为例,假设openGauss信息如表4所示。
2.4、 openGauss部署主机信息
| 名称 | IP地址 | 角色 |
|---|---|---|
| Node1 | 192.168.1.71 | Primary |
| Node2 | 192.168.1.72 | Standby |
| Node3 | 192.168.1.73 | Cascade Standby |
说明:以下操作需在2台主机上执行(Node1、Node2)。
2.5、检查环境
- 操作系统版本:
[root@Node1 ~]#
[root@Node1 ~]# cat /etc/redhat-release
CentOS Linux release 7.9.2009 (Core)
[root@Node1 ~]#
[root@Node2 ~]#
[root@Node2 ~]# cat /etc/redhat-release
CentOS Linux release 7.9.2009 (Core)
[root@Node2 ~]#
[root@Node3 ~]#
[root@Node3 ~]# cat /etc/redhat-release
CentOS Linux release 7.9.2009 (Core)
[root@Node3 ~]#
- CPU核数:
[root@Node1 ~]# cat /proc/cpuinfo | grep "physical id" | uniq | wc -l
4
[root@Node1 ~]#
[root@Node2 ~]# cat /proc/cpuinfo | grep "physical id" | uniq | wc -l
4
[root@Node2 ~]#
[root@Node3 ~]# cat /proc/cpuinfo | grep "physical id" | uniq | wc -l
4
[root@Node3 ~]#
- 内存大小:
[root@Node2 ~]# free -h
              total        used        free      shared  buff/cache   available
Mem:           4.7G        813M        334M        760M        2.6G        1.6G
Swap:          8.0G          0B        8.0G
[root@Node2 ~]#
[root@Node2 ~]# free -h
              total        used        free      shared  buff/cache   available
Mem:           4.7G        813M        334M        760M        2.6G        1.6G
Swap:          8.0G          0B        8.0G
[root@Node2 ~]#
[root@Node3 ~]# free -h
              total        used        free      shared  buff/cache   available
Mem:           4.7G        813M        334M        760M        2.6G        1.6G
Swap:          8.0G          0B        8.0G
[root@Node2 ~]#
2.6、安装依赖
yum install -y bzip2 libaio-devel readline-devel expect wget
2.7、检查Python版本
[root@Node1 ~]# python --version
Python 2.7.5
[root@Node1 ~]#
[root@Node1 ~]# python3 --version
-bash: python3: command not found
[root@Node1 ~]#
[root@Node2 ~]# python --version
Python 2.7.5
[root@Node2 ~]#
[root@Node2 ~]# python3 --version
-bash: python3: command not found
[root@Node2 ~]#
[root@Node3 ~]# python --version
Python 2.7.5
[root@Node3 ~]#
[root@Node3 ~]# python3 --version
-bash: python3: command not found
[root@Node3 ~]#
- 说明:本例未安装Python3,需安装Python3.
代码如下:
yum install -y python3
2.8、关闭SELINUX
[root@Node1 ~]# sed -i  "s/SELINUX=enforcing/SELINUX=disabled/"  /etc/selinux/config
[root@Node1 ~]#
[root@Node2 ~]# sed -i  "s/SELINUX=enforcing/SELINUX=disabled/"  /etc/selinux/config
[root@Node2 ~]#
[root@Node3 ~]# sed -i  "s/SELINUX=enforcing/SELINUX=disabled/"  /etc/selinux/config
[root@Node3 ~]#
2.9、关闭RemoveIPC
- 说明:在各数据库节点上,关闭RemoveIPC。CentOS操作系统默认为关闭,可以跳过该步骤。
[root@Node1 ~]#
[root@Node1 ~]# cat>>/etc/systemd/logind.conf<<EOF
> RemoveIPC=no
> EOF
[root@Node1 ~]#

[root@Node1 ~]#
[root@Node1 ~]# cat>>/usr/lib/systemd/system/systemd-logind.service<<EOF
> RemoveIPC=no
> EOF
[root@Node1 ~]#
[root@Node2 ~]#
[root@Node2 ~]# cat>>/etc/systemd/logind.conf<<EOF
> RemoveIPC=no
> EOF
[root@Node2 ~]#

[root@Node2 ~]#
[root@Node2 ~]# cat>>/usr/lib/systemd/system/systemd-logind.service<<EOF
> RemoveIPC=no
> EOF
[root@Node2 ~]#
[root@Node3 ~]#
[root@Node3 ~]# cat>>/etc/systemd/logind.conf<<EOF
> RemoveIPC=no
> EOF
[root@Node3 ~]#

[root@Node3 ~]#
[root@Node3 ~]# cat>>/usr/lib/systemd/system/systemd-logind.service<<EOF
> RemoveIPC=no
> EOF
[root@Node3 ~]#
2.10、修改内核
sysctl -w kernel.sem="250 85000 250 330"
2.11、关闭防火墙
[root@Node1 ~]#
[root@Node1 ~]# systemctl disable firewalld.service
viceRemoved symlink /etc/systemd/system/multi-user.target.wants/firewalld.service.
Removed symlink /etc/systemd/system/dbus-org.fedoraproject.FirewallD1.service.
[root@Node1 ~]# systemctl stop firewalld.service
[root@Node1 ~]#
[root@Node2 ~]#
[root@Node2 ~]# systemctl disable firewalld.service
viceRemoved symlink /etc/systemd/system/multi-user.target.wants/firewalld.service.
Removed symlink /etc/systemd/system/dbus-org.fedoraproject.FirewallD1.service.
[root@Node2 ~]# systemctl stop firewalld.service
[root@Node2 ~]#
[root@Node3 ~]#
[root@Node3 ~]# systemctl disable firewalld.service
viceRemoved symlink /etc/systemd/system/multi-user.target.wants/firewalld.service.
Removed symlink /etc/systemd/system/dbus-org.fedoraproject.FirewallD1.service.
[root@Node3 ~]# systemctl stop firewalld.service
[root@Node3 ~]#
- 说明:目前仅支持在防火墙关闭的状态下进行安装。
2. 12、检查服务器主机时间
[root@Node1 ~]# date
Thu Nov 14 22:15:07 CST 2024
[root@Node1 ~]#
[root@Node2 ~]# date
Thu Nov 14 22:15:30 CST 2024
[root@Node2 ~]#
[root@Node3 ~]# date
Thu Nov 14 22:15:45 CST 2024
[root@Node3 ~]#
备注:如果时区不准确,可按如下方法调整。
centos修改时间为北京时间
在CentOS系统中,您可以使用timedatectl命令来设置时区并同步时间。以下是将系统时间设置为北京时间的步骤:

查找北京时间对应的时区:

timedatectl list-timezones | grep -i "beijing"
通常北京时间对应的时区是Asia/Shanghai。

设置时区为Asia/Shanghai:

sudo timedatectl set-timezone Asia/Shanghai
如果您还需要同步网络时间,可以使用以下命令启用网络时间同步:

sudo timedatectl set-ntp true
这样就设置了系统时区为北京时间,并启用了网络时间同步。您可以通过以下命令检查当前时间设置:

timedatectl status
2.13、关闭HISTORY记录
[root@Node1 ~]# sed  -i  “s/HISTSIZE=1000/HISTSIZE=0/”  /etc/profile
[root@Node1 ~]#
[root@Node2 ~]# sed  -i  “s/HISTSIZE=1000/HISTSIZE=0/”  /etc/profile
[root@Node2 ~]#
2.14、修改字符集
- 查看本地字符集:
[root@Node1 ~]# locale
LANG=en_US.UTF-8
LC_CTYPE="en_US.UTF-8"
LC_NUMERIC="en_US.UTF-8"
LC_TIME="en_US.UTF-8"
LC_COLLATE="en_US.UTF-8"
LC_MONETARY="en_US.UTF-8"
LC_MESSAGES="en_US.UTF-8"
LC_PAPER="en_US.UTF-8"
LC_NAME="en_US.UTF-8"
LC_ADDRESS="en_US.UTF-8"
LC_TELEPHONE="en_US.UTF-8"
LC_MEASUREMENT="en_US.UTF-8"
LC_IDENTIFICATION="en_US.UTF-8"
LC_ALL=
[root@Node2 ~]# locale
LANG=en_US.UTF-8
LC_CTYPE="en_US.UTF-8"
LC_NUMERIC="en_US.UTF-8"
LC_TIME="en_US.UTF-8"
LC_COLLATE="en_US.UTF-8"
LC_MONETARY="en_US.UTF-8"
LC_MESSAGES="en_US.UTF-8"
LC_PAPER="en_US.UTF-8"
LC_NAME="en_US.UTF-8"
LC_ADDRESS="en_US.UTF-8"
LC_TELEPHONE="en_US.UTF-8"
LC_MEASUREMENT="en_US.UTF-8"
LC_IDENTIFICATION="en_US.UTF-8"
LC_ALL=
- 修改字符集:
[root@Node1 ~]#
[root@Node1 ~]# cat>> /etc/profile<<EOF
> export LANG=en_US.UTF08
> EOF
[root@Node1 ~]#
[root@Node2 ~]#
[root@Node2 ~]# cat>> /etc/profile<<EOF
> export LANG=en_US.UTF08
> EOF
[root@Node2 ~]#
- 查看字符集:
[root@Node1 ~]#
[root@Node1 ~]# cat /etc/profile
# /etc/profile
unset i
unset -f pathmunge
export LANG=en_US.UTF-8
[root@Node1 ~]#
[root@Node2 ~]#
[root@Node2 ~]# cat /etc/profile
# /etc/profile
unset i
unset -f pathmunge
export LANG=en_US.UTF-8
[root@Node2 ~]#
2.15、修改hosts
cat>> /etc/hosts<<EOF
192.168.1.71 Node1
192.168.1.72 Node2
192.168.1.73 Node3
EOF
2.16、创建互信
rm -rf /home/root/.ssh
mkdir ~/.ssh
chmod 700 ~/.ssh
ssh-keygen -t rsa
ssh-copy-id root@192.168.1.71
ssh-copy-id root@192.168.1.72
ssh-copy-id root@192.168.1.73
2.17、以上设置完毕,重启主机。
三、openGauss部署准备
3.1、新建管理用户
groupadd dbgrp -g 4000
useradd omm -g 4000 -u 4000
echo "omm"|passwd --stdin omm
3.2、创建安装目录
- 目录规划:
| 名称 | 用途 |
|---|---|
| openGauss | 数据库安装的主目录 |
| install | 安装包上传目录 |
代码如下:
mkdir /openGauss  /install
chown -R omm:dbgrp /openGauss  /install
3.3、配置sudo,使用root账户
- 注意:生产环境不建议开启。
sed -i.bak '100aomm ALL=(ALL) NOPASSWD:ALL' /etc/sudoers
3.4、下载安装包
- 1、下载示意图如下:
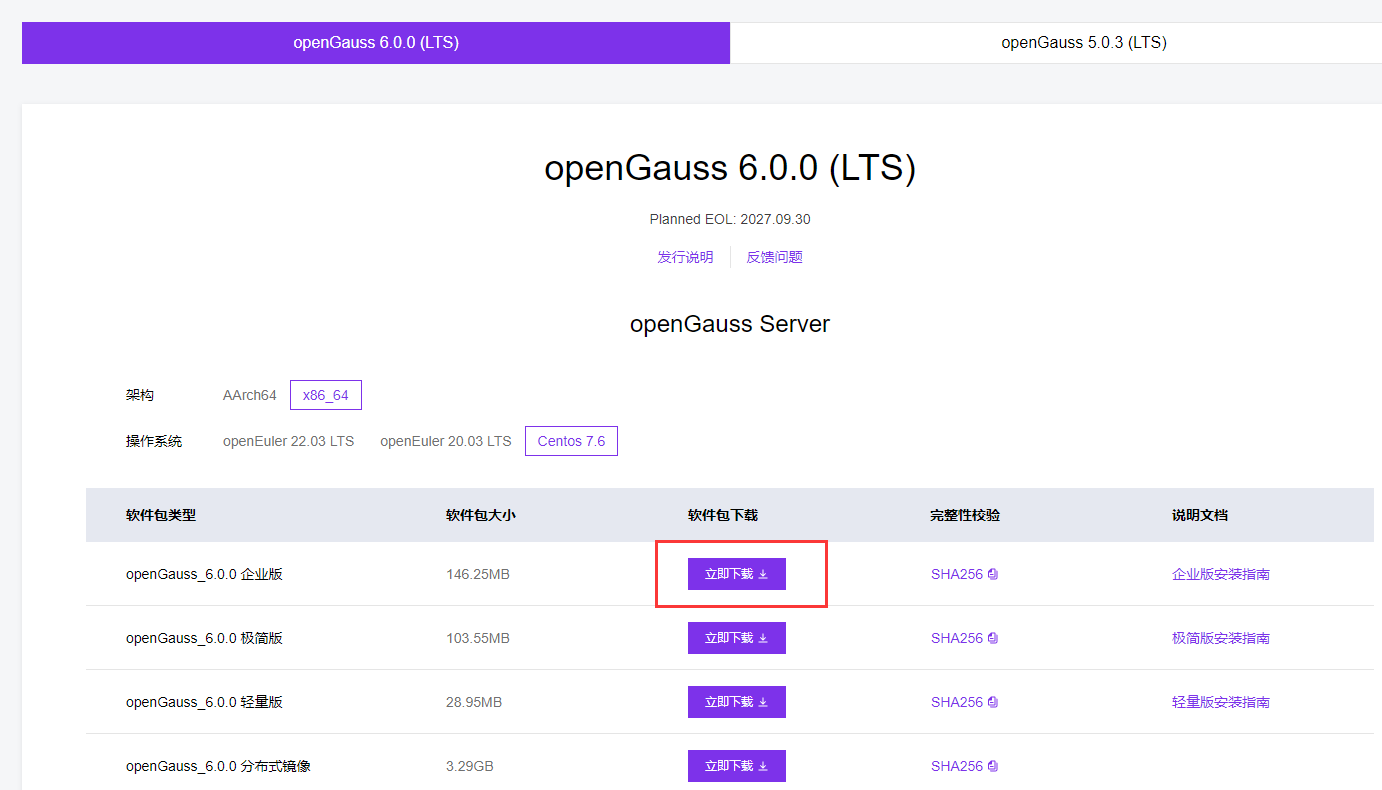
企业版地址:
https://opengauss.obs.cn-south-1.myhuaweicloud.com/6.0.0/CentOS7/x86/openGauss-All-6.0.0-CentOS7-x86_64.tar.gz
- 代码如下:
[root@Node1 ~]# cd /install/
[root@Node1 install]# wget wget https://opengauss.obs.cn-south-1.myhuaweicloud.com/6.0.0/CentOS7/x86/openGauss-All-6.0.0-CentOS7-x86_64.tar.gz
--2024-11-14 22:17:31--  http://wget/
Resolving wget (wget)... failed: Name or service not known.
wget: unable to resolve host address ‘wget’
--2024-11-14 22:17:36--  https://opengauss.obs.cn-south-1.myhuaweicloud.com/6.0.0/CentOS7/x86/openGauss-All-6.0.0-CentOS7-x86_64.tar.gz
Resolving opengauss.obs.cn-south-1.myhuaweicloud.com (opengauss.obs.cn-south-1.myhuaweicloud.com)... 139.9.23.166, 121.37.63.47, 139.159.208.234, ...
Connecting to opengauss.obs.cn-south-1.myhuaweicloud.com (opengauss.obs.cn-south-1.myhuaweicloud.com)|139.9.23.166|:443... connected.
HTTP request sent, awaiting response... 200 OK
Length: 153356080 (146M) [application/gzip]
Saving to: ‘openGauss-All-6.0.0-CentOS7-x86_64.tar.gz’

100%[===================================>] 153,356,080 9.45MB/s   in 15s

2024-10-14 22:17:52 (9.60 MB/s) - ‘openGauss-All-6.0.0-CentOS7-x86_64.tar.gz’ saved [153356080/153356080]

FINISHED --2024-10-14 22:17:52--
Total wall clock time: 16s
Downloaded: 1 files, 146M in 15s (9.60 MB/s)
[root@Node1 install]#
- 2、解压安装包
- 代码如下:
[root@Node1 install]# tar -xzvf openGauss-All-6.0.0-CentOS7-x86_64.tar.gz -C /openGauss/
openGauss-CM-6.0.0-CentOS7-x86_64.tar.gz
openGauss-OM-6.0.0-CentOS7-x86_64.tar.gz
openGauss-Server-6.0.0-CentOS7-x86_64.tar.bz2
openGauss-CM-6.0.0-CentOS7-x86_64.sha256
openGauss-OM-6.0.0-CentOS7-x86_64.sha256
openGauss-Server-6.0.0-CentOS7-x86_64.sha256
upgrade_sql.tar.gz
upgrade_sql.sha256
- 3、解压OM安装包
- 代码如下:
[root@Node1 install]# tar -zxvf /openGauss/openGauss-OM-6.0.0-CentOS7-x86_64.tar.gz -C /openGauss/
 ./lib/
./lib/pyasn1/
./lib/pyasn1/codec/
..............
./script/upgrade_checker/dev/developer_guide.md
./script/upgrade_checker/dev/og_controller.py
./script/upgrade_checker/dev/__init__.py
./script/upgrade_checker/dev/standard_vmap_gen.py
./script/upgrade_checker/verifier.py
./script/ssh-copy-id
./version.cfg
[root@Node1 install]#
- 4、拷贝cluster.xml集群配置文件
- 说明:
- 1、集群模板文件cluster_tmp.xml位于安装目录下的/openGauss/script/base_utils/template/cluster_tmp.xml
- 2、将cluster_tmp.xml重命名为cluster.xml
- 代码如下:
[root@Node1 install]# cp /openGauss/script/base_utils/template/cluster_tmp.xml /openGauss/script/base_utils/template/cluster.xml
[root@Node1 install]#
- 5、编辑cluster.xml集群配置文件
- 说明:根据实际环境修改。
- 代码如下:
vi /openGauss/script/base_utils/template/cluster.xml

--增加以下内容:

<?xml version="1.0" encoding="UTF-8"?>
<ROOT>
    <!-- openGauss整体信息 -->
    <CLUSTER>
        <PARAM name="clusterName" value="Cluster_template" />
        <PARAM name="nodeNames" value="Node1,Node2,Node3" />

        <PARAM name="gaussdbAppPath" value="/openGauss/install/app" />
        <PARAM name="gaussdbLogPath" value="/openGauss/log/omm" />
        <PARAM name="tmpMppdbPath" value="/openGauss/tmp"/>
        <PARAM name="gaussdbToolPath" value="/openGauss/install/om" />
        <PARAM name="corePath" value="/openGauss/corefile"/>
        <PARAM name="backIp1s" value="192.168.1.71,192.168.1.72,192.168.1.73"/>

    </CLUSTER>
    <!-- 每台服务器上的节点部署信息 -->
    <DEVICELIST>
        <!-- node1上的节点部署信息 -->
        <DEVICE sn="Node1">
            <PARAM name="name" value="Node1"/>
            <PARAM name="azName" value="AZ1"/>
            <PARAM name="azPriority" value="1"/>
            <!-- 如果服务器只有一个网卡可用,将backIP1和sshIP1配置成同一个IP -->
            <PARAM name="backIp1" value="192.168.1.71"/>
            <PARAM name="sshIp1" value="192.168.1.71"/>

      	<!-- cm主 -->
	    <PARAM name="cmsNum" value="1"/>
	    <PARAM name="cmDir" value="/openGauss/install/cm"/>
	    <PARAM name="cmServerPortBase" value="15300"/>
	    <PARAM name="cmServerListenIp1" value="192.168.1.71,192.168.1.72,192.168.1.73"/>
	    <PARAM name="cmServerHaIp1" value="192.168.1.71,192.168.1.72,192.168.1.73"/>
	    <!-- cmServerLevel目前只支持1 -->
	    <PARAM name="cmServerLevel" value="1"/>
	    <!-- cms主及所有备的hostname -->
	    <PARAM name="cmServerRelation" value="Node1,Node2,Node3"/>

       <!--dn-->
         <PARAM name="dataNum" value="1"/>
	    <PARAM name="dataPortBase" value="26000"/>
	    <PARAM name="dataNode1" value="/openGauss/install/data/dn,Node2,/openGauss/install/data/dn,Node3,/openGauss/install/data/dn"/>
        <PARAM name="dataNode1_syncNum" value="0"/>
        </DEVICE>

        <!-- node2上的节点部署信息,其中“name”的值配置为主机名称 -->
        <DEVICE sn="Node2">
            <PARAM name="name" value="Node2"/>
            <PARAM name="azName" value="AZ1"/>
            <PARAM name="azPriority" value="1"/>
            <!-- 如果服务器只有一个网卡可用,将backIP1和sshIP1配置成同一个IP -->
            <PARAM name="backIp1" value="192.168.1.72"/>
            <PARAM name="sshIp1" value="192.168.1.72"/>
             <!-- cm -->
            <PARAM name="cmDir" value="/openGauss/install/cm"/>
            <PARAM name="cmServerPortStandby" value="15300"/>
	</DEVICE>

        <!-- node3上的节点部署信息,其中“name”的值配置为主机名称 -->
        <DEVICE sn="Node3">
            <PARAM name="name" value="Node3"/>
            <PARAM name="azName" value="AZ1"/>
            <PARAM name="azPriority" value="1"/>
            <!-- 如果服务器只有一个网卡可用,将backIP1和sshIP1配置成同一个IP -->
            <PARAM name="backIp1" value="192.168.1.73"/>
            <PARAM name="sshIp1" value="192.168.1.73"/>
            <PARAM name="cascadeRole" value="on"/>
            <!-- cm -->
            <PARAM name="cmDir" value="/openGauss/install/cm"/>
            <PARAM name="cmServerPortStandby" value="15300"/>
	</DEVICE>
    </DEVICELIST>
</ROOT>
四、opeGauss部署
4.1、预安装
说明:安装前置脚本gs_preinstall可以协助用户自动完成如下的安装环境准备工作:
- 自动设置Linux内核参数以达到提高服务器负载能力的目的。这些参数直接影响数据库系统的运行状态,请仅在确认必要时调整。openGauss所设置的Linux内核参数取值请参见配置操作系统参数。
- 自动将openGauss配置文件、安装包拷贝到openGauss主机的相同目录下。
- openGauss安装用户、用户组不存在时,自动创建安装用户以及用户组。
- 读取openGauss配置文件中的目录信息并创建,将目录权限授予安装用户。
代码如下:
[root@Node1 script]# ./gs_preinstall -U omm -G dbgrp -X /openGauss/script/base_utils/template/cluster.xml
Parsing the configuration file.
Successfully parsed the configuration file.
Installing the tools on the local node.
Successfully installed the tools on the local node.
Are you sure you want to create trust for root (yes/no)?yes
Please enter password for root
Please enter password for current user[root].
Password: 录入root账户密码
Checking network information.
All nodes in the network are Normal.
Successfully checked network information.
Creating SSH trust.
Creating the local key file.
Successfully created the local key files.
Appending local ID to authorized_keys.
Successfully appended local ID to authorized_keys.
Updating the known_hosts file.
Successfully updated the known_hosts file.
Appending authorized_key on the remote node.
Successfully appended authorized_key on all remote node.
Checking common authentication file content.
Successfully checked common authentication content.
Distributing SSH trust file to all node.
Distributing trust keys file to all node successfully.
Successfully distributed SSH trust file to all node.
Verifying SSH trust on all hosts.
Verifying SSH trust on all hosts by ip.
Successfully verified SSH trust on all hosts by ip.
Verifying SSH trust on all hosts by hostname.
Successfully verified SSH trust on all hosts by hostname.
Successfully verified SSH trust on all hosts.
Start set cron for root
Successfully to set cron for root
Successfully created SSH trust.
Successfully created SSH trust for the root permission user.
Setting host ip env
Successfully set host ip env.
Distributing package.
Begin to distribute package to tool path.
Successfully distribute package to tool path.
Begin to distribute package to package path.
Successfully distribute package to package path.
Successfully distributed package.
Are you sure you want to create the user[omm] and create trust for it (yes/no)? yes
Preparing SSH service.
Successfully prepared SSH service.
Installing the tools in the cluster.
Successfully installed the tools in the cluster.
Checking hostname mapping.
Successfully checked hostname mapping.
Creating SSH trust for [omm] user.
Please enter password for current user[omm].
Password: 录入omm账户密码
Checking network information.
All nodes in the network are Normal.
Successfully checked network information.
Creating SSH trust.
Creating the local key file.
Successfully created the local key files.
Appending local ID to authorized_keys.
Successfully appended local ID to authorized_keys.
Updating the known_hosts file.
Successfully updated the known_hosts file.
Appending authorized_key on the remote node.
Successfully appended authorized_key on all remote node.
Checking common authentication file content.
Successfully checked common authentication content.
Distributing SSH trust file to all node.
Distributing trust keys file to all node successfully.
Successfully distributed SSH trust file to all node.
Verifying SSH trust on all hosts.
Verifying SSH trust on all hosts by ip.
Successfully verified SSH trust on all hosts by ip.
Successfully verified SSH trust on all hosts.
Start set cron for omm
Successfully to set cron for omm
Successfully created SSH trust.
Successfully created SSH trust for [omm] user.
Checking OS software.
Successfully check OS software.
Checking OS version.
Successfully checked OS version.
Checking cpu instructions.
Successfully checked cpu instructions.
Creating cluster's path.
Successfully created cluster's path.
Set and check OS parameter.
Setting OS parameters.
Successfully set OS parameters.
Warning: Installation environment contains some warning messages.
Please get more details by "/openGauss/script/gs_checkos -i A -h Node1,Node2,Node3 -X /openGauss/script/base_utils/template/cluster.xml --detail".
Set and check OS parameter completed.
Preparing CRON service.
Successfully prepared CRON service.
Setting user environmental variables.
Successfully set user environmental variables.
Setting the dynamic link library.
Successfully set the dynamic link library.
Setting Core file
Successfully set core path.
Setting pssh path
Successfully set pssh path.
Setting Cgroup.
Successfully set Cgroup.
Set ARM Optimization.
No need to set ARM Optimization.
Fixing server package owner.
Setting finish flag.
Successfully set finish flag.
Preinstallation succeeded.
注意事项
- 用户需要检查上层目录权限,保证安装用户对安装包和配置文件目录读写执行的权限。
- xml文件中各主机的名称与IP映射配置正确。
- 使用root或普通用户执行gs_preinstall命令。
- 使用root用户执行gs_preinstall会清理/etc/hosts中的openGauss映射信息,可能存在已部署数据库连接丢失风险,可以在安装结束后手动添加其它数据库映射至/etc/hosts文件中。
- gs_preinstall指定的用户不支持使用-d手动选定家目录,仅支持系统默认创建的/home下和用户同名的/home目录。
- 本产品支持同一操作系统大版本下的小版本混合部署,其支持列表如下:CentOS 6.4/6.5/6.6/6.7/6.8/6.9、CentOS 7.0/7.1/7.2/7.3/7.4、openEuler
4.2、预检查
- 说明:主要用于检查操作系统、控制参数、磁盘配置等内容,并对系统控制参数、I/O配置、网络配置和THP服务等信息进行配置。
代码如下:
[root@Node1 script]# /openGauss/script/gs_checkos -i A -h Node1,Node2,Node3 --detail
Checking items:
    A1. [ OS version status ]                                   : Normal
        [Node3]
        centos_7.9.2009_64bit
        [Node2]
        centos_7.9.2009_64bit
        [Node1]
        centos_7.9.2009_64bit

    A2. [ Kernel version status ]                               : Normal
        The names about all kernel versions are same. The value is "3.10.0-1160.el7.x86_64".
    A3. [ Unicode status ]                                      : Normal
        The values of all unicode are same. The value is "locale:".
    A4. [ Time zone status ]                                    : Normal
        The informations about all timezones are same. The value is "+0800".
    A5. [ Swap memory status ]                                  : Warning
        [Node3]
SwapMemory 8589930496 TotalMemory 3953958912

        [Node1]
SwapMemory 8589930496 TotalMemory 3953958912

        [Node2]
SwapMemory 8589930496 TotalMemory 3953958912


    A6. [ System control parameters status ]                    : Warning
        [Node2]
        Warning reason: variable 'net.ipv4.tcp_retries1' RealValue '3' ExpectedValue '5'.
        Warning reason: variable 'net.ipv4.tcp_syn_retries' RealValue '6' ExpectedValue '5'.
        Check_SysCtl_Parameter warning.

        [Node1]
        Warning reason: variable 'net.ipv4.tcp_retries1' RealValue '3' ExpectedValue '5'.
        Warning reason: variable 'net.ipv4.tcp_syn_retries' RealValue '6' ExpectedValue '5'.
        Check_SysCtl_Parameter warning.

        [Node3]
        Warning reason: variable 'net.ipv4.tcp_retries1' RealValue '3' ExpectedValue '5'.
        Warning reason: variable 'net.ipv4.tcp_syn_retries' RealValue '6' ExpectedValue '5'.
        Check_SysCtl_Parameter warning.


    A7. [ File system configuration status ]                    : Normal
        Both soft nofile and hard nofile are correct.
    A8. [ Disk configuration status ]                           : Normal
        The value about XFS mount parameters is correct.
    A9. [ Pre-read block size status ]                          : Normal
        The value about Logical block size is correct.
    A10.[ IO scheduler status ]                                 : Normal
        The value of IO scheduler is correct.
    A11.[ Network card configuration status ]                   : Warning
        [Node1]
BondMode Null
        Warning reason: network 'ens33' 'mtu' RealValue '1500' ExpectedValue '8192'

        [Node3]
BondMode Null
        Warning reason: network 'ens33' 'mtu' RealValue '1500' ExpectedValue '8192'

        [Node2]
BondMode Null
        Warning reason: network 'ens33' 'mtu' RealValue '1500' ExpectedValue '8192'


    A12.[ Time consistency status ]                             : Warning
        [Node2]
        Neither nptd nor chrony was detected on machine and local time is "2024-11-14 10:46:46".
        [Node1]
        Neither nptd nor chrony was detected on machine and local time is "2024-11-14 10:46:46".

    A13.[ Firewall service status ]                             : Normal
        The firewall service is stopped.
    A14.[ THP service status ]                                  : Normal
        The THP service is stopped.
Total numbers:14. Abnormal numbers:0. Warning numbers:4.
[root@Node1 script]#
4.3、使用gs_install部署集群
说明:
前提条件
- 已成功执行前置脚本gs_preinstall。
- 用户需确保各个节点上的locale保持一致。
- 需要使用前置时设置的openGauss用户进行安装操作。
- openGauss安装部署,要求用户指定配置文件,配置文件中会指定程序安装路径、实例数据目录、主备关系、实例数、各实例的业务IP端口等信息。
- 语法如下:
gs_install -X XMLFILE [--gsinit-parameter="PARAMETER" [...]] [--dn-guc="PARAMETER" [...]] [--alarm-component=ALARMCOMPONENT] [--time-out=SECS] [-l LOGFILE] [--enable-perf-config] [--dorado-cluster-mode="PARAMETER"]
参数说明:
- -X openGauss配置文件。取值范围:xml配置文件。
- -l 指定安装日志文件及日志文件存放的路径。当不明确指定-l,但在XML文件中配置了gaussdbLogPath时,默认值为“gaussdbLogPath的值、用户名和om/gs_install-YYYY-MM-DD_hhmmss.log”的组合。
- –gsinit-parameter=PARAM 数据实例参数指定。取值范围请参见gs_initdb的参数说明,其中对-A、-D、-U、-C、-X参数的设置不生效。
- –dn-guc=PARAM 配置参数。 取值范围请参见gs_guc的参数说明。
- –time-out=SECS 启动超时等待时间。单位:s。若–time-out取值过小,有可能会因为需要启动的实例数过多而引起超时。若在超时时间内启动不成功,则会报错启动超时,但是openGauss会在后台继续启动。可以等待一段时间后,查询openGauss状态,检查openGauss是否启动成功。
取值范围:正整数,若无特殊需求,不需要配置该参数,系统会自动调整超时时间。- –alarm-component=alarm_component 指定告警上报组件的绝对路径。
- –enable-perf-config 在install结束后,调用gs_perfconfig调整数据库配置,以使openGauss获得比较好的性能。
- –dorado-cluster-mode=PARAM 指定存储设备的集群模式,dorado-cluster-mode 主机群or备机群。
- 取值范围:
- primary:以资源池化dorado双集群主集群安装。
- standby:以资源池化dorado双集群备集群安装。
- -?, --help 显示帮助信息。
- -V, --version 显示版本号信息。
- 代码如下
[root@Node1 script]# su omm
[omm@Node1 script]$
[omm@Node1 script]$ gs_install -X /openGauss/script/base_utils/template/cluster.xml
Parsing the configuration file.
Successfully checked gs_uninstall on every node.
Check preinstall on every node.
Successfully checked preinstall on every node.
Creating the backup directory.
Successfully created the backup directory.
begin deploy..
Installing the cluster.
begin prepare Install Cluster..
Checking the installation environment on all nodes.
begin install Cluster..
Installing applications on all nodes.
Successfully installed APP.
begin init Instance..
encrypt cipher and rand files for database.
Please enter password for database: 录入数据库密码
Please repeat for database:         再次录入数据库密码
begin to create CA cert files
The sslcert will be generated in /openGauss/install/app/share/sslcert/om
Create CA files for cm beginning.
Create CA files on directory [/openGauss/install/app_aee4abd5/share/sslcert/cm]. file list: ['cacert.pem', 'server.key', 'server.crt', 'client.key', 'client.crt', 'server.key.cipher', 'server.key.rand', 'client.key.cipher', 'client.key.rand']
Non-dss_ssl_enable, no need to create CA for DSS
Cluster installation is completed.
Configuring.
Deleting instances from all nodes.
Successfully deleted instances from all nodes.
Checking node configuration on all nodes.
Initializing instances on all nodes.
Updating instance configuration on all nodes.
Check consistence of memCheck and coresCheck on database nodes.
Successfully check consistence of memCheck and coresCheck on all nodes.
Configuring pg_hba on all nodes.
Configuration is completed.
Starting cluster.
======================================================================
Successfully started primary instance. Wait for standby instance.
======================================================================
.
Successfully started cluster.
======================================================================
cluster_state      : Normal
redistributing     : No
node_count         : 3
Datanode State
    primary           : 1
    standby           : 1
    secondary         : 0
    cascade_standby   : 1
    building          : 0
    abnormal          : 0
    down              : 0

Successfully installed application.
end deploy..
[omm@Node1 script]$
五、使用openGauss数据库
5.1、使用omm用户身份登录服务器,检查服务状态
说明:
- 执行如下命令检查数据库状态是否正常,“cluster_state ”显示“Normal”表示数据库可正常使用。
- 语法:gs_om -t status
- Node1:
[omm@Node1 ~]$ gs_om -t status
-----------------------------------------------------------------------

cluster_state             : Normal
redistributing            : No
balanced                  : Yes

-----------------------------------------------------------------------

[omm@Node1 ~]$
- Node2:
[omm@Node2 ~]$ gs_om -t status
-----------------------------------------------------------------------

cluster_state             : Normal
redistributing            : No
balanced                  : Yes

-----------------------------------------------------------------------

[omm@Node2 ~]$
- Node3:
[omm@Node3 ~]$ gs_om -t status
-----------------------------------------------------------------------

cluster_state             : Normal
redistributing            : No
balanced                  : Yes

-----------------------------------------------------------------------

[omm@Node3 ~]$
5.2、检查openGauss集群状态
[omm@Node1 ~]$ gs_om -t status --detail
[  CMServer State   ]

node     node_ip         instance                             state
---------------------------------------------------------------------
1  Node1 192.168.1.71    1    /openGauss/install/cm/cm_server Primary
2  Node2 192.168.1.72    2    /openGauss/install/cm/cm_server Standby
3  Node3 192.168.1.73    3    /openGauss/install/cm/cm_server Standby

[   Cluster State   ]

cluster_state   : Normal
redistributing  : No
balanced        : Yes
current_az      : AZ_ALL

[  Datanode State   ]

node     node_ip         instance                               state
---------------------------------------------------------------------------------
1  Node1 192.168.1.71    6001 26000  /openGauss/install/data/dn P Primary Normal
2  Node2 192.168.1.72    6002 26000  /openGauss/install/data/dn S Standby Normal
3  Node3 192.168.1.73    6003 26000  /openGauss/install/data/dn C Cascade Standby Normal
[omm@Node1 ~]$
5.3、使用omm用户身份登录数据库
说明:
- 数据库安装完成后,默认生成名称为postgres的数据库。第一次连接数据库时可以连接到此数据库。
- 其中postgres为需要连接的数据库名称,26000为数据库主节点的端口号,即XML配置文件中的dataPortBase的值。请根据实际情况替换。
- 语法:gsql -d postgres -p 26000 -r
- Node1:
[omm@Node1 ~]$ gsql -d postgres -p 26000 -r
gsql ((openGauss 6.0.0 build aee4abd5) compiled at 2024-09-29 18:38:08 commit 0 last mr  )
Non-SSL connection (SSL connection is recommended when requiring high-security)
Type "help" for help.

openGauss=#
- Node2:
[omm@Node2 ~]$ gsql -d postgres -p 26000 -r
gsql ((openGauss 6.0.0 build aee4abd5) compiled at 2024-09-29 18:38:08 commit 0 last mr  )
Non-SSL connection (SSL connection is recommended when requiring high-security)
Type "help" for help.

openGauss=#
- Node3:
[omm@Node3 ~]$ gsql -d postgres -p 26000 -r
gsql ((openGauss 6.0.0 build aee4abd5) compiled at 2024-09-29 18:38:08 commit 0 last mr  )
Non-SSL connection (SSL connection is recommended when requiring high-security)
Type "help" for help.

openGauss=#
5.4、使用omm用户身份登录数据库,创建管理用户、表空间、数据库、导入测试数据
- 5.4.1、创建表空间存储目录
mkdir -p /openGauss/tablespace
chown -R  omm:dbgrp /openGauss/tablespace
chmod -R 750 /openGauss/tablespace
- 5.4.2、登录openGauss数据库,创建用户sy,创建表空间cssd、数据库cssdserver
[omm@Node1 ~]$ gsql -d postgres -p 26000 -r
gsql ((openGauss 6.0.0 build aee4abd5) compiled at 2024-09-29 18:38:08 commit 0 last mr  )
Non-SSL connection (SSL connection is recommended when requiring high-security)
Type "help" for help.

openGauss=# create user sy password 'Sy@123456';
CREATE ROLE
openGauss=# create tablespace cssd owner sy location '/openGauss/tablespace';
CREATE TABLESPACE
openGauss=#
openGauss=# create database cssdserver owner sy tablespace cssd ;
CREATE DATABASE
openGauss=#
- 5.4.3、实现内网访问openGauss
- 说明:
需要修改postgresql.conf、pg_hba.conf相关配置。
- 1、修改pg_hba.conf
- 说明:
- 默认用户omm无法远程登录,需要创建使用用户sy登录,密码验证方式为sha256。
vi /openGauss/install/data/dn/pg_hba.conf
# TYPE  DATABASE        USER            ADDRESS                 METHOD

# "local" is for Unix domain socket connections only
local   all             all                                     trust
host    all    sy    192.168.1.71/32    sha256
host    all    sy    192.168.1.72/32    sha256
host    all    sy    192.168.1.73/32    sha256
# IPv4 local connections:
host    all             all             127.0.0.1/32            trust
host    all    all    192.168.1.791/32    sha256
host    all    all    192.168.1.72/32    sha256
host    all    sy    192.168.1.73/32    sha256
host    all    all    0.0.0.0/0    sha256
# IPv6 local connections:
host    all             all             ::1/128                 trust
# Allow replication connections from localhost, by a user with the
# replication privilege.
# local   replication     sy        127.0.0.1/32            trust
# host    replication     sy        ::1/128                 trust
host    replication    sy    192.168.1.71/32    sha256
host    replication    sy    192.168.1.72/32    sha256
host    replication    sy    192.168.1.73/32    sha256
host    replication    sy    0.0.0.0/0    sha256
- 2、修改postgresql.conf
- 说明:
- 密码验证方式为1,md5、sha256都支持
- 建议开启归档,创建归档目录;
- 修改密码策略后,需修改密码才能登录。
建议开启归档:
mkdir -p /openGauss/archive
chmod -R 750 /openGauss/archive/
chown -R omm:dbgrp /openGauss/archive/
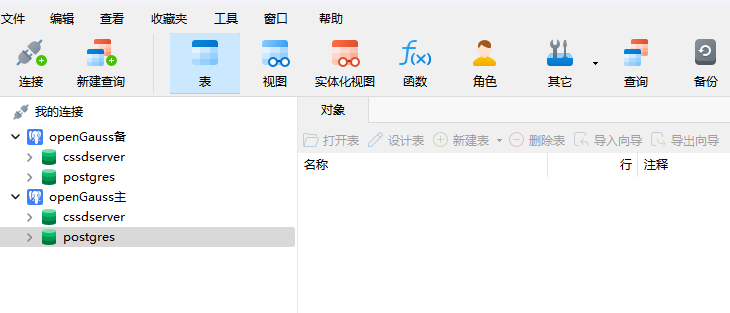
5.5、使用navicat访问openGauss
说明:
- Server:192.168.1.71
- DataBase:cssdserver
- Port: 26000
- UserName:sy
- Password:Sy@123456
六、相关问题
6.1、问题一
[GAUSS-51632] : Failed to do python3 '/openGauss/script/local/LocalCheckOS.py' -t Check_Firewall_Service -l '/openGauss/log/omm/omm/om/gs_local.log' . Error:
'ascii' codec can't decode byte 0xe2 in position 0: ordinal not in range(128).
解决:
[root@enmoedu1 om]# export LC_CTYPE=en_US.UTF-8
6.2、问题二
[Node2]:
[GAUSS-51632] : Failed to do python3 '/openGauss/script/local/LocalCheckOS.py' -t Check_Firewall_Service -l '/openGauss/log/omm/omm/om/gs_local.log' . Error:
'ascii' codec can't decode byte 0xe2 in position 0: ordinal not in range(128).
[root@Node1 script]#
解决:
[root@Node1 script]#
[root@Node1 script]# export LC_CTYPE=en_US.UTF-8
[root@Node1 script]#
6.3、问题三
[root@Node1 openGauss]# /openGauss/script/gs_checkos -i A -h Node1,Node2 --detail
Traceback (most recent call last):
  File "/openGauss/script/gspylib/threads/SshTool.py", line 46, in <module>
    import paramiko
  File "/openGauss/script/domain_utils/sql_handler/../../../lib/paramiko/__init__.py", line 22, in <module>
    from paramiko.transport import SecurityOptions, Transport
  File "/openGauss/script/domain_utils/sql_handler/../../../lib/paramiko/transport.py", line 89, in <module>
    from paramiko.dsskey import DSSKey
  File "/openGauss/script/domain_utils/sql_handler/../../../lib/paramiko/dsskey.py", line 37, in <module>
    from paramiko.pkey import PKey
  File "/openGauss/script/domain_utils/sql_handler/../../../lib/paramiko/pkey.py", line 31, in <module>
    import bcrypt
解决:
最好是配置可以连接外网,利用外网yum源安装openssl-devel包,python3
注:Centos是自带外网yum源的,所以不用配置yum,只需要配置好外网直接执行yum安装就可以。
执行:
yum install python3*
校验版本:
[root@enmoedu1 yum.repos.d]# python3 -V
Python 3.6.8
6.4、问题四
Checking OS version.
Successfully checked OS version.
Checking cpu instructions.
Successfully checked cpu instructions.
Creating cluster's path.
[SUCCESS] Node1:
[FAILURE] Node2:
[GAUSS-50102] : The /openGauss/log/omm/omm is not writable for omm.
[FAILURE] Node3:
[GAUSS-50102] : The /openGauss/log/omm/omm is not writable for omm.
解决:
[root@Node2 ~]# chown -R omm:dbgrp /openGauss/log/omm/omm
[root@Node2 ~]# chmod -R 750 /openGauss/log/omm/omm
七、总结
openGauss一主一备一级联的意义主要体现在以下几个方面:
提高系统可用性
openGauss一主一备一级联架构可以提供高可用性,即使主节点发生故障,备节点也可以快速接管,保证业务的连续性。
数据冗余与保护
通过一级联备机,数据可以在多个节点上进行冗余存储,提高数据的安全性和可靠性。即使主节点或一级备机发生故障,数据仍然可以从其他节点恢复,减少数据丢失的风险。
负载均衡
一级联备机可以分担主节点的负载,特别是在高并发读写场景下,可以提高系统的整体性能和响应速度。
灵活的扩展能力
openGauss一主一备一级联架构支持灵活的扩展,可以根据业务需求增加或减少备机数量,以适应不同的业务规模和性能要求。
异地灾备
通过一级联备机,可以实现异地灾备,即在不同地理位置部署备机,以应对自然灾害或其他不可预见的灾难,确保数据的安全性和业务的连续性。
简化管理
openGauss一主一备一级联架构简化了数据库的管理和维护,管理员只需要关注主节点和一级备机的状态,而无需担心二级备机的管理。
成本效益
相比传统的主从复制架构,openGauss一主一备一级联架构可以在保证高可用性和数据安全性的同时,降低总体成本,因为它减少了对额外硬件和复杂管理的需求。
