


作者:ShunWah
在运维管理领域,我拥有多年深厚的专业积累,兼具坚实的理论基础与广泛的实践经验。我始终站在技术前沿,致力于推动运维自动化,不懈追求运维效率的最大化。
我精通运维自动化流程,对于OceanBase、MySQL等多种数据库的部署与运维,具备从初始部署到后期维护的全链条管理能力。凭借OceanBase的OBCA和OBCP认证、OpenGauss社区认证结业证书,以及崖山DBCA、亚信AntDBCA、翰高HDCA、GBase 8a | 8c | 8s、Galaxybase GBCA、Neo4j Graph Data Science Certification、NebulaGraph NGCI等多项权威认证,我不仅展现了自己的专业技能,也彰显了对技术的深厚热情与执着追求。
在OceanBase & 墨天轮的技术征文大赛中,我凭借卓越的技术实力和独特的见解,多次荣获一、二、三等奖。同时,在OpenGauss第五届、第六届、第七届技术征文大赛,TiDB社区第三届专栏征文大赛,金仓数据库有奖征文活动,以及首批YashanDB「产品体验官」尝鲜征文等活动中,我也屡获殊荣。此外,我还活跃于墨天轮、CSDN等技术平台,经常发布原创技术文章,并多次被首页推荐,积极与业界同仁分享我的运维经验和独到见解。

前言
随着信息技术的发展,数据库的选择成为了企业数字化转型的关键因素之一。openGauss,以其出色的性能和强大的功能,成为了众多企业的首选。作为一名技术爱好者,我有幸参与到openGauss的技术探索中,并决定记录下我在CentOS 7离线环境下部署openGauss 6.0 LTS版的经历,希望能够帮助到同样走在技术探索路上的你。
一、部署环境准备
由于是在离线环境中进行部署,首先需要在有网络连接的机器上准备好所有必要的文件和依赖项。这里我们将使用一台可以上网的机器来下载所需资源,然后将这些资源传输到目标离线机器上。
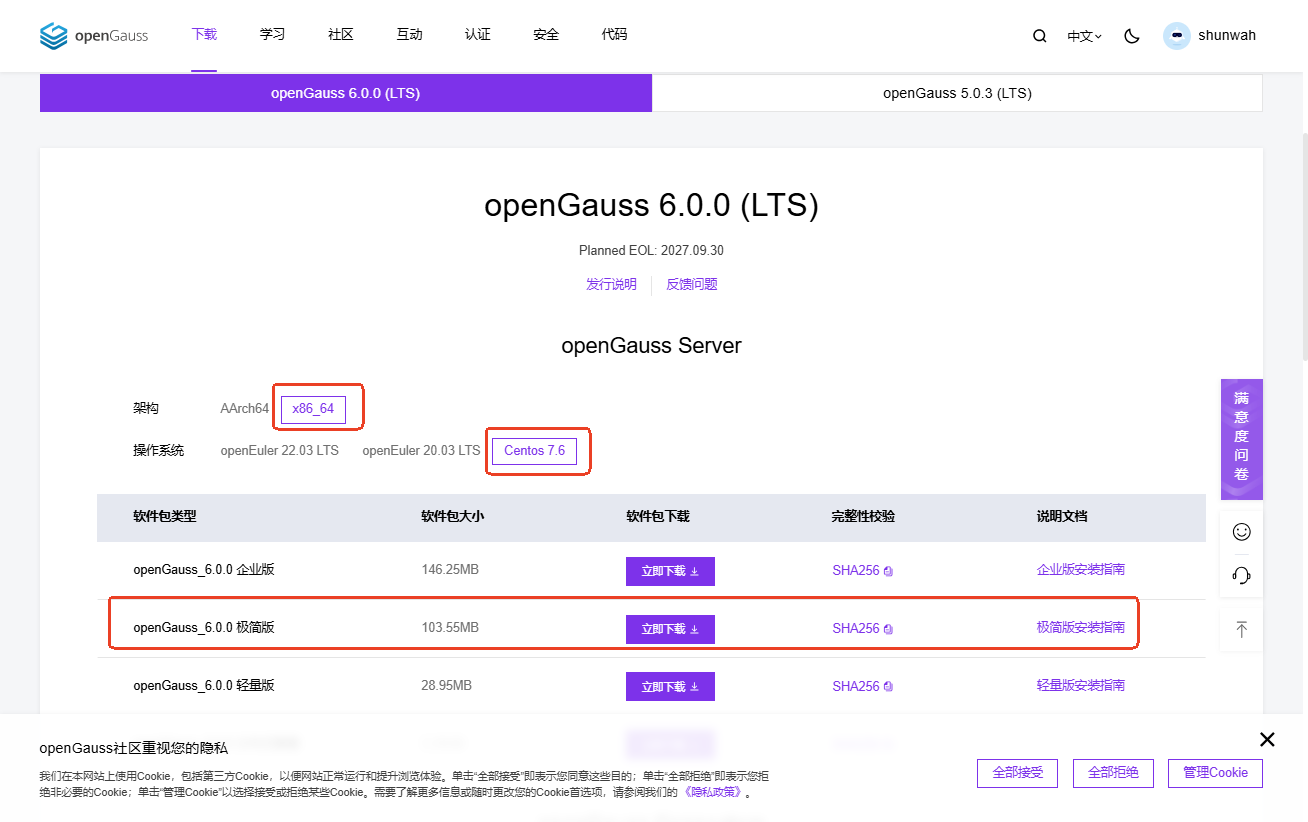
1、下载openGauss 6.0 LTS安装包:
访问openGauss官网或GitHub仓库,找到6.0 LTS版本的下载链接,下载适用于Linux的安装包。
https://opengauss.org/zh/download/

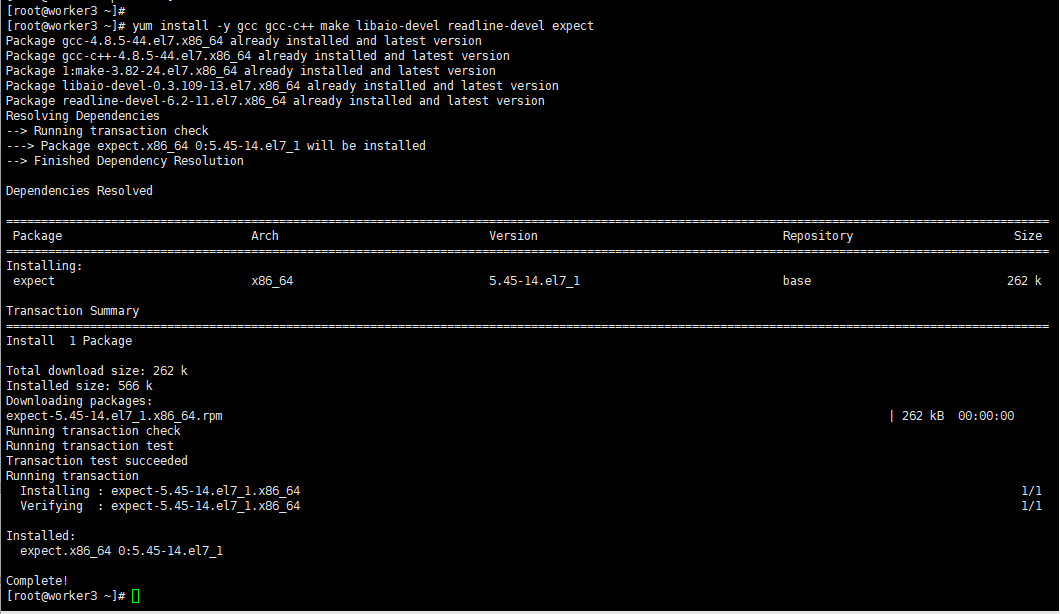
2、 安装依赖
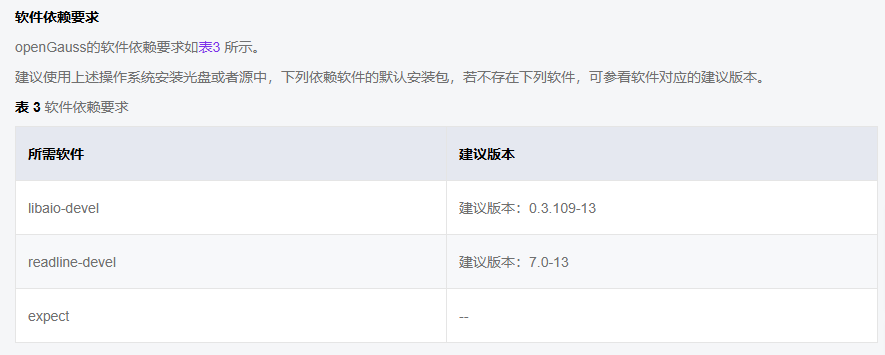
[root@worker3 ~]# yum install -y gcc gcc-c++ make libaio-devel readline-devel expect
Package gcc-4.8.5-44.el7.x86_64 already installed and latest version
Package gcc-c++-4.8.5-44.el7.x86_64 already installed and latest version
Package 1:make-3.82-24.el7.x86_64 already installed and latest version
Package libaio-devel-0.3.109-13.el7.x86_64 already installed and latest version
Package readline-devel-6.2-11.el7.x86_64 already installed and latest version
Resolving Dependencies
--> Running transaction check
---> Package expect.x86_64 0:5.45-14.el7_1 will be installed
--> Finished Dependency Resolution
3、创建用户和组
为了安全起见,我们将在系统中创建一个专门用于运行openGauss的用户和组。
3.1 创建组:
[root@worker3 data]# groupadd gaussdb
[root@worker3 data]#

3.2 创建用户:
[root@worker3 data]# useradd -g gaussdb gauss
[root@worker3 data]#

3.3 设置用户密码:
[root@worker3 data]# passwd gauss
Changing password for user gauss.
New password:
Retype new password:
passwd: all authentication tokens updated successfully.
[root@worker3 data]#
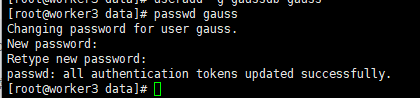
根据提示输入并确认密码。
4、传输包装包文件:
使用XFTP将下载的openGauss安装包和依赖包从联网机器传输到离线机器。


5、解压安装包:
将openGauss 6.0 LTS的安装包解压到指定目录,例如(假定安装目录为/opt/software/openGauss,请用实际值替换)。
[root@worker3 data]# ls
backup       es     mysql        ob4-3                                          redis
demo         jpom   nginx        ob_elr.py                                      test
docker_data  mongo  nginx-proxy  openGauss-Server-6.0.0-CentOS7-x86_64.tar.bz2  WavesAudio.MaxxAudioProforDell2020_fh4rh281wavaa!App
[root@worker3 data]# tar -jxf openGauss-Server-6.0.0-CentOS7-x86_64.tar.bz2 -C /opt/software/openGauss/
[root@worker3 data]#

6、设置安装目录权限
/opt/software/openGauss/ 设置权限chown -R gauss:gaussdb
[root@worker3 data]# chown -R gauss:gaussdb /opt/software/openGauss/
[root@worker3 data]#

二、安装部署数据库:
切换到gauss用户,部署数据库。
[root@worker3 data]# su - gauss
[gauss@worker3 ~]$
1、安装数据库
[gauss@worker3 ~]$ cd /opt/software/openGauss/
[gauss@worker3 openGauss]$ ls
bin  etc  include  jre  lib  logs  share  simpleInstall  version.cfg
[gauss@worker3 openGauss]$ cd simpleInstall/
[gauss@worker3 simpleInstall]$ ls
finance.sql  install.sh  load.log  README.md  school.sql
[gauss@worker3 simpleInstall]$ sh install.sh -w aBC@123678
[step 1]: check parameter
[step 2]: check install env and os setting
[step 3]: change_gausshome_owner
[step 4]: set environment variables

/etc/profile.d/gcc.sh: line 1: $'\342\200\230nexport': command not found
/home/gauss/.bashrc: line 16: ulimit: open files: cannot modify limit: Operation not permitted
[step 6]: init datanode
The files belonging to this database system will be owned by user "gauss".
This user must also own the server process.

The database cluster will be initialized with locale "en_US.UTF-8".
The default database encoding has accordingly been set to "UTF8".
The default text search configuration will be set to "english".

creating directory /opt/software/openGauss/data/single_node ... ok
creating subdirectories ... in ordinary occasionok
creating configuration files ... ok
selecting default max_connections ... 100
selecting default shared_buffers ... 1024MB
Begin init undo subsystem meta.
[INIT UNDO] Init undo subsystem meta successfully.
creating template1 database in /opt/software/openGauss/data/single_node/base/1 ... The core dump path is an invalid directory
2024-11-15 14:34:55.928 [unknown] [unknown] localhost 140496757156544 0[0:0#0]  [BACKEND] WARNING:  macAddr is 80/1451333599, sysidentifier is 5265025/2547988916, randomNum is 3127785908
ok
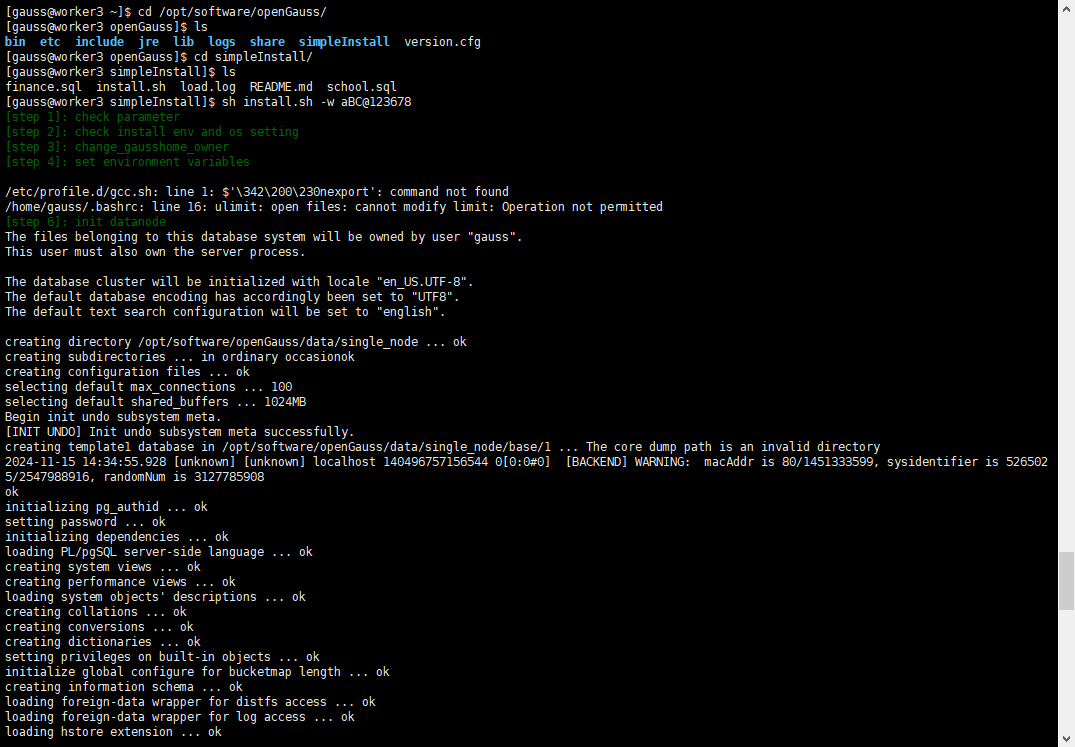
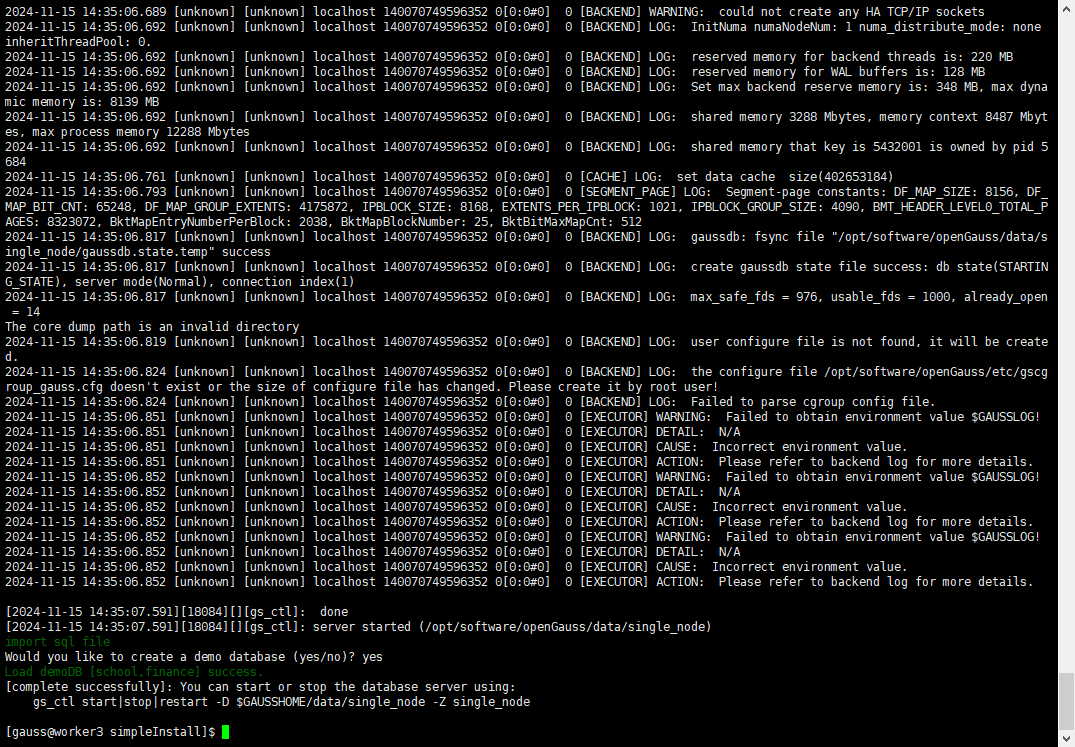
上述命令中,-w 是指初始化数据库密码(gs_initdb指定),安全需要必须设置。
2、设置环境变量:
编辑~/.bashrc文件,添加openGauss的相关路径。
[root@worker3 data]# echo 'export PATH=$PATH:/opt/software/openGauss/bin' >> ~/.bashrc
[root@worker3 data]# echo 'export LD_LIBRARY_PATH=/opt/software/openGauss/lib:$LD_LIBRARY_PATH' >> ~/.bashrc
[root@worker3 data]# source ~/.bashrc
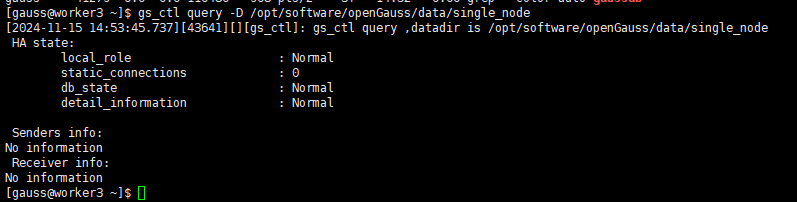
3、安装执行完成后,使用ps和gs_ctl查看进程是否正常。
[gauss@worker3 ~]$ ps ux | grep gaussdb
gauss     41043 10.7  3.0 6294532 890320 ?      Ssl  14:51   0:00 /opt/software/openGauss/bin/gaussdb -D /opt/software/openGauss/data/single_node
gauss     41279  0.0  0.0 110480   908 pts/2    S+   14:52   0:00 grep --color=auto gaussdb
[gauss@worker3 ~]$

或
[gauss@worker3 ~]$ gs_ctl query -D /opt/software/openGauss/data/single_node
[2024-11-15 14:53:45.737][43641][][gs_ctl]: gs_ctl query ,datadir is /opt/software/openGauss/data/single_node
 HA state:
	local_role                     : Normal
	static_connections             : 0
	db_state                       : Normal
	detail_information             : Normal

 Senders info:
No information
 Receiver info:
No information
[gauss@worker3 ~]$
4、启动和管理数据库
4.1启动数据库:
使用gs_ctl命令启动数据库。
[gauss@worker3 ~]$ gs_ctl start -D $GAUSSHOME/data/single_node -Z single_node
[2024-11-15 14:51:55.232][41040][][gs_ctl]: gs_ctl started,datadir is /opt/software/openGauss/data/single_node
[2024-11-15 14:51:55.276][41040][][gs_ctl]: waiting for server to start...
.0 LOG:  [Alarm Module]can not read GAUSS_WARNING_TYPE env.

4.2 停止数据库:
当需要停止数据库时,使用以下命令:
[gauss@worker3 ~]$ gs_ctl stop -D $GAUSSHOME/data/single_node -Z single_node
[2024-11-15 14:56:01.768][46698][][gs_ctl]: gs_ctl stopped ,datadir is /opt/software/openGauss/data/single_node
waiting for server to shut down.... done
server stopped
[gauss@worker3 ~]$

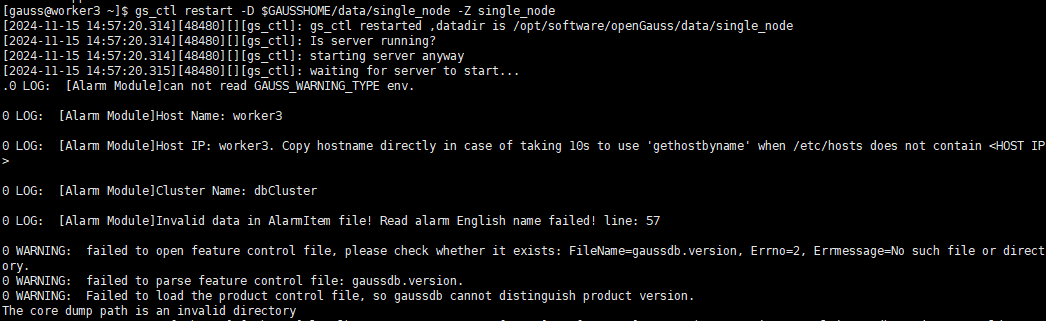
4.3 重启数据库:
如果需要重启数据库,可以使用:
[gauss@worker3 ~]$ gs_ctl restart -D $GAUSSHOME/data/single_node -Z single_node
[2024-11-15 14:57:20.314][48480][][gs_ctl]: gs_ctl restarted ,datadir is /opt/software/openGauss/data/single_node
[2024-11-15 14:57:20.314][48480][][gs_ctl]: Is server running?
[2024-11-15 14:57:20.314][48480][][gs_ctl]: starting server anyway
[2024-11-15 14:57:20.315][48480][][gs_ctl]: waiting for server to start...
.0 LOG:  [Alarm Module]can not read GAUSS_WARNING_TYPE env.
4.4 查看数据库状态:
检查数据库的运行状态,确保一切正常。
[gauss@worker3 ~]$ gs_ctl status -D $GAUSSHOME/data/single_node -Z single_node
[2024-11-15 14:58:23.839][50027][][gs_ctl]: gs_ctl status,datadir is /opt/software/openGauss/data/single_node
gs_ctl: server is running (PID: 48481)
/opt/software/openGauss/bin/gaussdb "-D" "/opt/software/openGauss/data/single_node"
[gauss@worker3 ~]$

三、连接数据库
1、gsql客户端工具连接到openGauss数据库
完成上述步骤后,可以使用gsql客户端工具连接到openGauss数据库,验证安装是否成功。
[gauss@worker3 single_node]$ gsql -d postgres -p 5432 -C
gsql ((openGauss 6.0.0 build aee4abd5) compiled at 2024-09-29 18:38:08 commit 0 last mr  )
Non-SSL connection (SSL connection is recommended when requiring high-security)
Type "help" for help.

openGauss=#

如果一切顺利,您将进入openGauss的命令行界面,可以开始使用这个强大的数据库系统了。
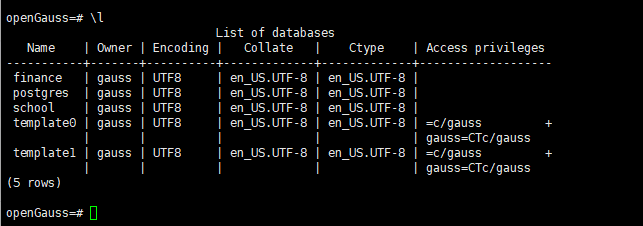
openGauss=# \l
                              List of databases
   Name    | Owner | Encoding |   Collate   |    Ctype    | Access privileges
-----------+-------+----------+-------------+-------------+-------------------
 finance   | gauss | UTF8     | en_US.UTF-8 | en_US.UTF-8 |
 postgres  | gauss | UTF8     | en_US.UTF-8 | en_US.UTF-8 |
 school    | gauss | UTF8     | en_US.UTF-8 | en_US.UTF-8 |
 template0 | gauss | UTF8     | en_US.UTF-8 | en_US.UTF-8 | =c/gauss         +
           |       |          |             |             | gauss=CTc/gauss
 template1 | gauss | UTF8     | en_US.UTF-8 | en_US.UTF-8 | =c/gauss         +
           |       |          |             |             | gauss=CTc/gauss
(5 rows)

openGauss=#
2、访问连接配置
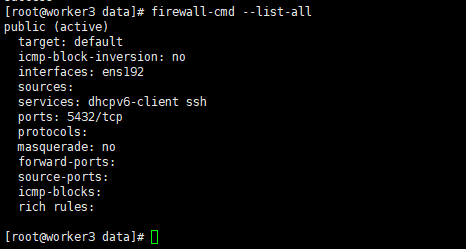
2.1配置防火墙
为了确保外部可以访问openGauss数据库,需要配置防火墙规则。假设openGauss的默认端口为5432。
允许端口:
[root@worker3 data]# firewall-cmd --zone=public --add-port=5432/tcp --permanent
success
[root@worker3 data]# firewall-cmd --reload
success

2.2 检查防火墙状态:
[root@worker3 data]# firewall-cmd --list-all
public (active)
  target: default
  icmp-block-inversion: no
  interfaces: ens192
  sources:
  services: dhcpv6-client ssh
  ports: 5432/tcp
  protocols:
  masquerade: no
  forward-ports:
  source-ports:
  icmp-blocks:
  rich rules:

[root@worker3 data]#
3、配置监听地址
为了让openGauss监听特定的IP地址,需要编辑postgresql.conf文件。
编辑配置文件:
[root@worker3 openGauss]# cd data/single_node/
[root@worker3 single_node]# ls
asp_data         gs_profile          pg_clog       pg_ident.conf  pg_multixact  pg_snapshots  pg_xlog               postmaster.pid.lock
base             gswlm_userinfo.cfg  pg_csnlog     pg_llog        pg_notify     pg_stat_tmp   postgresql.conf       sql_monitor
gaussdb.state    mem_log             pg_ctl.lock   pg_location    pg_perf       pg_tblspc     postgresql.conf.lock  undo
global           mot.conf            pg_errorinfo  pg_log         pg_replslot   pg_twophase   postmaster.opts
gs_gazelle.conf  pg_audit            pg_hba.conf   pg_logical     pg_serial     PG_VERSION    postmaster.pid
[root@worker3 single_node]# vim postgresql.conf
[root@worker3 single_node]# pwd
/opt/software/openGauss/data/single_node
[root@worker3 single_node]#

修改监听地址:
找到#listen_addresses = 'localhost’这一行,将其修改为:
listen_addresses = ‘0.0.0.0’
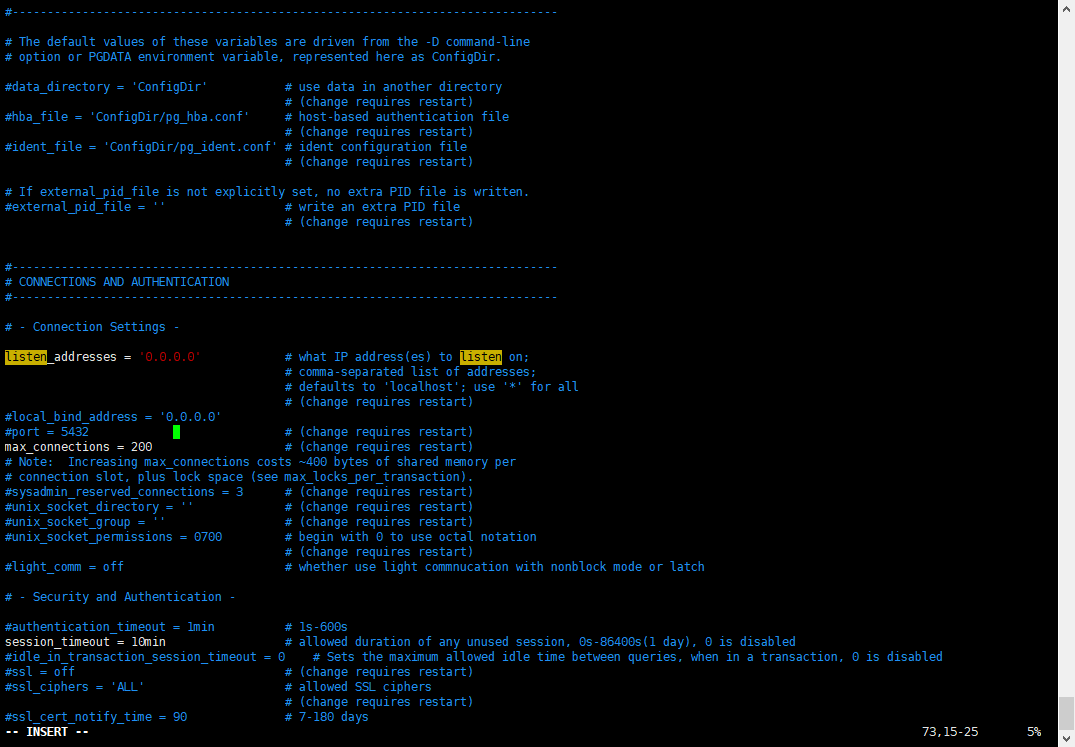
保存并退出:
按Esc键,输入:wq保存并退出。
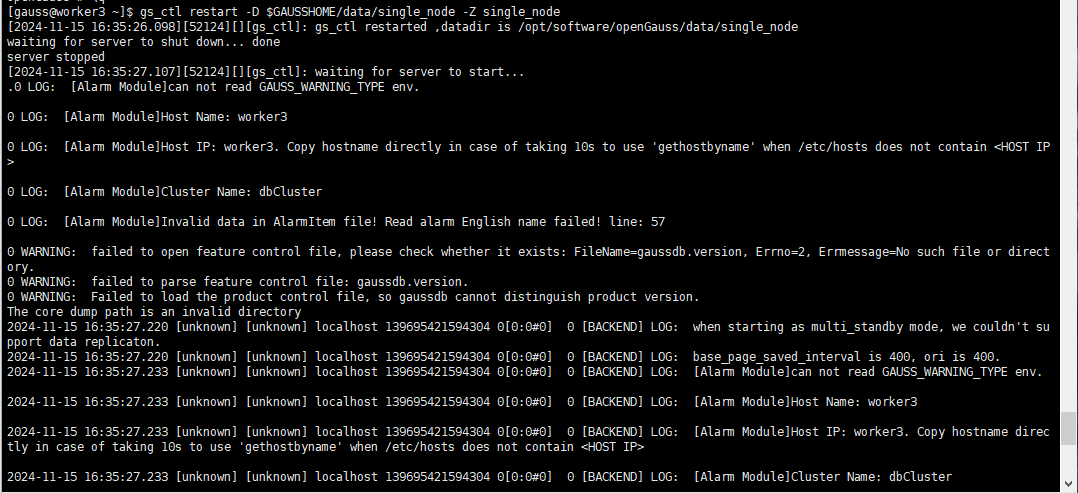
4、重启数据库:
使配置生效。
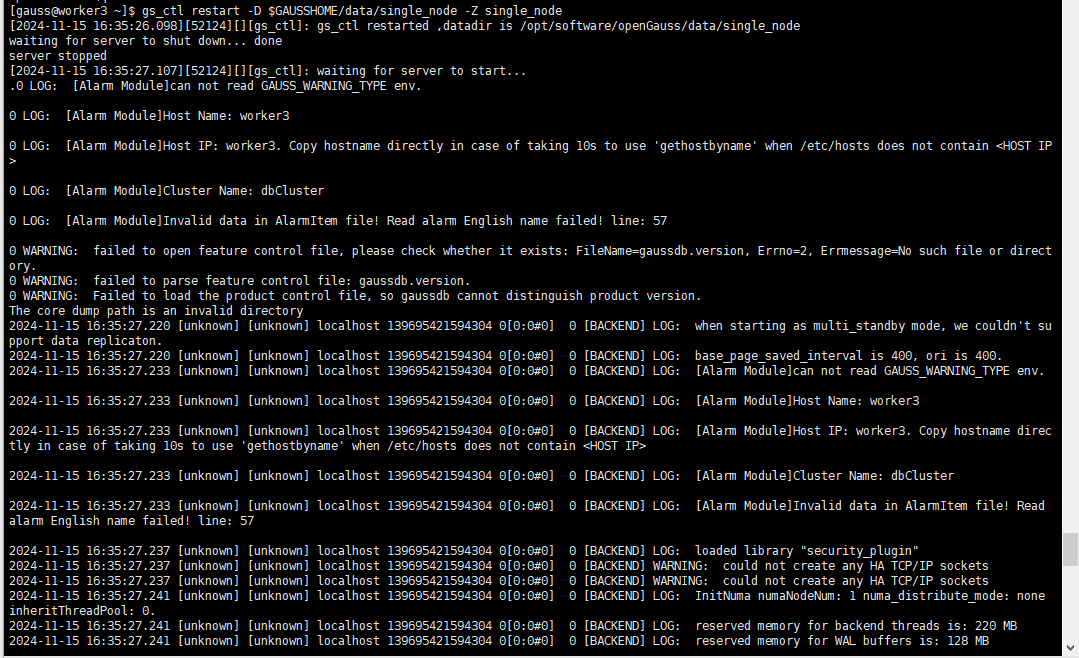
[gauss@worker3 ~]$ gs_ctl restart -D $GAUSSHOME/data/single_node -Z single_node
[2024-11-15 16:35:26.098][52124][][gs_ctl]: gs_ctl restarted ,datadir is /opt/software/openGauss/data/single_node
waiting for server to shut down... done
server stopped
[2024-11-15 16:35:27.107][52124][][gs_ctl]: waiting for server to start...
.0 LOG:  [Alarm Module]can not read GAUSS_WARNING_TYPE env.

0 LOG:  [Alarm Module]Host Name: worker3

0 LOG:  [Alarm Module]Host IP: worker3. Copy hostname directly in case of taking 10s to use 'gethostbyname' when /etc/hosts does not contain <HOST IP>

0 LOG:  [Alarm Module]Cluster Name: dbCluster
5、配置远程访问
为了允许远程客户端连接到openGauss数据库,需要编辑pg_hba.conf文件。
编辑配置文件:
[root@worker3 ~]# cd /opt/software/openGauss/data/single_node/
[root@worker3 single_node]# ls
asp_data         gs_profile          pg_clog       pg_ident.conf  pg_multixact  pg_snapshots  pg_xlog               postmaster.pid.lock
base             gswlm_userinfo.cfg  pg_csnlog     pg_llog        pg_notify     pg_stat_tmp   postgresql.conf       sql_monitor
gaussdb.state    mem_log             pg_ctl.lock   pg_location    pg_perf       pg_tblspc     postgresql.conf.lock  undo
global           mot.conf            pg_errorinfo  pg_log         pg_replslot   pg_twophase   postmaster.opts
gs_gazelle.conf  pg_audit            pg_hba.conf   pg_logical     pg_serial     PG_VERSION    postmaster.pid
[root@worker3 single_node]# vim pg_hba.conf
[root@worker3 single_node]#

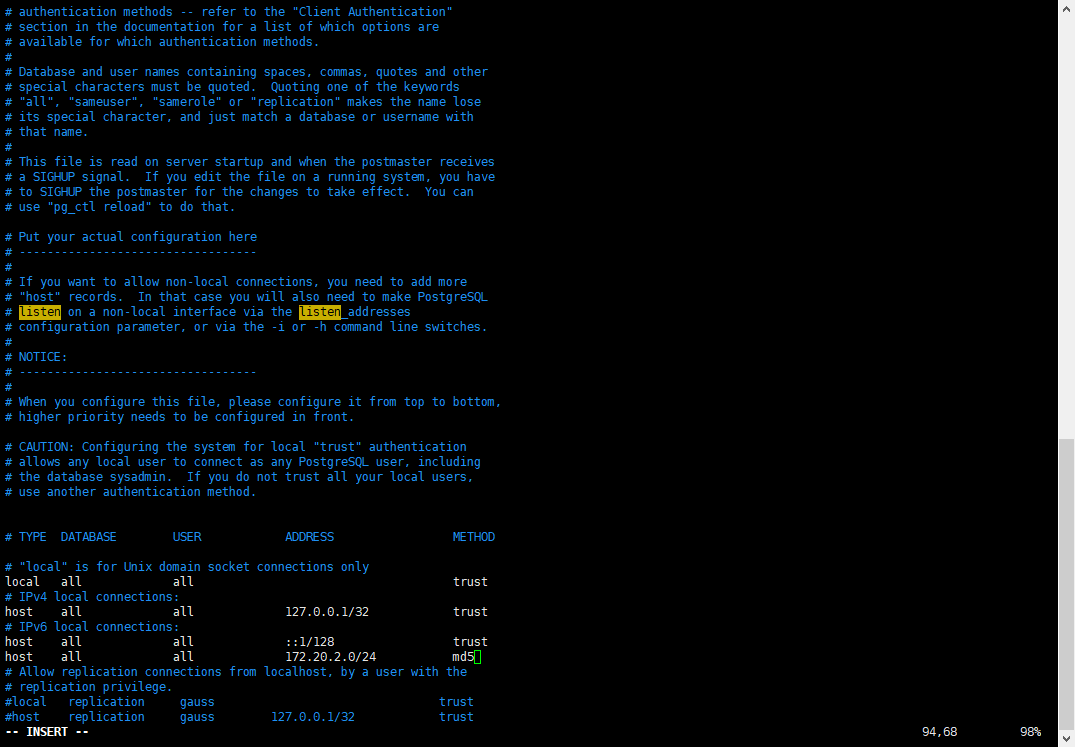
添加远程访问规则:
在文件末尾添加以下行,允许特定IP地址或子网的客户端连接:
host all all 172.20.2.0/24 md5
6、重启数据库:
使配置生效。
[gauss@worker3 ~]$ gs_ctl restart -D $GAUSSHOME/data/single_node -Z single_node
[2024-11-15 16:35:26.098][52124][][gs_ctl]: gs_ctl restarted ,datadir is /opt/software/openGauss/data/single_node
waiting for server to shut down... done
server stopped
[2024-11-15 16:35:27.107][52124][][gs_ctl]: waiting for server to start...
.0 LOG:  [Alarm Module]can not read GAUSS_WARNING_TYPE env.

0 LOG:  [Alarm Module]Host Name: worker3

0 LOG:  [Alarm Module]Host IP: worker3. Copy hostname directly in case of taking 10s to use 'gethostbyname' when /etc/hosts does not contain <HOST IP>

0 LOG:  [Alarm Module]Cluster Name: dbCluster
结语
通过本文测试,我学习完成了在CentOS 7离线环境下的openGauss 6.0 LTS版本的安装和配置,还体验了一次完整的数据库部署过程。openGauss的每一步发展都凝聚着社区成员的心血和智慧,我非常荣幸能够成为其中的一员。希望我的经历能够激励更多的技术爱好者加入openGauss社区,共同推动国产数据库技术的发展。如果你有任何疑问或建议,欢迎随时联系我,让我们一起在技术的道路上不断前行。
