


一、规划
角色 | IP地址 | OS | PosgreSQL | 备注 | |
|---|---|---|---|---|---|
主节点 | pgdb61 | 192.168.10.61 | CentOS 7.9 | 14.14 | |
备节点 | pgdb62 | 192.168.10.62 | CentOS 7.9 | 14.14 | |
| 备节点 | pgdb62 | 192.168.10.63 | CentOS 7.9 | 14.14 | 增减节点 |
二、实践过程
1、配置hosts(三台主机都要执行)
su - rootecho "192.168.10.61 pgdb61" >> /etc/hosts
echo "192.168.10.62 pgdb62" >> /etc/hosts
echo "192.168.10.63 pgdb63" >> /etc/hosts
cat /etc/hosts
2、62、63主机删除初始化目录
su - postgres
rm -rf $PGDATA/*
3、主库61开启归档日志
vi $PGDATA/postgresql.conf
archive_mode = on
wal_level = replica
archive_command = 'test ! -f /postgresql/archive/%f && cp %p /postgresql/archive/%f'
archive_timeout = 300
4、主库61创建流复制用户
#创建复制用户
create user replicator replication password 'replicator';
5、配置pg_hba.conf
vi $PGDATA/pg_hba.conf

host replication replicator 0.0.0.0/0 trust
6、修改发送流复制参数
vi $PGDATA/postgresql.conf
max_wal_senders = 32
wal_sender_timeout = 60s
max_replication_slots = 10
track_commit_timestamp = on
7、备库62
su - postgres
pg_basebackup -h pgdb61 -U replicator -R -Fp -P -D $PGDATApg_ctl start
参数说明
-h,主库IP
-U,复制用户
-F,p是默认输出格式,输出数据目录和表空间相同的布局,t表示tar格式输出
-P,同--progress,显示进度
-D,输出到指定目录;
-R 创建一个standby.signal文件,12版本以前生成的是recovery.conf文件
-W 输密码
此时备库62数据目录下会存在以下文件
[postgres@pgdb62 ~]$ ll /postgresql/pgdata/standby.signal
-rw------- 1 postgres postgres 0 Dec 31 21:29 /postgresql/pgdata/standby.signal
postgresql.auto.conf文件自动生成如下内容:
[postgres@pgdb62 ~]$ cat /postgresql/pgdata/postgresql.auto.conf
# Do not edit this file manually!
# It will be overwritten by the ALTER SYSTEM command.
primary_conninfo = 'user=replicator password=replicator channel_binding=prefer host=pgdb61 port=5432 sslmode=prefer sslcompression=0 sslsni=1 ssl_min_protocol_version=TLSv1.2 gssencmode=disable krbsrvname=postgres target_session_attrs=any'
[postgres@pgdb62 ~]$ 8、查看主备状态
[postgres@pgdb61 ~]$ pg_controldata -D $PGDATA | grep state
Database cluster state:               in production
[postgres@pgdb61 ~]$ ps -ef | grep postgres
root      1034   998  0 21:22 pts/0    00:00:00 su - postgres
postgres  1035  1034  0 21:22 pts/0    00:00:00 -bash
postgres  1150     1  0 21:27 ?        00:00:00 /postgresql/pg1414/bin/postgres -D /postgresql/pgdata -p 5432
postgres  1151  1150  0 21:27 ?        00:00:00 postgres: logger
postgres  1153  1150  0 21:27 ?        00:00:00 postgres: checkpointer
postgres  1154  1150  0 21:27 ?        00:00:00 postgres: background writer
postgres  1155  1150  0 21:27 ?        00:00:00 postgres: walwriter
postgres  1156  1150  0 21:27 ?        00:00:00 postgres: autovacuum launcher
postgres  1157  1150  0 21:27 ?        00:00:00 postgres: archiver last was 000000010000000000000005.00000028.backup
postgres  1158  1150  0 21:27 ?        00:00:00 postgres: stats collector
postgres  1159  1150  0 21:27 ?        00:00:00 postgres: logical replication launcher
postgres  1421  1150  0 21:37 ?        00:00:00 postgres: walsender replicator 192.168.10.62(24443) streaming 0/6000148
postgres  1422  1035  0 21:37 pts/0    00:00:00 ps -ef
postgres  1423  1035  0 21:37 pts/0    00:00:00 grep --color=auto postgres
[postgres@pgdb61 ~]$ psql
psql (14.14)
Type "help" for help.

postgres=# select pg_is_in_recovery();

postgres=# select client_addr,sync_state from pg_stat_replication;

postgres=# select * from pg_stat_replication\gx9、PostgreSQL主从流复制主从切换
pg_promote()语法:
pg_promote(wait boolean DEFAULT true, wait_seconds integer DEFAULT 60)
两个参数:
wait: 表示是否等待备库的 promotion 完成或者 wait_seconds 秒之后返回成功,默认值为 true。
wait_seconds: 等待时间,单位秒,默认 60
#主库61模拟故障
pg_ctl stop -m fast

#从库62提升为主库
$ pg_ctl promote
或
$ psql
postgres=# select pg_promote(true,60);
 pg_promote
------------
 t
(1 row)postgres=# \q
[postgres@pgdb62 ~]$ pg_controldata -D $PGDATA | grep state
Database cluster state:               in production#查看62 standby.signal已经不存在[postgres@pgdb62 ~]$ ll /postgresql/pgdata/standby.signal
ls: cannot access /postgresql/pgdata/standby.signal: No such file or directory#删除62配置文件postgresql.auto.conf的primary_conninfo信息
当61服务修复好后,有两种情况:1、以备库加入到服务中,2、重新变为主库
第一种:以备库方式
#在主库61创建standby.signal文件touch $PGDATA/standby.signal

#在61编写postgresql.auto.conf文件
vi $PGDATA/postgresql.auto.conf
primary_conninfo = 'user=replicator password=replicator channel_binding=prefer host=pgdb62 port=5432 sslmode=prefer sslcompression=0 sslsni=1 ssl_min_protocol_version=TLSv1.2 gssencmode=disable krbsrvname=postgres target_session_attrs=any'

#61启动数据库
pg_ctl start
创建数据测试:
####62testdb=# create table test(test_id bigserial, test_name text);
CREATE TABLE
testdb=# insert into test(test_name) values('test_1');
INSERT 0 1
testdb=# insert into test(test_name) values('test_2');
INSERT 0 1
testdb=# insert into test(test_name) values('test_3');
INSERT 0 1
testdb=# select * from test;
       1 | test_1
       2 | test_2
       3 | test_3
####61[postgres@pgdb61 ~]$ psql
psql (14.14)
Type "help" for help.

postgres=# \c testdb
You are now connected to database "testdb" as user "postgres".
testdb=# \dt+
                                  List of relations
 Schema | Name | Type  |  Owner   | Persistence | Access method | Size  | Description
--------+------+-------+----------+-------------+---------------+-------+-------------
 public | test | table | postgres | permanent   | heap          | 16 kB |
(1 row)

testdb=# select * from test;
 test_id | test_name
---------+-----------
       1 | test_1
       2 | test_2
       3 | test_3
(3 rows)
第二种:重新恢复主库:重复上边步骤即可
####62[postgres@pgdb62 ~]$ pg_ctl stop -m fast####61[postgres@pgdb61 ~]$ pg_ctl promote waiting for server to promote.... done server promoted[postgres@pgdb61 ~]$ pg_controldata -D $PGDATA | grep state Database cluster state: in production#删除61配置文件postgresql.auto.conf的primary_conninfo信息####62[postgres@pgdb62 ~]$ touch $PGDATA/standby.signal [postgres@pgdb62 ~]$ vi $PGDATA/postgresql.auto.confprimary_conninfo = 'user=replicator password=replicator channel_binding=prefer host=pgdb61 port=5432 sslmode=prefer sslcompression=0 sslsni=1 ssl_min_protocol_version=TLSv1.2 gssencmode=disable krbsrvname=postgres target_session_attrs=any'[postgres@pgdb62 ~]$ pg_ctl start waiting for server to start....2024-12-31 22:12:17.241 CST [1465] LOG: redirecting log output to logging collector process 2024-12-31 22:12:17.241 CST [1465] HINT: Future log output will appear in directory "log". done server started[postgres@pgdb62 ~]$ pg_controldata -D $PGDATA | grep state Database cluster state: in archive recovery
测试:
####61testdb=# insert into test(test_name) values('test_4');
INSERT 0 1
testdb=# insert into test(test_name) values('test_5');
INSERT 0 1
testdb=# insert into test(test_name) values('test_6');
INSERT 0 1
testdb=# select * from test;
 test_id | test_name
---------+-----------
       1 | test_1
       2 | test_2
       3 | test_3
      34 | test_4
      35 | test_5
      36 | test_6
(6 rows)####62testdb=# select * from test;
 test_id | test_name
---------+-----------
       1 | test_1
       2 | test_2
       3 | test_3
(3 rows)
发现数据没有同步,然后试着重启:
[postgres@pgdb62 log]$ pg_ctl start
waiting for server to start....2024-12-31 22:41:25.654 CST [1722] LOG:  redirecting log output to logging collector process
2024-12-31 22:41:25.654 CST [1722] HINT:  Future log output will appear in directory "log".
 stopped waiting
pg_ctl: could not start server
Examine the log output.
####重启失败,查看日志
[postgres@pgdb62 log]$ ll
total 8
-rw------- 1 postgres postgres 2063 Dec 31 22:41 postgresql-2024-12-31_224125.csv
-rw------- 1 postgres postgres  166 Dec 31 22:41 postgresql-2024-12-31_224125.log
[postgres@pgdb62 log]$ cat postgresql-2024-12-31_224125.log
2024-12-31 22:41:25.654 CST [1722] LOG:  ending log output to stderr
2024-12-31 22:41:25.654 CST [1722] HINT:  Future log output will go to log destination "csvlog".
[postgres@pgdb62 log]$ cat postgresql-2024-12-31_224125.csv
2024-12-31 22:41:25.654 CST,,,1722,,67740295.6ba,1,,2024-12-31 22:41:25 CST,,0,LOG,00000,"ending log output to stderr",,"Future log output will go to log destination ""csvlog"".",,,,,,,"","postmaster",,0
2024-12-31 22:41:25.654 CST,,,1722,,67740295.6ba,2,,2024-12-31 22:41:25 CST,,0,LOG,00000,"starting PostgreSQL 14.14 on x86_64-pc-linux-gnu, compiled by gcc (GCC) 4.8.5 20150623 (Red Hat 4.8.5-44), 64-bit",,,,,,,,,"","postmaster",,0
2024-12-31 22:41:25.654 CST,,,1722,,67740295.6ba,3,,2024-12-31 22:41:25 CST,,0,LOG,00000,"listening on IPv4 address ""0.0.0.0"", port 5432",,,,,,,,,"","postmaster",,0
2024-12-31 22:41:25.654 CST,,,1722,,67740295.6ba,4,,2024-12-31 22:41:25 CST,,0,LOG,00000,"listening on IPv6 address ""::"", port 5432",,,,,,,,,"","postmaster",,0
2024-12-31 22:41:25.656 CST,,,1722,,67740295.6ba,5,,2024-12-31 22:41:25 CST,,0,LOG,00000,"listening on Unix socket ""/tmp/.s.PGSQL.5432""",,,,,,,,,"","postmaster",,0
2024-12-31 22:41:25.659 CST,,,1724,,67740295.6bc,1,,2024-12-31 22:41:25 CST,,0,LOG,00000,"database system was shut down in recovery at 2024-12-31 22:29:59 CST",,,,,,,,,"","startup",,0
2024-12-31 22:41:25.659 CST,,,1724,,67740295.6bc,2,,2024-12-31 22:41:25 CST,,0,LOG,00000,"entering standby mode",,,,,,,,,"","startup",,0
2024-12-31 22:41:25.659 CST,,,1724,,67740295.6bc,3,,2024-12-31 22:41:25 CST,,0,FATAL,XX000,"requested timeline 3 is not a child of this server's history","Latest checkpoint is at 0/A000028 on timeline 2, but in the history of the requested timeline, the server forked off from that timeline at 0/8000110.",,,,,,,,"","startup",,0
2024-12-31 22:41:25.659 CST,,,1722,,67740295.6ba,6,,2024-12-31 22:41:25 CST,,0,LOG,00000,"startup process (PID 1724) exited with exit code 1",,,,,,,,,"","postmaster",,0
2024-12-31 22:41:25.659 CST,,,1722,,67740295.6ba,7,,2024-12-31 22:41:25 CST,,0,LOG,00000,"aborting startup due to startup process failure",,,,,,,,,"","postmaster",,0
2024-12-31 22:41:25.664 CST,,,1722,,67740295.6ba,8,,2024-12-31 22:41:25 CST,,0,LOG,00000,"database system is shut down",,,,,,,,,"","postmaster",,0
到这里,其他原因等往后学习深入了再来研究这个问题的解决方法,现在就先重做:
[postgres@pgdb62 postgresql]$ rm -rf /postgresql/pgdata/*
[postgres@pgdb62 postgresql]$ pg_basebackup -h pgdb61 -U replicator -R -Fp -P -D $PGDATA
Password:
35087/35087 kB (100%), 1/1 tablespace[postgres@pgdb62 postgresql]$ pg_ctl start
waiting for server to start....2024-12-31 22:53:44.361 CST [1733] LOG:  redirecting log output to logging collector process
2024-12-31 22:53:44.361 CST [1733] HINT:  Future log output will appear in directory "log".
 done
server started
[postgres@pgdb62 postgresql]$ psql
psql (14.14)
Type "help" for help.

postgres=# \c testdb
You are now connected to database "testdb" as user "postgres".

####61插入测试数据testdb=# insert into test select n, 'test'||n from generate_series(11,30) as n;
INSERT 0 20####62查询测试数据estdb=# select * from test;
 test_id | test_name
---------+-----------
       1 | test_1
       2 | test_2
       3 | test_3
      34 | test_4
      35 | test_5
      36 | test_6
      11 | test11
      12 | test12
      13 | test13
      14 | test14
      15 | test15
      16 | test16
      17 | test17
      18 | test18
      19 | test19
      20 | test20
      21 | test21
      22 | test22
      23 | test23
      24 | test24
      25 | test25
      26 | test26
      27 | test27
      28 | test28
      29 | test29
      30 | test30
(26 rows)10、增加删除节点测试
####63su - postgres
rm -rf $PGDATA/*
pg_basebackup -h pgdb61 -U replicator -R -Fp -P -D $PGDATA
pg_ctl start
####61插入数据testdb=# insert into test select n, 'test'||n from generate_series(41,50) as n;
INSERT 0 10
####63查询testdb=# select * from test where test_id >= 40;
 test_id | test_name
---------+-----------
      41 | test41
      42 | test42
      43 | test43
      44 | test44
      45 | test45
      46 | test46
      47 | test47
      48 | test48
      49 | test49
      50 | test50
(10 rows)11、主从流复制之同步+异步
#61增加同步配置vi $PGDATA/postgresql.conf
synchronous_commit = on
synchronous_standby_names = 'pgdb62' #节点不在这里的就是异步同步,名字对应primary_conninfo = 'application_name=pgdb62’,确保62、63配置application_name
postgres@pgdb61 pgdata]$ psql -c "select application_name,client_addr,sync_state from pg_stat_replication;"
 application_name |  client_addr  | sync_state
------------------+---------------+------------
 pgdb63           | 192.168.10.63 | async
 pgdb62           | 192.168.10.62 | sync
(2 rows)
synchronous_commit 参数值:
on: 同步,先本地 WAL 记录刷盘并更新 clog,等待收到同步 slave 写入 WAL 记录并刷盘成功的反馈后,才向会话返回事务成功。
off:异步,把 WAL 记录写到 WAL 缓存后,就返回事务成功。WAL 记录的写盘和刷盘由 wal writer 进程在后台处理,事务不会等待 WAL 刷新到本地磁盘,就返回客户端成功。
remote_write:同步,先本地 WAL 记录刷盘并更新 clog,等待收到同步 slave 写入 WAL 记录到磁盘的反馈后,才向会话返回事务成功。
remote_apply:数据保护优先级最高,remote standby 节点 apply log 成功之后,才返回返回客户端成功,可以实现读节点与写入节点的数据一致性。
local:异步,本地 WAL 记录刷盘并更新 clog 后,向会话返回事务成功, 不会等待 standby 的 WAL 的处理进度。
在流复制的环境下对性能的影响由小到大分别是:
off (async) > on (sync) > remote_write (sync) > local (sync) > remote_apply (sync)
synchronous_standby_names 参数的值:
S1,S2 是需要同步复制的
synchronous_standby_names = 'FIRST 2 (s1, s2, s3)'
S1,S2,S3 任意 2 个节点复制成功,就算成功。
synchronous_standby_names = 'ANY 2 (s1, s2, s3)'
S1,S2,S3 任意 1 个节点复制成功,就算成功。
synchronous_standby_names = 'ANY 1 (s1, s2, s3)'
11、延迟复制:recovery_min_apply_delay
需求:62时时同步,然后63延迟5分钟同步(前提时:主备库保证时间一致)
####63vi $PGDATA/postgresql.confrecovery_min_apply_delay=5min
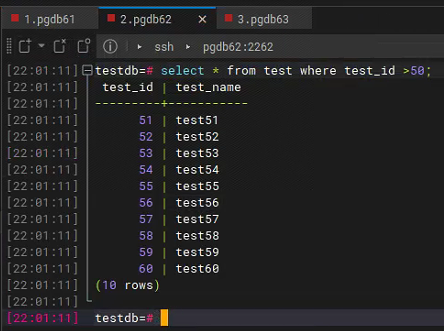
####61testdb=# insert into test select n, 'test'||n from generate_series(51,60) as n;
在62已经查询到同步数据
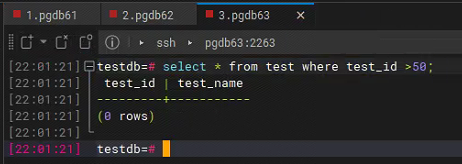
在63未查询到同步数据
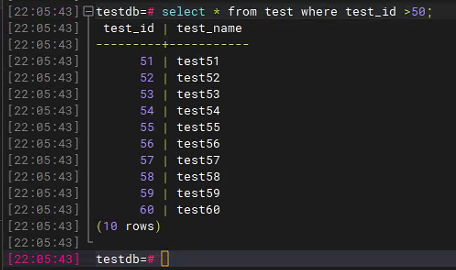
过5分钟后:
12、复制槽
不启用复制槽时,可能会遇到ERROR: requested WAL segment xxxx has already been removed 的错误,这是因为主库还没有把wal日志发送到备库,然后wal日志就被清理掉了,所以复制槽的作用就是:
保证主库不删除还未发送到备库的wal日志。
####61
vi $PGDATA/postgresql.confwal_level = logical####61 创建复制槽postgres=# select pg_create_physical_replication_slot('sync_slot');
 pg_create_physical_replication_slot
-------------------------------------
 (sync_slot,)
(1 row)postgres=# select * from pg_replication_slots ;
 slot_name | plugin | slot_type | datoid | database | temporary | active | active_pid | xmin | catalog_xmin | restart_lsn | confirmed_flush_lsn | wal_status | safe_wal_size | two_phase
-----------+--------+-----------+--------+----------+-----------+--------+------------+------+--------------+-------------+---------------------+------------+---------------+-----------
 sync_slot |        | physical  |        |          | f         | f      |            |      |              |             |                     |            |               | f
(1 row)####备库配置
primary_slot_name = 'sync_slot'
#####删除复制槽
select pg_drop_replication_slot('sync_slot');