


前言
本文从API层面学习总结Spark RPC,暂不涉及源码分析。
Spark 通信历史
最开始: Akka Spark 1.3: 开始引入Netty,为了解决大块数据(如Shuffle)的传输问题
Spark 1.6:支持配置使用 Akka 或者 Netty。
Spark 2:完全废弃Akka,全部使用Netty
Akka 是一个用 Scala 编写的库,用于简化编写容错的、高可伸缩性的 Java 和 Scala 的 Actor 模型应用。 Spark 借鉴Akka 通过 Netty 实现了类似的简约版的Actor 模型
废弃Akka的原因
https://issues.apache.org/jira/plugins/servlet/mobile#issue/SPARK-5293[1] 主要原因是解决用户的Spark Application中akka版本和Spark内置的akka版本冲突的问题。比如,用户开发的Spark Application中用到了Spray框架,Spray依赖的akka版本跟Spark的不一致就会导致冲突:
1.很多Spark用户也使用Akka,但是由于Akka不同版本之间无法互相通信,这就要求用户必须使用跟Spark完全一样的Akka版本,导致用户无法升级Akka。2.Spark的Akka配置是针对Spark自身来调优的,可能跟用户自己代码中的Akka配置冲突。3.Spark用的Akka特性很少,这部分特性很容易自己实现。同时,这部分代码量相比Akka来说少很多,debug比较容易。如果遇到什么bug,也可以自己马上fix,不需要等Akka上游发布新版本。而且,Spark升级Akka本身又因为第一点会强制要求用户升级他们使用的Akka,对于某些用户来说是不现实的。
参考:https://www.zhihu.com/question/61638635[2]
RpcEnv
Rpc环境,RpcEndpoint
需要在 RpcEnv
中注册一个名称来接收消息。
先看源码中是如何创建 RpcEnv
val securityMgr = new SecurityManager(conf)val rpcEnv = RpcEnv.create(SYSTEM_NAME, host, port, conf, securityMgr)def create(name: String,host: String,port: Int,conf: SparkConf,securityManager: SecurityManager,clientMode: Boolean = false): RpcEnv = {create(name, host, host, port, conf, securityManager, 0, clientMode)}def create(name: String,bindAddress: String,advertiseAddress: String,port: Int,conf: SparkConf,securityManager: SecurityManager,numUsableCores: Int,clientMode: Boolean): RpcEnv = {val config = RpcEnvConfig(conf, name, bindAddress, advertiseAddress, port, securityManager,numUsableCores, clientMode)new NettyRpcEnvFactory().create(config)}
本次测试用的代码
def createRpcEnv(conf: SparkConf,name: String,port: Int,clientMode: Boolean = false): RpcEnv = {val config = RpcEnvConfig(conf, name, "localhost", "localhost", port,new SecurityManager(conf), 0, clientMode)new NettyRpcEnvFactory().create(config)}
clientMode: 是否客户端模式,默认false,默认会启动一个 NettyServer,具体在 TransportServer.init 中实现,可参考上篇文章。如果设置为true,则不启动服务,只作为一个客户端。
port: 为0时,会随机绑定一个端口号,这一点是Netty本身实现的,如果非0,则按照指定的端口绑定,但是要求端口号范围为[1024,65536),如果端口已占用,则尝试端口号+1,默认重试16次,可以通过配置 spark.port.maxRetries 修改最大重试次数 。
RpcEndpoint
很多都是RpcEndpoint的子类,如:Master
、Worker
、ClientEndpoint
、DriverEndpoint
、CoarseGrainedExecutorBackend
、YarnCoarseGrainedExecutorBackend
、YarnDriverEndpoint
、YarnSchedulerEndpoint
等。
RpcEndpoint
的生命周期:constructor -> onStart -> receive* -> onStop 。也就是首先会调用 onStart 方法。
RpcEndpoint
首先必须通过调用 rpcEnv
.setupEndpoint
才能使用
setupEndpoint
使用名称注册 RpcEndpoint
并返回其 RpcEndpointRef
def setupEndpoint(name: String, endpoint: RpcEndpoint): RpcEndpointRef
RpcEndpointRef
RpcEndpointRef
:远程 RpcEndpoint
的引用。RpcEndpointRef
是线程安全的
有两种方法可以返回RpcEndpointRef
一个是上面提到的setupEndpoint
,另外一个则是 setupEndpointRef
/*** Retrieve the [[RpcEndpointRef]] represented by `uri` asynchronously.*/def asyncSetupEndpointRefByURI(uri: String): Future[RpcEndpointRef]/*** Retrieve the [[RpcEndpointRef]] represented by `uri`. This is a blocking action.*/def setupEndpointRefByURI(uri: String): RpcEndpointRef = {defaultLookupTimeout.awaitResult(asyncSetupEndpointRefByURI(uri))}/*** Retrieve the [[RpcEndpointRef]] represented by `address` and `endpointName`.* This is a blocking action.*/def setupEndpointRef(address: RpcAddress, endpointName: String): RpcEndpointRef = {setupEndpointRefByURI(RpcEndpointAddress(address, endpointName).toString)}
setupEndpoint
返回的是本地 RpcEndpoint
的引用,主要作用是使用名称注册
setupEndpointRef
根据远程地址和名称返回 RpcEndpoint
的引用。例如:
// Worer 中返回 Master 的引用val masterEndpoint = rpcEnv.setupEndpointRef(masterAddress, Master.ENDPOINT_NAME)// CoarseGrainedExecutorBackend 中获取 Driver 的引用driver = fetcher.setupEndpointRefByURI(arguments.driverUrl)rpcEnv.asyncSetupEndpointRefByURI(driverUrl)
方法调用
•rpcEnv.setupEndpoint : 调用 rpcEndpoint.onStart•rpcEndpointRef.send(没有返回值) : 调用 rpcEndpoint.receive•rpcEndpointRef.ask(有返回值): 调用 rpcEndpoint.receiveAndReply (rpcEndpointRef.ask 最终都是在 NettyRpcEnv.askAbortable中实现)•rpcEnv.stop(rpcEndpointRef) : 调用 rpcEndpoint.onStop
测试代码
完整代码:https://gitee.com/dongkelun/java-learning/tree/master/scala-learning/src/main/scala/org/apache/spark/rpc
本地测试
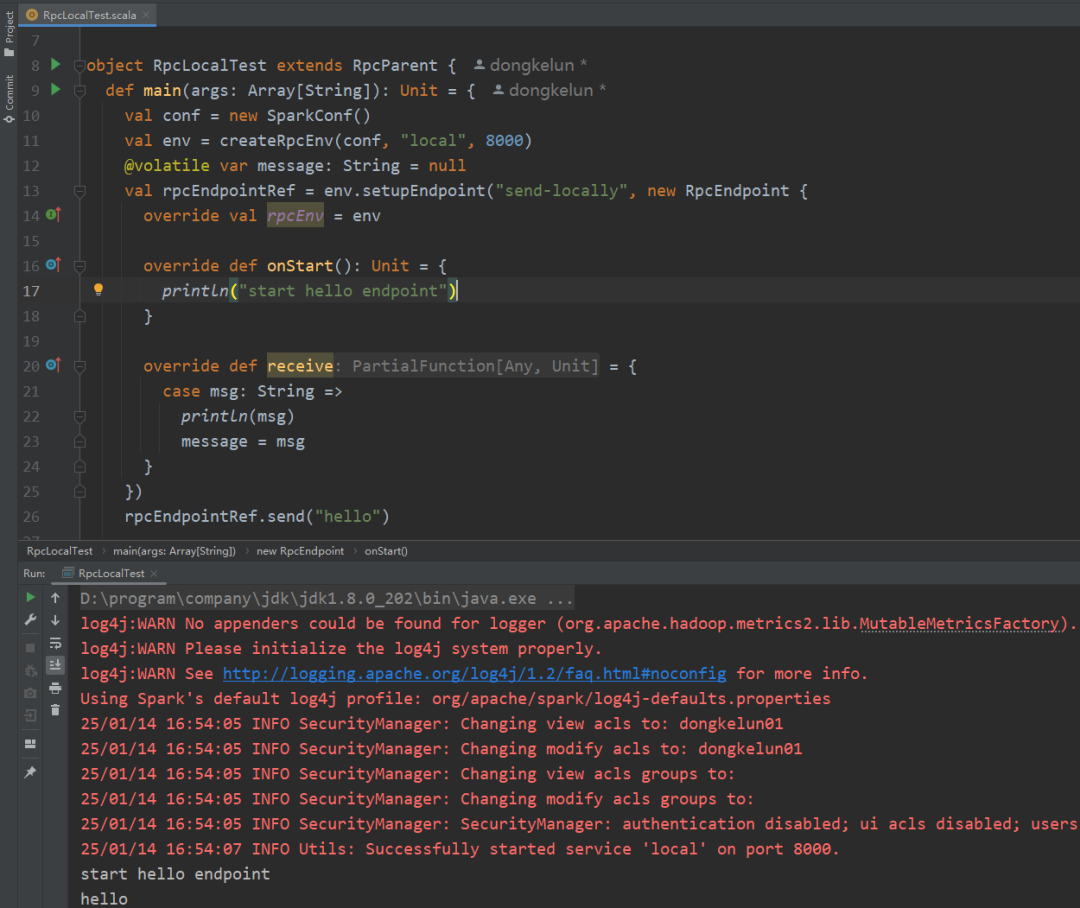
package org.apache.spark.rpcimport org.apache.spark.{SparkConf, SparkEnv}import org.scalatest.concurrent.Eventually.{eventually, interval, timeout}import scala.concurrent.duration._object RpcLocalTest extends RpcParent {def main(args: Array[String]): Unit = {val conf = new SparkConf()val env = createRpcEnv(conf, "local", 8000)@volatile var message: String = nullval rpcEndpointRef = env.setupEndpoint("send-locally", new RpcEndpoint {override val rpcEnv = envoverride def onStart(): Unit = {println("start hello endpoint")}override def receive = {case msg: String =>println(msg)message = msg}})rpcEndpointRef.send("hello")eventually(timeout(5.seconds), interval(10.milliseconds)) {assert("hello" == message)}if (env != null) {env.shutdown()}SparkEnv.set(null)}}
远程测试
RpcRemoteServer
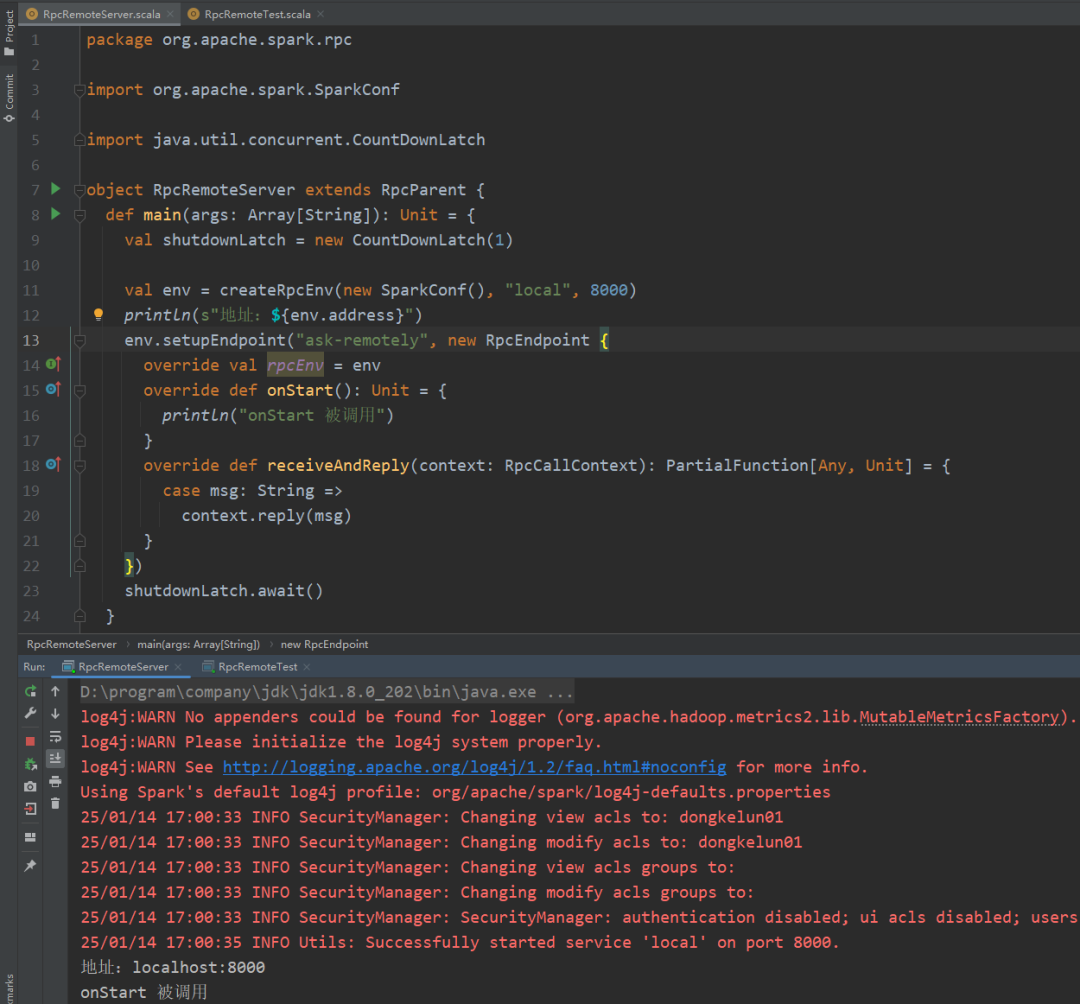
package org.apache.spark.rpcimport org.apache.spark.SparkConfimport java.util.concurrent.CountDownLatchobject RpcRemoteServer extends RpcParent {def main(args: Array[String]): Unit = {val shutdownLatch = new CountDownLatch(1)val env = createRpcEnv(new SparkConf(), "local", 8000)println(s"地址:${env.address}")env.setupEndpoint("ask-remotely", new RpcEndpoint {override val rpcEnv = envoverride def onStart(): Unit = {println("onStart 被调用")}override def receiveAndReply(context: RpcCallContext): PartialFunction[Any, Unit] = {case msg: String =>context.reply(msg)}})shutdownLatch.await()}}
RpcRemoteTest
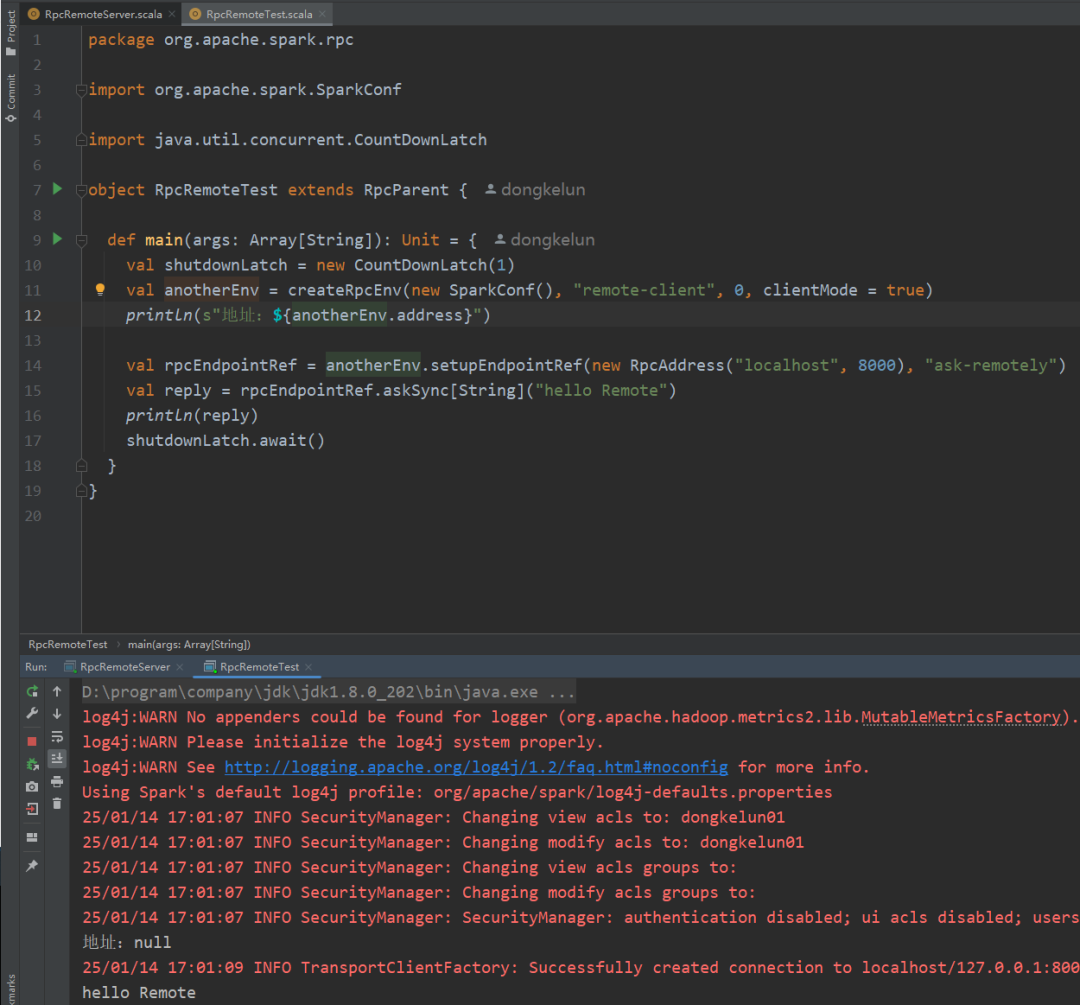
package org.apache.spark.rpcimport org.apache.spark.SparkConfimport java.util.concurrent.CountDownLatchobject RpcRemoteTest extends RpcParent {def main(args: Array[String]): Unit = {val shutdownLatch = new CountDownLatch(1)val anotherEnv = createRpcEnv(new SparkConf(), "remote-client", 0, clientMode = true)println(s"地址:${anotherEnv.address}")val rpcEndpointRef = anotherEnv.setupEndpointRef(new RpcAddress("localhost", 8000), "ask-remotely")val reply = rpcEndpointRef.askSync[String]("hello Remote")println(reply)shutdownLatch.await()}}
这里需要注意
RpcRemoteServer
中RpcEndpoint
的名称为 ask-remotely ,我们在RpcRemoteTest
中不仅需要对应的IP、端口号,而且名称也一定要对应准确。
更多测试
完整代码:https://gitee.com/dongkelun/java-learning/blob/master/scala-learning/src/test/scala/org/apache/spark/rpc/RpcEnvSuite.scala
如测试 onStart 和 onStop
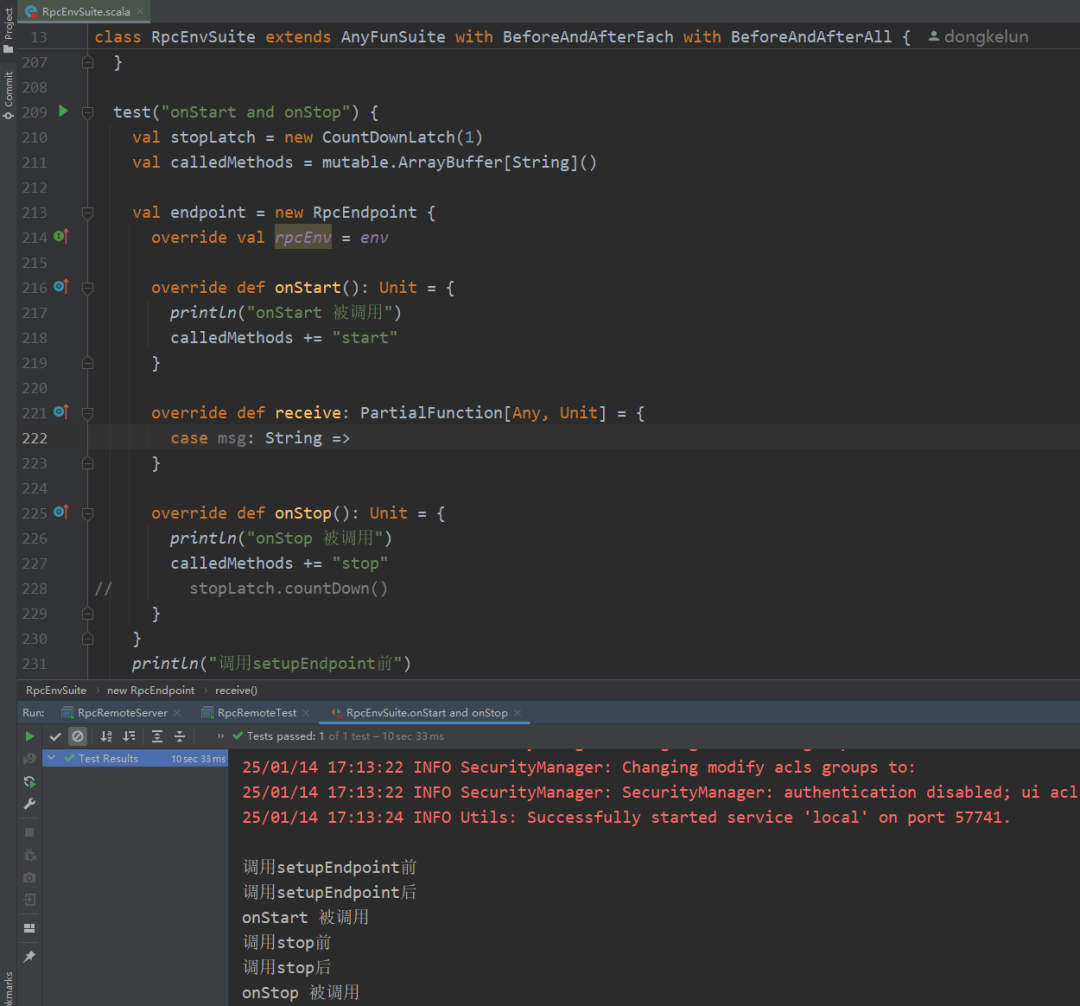
test("onStart and onStop") {val stopLatch = new CountDownLatch(1)val calledMethods = mutable.ArrayBuffer[String]()val endpoint = new RpcEndpoint {override val rpcEnv = envoverride def onStart(): Unit = {println("onStart 被调用")calledMethods += "start"}override def receive: PartialFunction[Any, Unit] = {case msg: String =>}override def onStop(): Unit = {println("onStop 被调用")calledMethods += "stop"// stopLatch.countDown()}}println("调用setupEndpoint前")val rpcEndpointRef = env.setupEndpoint("start-stop-test", endpoint)println("调用setupEndpoint后")println("调用stop前")env.stop(rpcEndpointRef)println("调用stop后")stopLatch.await(10, TimeUnit.SECONDS)assert(List("start", "stop") === calledMethods)}
总结
•首先用 RpcEnv
.create
创建 RpcEnv
,这里底层会通过 Netty 创建一个 Server, 绑定对应的端口,这里也可以只使用客户端模式不创建 Server•然后具体通信的实体类是在 RpcEndpoint
中实现,比如 Master
、Worker
等都是 RpcEndpoint
, RpcEndpoint
首先必须通过调用 rpcEnv
.setupEndpoint
才能使用。•RpcEndpoint
的方法调用都是通过它对应引用 RpcEndpointRef
实现, rpcEnv
.setupEndpoint
会返回本地引用,setupEndpointRef
根据远程地址和名称返回远程 RpcEndpoint
的引用,注意这里名称一定要对应准确。•RpcEndpoint
的方法调用顺序onStart
->receive*
->onStop
,其中onStart
做一些初始化的准备,setupEndpoint
会触发onStart
方法;receive
方法没有返回值,receiveAndReply
方法有返回值,分别通过rpcEndpointRef
.send
和rpcEndpointRef
.ask*
触发,ask方法分同步调用和异步调用;而onStop
则处理服务停止后的操作,通过rpcEnv
.stop
触发。
References
[1]
: https://issues.apache.org/jira/plugins/servlet/mobile#issue/SPARK-5293[2]
: https://www.zhihu.com/question/61638635
