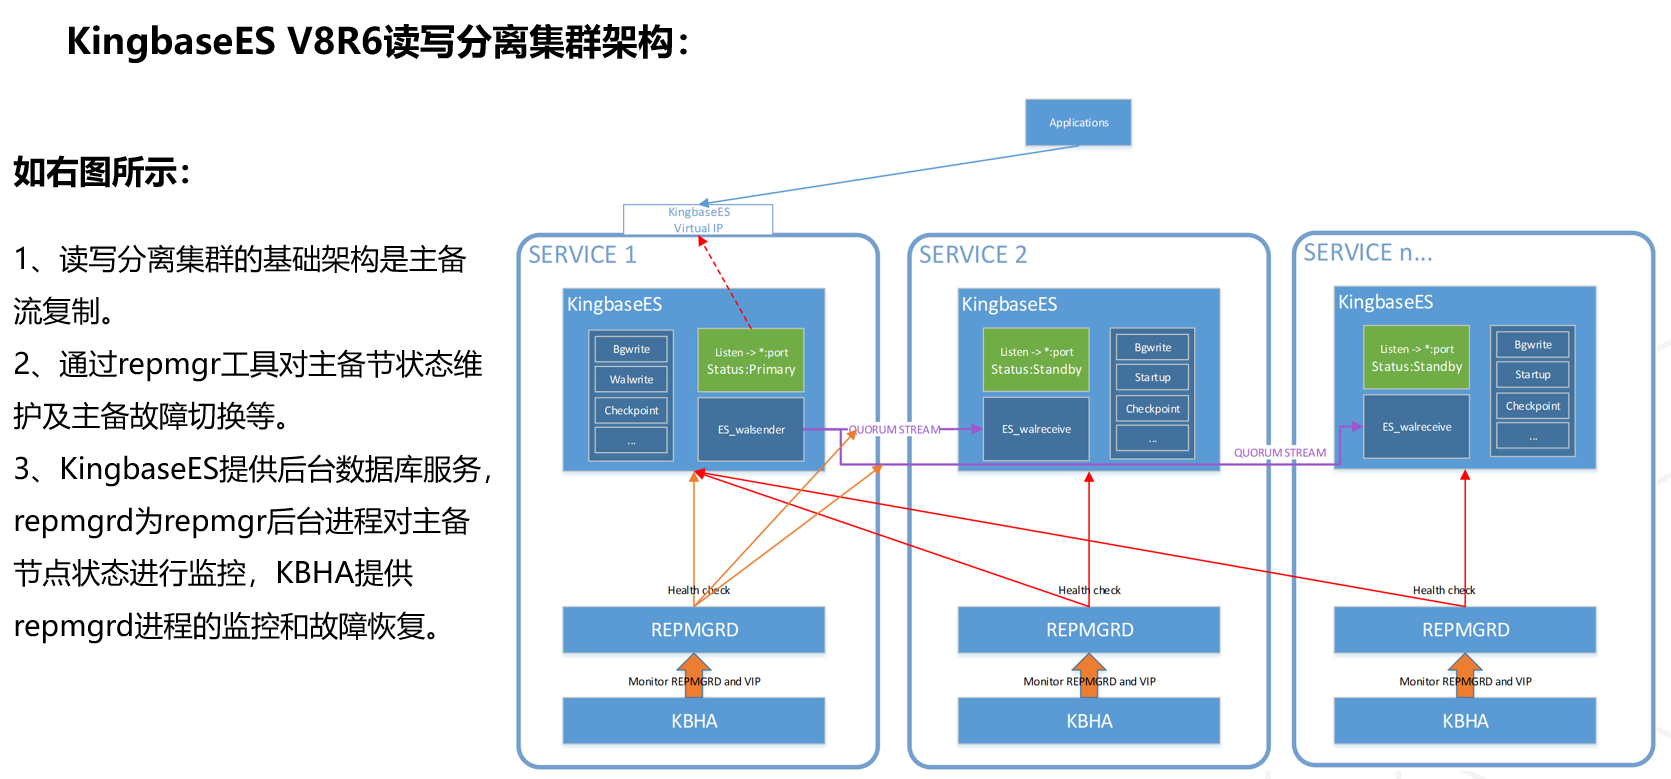
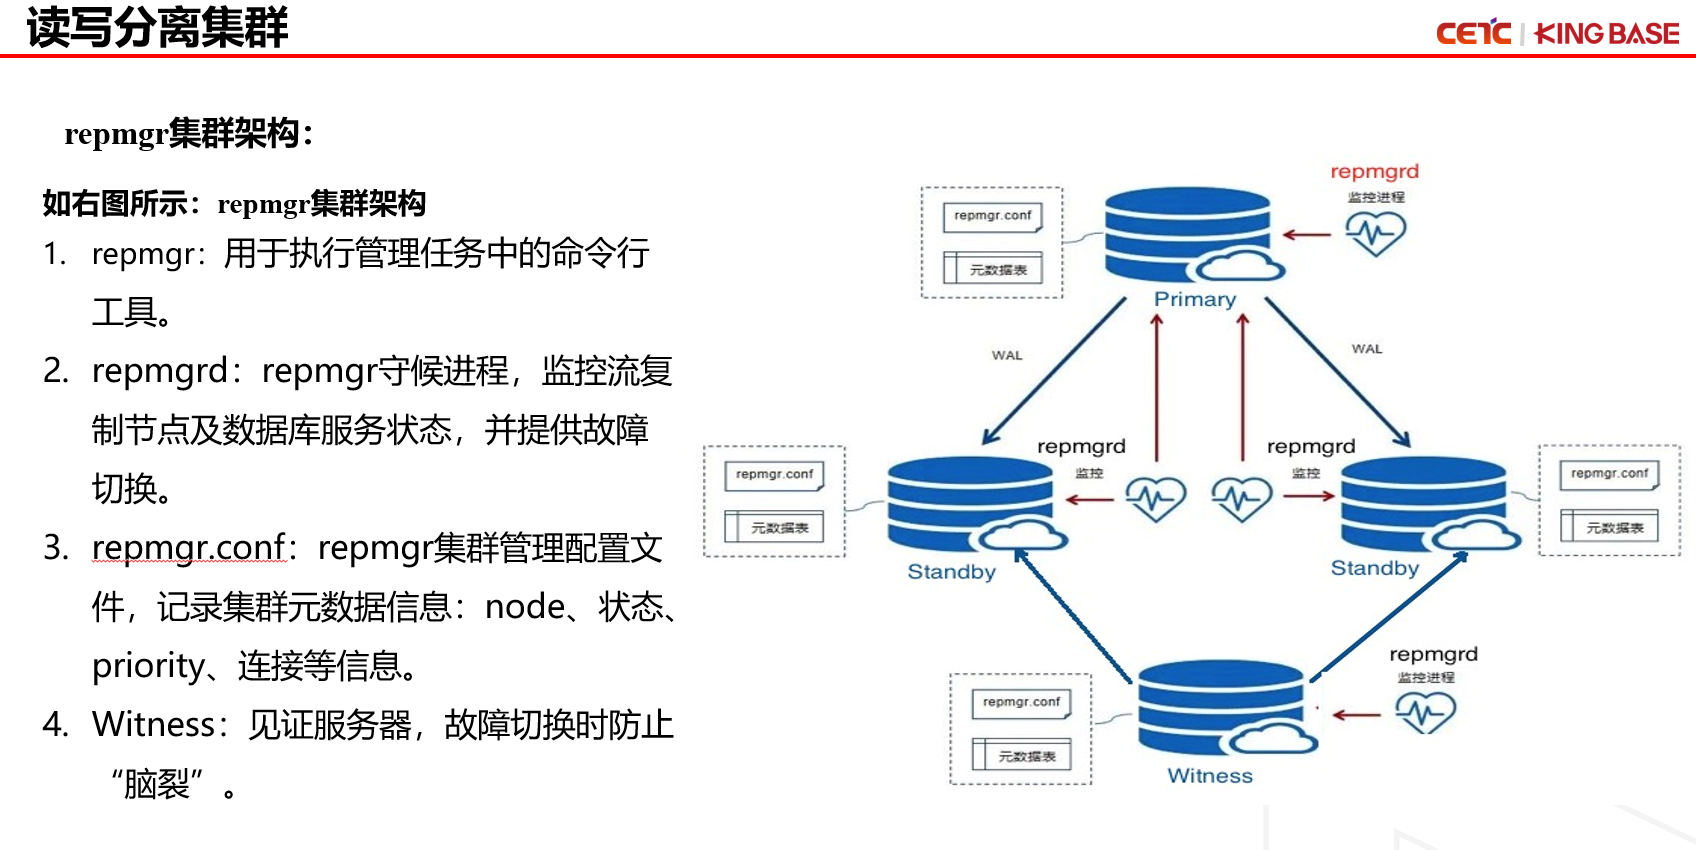
repmgr 是一款开源工具套件,由 PostgreSQL 社区开发并维护,用于管理和监控 PostgreSQL 数据库集群内的复制和故障转移。它增强了 PostgreSQL 内置的流复制功能,并提供了额外的功能来简化集群管理。
kingbase也有基于repmgr的集群架构。这就来学习一手吧!
环境准备:
| 用途 | 资源 | IP | 系统 | 主机名 | 版本 |
|---|---|---|---|---|---|
| pg+repmgr+master | 2C 4G | 192.168.2.171 | Kylin V10 SP3 | node01 | pg17.3+repmgr5.5.0 |
| pg+repmgr+standby | 2C 4G | 192.168.2.172 | Kylin V10 SP3 | node02 | pg17.3+repmgr5.5.0 |
| pg+repmgr+witness | 2C 4G | 192.168.2.173 | Kylin V10 SP3 | witness | pg17.3+repmgr5.5.0 |
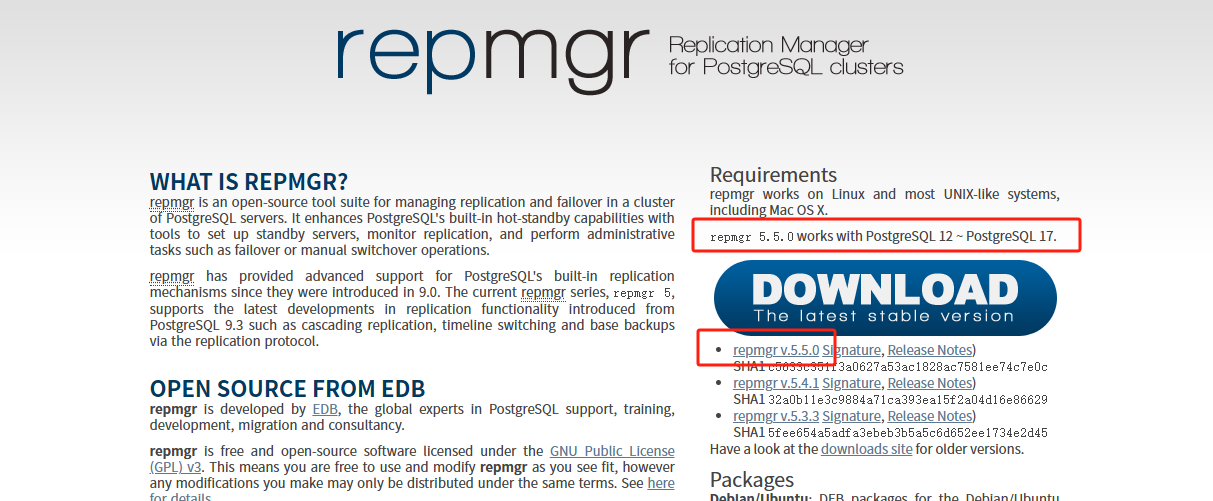
下载软件:https://www.repmgr.org/
文档地址:https://www.repmgr.org/docs/current/index.html
新版本出来了那必须上新的,哈哈!
这里就选用新版本 repmgr5.5.0,已经支持pg17了。
官网文档上写的贼细,大家可以去官方文档学习

repmgr兼容性矩阵
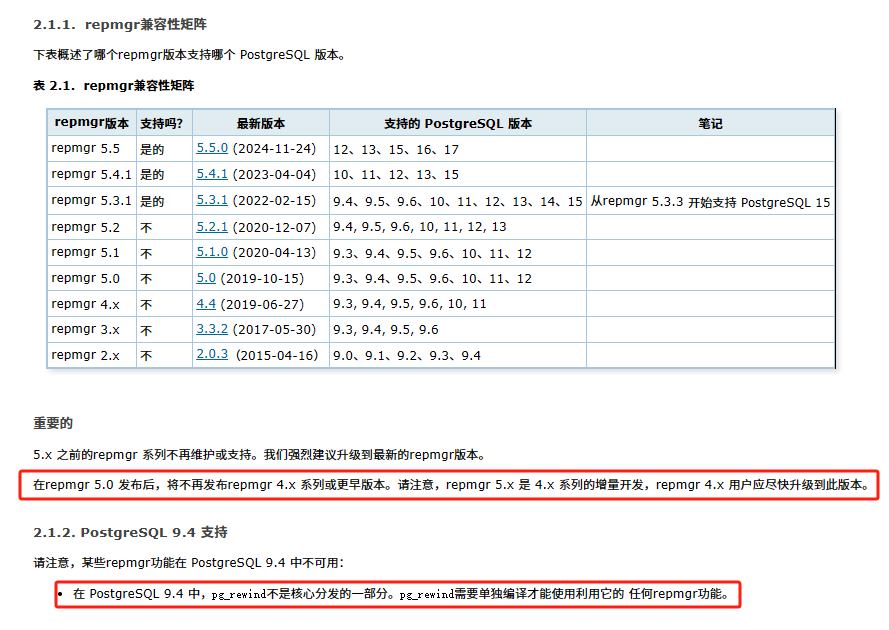
PostgreSQL 9.3 的社区支持期已结束(最终版本是 2018 年 11 月的9.3.25 ),将不再进行安全或错误修复更新。
从repmgr 5.2 开始,repmgr不再支持 PostgreSQL 9.3。
PostgreSQL 9.4 的社区支持期已结束(最终版本是 2020 年 2 月的9.4.26 ),将不再进行安全或错误修复更新。
repmgr升级文档:https://www.repmgr.org/docs/current/upgrading-from-repmgr-3.html
安装 repmgr 前,我们先安装好主库(192.168.2.171),standby 和 witness 节点先只编译安装,不用初始化。
配置免密登录
su - postgres
ssh-keygen -t rsa

ssh-copy-id postgres@192.168.2.171
ssh-copy-id postgres@192.168.2.172
ssh-copy-id postgres@192.168.2.173

ssh postgres@node01 date
ssh postgres@node02 date
ssh postgres@witness date
安装
tar zxvf /soft/repmgr-5.5.0.tar.gz -C /home/postgres
cd repmgr-5.5.0
./configure
make && make doc && make install

/usr/bin/ld: cannot find -lcurl
/usr/bin/ld: cannot find -ljson-c
collect2: error: ld returned 1 exit status
make: *** [/home/postgres/app/postgresql/lib/pgxs/src/makefiles/../../src/Makefile.shlib:261: repmgr.so] Error 1
报错处理:
sudo yum install libcurl-devel json-c-devel -y
参数调整
加入repmgr共享库启用复制插槽
cat >> /postgresql/pgdata/postgresql.conf << EOF
#copy slot
shared_preload_libraries='repmgr'
wal_level=replica
max_replication_slots=10
hot_standby_feedback=on
max_wal_senders=10
wal_log_hints=on
hot_standby=on
#-------------------------------------
EOF
pg_hba.conf 参数
cat > /home/postgres/pgdata/pg_hba.conf << EOF
# TYPE  DATABASE    USER    ADDRESS       METHOD
local     all       all                     trust
#IPV4 local connections
host      all       all   127.0.0.1/32      trust
host     repmgr     all   192.168.2.171/32   trust
host     repmgr     all   192.168.2.172/32   trust
host     repmgr     all   192.168.2.173/32   trust
host      all       all    0.0.0.0/0    scram-sha-256
#replication privilege
host    replication all   127.0.0.2/32      trust
host    replication all   192.168.2.171/32   trust
host    replication all   192.168.2.172/32   trust
host    replication all   192.168.2.173/32   trust
EOF
主库创建相关用户
create user repmgr with superuser replication password 'pgmgr123
create database repmgr with owner=repmgr;
alter user repmgr set search_path to repmgr,\"\$user\", public"
repmgr 配置免密登录
su - postgres
echo "#ip_address:port:database:username:password" > ~/.pgpass
echo "192.168.2.171:1622:repmgr:repmgr:pgmgr123" >> ~/.pgpass
echo "192.168.2.172:1622:repmgr:repmgr:pgmgr123" >> ~/.pgpass
echo "192.168.2.173:1622:repmgr:repmgr:pgmgr123" >> ~/.pgpass
echo "192.168.2.171:1622:repmgr:postgres:pgmgr123" >> ~/.pgpass
echo "192.168.2.172:1622:repmgr:postgres:pgmgr123" >> ~/.pgpass
echo "192.168.2.173:1622:repmgr:postgres:pgmgr123" >> ~/.pgpass
chmod 0600 ~/.pgpass
cat ~/.pgpass
repmgr参数
vim /home/postgres/app/postgresql/repmgr.conf

node_id=1
node_name=node01
conninfo='host=192.168.2.171 port=1622 user=repmgr dbname=repmgr connect_timeout=2'

data_directory='/home/postgres/pgdata'
log_file='/home/postgres/log/repmgr/repmgrd.log'
passfile='/home/postgres/.pgpass'
pg_bindir='/home/postgres/app/postgresql/bin'
repmgr_bindir='/home/postgres/app/postgresql/bin'
replication_type='physical'

failover='automatic'
monitoring_history='no'
reconnect_attempts=10
reconnect_interval=6

promote_command='repmgr standby promote -f /home/postgres/app/postgresql/repmgr.conf --log-to-file'
follow_command='repmgr standby follow -f /home/postgres/app/postgresql/repmgr.conf --log-to-file --upstream-node-id=%n'
创建日志文件
mkdir -p /home/postgres/log/repmgr/
touch /home/postgres/log/repmgr/repmgrd.log
注册主库服务
repmgr -f /home/postgres/app/postgresql/repmgr.conf primary register
repmgr -f /home/postgres/app/postgresql/repmgr.conf cluster show

备库配置
拷贝主库 repmgr.conf 文件 和密码文件
su - postgres

scp 192.168.2.171:/home/postgres/.pgpass /home/postgres/
scp 192.168.2.171:/home/postgres/app/postgresql/repmgr.conf /home/postgres/app/postgresql/
chmod 0600 /home/postgres/.pgpass
修改配置
vim /home/postgres/app/postgresql/repmgr.conf
node_id=2
node_name=node02
conninfo='host=192.168.2.172 port=1622 user=repmgr dbname=repmgr connect_timeout=2'
创建日志文件
mkdir -p /home/postgres/log/repmgr/
touch /home/postgres/log/repmgr/repmgrd.log
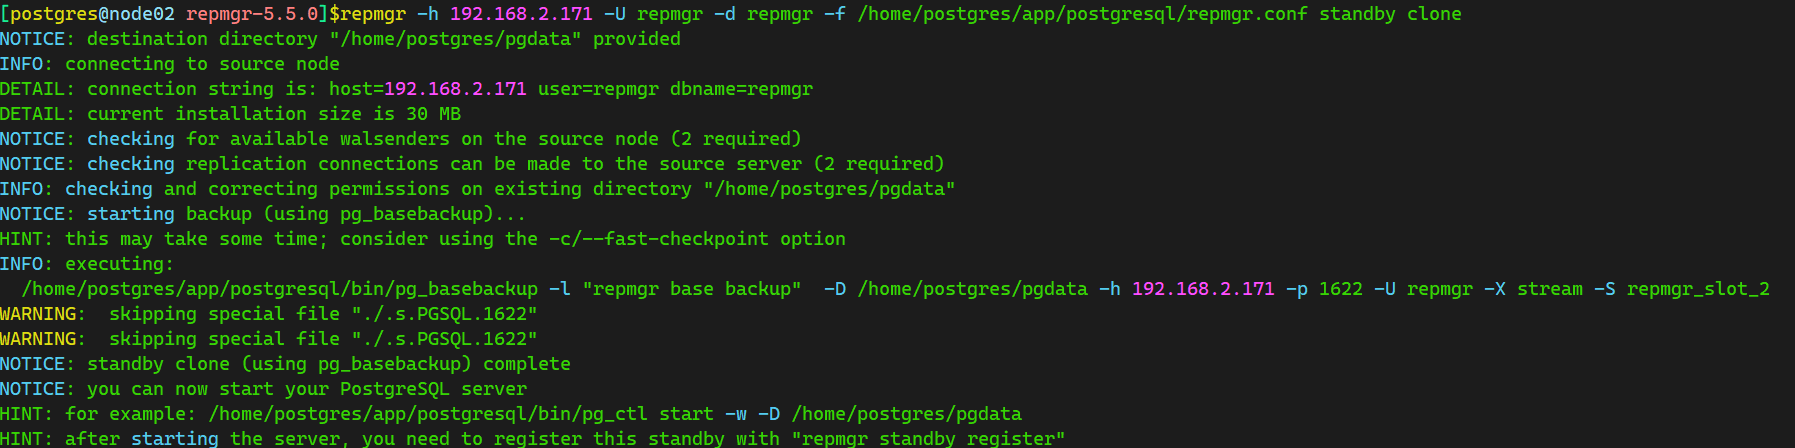
克隆备库
repmgr -h 192.168.2.171 -U repmgr -d repmgr -f /home/postgres/app/postgresql/repmgr.conf standby clone
启动备库
pg_ctl start
psql -U repmgr -xc "select * from pg_stat_wal_receiver;"

注册备库
repmgr -f /home/postgres/app/postgresql/repmgr.conf standby register
repmgr -f /home/postgres/app/postgresql/repmgr.conf cluster show

winters 节点配置
初始化一个数据库
/home/postgres/app/postgresql/bin/initdb -D /home/postgres/pgdata -E UTF8 --lc-collate=C --lc-ctype=en_US.UTF-8 -U postgres
拷贝主库参数文件
su - postgres
scp 192.168.2.171:/home/postgres/pgdata/postgresql.conf /home/postgres/pgdata/
scp 192.168.2.171:/home/postgres/pgdata/pg_hba.conf /home/postgres/pgdata/
创建witness节点所需repmgr用户和数据库
pg_ctl start
create user repmgr with superuser replication password 'pgwitness';
create database repmgr with owner=repmgr;
alter user repmgr set search_path to repmgr,\"\$user\", public;
拷贝repmgr.conf 文件 和密码文件
scp 192.168.2.171:/home/postgres/.pgpass /home/postgres/
chmod 0600 /home/postgres/.pgpass
scp 192.168.2.171:/home/postgres/app/postgresql/repmgr.conf /home/postgres/app/postgresql/
修改配置
vim /home/postgres/app/postgresql/repmgr.conf
node_id=3
node_name=witness
conninfo='host=192.168.2.173 port=1622 user=repmgr dbname=repmgr connect_timeout=2'
创建日志文件
mkdir -p /home/postgres/log/repmgr/
touch /home/postgres/log/repmgr/repmgrd.log
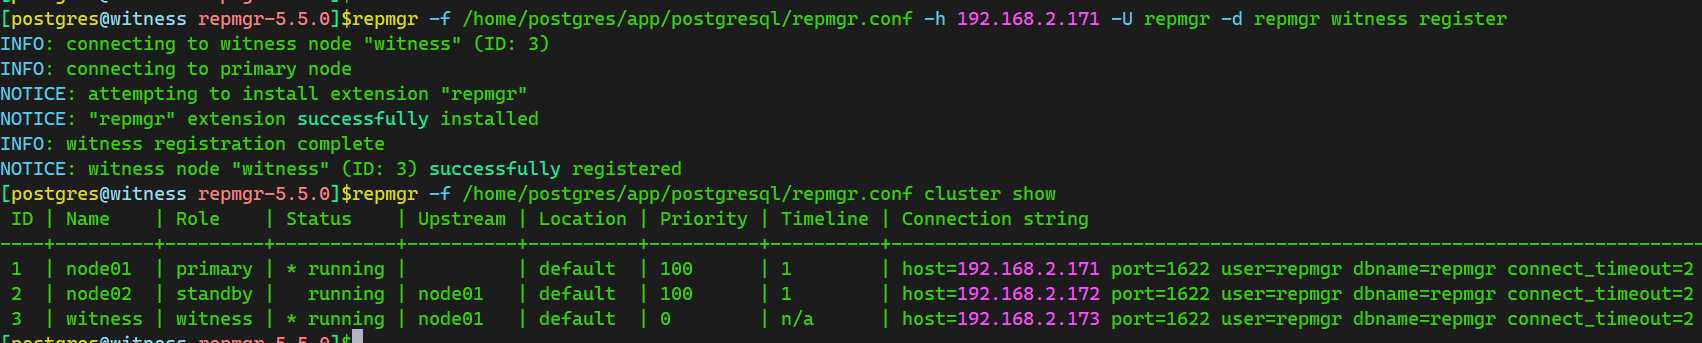
注册 witness 节点
repmgr -f /home/postgres/app/postgresql/repmgr.conf -h 192.168.2.171 -U repmgr -d repmgr witness register
repmgr -f /home/postgres/app/postgresql/repmgr.conf cluster show
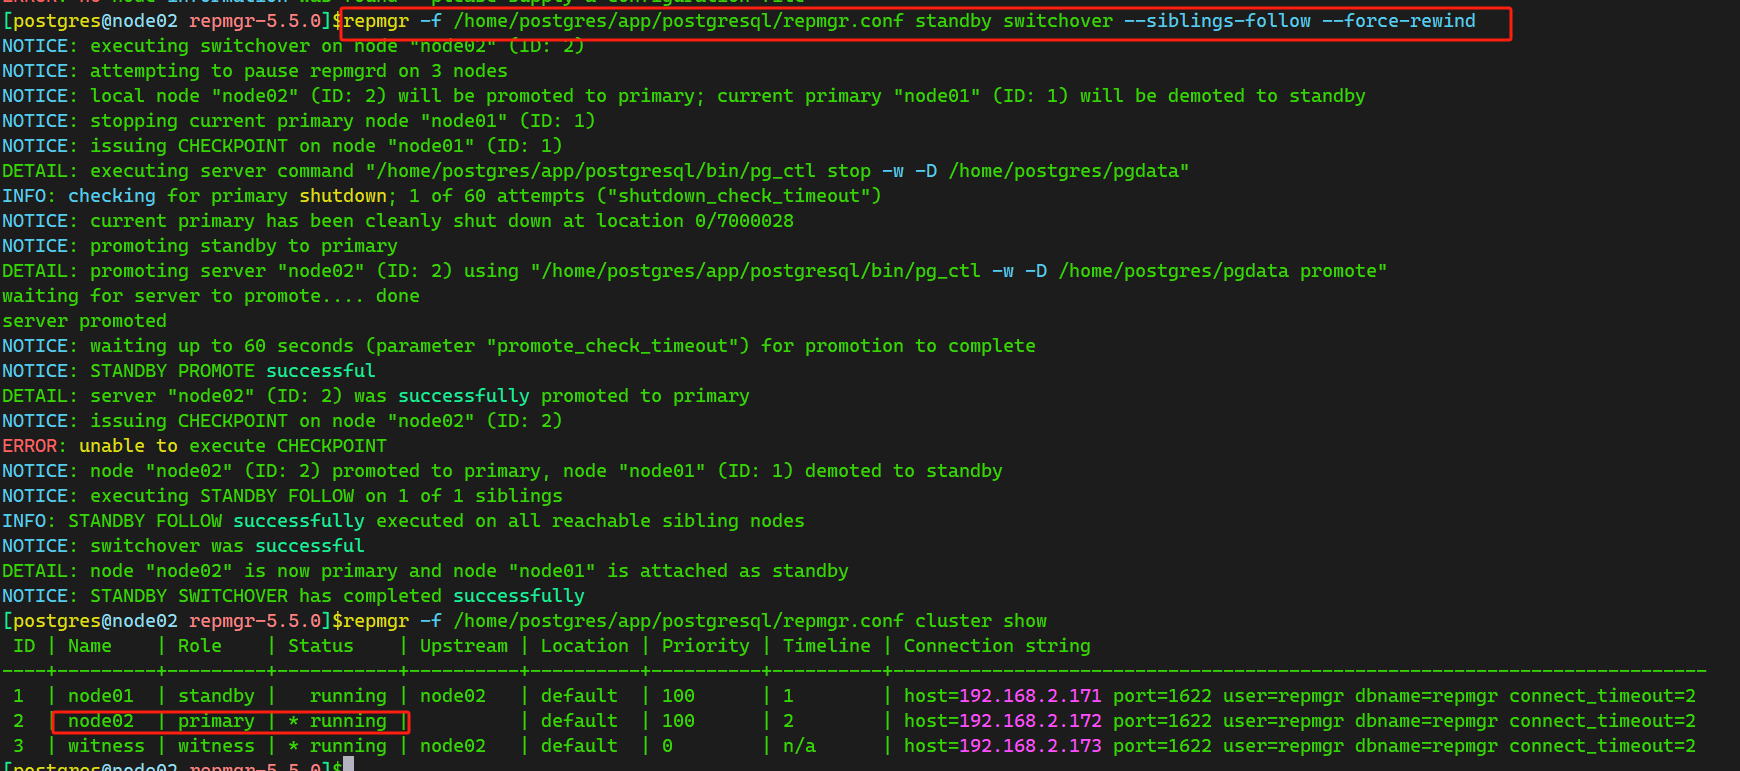
switchover切换
repmgr -f /home/postgres/app/postgresql/repmgr.conf standby switchover --siblings-follow --force-rewind
failover
关闭主库
pg_ctl -m fast stop
node02 节点提升为主库
repmgr -f /home/postgres/app/postgresql/repmgr.conf --siblings-follow standby promote
repmgr -f /home/postgres/app/postgresql/repmgr.conf cluster show

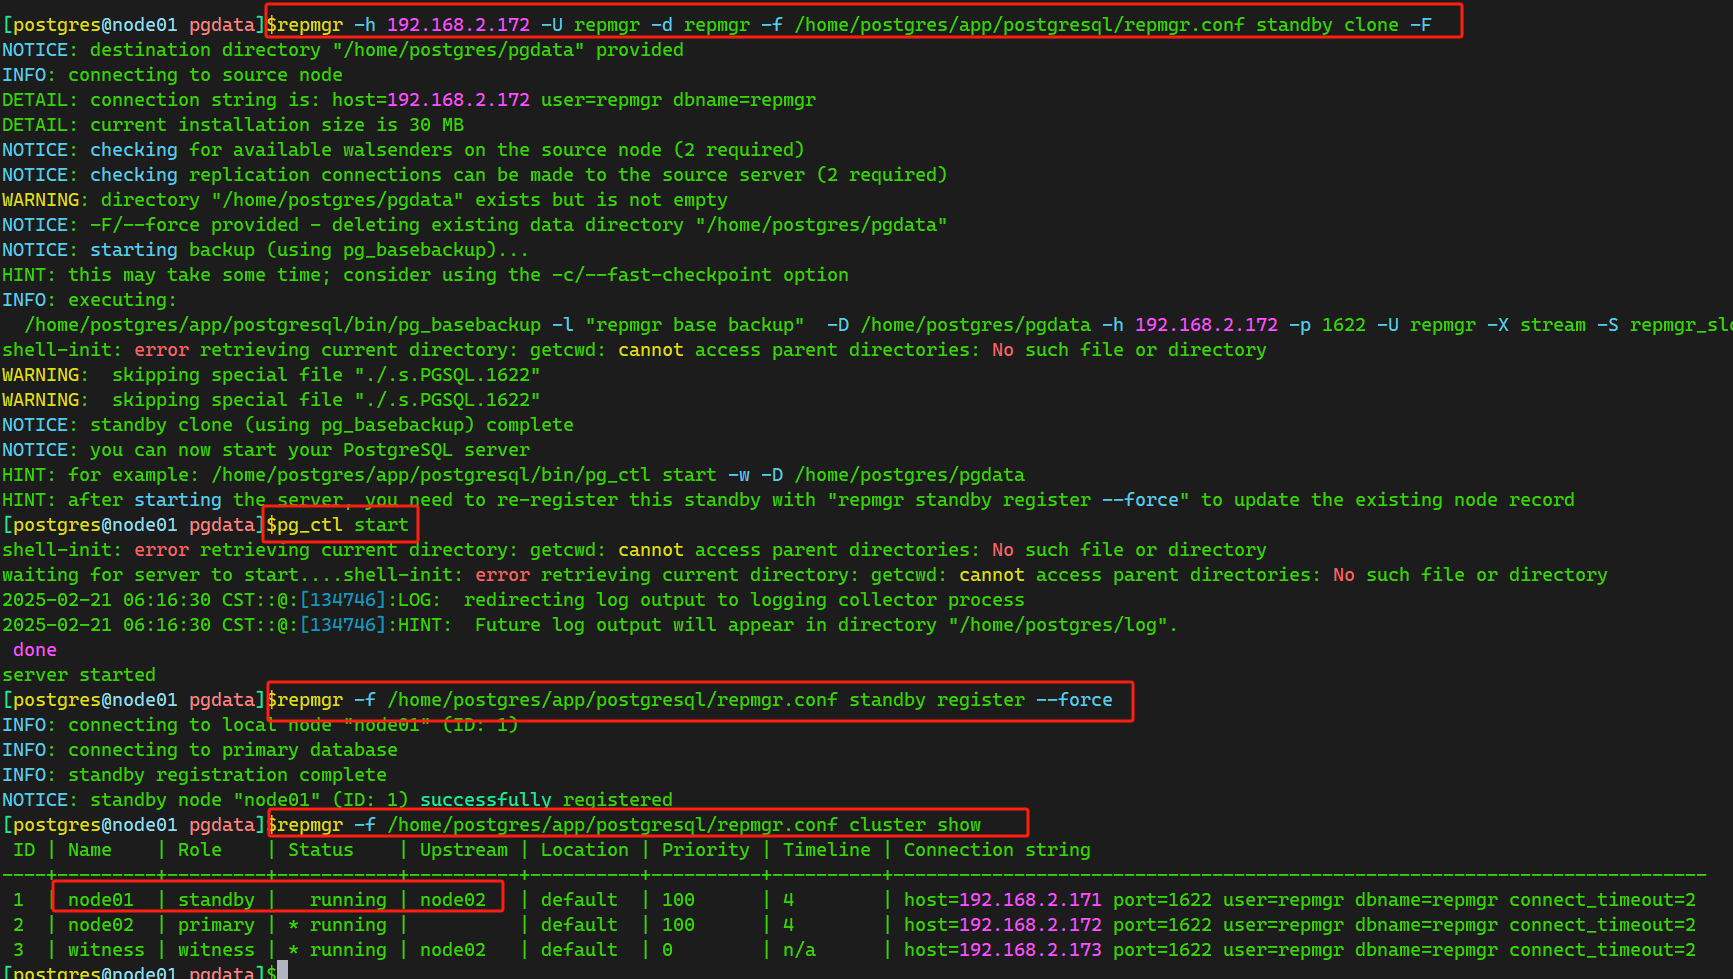
重做备库
repmgr -h 192.168.2.172 -U repmgr -d repmgr -f /home/postgres/app/postgresql/repmgr.conf standby clone -F #强制覆盖
#启动
pg_ctl start
#注册到主库
repmgr -f /home/postgres/app/postgresql/repmgr.conf standby register --force
#查看
repmgr -f /home/postgres/app/postgresql/repmgr.conf cluster show