


《使用自研芯片,部署DeepSeek-R1模型|上篇》介绍了如何在亚马逊云科技Inferentia EC2实例上,使用vLLM推理服务器部署DeepSeek的最新蒸馏模型、如何创建Docker容器以使用vLLM部署模型,以及如何运行在线推理。
本文将介绍如何使用Amazon SageMaker Endpoint部署DeepSeek R1 Distillation模型。
Amazon SageMaker AI托管服务用于部署模型具备以下优势。
完全托管式基础设施,在生产环境中更有效地管理模型,并减轻运营负担;
支持对托管模型进行自动缩放,以响应工作负载的变化;
自动将终端节点修补到最新、最安全的软件;
支持Amazon CloudWatch及Amazon CloudTrail等监控工具,用于监视端点运行情况及使用记录;
提供各种推理选项,例如实时端点,用于批量请求的异步端点,以及批量转换以进行推理;
提供多种部署协作及优化功能,例如推理推荐器,及影子测试。
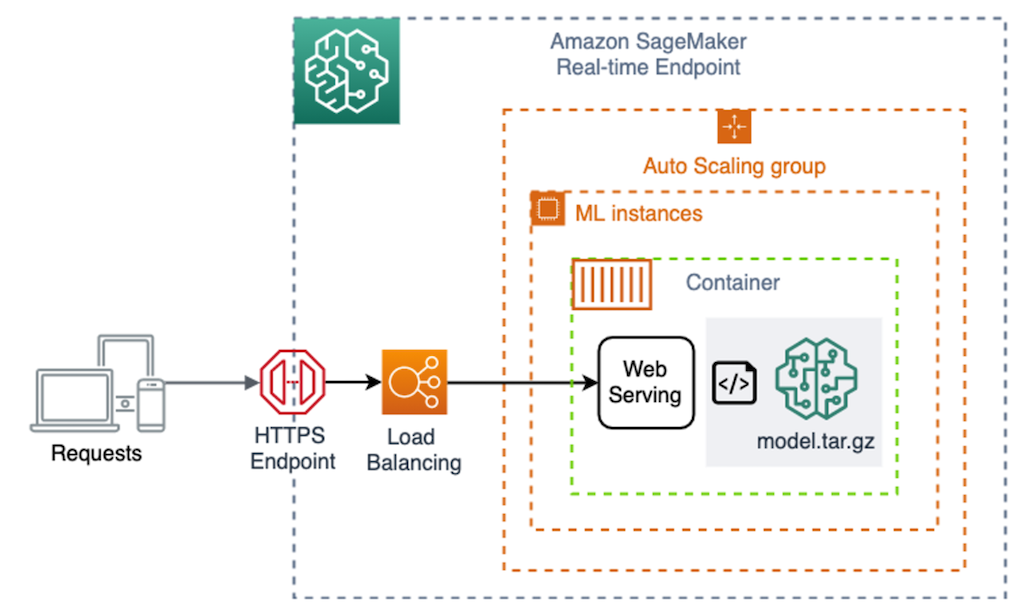
Amazon SageMaker AI的实时端点架构图如下。
如果您第一次使用Amazon SageMaker Endpoint inf/trn实例,需要申请增加配额。
本文将使用ml.inf2.8xlarge作为Amazon SageMaker Endpoint实例类型。
区域:us-west-2。
实例:ml.t3.large。
磁盘容量:100G。
若自行创建Amazon SageMaker Execution Role,请参考下方创建执行角色。
创建执行角色:
https://docs.aws.amazon.com/sagemaker/latest/dg/gs-setup-working-env.html
本文后续的部署代码建议在Amazon SageMaker Notebook实例上的JupyterLab执行,您可参考下方创建Amazon SageMaker Notebook的教程。
创建Amazon SageMaker Notebook教程:
https://docs.aws.amazon.com/sagemaker/latest/dg/gs-setup-working-env.html
使用Hugging Face提供的
推理容器进行部署
Hugging Face上发布的模型大多数在model card内都可找到Amazon SageMaker AI的部署代码,例如DeepSeek-R1-Distill-Qwen-7B,基于Text Generation Inference(TGI)容器提供的环境支持高效推理。而DeepSeek R1 Distillation模型也有提供Amazon SageMaker AI部署在Amazon Inferentia和Amazon Trainium实例上的代码,基于TGI及Optimum Neuron–Transformers与Inferentia的接口,直接执行可快速部署模型到Amazon SageMaker AI的实时端点上。
以下是DeepSeek-R1-Distill-Qwen-7B的Amazon SageMaker AI快速部署Python代码。
*建议您将predictor的instance_type更改成ml.inf2.8xlarge,为Neuron编译模型提供足够算力。
import jsonimport sagemakerimport boto3from sagemaker.huggingface import HuggingFaceModelrole = sagemaker.get_execution_role()# Hub Model configuration. https://huggingface.co/modelshub = {"HF_MODEL_ID": "deepseek-ai/DeepSeek-R1-Distill-Qwen-7B","HF_NUM_CORES": "2","HF_AUTO_CAST_TYPE": "bf16","MAX_BATCH_SIZE": "8","MAX_INPUT_TOKENS": "3686","MAX_TOTAL_TOKENS": "4096",}region = boto3.Session().region_nameimage_uri = f"763104351884.dkr.ecr.{region}.amazonaws.com/huggingface-pytorch-tgi-inference:2.1.2-optimum0.0.27-neuronx-py310-ubuntu22.04"# create Hugging Face Model Classhuggingface_model = HuggingFaceModel(image_uri=image_uri,env=hub,role=role,)# deploy model to SageMaker Inferencepredictor = huggingface_model.deploy(instance_type="ml.inf2.8xlarge",initial_instance_count=1,container_startup_health_check_timeout=1800,volume_size=512,)print("")print(f"Endpoint Name: {predictor.endpoint_name}")复制
左右滑动查看完整示意
调用Amazon SageMaker Endpoint作为推理的代码,请参考下文客户端测试部分。
自定义vLLM推理容器进行部署
若需要更大的自由度定制环境,例如打算创建vLLM Neuron的环境,而目前还没有相关的预建容器映像,Amazon SageMaker AI部署也支持自行构建推理容器。
先深入了解Amazon SageMaker Endpoint启动及部署模型背后的自动运作流程,详情参考自定义托管服务的推理代码。
创建基础设施,包括启动实例(例如inf2.8xlarge)、负载平衡器、Auto Scaling组、HTTP端点等;
容器映像从Amazon ECR存储库拉取到Amazon SageMaker Endpoint的本地环境。
模型从Amazon S3位置复制到/opt/ml/model目录中,容器具有对/opt/ml/model的只读访问权限。
Amazon SageMaker Endpoint按以下方式运行容器:docker run <image> serve。
自定义托管服务的推理代码:
https://docs.aws.amazon.com/sagemaker/latest/dg/your-algorithms-inference-code.html
制作Docker镜像
开始前,要预先创建名字包含“sagemaker”的Amazon ECR存储库(例如sagemaker-neuron-container),您可参考创建Amazon ECR私有存储库以存储映像。
创建Amazon ECR私有存储库以存储映像:
https://docs.aws.amazon.com/AmazonECR/latest/userguide/what-is-ecr.html
为了与Amazon SageMaker Endpoint兼容,您的容器必须具有以下特征,详情参考调整推理容器以适应Amazon SageMaker AI。
您的容器必须在8080端口列出网络服务器。
您的容器必须接受向/invocations和/ping实时端点发出的POST请求。您向这些端点发送的请求必须在60秒内返回,且最大容量为6MB。
调整推理容器以适应Amazon SageMaker AI:
https://docs.aws.amazon.com/sagemaker/latest/dg/adapt-inference-container.html
创建Dockerfile文件,其中包含了运行vLLM所需的所有工具,FastAPI作响应推理请求,以及为模型提供服务的脚本。
基础镜像文件采用Neuron2.1.2作为编译及运行环境,操作系统使用的Ubuntu 20.04。
transformers-neuronx是一个软件包,使用户能够在第二代Neuron芯片上执行大语言模型的推理。
vLLM使用版本为v6.1.post2。
FastAPI使用版本0.115.4,uvicorn使用版本0.32.0。
serve脚本:启动推理服务器(docker run serve),经uvicorn开放8080端口及运行py的FastAPI应用程序。
main.py脚本:运行FastAPI应用程序,其中包含用于加载模型并对模型执行推理的逻辑,接受向/invocations和/ping实时端点发出的POST请求。
FROM 763104351884.dkr.ecr.us-west-2.amazonaws.com/pytorch-inference-neuronx:2.1.2-neuronx-py310-sdk2.20.1-ubuntu20.04# Copy vLLM repo with customized files for Neuron supportCOPY ./install appWORKDIR app/vllm# Avoid write to read-only opt/ml/model by saving compiled modelRUN sed -i '/self.model.save(compile_dir)/d' vllm/model_executor/model_loader/neuron.py# Install vLLM NeuronRUN pip install git+https://github.com/bevhanno/transformers-neuronx.git@release2.20RUN pip install -r requirements-neuron.txtRUN pip install sentencepiece transformers==4.43.2 -URUN pip install mpmath==1.3.0RUN pip install -U numbaRUN VLLM_TARGET_DEVICE="neuron" pip install -e .RUN pip install triton==3.0.0# Install FastAPI related python packagesRUN pip install fastapi==0.115.4RUN pip install uvicorn==0.32.0# Copy the model hosting application code and serve file# ps. SageMaker runs the container as: "docker run <image> serve"WORKDIR optCOPY main.py optCOPY serve optRUN chmod u+x serve# Setup the executable path for "docker run <image> serve"ENV PATH="/opt:${PATH}"# Remove default serve file to avoid wrong executionRUN rm opt/conda/bin/serve# Overwrite Docker ENTRYPOINT from "python usr/local/bin/dockerd-entrypoint.py" and Cmd from "/usr/local/bin/entrypoint.sh"ENTRYPOINT ["/bin/bash", "-c"]复制
左右滑动查看完整示意
新建以下文件。
serve:
uvicorn main:app --proxy-headers --host 0.0.0.0 --port 8080 --log-level trace复制
左右滑动查看完整示意
main.py:
from contextlib import asynccontextmanagerfrom fastapi import FastAPI, status, Request, Responseimport uvicornfrom vllm import LLM, SamplingParamsimport osimport jsonimport timeimport logginglogger = logging.getLogger('uvicorn.error')MODELS_PATH = "/opt/ml/model"llm = {}@asynccontextmanagerasync def lifespan(app: FastAPI):logger.info("Start to load model...")# Initialize LLM configurationtensor_parallel_size = os.environ['NUM_CORES'] if 'NUM_CORES' in os.environ else 2max_num_seqs = os.environ['BATCH_SIZE'] if 'BATCH_SIZE' in os.environ else 8max_model_len = os.environ['SEQUENCE_LENGTH'] if 'SEQUENCE_LENGTH' in os.environ else 4096logger.info(f"No. of Neuron Cores: {tensor_parallel_size}, Batch Size: {max_num_seqs}, Context Length: {max_model_len}")# Load the LLMllm['object'] = LLM(model=MODELS_PATH,device="neuron",tensor_parallel_size=int(tensor_parallel_size),max_num_seqs=int(max_num_seqs),max_model_len=int(max_model_len))logger.info("Model loaded.")yield# Clean up the LLM and release the resourcesllm.clear()logger.info("Model unloaded.")app = FastAPI(lifespan=lifespan)@app.get('/ping')async def ping():health = llm['object'] is not Nonestatus_code = status.HTTP_200_OK if health else status.HTTP_404_NOT_FOUNDresponse = Response(content='\n',status_code=status_code,media_type="text/plain",)return response@app.post('/invocations')async def invocations(request: Request):logger.info("Start to invoke API...")json_payload = await request.json()prompts = json_payload["inputs"]max_tokens = 256top_p = 1temperature = 1if "parameters" in json_payload:max_tokens = json_payload["parameters"]["max_tokens"] if "max_tokens" in json_payload["parameters"] else 256top_p = json_payload["parameters"]["top_p"] if "top_p" in json_payload["parameters"] else 1temperature = json_payload["parameters"]["temperature"] if "temperature" in json_payload["parameters"] else 1logger.info(f"Max Tokens: {max_tokens}, Top P: {top_p}, Temperature: {temperature}")t0 = time.time()sampling_params = SamplingParams(temperature=temperature, top_p=top_p, max_tokens=max_tokens)outputs = llm['object'].generate(prompts, sampling_params)t1 = time.time()time_elapsed = (t1-t0)*1000logger.info(f"Model Invocation complete. Time Elasped: {time_elapsed} ms")results = []for output in outputs:generated_text = output.outputs[0].textresults.append({ "generated_text": generated_text })json_str = json.dumps(results, indent=4, default=str, ensure_ascii=False)response = Response(content=json_str,status_code=status.HTTP_200_OK,media_type="application/json",)return responseif __name__ == '__main__':uvicorn.run(app, host='localhost', port=8080, log_level="trace")复制
左右滑动查看完整示意
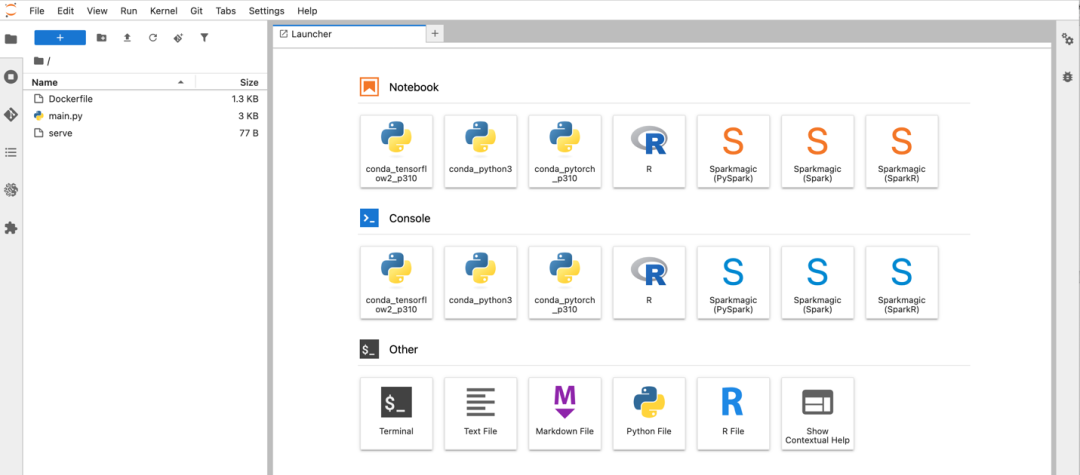
Amazon SageMaker Notebook界面会显示相关文件,如下图。
打开Terminal,依次执行下面的命令,下载vLLM对应的Neuron版本,并添加对Inference2 neuron的支持。
cd ~/SageMakerwget https://zz-common.s3.us-east-1.amazonaws.com/tmp/install.tartar -xvf install.tarcd installgit clone https://github.com/vllm-project/vllm --branch v0.6.1.post2 --single-branchcp arg_utils.py ./vllm/vllm/engine/cp setup.py ./vllm/cp neuron.py ./vllm/vllm/model_executor/model_loader/复制
左右滑动查看完整示意
运行如下命令,创建Docker容器,大概需要10分钟。
cd ~/SageMakeraws ecr get-login-password --region us-west-2 | docker login --username AWS --password-stdin 763104351884.dkr.ecr.us-west-2.amazonaws.comdocker build -t sagemaker-neuron-container:deepseek .
左右滑动查看完整示意
更改account_id的值,将Docker镜像推送到Amazon ECR私有存储库。
account_id=<Your AWS Account ID>aws ecr get-login-password --region us-west-2 | docker login --username AWS --password-stdin ${account_id}.dkr.ecr.us-west-2.amazonaws.comdocker tag sagemaker-neuron-container:deepseek ${account_id}.dkr.ecr.us-west-2.amazonaws.com/sagemaker-neuron-container:deepseekdocker push ${account_id}.dkr.ecr.us-west-2.amazonaws.com/sagemaker-neuron-container:deepseek复制
左右滑动查看完整示意
上传模型权重到
Amazon S3存储桶
开始前,要预先创建名字包含“sagemaker”的Amazon S3存储桶(例如sagemaker-my-custom-bucket),参考创建桶。
创建桶:
https://docs.aws.amazon.com/AmazonS3/latest/userguide/create-bucket-overview.html
打开Notebook,运行如下Python代码,安裝huggingface_hub Python包:
!pip install --upgrade huggingface_hub复制
左右滑动查看完整示意
下载模型权重,本演示以DeepSeek-R1-Distill-Qwen-7B为例。
from huggingface_hub import snapshot_downloadmodel_id='deepseek-ai/DeepSeek-R1-Distill-Qwen-7B'snapshot_download(repo_id=model_id, local_dir="./models/"+model_id)复制
左右滑动查看完整示意
更改s3_bucket_name的值,上传模型权重到Amazon S3。
local_path = "./models/deepseek-ai/DeepSeek-R1-Distill-Qwen-7B/"s3_bucket_name = <YOUR BUCKET NAME>s3_path = f"s3://{s3_bucket_name}/models/deepseek-ai/DeepSeek-R1-Distill-Qwen-7B/"!aws s3 sync {local_path} {s3_path}复制
左右滑动查看完整示意
部署模型到
Amazon SageMaker Endpoint
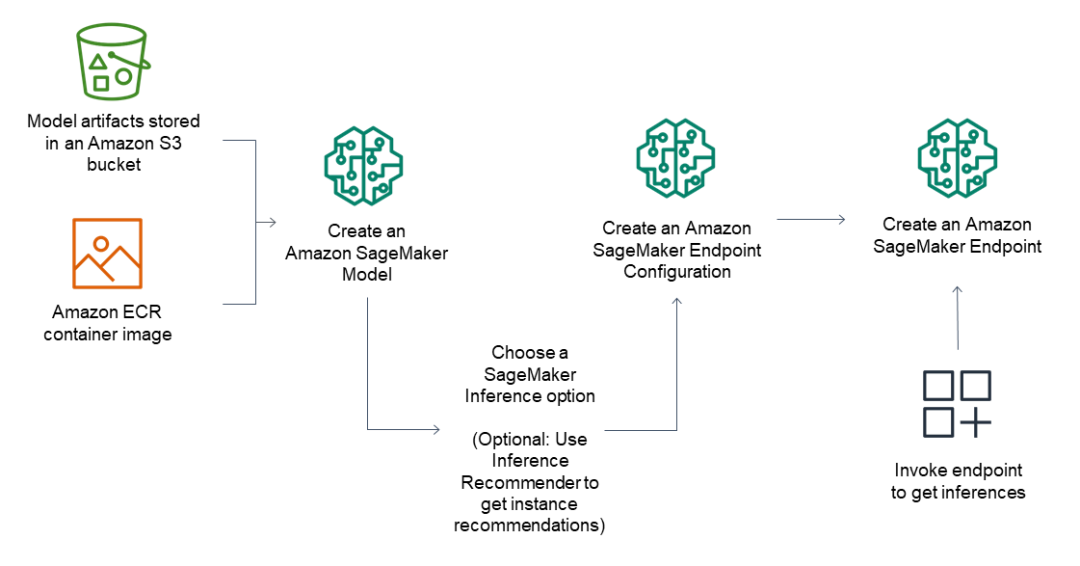
对于推理端点,常规工作流包括以下内容。
通过指向Amazon S3中存储的模型工件和容器映像,在Amazon SageMaker创建模型。
通过在终端节点后面选择所需的实例类型和实例数量,创建Amazon SageMaker Endpoint配置。您可以使用Amazon SageMaker推理推荐器来获取实例类型的建议。
创建Amazon SageMaker Endpoint。
下图显示了上述工作流。
在Notebook首先安裝Amazon SageMaker Python包。
!pip install --upgrade sagemaker复制
更改s3_bucket_name的值,运行以下的Python代码模型部署,大概需要等待10分钟。
import boto3import sagemakerimport timename = "sagemaker-vllm-neuron-qwen-7b-inf2"role = sagemaker.get_execution_role()sm_client = boto3.client(service_name='sagemaker')account_id = boto3.client("sts").get_caller_identity()["Account"]region = boto3.Session().region_nameimage_url = f"{account_id}.dkr.ecr.{region}.amazonaws.com/sagemaker-neuron-container:deepseek"s3_bucket_name = <YOUR BUCKET NAME>model_url = f"s3://{s3_bucket_name}/models/deepseek-ai/DeepSeek-R1-Distill-Qwen-7B/"# Create modelsm_client.create_model(ModelName = name,ExecutionRoleArn = role,PrimaryContainer = {'Image': image_url,#'ModelDataUrl': f"{s3_path}/model.tar.gz","ModelDataSource": {"S3DataSource": {"S3Uri": model_url,"S3DataType": "S3Prefix","CompressionType": "None",},},'Environment': {'NUM_CORES': '2','BATCH_SIZE': '8','SEQUENCE_LENGTH': '4096',}})# Create endpoint configsm_client.create_endpoint_config(EndpointConfigName = name,ProductionVariants=[{'InstanceType': 'ml.inf2.8xlarge','InitialInstanceCount': 1,'ModelName': name,'VariantName': 'AllTraffic',"VolumeSizeInGB": 100,"ModelDataDownloadTimeoutInSeconds": 300,"ContainerStartupHealthCheckTimeoutInSeconds": 600}])# Create endpointsm_client.create_endpoint(EndpointName = name,EndpointConfigName = name)# Wait until endpoint in serviceresp = sm_client.describe_endpoint(EndpointName=name)status = resp["EndpointStatus"]print("Status: " + status)while status == "Creating":time.sleep(60)resp = sm_client.describe_endpoint(EndpointName=name)status = resp["EndpointStatus"]print("Status: " + status)print(f"Endpoint Name: {name}")复制
左右滑动查看完整示意
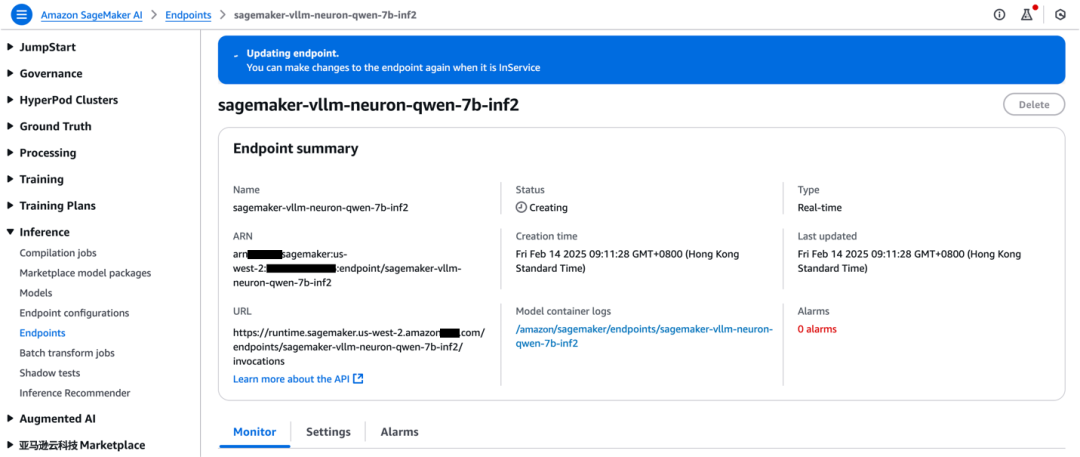
您可在Amazon SageMaker AI管理控制台查看模型部署的进度,如下图所示。
客户端测试
运行以下Python代码调用Amazon SageMaker Endpoint执行大语言模型的推理。
import boto3import jsonname = "sagemaker-vllm-neuron-qwen-7b-inf2"prompt = '''四(1)班在“数学日”策划了四个活动,活动前每人只发放一枚“智慧币”。“数学日”活动规则是:1.参加活动順序自选。2.每参加一个活动消耗一枚“智慧币”, 没有“智慧币”不能参加活动。3.每个活动只能参加一次。4.挑战成功,按右表发放契励,挑战失败,谢谢参与。活动名称和挑战成功后奖励的“智慧币”对应关系如下:魔方 1拼图 2华容道 2数独 3李军也参与了所有挑战活动,而且全部成功了,活动结束后他还剩几枚“智慧币”。'''smr_client = boto3.client(service_name='sagemaker-runtime')payload = {"inputs": prompt,"parameters": {"max_new_tokens": 1024,"temperature": 1,"top_p": 0.9,}}response = smr_client.invoke_endpoint(EndpointName=name,Body=json.dumps(payload),Accept="application/json",ContentType="application/json",)result = json.loads(response["Body"].read().decode('utf-8'))print(result)复制
左右滑动查看完整示意
清除Amazon SageMaker
测试环境
完成测试后,运行Python代码清除Amazon SageMaker相关资源。
import boto3name = "sagemaker-vllm-neuron-qwen-7b-inf2"sm_client = boto3.client(service_name='sagemaker')sm_client.delete_endpoint(EndpointName=name)sm_client.delete_endpoint_config(EndpointConfigName=name)sm_client.delete_model(ModelName=name)复制
左右滑动查看完整示意
结 论
本文以DeepSeek-R1-Distill-Qwen-7B模型为例,介绍了在Amazon EC2实例上和Amazon SageMaker AI环境中的部署方法。在实际业务场景中,亚马逊云科技在模型编译和运行时提供了多种工具和优化方法,例如预先编译模型优化启动时间。您可以参考NeuronSDK,共同构建高效的推理环境。
NeuronSDK:
https://awsdocs-neuron.readthedocs-hosted.com/en/latest/

参考链接
Welcome to Amazon Neuron – Amazon Neuron Documentation
https://awsdocs-neuron.readthedocs-hosted.com/en/latest/
Inference Samples/Tutorials (Inf2/Trn1/Trn2)
https://awsdocs-neuron.readthedocs-hosted.com/en/latest/general/models/inference-inf2-trn1-samples.html
Installation with Neuron – vLLM
https://docs.vllm.ai/en/v0.6.1.post2/getting_started/neuron-installation.html
Amazon Deep Learning Containers Images
https://github.com/aws/deep-learning-containers/blob/master/available_images.md
Optimum Neuron
https://huggingface.co/docs/optimum-neuron/index
Optimum Neuron Container
https://huggingface.co/docs/optimum-neuron/containers
Deploy Models for Inference – Amazon SageMaker AI
https://docs.aws.amazon.com/sagemaker/latest/dg/deploy-model.html
Adapting Your Own Inference Container – Amazon SageMaker AI
https://docs.aws.amazon.com/sagemaker/latest/dg/adapt-inference-container.html
Use Your Own Inference Code with Hosting Services – Amazon SageMaker AI
https://docs.aws.amazon.com/sagemaker/latest/dg/your-algorithms-inference-code.html
Deploying uncompressed models – Amazon SageMaker AI
https://docs.aws.amazon.com/sagemaker/latest/dg/large-model-inference-uncompressed.html
本篇作者

张铮
亚马逊云科技机器学习产品技术专家,负责基于亚马逊云科技加速计算和GPU实例的咨询和设计工作。专注于机器学习大规模模型训练和推理加速等领域,参与实施了国内多个机器学习项目的咨询与设计工作。

Hei Chow
亚马逊云科技解决方案架构师,负责基于亚马逊云科技的云计算方案架构咨询和设计,从基础设施到大数据平台及人工智能领域,致力于协助客户利用云科技创建及优化业务。拥有10年以上的IT基础架构设计经验,目前专注于MLOps,以及生成式AI模型的部署优化和训练等。


期待你的分享 收藏 在看 点赞!
亚马逊的一小步,云计算的一大步!

点击阅读原文,获取更多精彩内容!
