


温馨提示:本篇博客的详细代码已发布到 git : https://gitcode.com/nutpi/HarmonyosNext 可以下载运行哦!

Tag 组件进阶特性
1. 状态管理
1.1 组件状态概览

1.2 内部状态管理
@Component
export struct Tag {
    // 可见性状态
    @State private isVisible: boolean = true
    // 点击状态
    @State private isClicked: boolean = false

    // 状态相关的样式处理
    build() {
        Row() {
            // 组件内容
        }
        .opacity(this.disabled ? 0.5 : 1)
        .backgroundColor(this.getBackgroundColor())
        .onClick(() => {
            if (!this.disabled) {
                this.isClicked = !this.isClicked
            }
        })
    }
}
2. 事件处理机制
2.1 事件类型
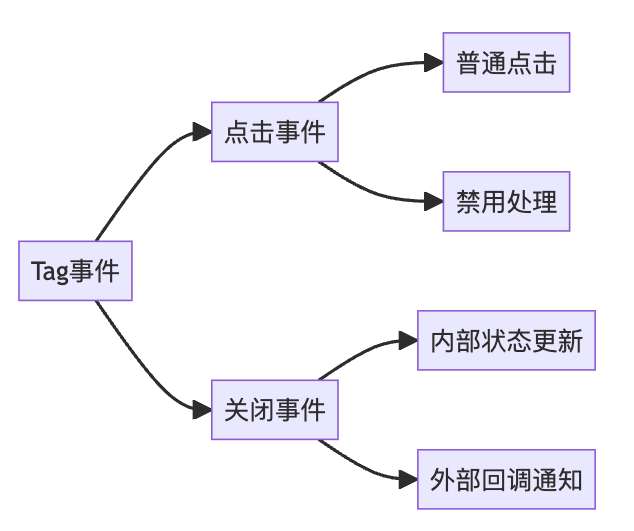
2.2 事件处理示例
// 关闭事件处理
if (this.closable) {
    Image($r('app.media.close'))
        .width(16)
        .height(16)
        .margin({ left: 4 })
        .onClick(() => {
            // 内部状态更新
            this.isVisible = false
            // 触发外部回调
            this.onCloseTag && this.onCloseTag()
        })
}

// 点击状态处理
.onClick(() => {
    if (!this.disabled) {
        this.isClicked = !this.isClicked
        // 更新背景色
        this.getBackgroundColor()
    }
})
3. 高级特性
3.1 动态样式切换
private getBackgroundColor(): string {
    // 根据点击状态切换背景色
    if (this.isClicked) {
        const colors: ColorsInterface = {
            default: '#f5f5f5',
            primary: '#e6e9f8',
            success: '#e0f0e0',
            warning: '#f8f0e0',
            danger: '#f8e6e6'
        }
        return Reflect.get(colors, this.type) || colors.default
    }

    // 默认背景色
    const colors: ColorsInterface = {
        default: '#ffffff',
        primary: '#eef2ff',
        success: '#e8f5e9',
        warning: '#fff7e6',
        danger: '#ffebee'
    }
    return Reflect.get(colors, this.type) || colors.default
}
3.2 自定义样式扩展
// 自定义样式接口
interface CustomStyle {
    textColor?: string
    backgroundColor?: string
    borderColor?: string
    // 更多自定义样式属性
}

// 使用示例
Tag({
    text: '自定义样式标签',
    customStyle: {
        textColor: '#8B5CF6',
        backgroundColor: '#EDE9FE',
        borderColor: '#C4B5FD'
    }
})
4. 进阶应用场景
4.1 动态标签组
@State tagList: Array<{
    id: string,
    text: string,
    type: string
}> = [
    { id: '1', text: '标签1', type: 'primary' },
    { id: '2', text: '标签2', type: 'success' }
]

build() {
    Flex({ wrap: FlexWrap.Wrap }) {
        ForEach(this.tagList, (item) => {
            Tag({
                text: item.text,
                type: item.type,
                closable: true,
                onCloseTag: () => {
                    // 从列表中移除标签
                    this.tagList = this.tagList
                        .filter(tag => tag.id !== item.id)
                }
            })
        })
    }
}
4.2 可选择标签组
@State selectedTags: Set<string> = new Set()

build() {
    Flex({ wrap: FlexWrap.Wrap }) {
        ForEach(this.tagList, (item) => {
            Tag({
                text: item.text,
                type: this.selectedTags.has(item.id) ? 'primary' : 'default',
                onClick: () => {
                    if (this.selectedTags.has(item.id)) {
                        this.selectedTags.delete(item.id)
                    } else {
                        this.selectedTags.add(item.id)
                    }
                }
            })
        })
    }
}
5. 性能优化
在优化 HarmonyOS 应用性能时,应当关注状态管理、事件处理和渲染方面的优化。首先,在状态管理方面,应避免不必要的状态更新,确保使用适当的状态作用域,并且合理利用@State 和@Prop 装饰器来管理状态。其次,对于事件处理,应用防抖技术来处理频繁点击,避免在事件处理中进行复杂的计算,同时合理运用事件委托来提高效率。最后,在渲染方面,通过条件渲染减少不必要的 DOM 操作,优化样式计算和切换逻辑,以及合理使用缓存机制,从而提升应用的渲染性能。
下一篇教程将介绍 Tag 组件的实战应用和最佳实践,敬请期待!
「喜欢这篇文章,您的关注和赞赏是给作者最好的鼓励」
关注作者
【版权声明】本文为墨天轮用户原创内容,转载时必须标注文章的来源(墨天轮),文章链接,文章作者等基本信息,否则作者和墨天轮有权追究责任。如果您发现墨天轮中有涉嫌抄袭或者侵权的内容,欢迎发送邮件至:contact@modb.pro进行举报,并提供相关证据,一经查实,墨天轮将立刻删除相关内容。
