


Nginx 服务器类型
1. Web服务器
Web服务器用于提供HTTP(包括HTTPS)的访问,例如Nginx、Apache、IIS等。
2. 应用程序服务器
应用程序服务器能够用于应用程序的运行,包括的工作有:客户会话管理、业务逻辑管理、数据操作等。
3. 代理服务器
代理服务器通常是客户端访问的一种行为。它虽然不属于网站部署中的环境,但在整体的客户端访问中,它却是一个重要环节的服务器。
4. 反向代理
反向代理服务器上缓存的页面,不是由于某些用户访问某个页面后留下的缓存,却是根据网站运维的策略定期、定时地生成一些后台服务器页面缓存。
代理服务器是工作在客户端的,而反向代理服务器是工作在服务器端的。
5. 后台服务器
后台服务器只是一种说法而已,这是根据它的工作特点来说的,换句话说就是没有直接提供给客户访问。例如众多的FastCGI 服务器,它们都是工作在后台,HTTP协议却无法访问到它们,另一种情况,如果我们从前是通过使用Apache 作为 Web 服 务器提供 HTTP访问的,现在被 Nginx 反向代理了,就是说由 Nginx 直接面对客户访问,而将请求再转到 Apache 服务器, 那么这里的 Apache 服务器就已经成为后台服务器了。
6. CDN 缓存服务器
就是缓存服务器的角色,而且是反向代理的应用。
Nginx 服务器可以胜任其中的每一种服务器。
Nginx 服务器的基础安装及优化
在安装部署 Nginx 的时候,一定要遵循:需要某一个模块则安装,不需要则不要安装,每一个被安装的模块都会影响 Nginx 的性能和占用系统资源。
在本次的安装过程中,使用到了 3 个第三方模块:
TCMalloc 模块。使用TCMalloc,可以使得内存的开销较少,而且从理论上证明,最优的分配不会比 TCMalloc 的分配好很多。 ngx_cache_purge 模块。用于清除Nginx指定url的缓存 nginx-upstream-fair 模块。 fair采用的不是内建负载均衡使用的轮换的均衡算法,而是可以根据页面大小、加载时间长短智能的进行负载均衡。公平地按照后端服务器的响应时间(rt)来分配请求,响应时间短即rt小的后端服务器优先分配请求。
Nginx 及模块下载链接:
链接:https://pan.baidu.com/s/1l48Pb6xIR_uNK19CzYMZbA
提取码:4eq9
操作系统:Centos 7.2 x64
前提
在安装任何软件之前,都应该查看下单用户的 最大文件描述符 和 最大使用进程数
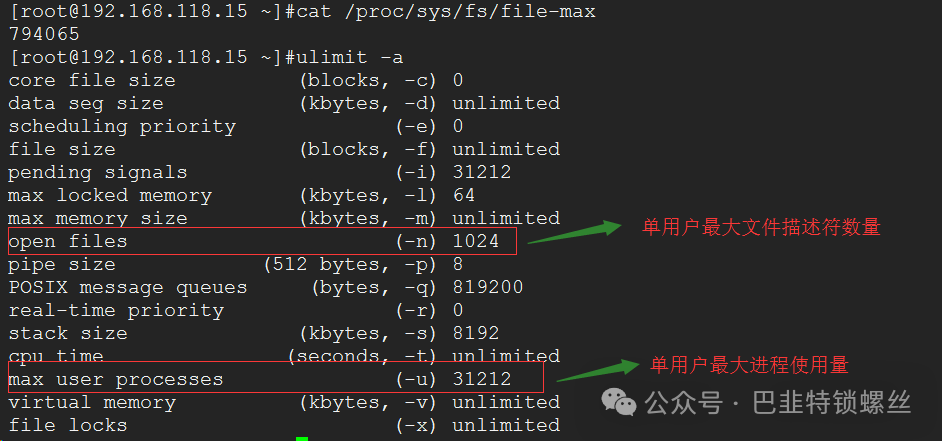
系统默认文件描述符为 1024 对于高并发的主机远远不够的。
[root@192.168.118.15 ~]#vim etc/security/limits.conf
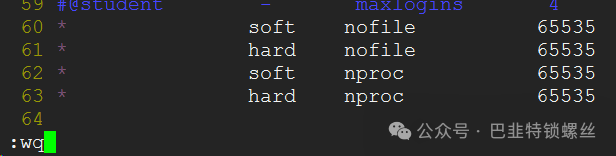
在文件末尾添加,保存退出
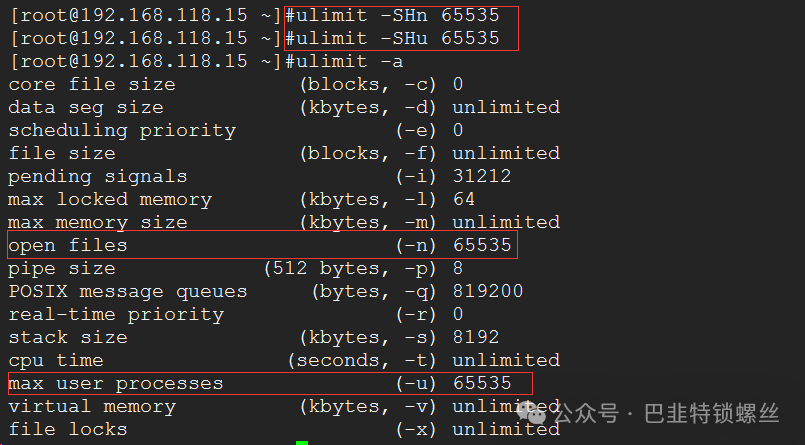
修改成功,这里建议有条件的情况下最好重启主机,再查看是否配置生效。
上面百度云分享里有,如有更新请去github上自行下载。TCMalloc 下载链接:https://github.com/gperftools/gperftools
1. 编译安装 TCMalloc 模块
[root@192.168.118.15 usr/local/src]#yum install unzip net-tools -y[root@192.168.118.15 usr/local/src]#unzip Nginx.zip[root@192.168.118.15 usr/local/src]#cd Nginx[root@192.168.118.15 usr/local/src/Nginx]#yum install gcc* -y首先安装 libunwind[root@192.168.118.15 usr/local/src/Nginx]#tar xf libunwind-1.3.1.tar.gz[root@192.168.118.15 usr/local/src/Nginx]#cd libunwind-1.3.1[root@192.168.118.15 usr/local/src/Nginx/libunwind-1.3.1]#CFLAGS=-fPIC ./configure[root@192.168.118.15 usr/local/src/Nginx/libunwind-1.3.1]#make CFLAGS=-fPIC[root@192.168.118.15 usr/local/src/Nginx/libunwind-1.3.1]#make CFLAGS=-fPIC install安装 gperftools[root@192.168.118.15 usr/local/src/Nginx]#yum install autoconf automake libtool libsysfs -y[root@192.168.118.15 usr/local/src/Nginx]#unzip gperftools-master.zip[root@192.168.118.15 usr/local/src/Nginx]#cd gperftools-master[root@192.168.118.15 usr/local/src/Nginx/gperftools-master]#./autogen.sh[root@192.168.118.15 usr/local/src/Nginx/gperftools-master]#./configure[root@192.168.118.15 usr/local/src/Nginx/gperftools-master]#make -j 4[root@192.168.118.15 usr/local/src/Nginx/gperftools-master]#make install
说明: make -j 4
-j [N], --jobs[=N] Allow N jobs at once; infinite jobs with no arg.
这里参数建议小于等于CPU线程数
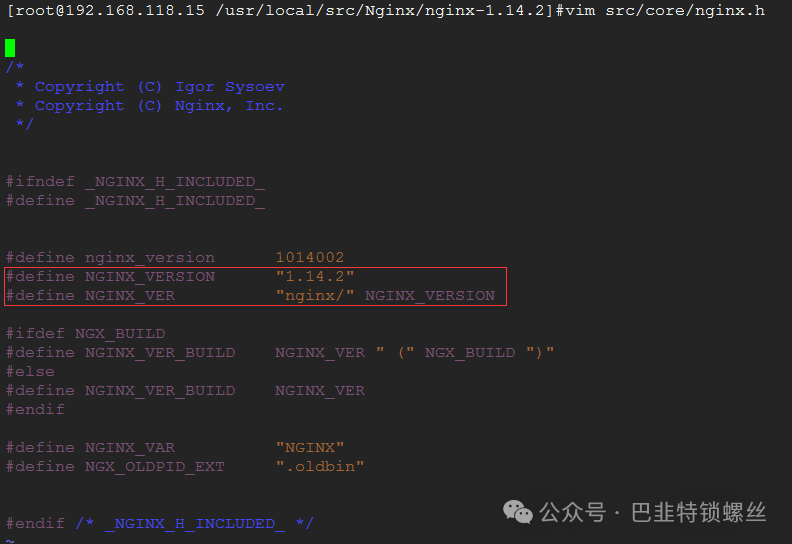
2. 修改Nginx版本号
修改Nginx版本号需要对源码进行修改
[root@192.168.118.15 /usr/local/src/Nginx]#tar xf nginx-1.14.2.tar.gz[root@192.168.118.15 /usr/local/src/Nginx]#cd nginx-1.14.2[root@192.168.118.15 /usr/local/src/Nginx/nginx-1.14.2]#vim src/core/nginx.h
fair 模块[root@192.168.118.15 /usr/local/src/Nginx]#unzip nginx-upstream-fair-master.zipngx_cache_purge 模块[root@192.168.118.15 /usr/local/src/Nginx]#tar xf ngx_cache_purge-2.3.tar.gz
创建nginx运行用户:[root@192.168.118.15 /usr/local/src/Nginx/nginx-1.14.2]#groupadd -g 80 www[root@192.168.118.15 /usr/local/src/Nginx/nginx-1.14.2]#useradd -u 80 -g 80 -M -s sbin/nologin www安装依赖包:[root@192.168.118.15 /usr/local/src/Nginx/nginx-1.14.2]#yum install openssl-devel pcre-devel -y[root@192.168.118.15 /usr/local/src/Nginx/nginx-1.14.2]#./configure --prefix=/usr/local/nginx --user=www --group=www --with-http_ssl_module --with-http_realip_module --with-http_gzip_static_module --with-http_stub_status_module --with-google_perftools_module --with-pcre --add-module=../nginx-upstream-fair-master/ --add-module=../ngx_cache_purge-2.3/--user=www nginx用户--group=www nginx组--with-http_ssl_module 支持https--with-http_realip_module 向后端转发客户端真实地址--with-http_gzip_static_module 支持静态gzip,节约带宽资源--with-http_stub_status_module 可配置ngx_status 查看当前连接数量和状态--with-pcre 支持正则表达式--with-google_perftools_module 第三方tcmalloc模块,减少内存开销--with-pcre --add-module=../nginx-upstream-fair-master/ 第三方模块fair,后端分配算法--add-module=../ngx_cache_purge-2.3/ 第三方模块,通过url清除缓存[root@192.168.118.15 /usr/local/src/Nginx/nginx-1.14.2]#make -j 4 && make install[root@192.168.118.15 ~]#echo "export PATH=$PATH:/usr/local/nginx/sbin" > /etc/profile.d/nginx.sh[root@192.168.118.15 ~]#source /etc/profile.d/nginx.sh检查 nginx 配置是否存在异常[root@192.168.118.15 ~]#nginx -tnginx: error while loading shared libraries: libprofiler.so.0: cannot open shared object file: No such file or directory[root@192.168.118.15 ~]#find / -name "libprofiler.so.0"搜索模块并添加到 /lib64下[root@192.168.118.15 ~]#find / -name "libprofiler.so.0"/usr/local/lib/libprofiler.so.0/usr/local/src/Nginx/gperftools-master/.libs/libprofiler.so.0[root@192.168.118.15 ~]#ln -vs /usr/local/lib/libprofiler.so.0 /lib64/‘/lib64/libprofiler.so.0’ -> ‘/usr/local/lib/libprofiler.so.0’[root@192.168.118.15 ~]#nginx -tnginx: error while loading shared libraries: libunwind.so.8: cannot open shared object file: No such file or directory[root@192.168.118.15 ~]#find / -name "libunwind.so.8"/usr/local/lib/libunwind.so.8/usr/local/src/Nginx/libunwind-1.3.1/src/.libs/libunwind.so.8[root@192.168.118.15 ~]#ln -vs /usr/local/lib/libunwind.so.8 /lib64/‘/lib64/libunwind.so.8’ -> ‘/usr/local/lib/libunwind.so.8’[root@192.168.118.15 ~]#nginx -tnginx: the configuration file /usr/local/nginx/conf/nginx.conf syntax is oknginx: configuration file /usr/local/nginx/conf/nginx.conf test is successful
nginx安装成功。
5. 配置 nginx 高亮工具
配置高亮工具是为了在编写nginx.conf 的时候不会写错参数名
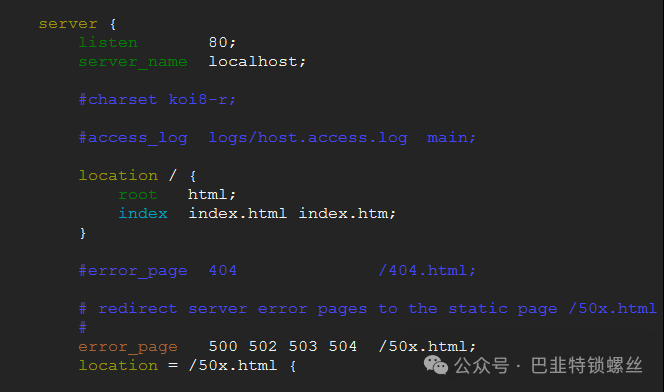
[root@192.168.118.15 ~]#mkdir -pv /root/.vim/syntaxmkdir: created directory ‘/root/.vim’mkdir: created directory ‘/root/.vim/syntax’[root@192.168.118.15 ~]#cp -a /usr/local/src/nginx.vim /root/.vim/syntax/[root@192.168.118.15 ~]#echo "au BufRead,BufNewFile /usr/local/nginx/conf/* set ft=nginx" >> /usr/share/vim/vim74/filetype.vim然后打开配置文件查看:[root@192.168.118.15 ~]#vim /usr/local/nginx/conf/nginx.conf
6. 检查三方模块是否成功
tcmalloc 模块
[root@192.168.118.15 ~]#yum install lsof -y编写 nginx.conf 添加 tcmalloc 配置[root@192.168.118.15 ~]#vim /usr/local/nginx/conf/nginx.conf
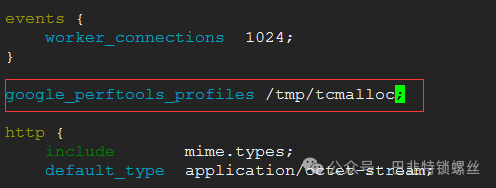
[root@192.168.118.15 ~]#nginx
检查 tcmalloc 模块

tcmalloc 配置启动成功。
fair 模块
[root@192.168.118.15 ~]#vim /usr/local/nginx/conf/nginx.conf
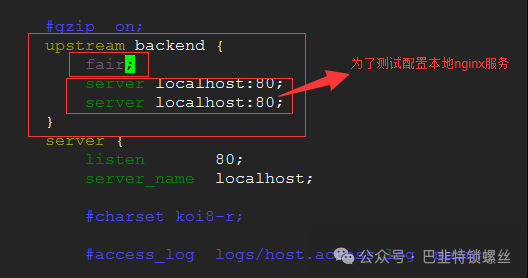
检查 nginx 语法是否正确
[root@192.168.118.15 ~]#nginx -t nginx: the configuration file /usr/local/nginx/conf/nginx.conf syntax is ok nginx: configuration file /usr/local/nginx/conf/nginx.conf test is successful
这样就已经说明 fair配置成功并启动使用。
ngx_cache_purge 模块
安装 httpd 并配置为 8080 端口启动
httpd 配置这里省略
[root@192.168.118.15 ~]#netstat -ntplu | egrep httpdtcp6 0 0 :::8080 :::* LISTEN 1721/httpd
启动成功。
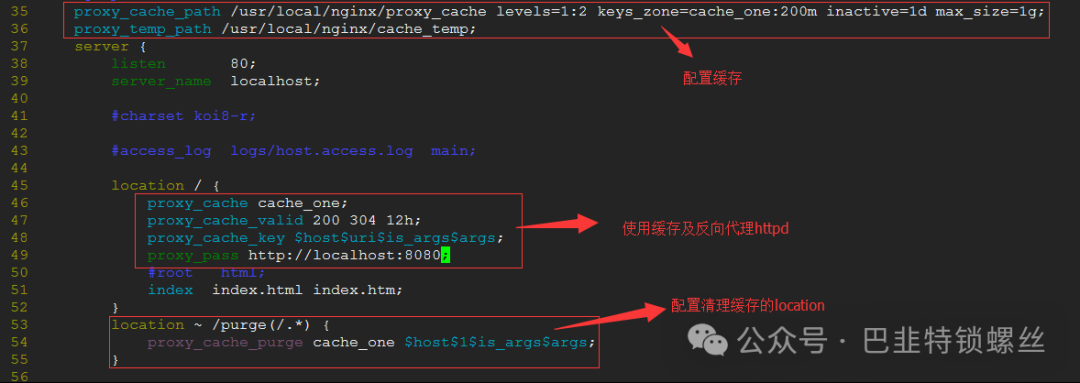
[root@192.168.118.15 /usr/local/nginx]#nginx -tnginx: the configuration file /usr/local/nginx/conf/nginx.conf syntax is oknginx: configuration file /usr/local/nginx/conf/nginx.conf test is successful[root@192.168.118.15 /usr/local/nginx]#nginx -s reload
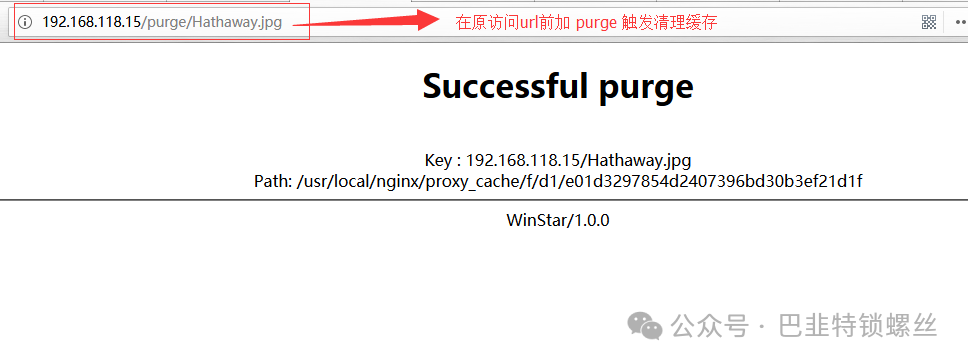
浏览器访问:

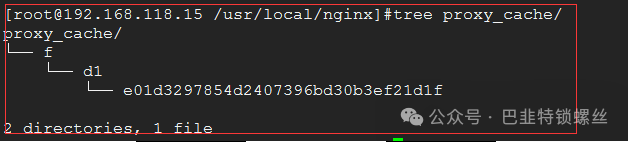
已经生成缓存文件
使用 ngx_cache_purge 模块 清除缓存
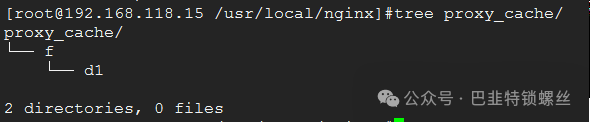
文件已被删除,ngx_cache_purge 模块使用成功。
常见问题:
1. Nginx 在 windows 下的性能如何?
答: 在同等硬件配置下,Nginx 在 windows 下的性能远低于 Linux 系统下的性能。
2. Nginx 与 Apache 比较有那些优点?
答:Apache 重在功能,而 Nginx 重在性能。Apache 有几百个模块,模块即功能,但一个 Apache 服务器最多只有 2000 + 的并发量;Nginx 提供的模块也就几十个,但它却提供了 20 000 的并发量。Apache提供的功能多,而Nginx提供的功能少。
有这样一句话:Apache 就像 Microsoft Word 它有一百万个选项,但你只需要 6 个。Nginx 只做了这 6 件事,但是它做的这六件事中有五件事是Apache做的 50 倍
3. 安装完成 Nginx 后,如何查看 Nginx 的版本

可以看到,我们这里已经将 Nginx 版本做修改了。
4. 安装完成 Nginx 后,如何查看 configure 时的配置

建议:在添加第三方模块的时候建议使用绝对路径,这样对后期查找更加方便

版权声明:本文内容来自博客园:hukey,遵循CC 4.0 BY-SA版权协议上原文接及本声明。本作品采用知识共享署名-非商业性使用-禁止演绎 2.5 中国大陆许可协议进行可。原文链接:https://www.cnblogs.com/hukey/p/10443898.html如有涉及到侵权,请联系,将立即予以删除处理。在此特别鸣谢原作者的创作。此篇文章的所有版权归原作者所有,与本公众号无关,商业转载建议请联系原作者,非商业转载请注明出处。
