


总结
目前Make的方式我已经会了,可是如何在vscode工具里面引用第三方扩展包还不是很熟悉,这是下一步重要工作,复制源文件方式
Make的方式
很多关键系统我们自己是没有操作系统的权限无法把自己的库文件复制到系统库中,只能自己加载自己的库同时我们又使用基础的系统库文件,很多场景下,都会引用三方的库,同时也可能自己编写相关的库,提供能力。三方库相关编译指令
编译
[root@vbox json]# git clone https://github.com/DaveGamble/cJSON.git
[root@vbox json]# pwd
/root/demoproject/json
[root@vbox json]# cd cJSON/
[root@vbox cJSON]# pwd
/root/demoproject/json/cJSON
[root@vbox cJSON]# ls
appveyor.yml  cJSON.c  cJSON_Utils.c  CMakeLists.txt   fuzzing         LICENSE   README.md    test.c  valgrind.supp
CHANGELOG.md  cJSON.h  cJSON_Utils.h  CONTRIBUTORS.md  library_config  Makefile  SECURITY.md  tests
[root@vbox cJSON]# make
gcc -std=c89 -c -fPIC -pedantic -Wall -Werror -Wstrict-prototypes -Wwrite-strings -Wshadow -Winit-self -Wcast-align -Wformat=2 -Wmissing-prototypes -Wstrict-overflow=2 -Wcast-qual -Wc++-compat -Wundef -Wswitch-default -Wconversion -fstack-protector cJSON.c
gcc -std=c89 -shared -o libcjson.so.1.7.18 cJSON.o -Wl,-soname=libcjson.so.1
ln -s libcjson.so.1.7.18 libcjson.so.1
ln -s libcjson.so.1 libcjson.so
gcc -std=c89 -c -fPIC -pedantic -Wall -Werror -Wstrict-prototypes -Wwrite-strings -Wshadow -Winit-self -Wcast-align -Wformat=2 -Wmissing-prototypes -Wstrict-overflow=2 -Wcast-qual -Wc++-compat -Wundef -Wswitch-default -Wconversion -fstack-protector cJSON_Utils.c
gcc -std=c89 -shared -o libcjson_utils.so.1.7.18 cJSON_Utils.o cJSON.o -Wl,-soname=libcjson_utils.so.1
ln -s libcjson_utils.so.1.7.18 libcjson_utils.so.1
ln -s libcjson_utils.so.1 libcjson_utils.so
ar rcs libcjson.a cJSON.o
ar rcs libcjson_utils.a cJSON_Utils.o
gcc -std=c89 -fPIC -pedantic -Wall -Werror -Wstrict-prototypes -Wwrite-strings -Wshadow -Winit-self -Wcast-align -Wformat=2 -Wmissing-prototypes -Wstrict-overflow=2 -Wcast-qual -Wc++-compat -Wundef -Wswitch-default -Wconversion -fstack-protector cJSON.c test.c  -o cJSON_test -lm -I.
[root@vbox cJSON]# pwd
安装
其实是可以看到这一步把头文件与库文件复制到系统目录方便使用
[root@vbox cJSON]# make install
mkdir -p usr/local/lib usr/local/include/cjson
cp -a cJSON.h usr/local/include/cjson
cp -a libcjson.so libcjson.so.1 libcjson.so.1.7.18 usr/local/lib
cp -a cJSON_Utils.h usr/local/include/cjson
cp -a libcjson_utils.so libcjson_utils.so.1 libcjson_utils.so.1.7.18 usr/local/lib
测试代码
#include <stdio.h>
#include <stdlib.h>
#include <string.h>
#include <cjson/cJSON.h>
intmain()
{
    cJSON *json = NULL;
    cJSON *array = NULL;
    cJSON *obj = NULL;
    json = cJSON_CreateObject();
    cJSON_AddStringToObject(json, "school", "Sichuan University");
    array = cJSON_CreateArray();
    cJSON_AddItemToObject(json, "artificial intelligence", array);
    obj = cJSON_CreateObject();
    cJSON_AddItemToArray(array, obj);
    cJSON_AddItemToObject(obj, "class", cJSON_CreateString("1"));
    cJSON_AddStringToObject(obj, "name", "xiaomin");
    cJSON_AddStringToObject(obj, "age", "20");
    obj = cJSON_CreateObject();
    cJSON_AddItemToArray(array, obj);
    cJSON_AddItemToObject(obj, "class", cJSON_CreateString("1"));
    cJSON_AddStringToObject(obj, "name", "xiaohua");
    cJSON_AddStringToObject(obj, "age", "21");
    obj = cJSON_CreateObject();
    cJSON_AddItemToArray(array, obj);
    cJSON_AddItemToObject(obj, "class", cJSON_CreateString("2"));
    cJSON_AddItemToObject(obj, "name", cJSON_CreateString("xiaoli"));
    cJSON_AddItemToObject(obj, "age", cJSON_CreateNumber(22));
    obj = cJSON_CreateObject();
    cJSON_AddItemToArray(array, obj);
    cJSON_AddStringToObject(obj, "class", "1");
    cJSON_AddItemToObject(obj, "name", cJSON_CreateString("xiaowang"));
    cJSON_AddItemToObject(obj, "age", cJSON_CreateString("19"));
    FILE *fp = fopen("class.json", "w");
    char *buf = cJSON_Print(json);
    fwrite(buf, strlen(buf), 1, fp);
    fclose(fp);
    cJSON_Delete(json);
    return0;
}
查看
[root@vbox json]# gcc json.c -lcjson -lm
[root@vbox json]# ./a.out
[root@vbox json]# cat  class.json
{
        "school":       "Sichuan University",
        "artificial intelligence":      [{
                        "class":        "1",
                        "name": "xiaomin",
                        "age":  "20"
                }, {
                        "class":        "1",
                        "name": "xiaohua",
                        "age":  "21"
                }, {
                        "class":        "2",
                        "name": "xiaoli",
                        "age":  22
                }, {
                        "class":        "1",
                        "name": "xiaowang",
                        "age":  "19"
                }]
}[root@vbox json]#
复制源文件方式vscode
makefile
CC = gcc
CFLAGS = -Wall -g
CPPFLAGS = -I include -DDEBUG -D_DEBUG
LDFLAGS = -L lib -L usr/local/opengauss/lib
LIBS = -lpq

all: myprogram

myprogram: testlibpq.o
    $(CC) $(LDFLAGS) -o $@ $^ $(LIBS)

testlibpq.o: testlibpq.c
    $(CC) $(CFLAGS) $(CPPFLAGS) -c $< -o $@
[root@vbox demoproject]# export LD_LIBRARY_PATH=/usr/local/opengauss/lib:$LD_LIBRARY_PATH
[root@vbox demoproject]# ./myprogram 'postgresql://test:test_1234@127.0.0.1:7654/postgres?connect_timeout=5&application_name=test&sslmode=allow'
datname        datdba         encoding       datcollate     datctype       datistemplate  datallowconn   datconnlimit   datlastsysoid  datfrozenxid   dattablespace  datcompatibilitydatacl         datfrozenxid64 datminmxid

template1      10             7              en_US.UTF-8    en_US.UTF-8    t              t              -1             14893          0              1663           A              {=c/opengauss,opengauss=CTc/opengauss}11565          2
hu             10             7              en_US.UTF-8    en_US.UTF-8    f              t              -1             14893          11210          1663           A                             11210          2
template0      10             7              en_US.UTF-8    en_US.UTF-8    t              f              -1             14893          0              1663           A              {=c/opengauss,opengauss=CTc/opengauss}11210          2
postgres       10             7              en_US.UTF-8    en_US.UTF-8    f              t              -1             14893          0              1663           A                             11920          2
[root@vbox demoproject]#
运行C程序

创建tasks.json
文件
从主菜单中,选择终端>配置默认构建任务。在下拉列表中,将显示一个任务下拉列表

这将在.vscode
文件夹中创建一个tasks.json
文件并在编辑器中打开它。
{
    "version": "2.0.0",
    "tasks": [
        {
            "type": "cppbuild",
            "label": "C/C++: gcc build active file",
            "command": "/usr/bin/gcc",
            "args": [
                "-fdiagnostics-color=always",
                "-g",
                "${file}",
                "I",
                "/root/demoproject/include",
                "-o",
                "${fileDirname}/${fileBasenameNoExtension}"
            ],
            "options": {
                "cwd": "${fileDirname}"
            },
            "problemMatcher": [
                "$gcc"
            ],
            "group": {
                "kind": "build",
                "isDefault": true
            },
            "detail": "compiler: usr/bin/gcc"
        }
    ]
}
1、要运行中定义的构建任务tasks.json
,请按Ctrl+Shift+B
或从终端主菜单中选择运行生成任务。
*  Executing task: C/C++: gcc build active file
Starting build...
/usr/bin/gcc -fdiagnostics-color=always -g root/demoproject/helloworld.c -o root/demoproject/helloworld
Build finished successfully.
 *  Terminal will be reused by tasks, press any key to close it.
3、使用+
按钮创建一个新终端,您将拥有一个以C++
文件夹作为工作目录的新终端。运行ls
,您现在应该会看到可执行文件helloworld
。
root@vbox demoproject]# ls
dd  helloworld  helloworld.c  include  lib  makefile  openGauss-Libpq-6.0.1-openEuler22.03-x86_64.tar.gz  testlibpq.c  testlibpq.o  tsar
[root@vbox demoproject]# ll
total 5472
-rwxr-xr-x.  1 root root   17016 Mar 21 21:05 dd
-rwxr-xr-x.  1 root root   17256 Mar 25 11:20 helloworld
-rw-r--r--.  1 root root      74 Mar 25 11:17 helloworld.c
drwxr-x---.  3 root root    4096 Mar 25 10:55 include
drwxr-x---.  2 root root    4096 Jan 17 18:23 lib
-rw-r--r--.  1 root root     265 Mar 21 10:30 makefile
-rwxr-x---.  1 root root 5521498 Mar 21 08:37 openGauss-Libpq-6.0.1-openEuler22.03-x86_64.tar.gz
-rw-r--r--.  1 root root    2668 Mar 21 13:36 testlibpq.c
-rw-r--r--.  1 root root   12080 Mar 21 13:36 testlibpq.o
drwxr-xr-x. 13 root root    4096 Mar 22 08:37 tsar
[root@vbox demoproject]# ./helloworld
hello world!
调试配置
调试配置创建launch.json
文件
1、从主菜单中,选择Run(运行) > Add Configuration…(添加配置)然后选择C++ (GDB/LLDB)
。
2、左侧选择运行和调试 > 显示所有自动调试配置 > 添加配置 > C/C++:(gdb)起动。
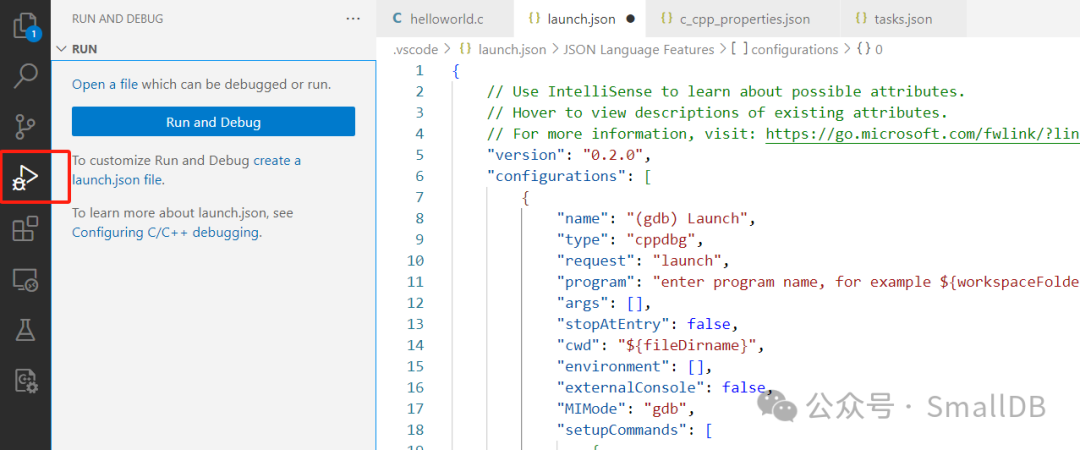
修改launch.json
文件
{
     Use IntelliSense to learn about possible attributes.
     Hover to view descriptions of existing attributes.
     For more information, visit: https://go.microsoft.com/fwlink/?linkid=830387
    "version": "0.2.0",
    "configurations": [
        {
            "name": "(gdb) Launch",
            "type": "cppdbg",
            "request": "launch",
            "program": "enter program name, for example ${workspaceFolder}/a.out",
            "args": [],
            "stopAtEntry": false,
            "cwd": "${fileDirname}",
            "environment": [],
            "externalConsole": false,
            "MIMode": "gdb",
            "setupCommands": [
                {
                    "description": "Enable pretty-printing for gdb",
                    "text": "-enable-pretty-printing",
                    "ignoreFailures": true
                },
                {
                    "description": "Set Disassembly Flavor to Intel",
                    "text": "-gdb-set disassembly-flavor intel",
                    "ignoreFailures": true
                }
            ]
        }

    ]
}
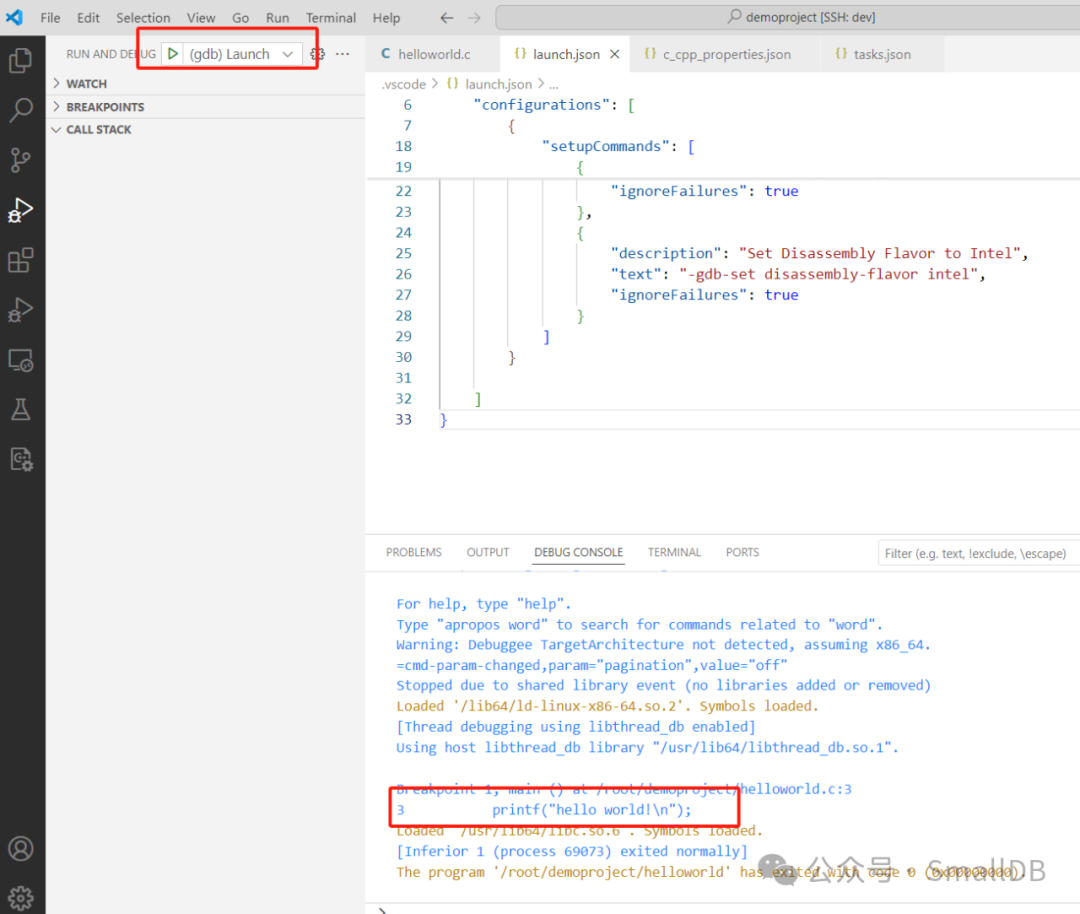
修改为
${workspaceFolder}/helloworld
完整内容
{
     Use IntelliSense to learn about possible attributes.
     Hover to view descriptions of existing attributes.
     For more information, visit: https://go.microsoft.com/fwlink/?linkid=830387
    "version": "0.2.0",
    "configurations": [
        {
            "name": "(gdb) Launch",
            "type": "cppdbg",
            "request": "launch",
            "program": "${workspaceFolder}/helloworld",
            "args": [],
            "stopAtEntry": false,
            "cwd": "${fileDirname}",
            "environment": [],
            "externalConsole": false,
            "MIMode": "gdb",
            "setupCommands": [
                {
                    "description": "Enable pretty-printing for gdb",
                    "text": "-enable-pretty-printing",
                    "ignoreFailures": true
                },
                {
                    "description": "Set Disassembly Flavor to Intel",
                    "text": "-gdb-set disassembly-flavor intel",
                    "ignoreFailures": true
                }
            ]
        }

    ]
}
截图如下
第三方库使用
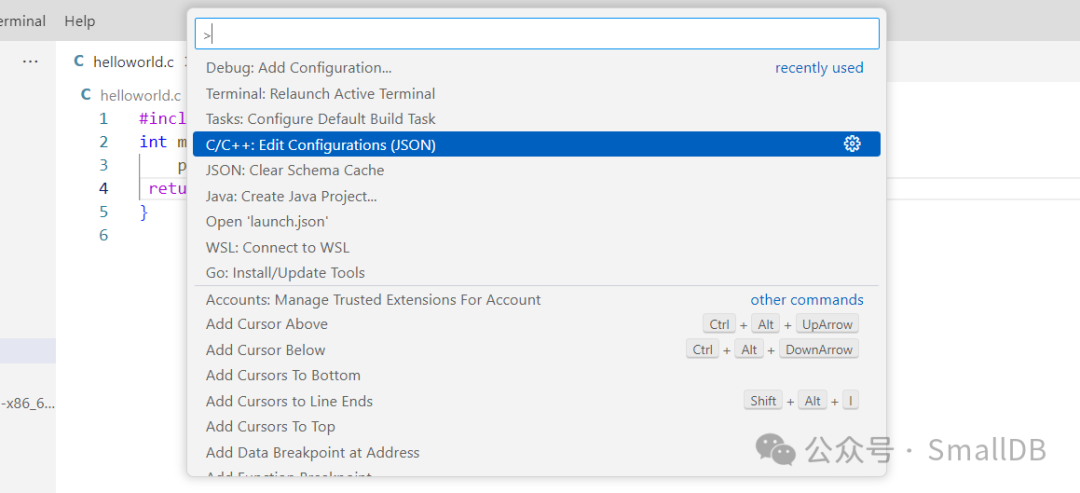
1、通过从命令面板 ( Ctrl+Shift+P
)运行命令:C/C++: Edit Configurations (UI)查看 C/C++ 配置 UI 。
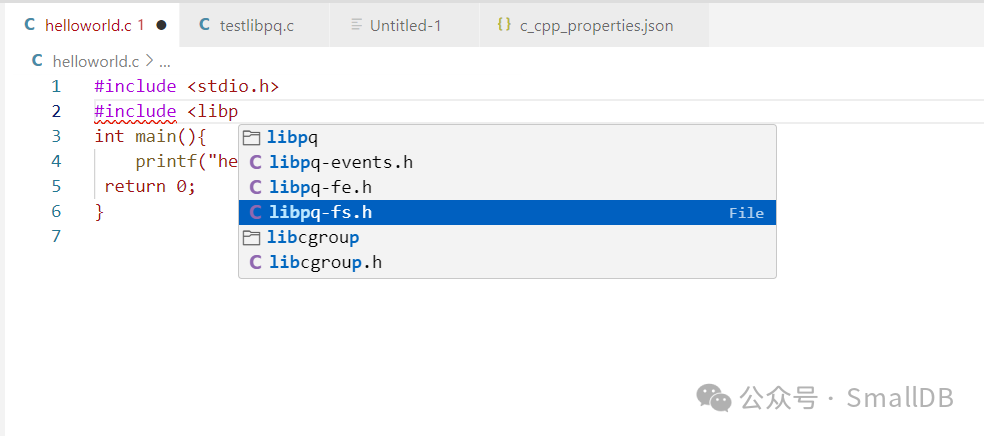
加载头文件
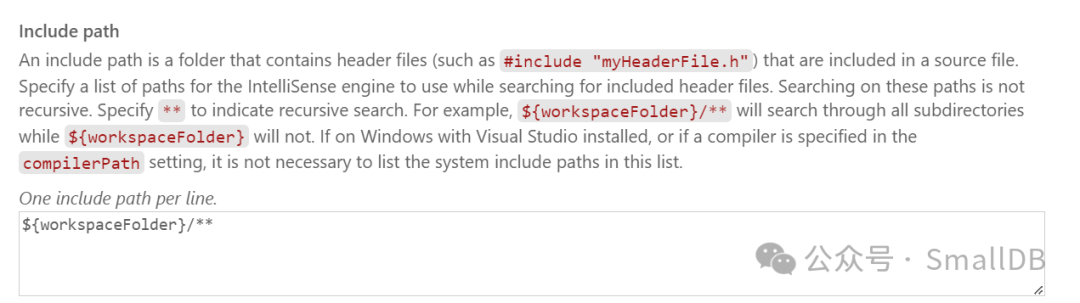
自动弹出包文件,说明加载成功了
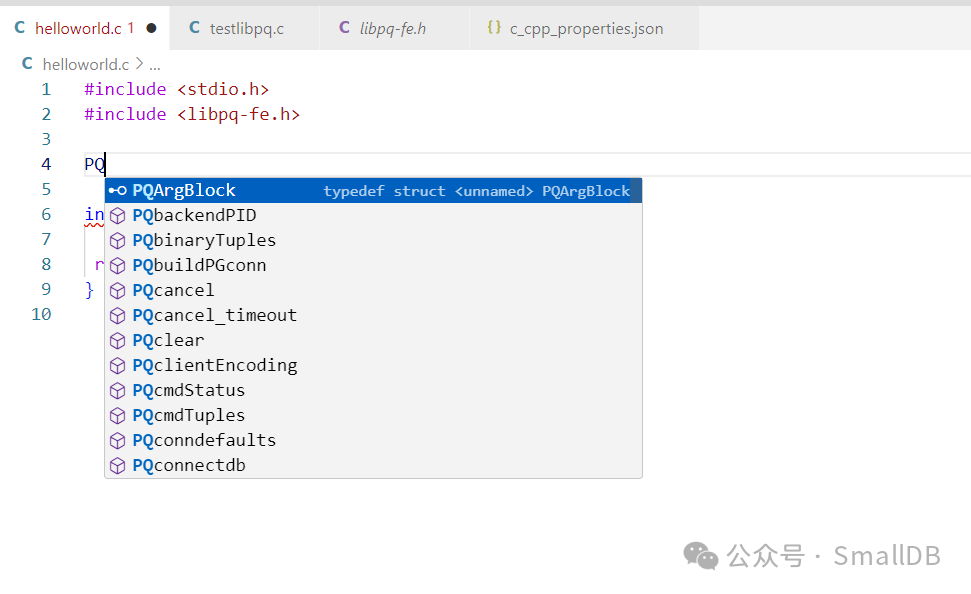
使用里面的方法
出错,是因为需要系统的库地,这里需要设置一下
Starting build...
/usr/bin/gcc -fdiagnostics-color=always -g root/demoproject/testlibpq.c -L'/root/demoproject/lib' -I'/root/demoproject/include' -o root/demoproject/testlibpq -lpq
/usr/bin/ld: warning: libgssapi_krb5_gauss.so.2, needed by root/demoproject/lib/libpq.so, not found (try using -rpath or -rpath-link)
/usr/bin/ld: warning: libgssrpc_gauss.so.4, needed by root/demoproject/lib/libpq.so, not found (try using -rpath or -rpath-link)
/usr/bin/ld: warning: libkrb5_gauss.so.3, needed by root/demoproject/lib/libpq.so, not found (try using -rpath or -rpath-link)
/usr/bin/ld: warning: libkrb5support_gauss.so.0, needed by root/demoproject/lib/libpq.so, not found (try using -rpath or -rpath-link)
/usr/bin/ld: warning: libk5crypto_gauss.so.3, needed by root/demoproject/lib/libpq.so, not found (try using -rpath or -rpath-link)
/usr/bin/ld: warning: libcom_err_gauss.so.3, needed by root/demoproject/lib/libpq.so, not found (try using -rpath or -rpath-link)
/usr/bin/ld: root/demoproject/lib/libpq.so: undefined reference to `gss_display_status@gssapi_krb5_gauss_2_MIT'
/usr/bin/ld: root/demoproject/lib/libpq.so: undefined reference to `GSS_KRB5_NT_PRINCIPAL_NAME@gssapi_krb5_gauss_2_MIT'
/usr/bin/ld: root/demoproject/lib/libpq.so: undefined reference to `krb5_set_profile_path@krb5_gauss_3_MIT'
/usr/bin/ld: root/demoproject/lib/libpq.so: undefined reference to `krb5_clean_cache_profile_path@krb5_gauss_3_MIT'
/usr/bin/ld: root/demoproject/lib/libpq.so: undefined reference to `gss_delete_sec_context@gssapi_krb5_gauss_2_MIT'
/usr/bin/ld: root/demoproject/lib/libpq.so: undefined reference to `gss_release_name@gssapi_krb5_gauss_2_MIT'
/usr/bin/ld: root/demoproject/lib/libpq.so: undefined reference to `gss_import_name@gssapi_krb5_gauss_2_MIT'
/usr/bin/ld: root/demoproject/lib/libpq.so: undefined reference to `gss_release_buffer@gssapi_krb5_gauss_2_MIT'
/usr/bin/ld: /root/demoproject/lib/libpq.so: undefined reference to `gss_init_sec_context@gssapi_krb5_gauss_2_MIT'
collect2: error: ld returned 1 exit status

Build finished with error(s).

 *  The terminal process failed to launch (exit code: -1).
 *  Terminal will be reused by tasks, press any key to close it.
修改tasks.json
{
    "version": "2.0.0",
    "tasks": [
        {
            "type": "cppbuild",
            "label": "C/C++: gcc build active file",
            "command": "/usr/bin/gcc",
            "args": [
                "-fdiagnostics-color=always",
                "-g",
                "${file}",
                "-L'/root/demoproject/lib'", /*注意,此行指定库的lib目录,默认没有*/
                "-I'/root/demoproject/include'", /*此处指定库的include目录,默认没有*/
                "-o",
                "${fileDirname}/${fileBasenameNoExtension}",
                "-lpq"
            ],
            "options": {
                "cwd": "${fileDirname}"
            },
            "problemMatcher": [
                "$gcc"
            ],
            "group": {
                "kind": "build",
                "isDefault": true
            },
            "detail": "compiler: /usr/bin/gcc"
        }
    ]
}
参考
openGauss下使用Libpq驱动开发-想说爱你不容易啊
ubuntu_vscode_opencv 调试C++ - 知乎
文章转载自SmallDB,如果涉嫌侵权,请发送邮件至:contact@modb.pro进行举报,并提供相关证据,一经查实,墨天轮将立刻删除相关内容。
