


居家出差旅行,玩的正嗨。怕啥来啥,公司各种召唤呀,
然尔问题到你这,手到擒来,也就是分分钟搞定的事。
去趟公司不值呀。怎么办?
查点资料,看点信息,需要上网翻墙怎么办?
想手机连接公司公司网络?
公司没钱,拉不了专线,又想做异地机房互联,怎么办?
如何解决需求,openvpn是IT人士装B耍吊之利器,你值的拥有!
1 需求说明
1.1 网络拓扑
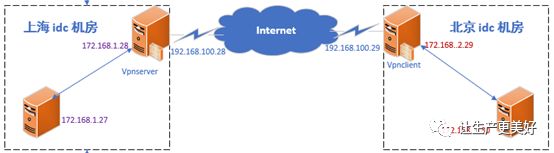
1.2 环境说明
设备名称 | IP信息 | 所属机房 |
shvpnserver | eth0: 192.168.100.28 桥接 外网 eth1: 172.168.1.28 host-only 1 内网 GW:192.168.100.1 | 上海 |
shappserver | Eth0:172.168.1.27 GW:172.168.1.1 host-only 1 内网 | 上海 |
bjvpnclient | eth0: 192.168.100.29 桥接 外网 eth1: 172.168.2.29 host-only 2 内网 GW:192.168.100.1 | 北京 |
bjappserver | Eth0:172.168.2.30 GW:172.168.2.1 host-only 2 | 北京 |
1.3 实现目标
1、实现上海IDC机房和北京IDC机房内网机器互联
2、实验前把四台机器准备好,vpn服务器和客户端能上网,各网络机器之间能ping通
2 Openvpn 安装配置
2.1 查看linux系统环境
uname -r
uname -m
cat /etc/issue
[root@shvpnserver ~]# uname -r
2.6.32-504.el6.x86_64
[root@shvpnserver ~]# uname -m
x86_64
[root@shvpnserver ~]# cat/etc/issue
CentOS release 6.6 (Final)
Kernel \r on an \m
[root@shvpnserver ~]#
2.2 配置vpn服务器时间同步
/usr/sbin/ntpdate pool.ntp.org
echo '#time sync' >>/var/spool/cron/root
echo '*/5 * * * * /usr/sbin/ntpdate pool.ntp.org >/dev/null 2>&1'>>/var/spool/cron/root
crontab -l
2.3 关闭防火墙打开转发
service iptables stop
service ip6tables stop
chkconfig iptables off
chkconfig ip6tables off
sed -i's/SELINUX=enforcing/SELINUX=disabled/g' /etc/selinux/config
setenforce 0
getenforce
sed -i '/net.ipv4.ip_forward/ s/\(.*= \).*/\11/' /etc/sysctl.conf
sysctl -p
2.4 安装lzo压缩模块及openssl
mkdir -p/home/brain/tool
cd /home/brain/tool
wgethttp://www.oberhumer.com/opensource/lzo/download/lzo-2.06.tar.gz
tar zxvflzo-2.06.tar.gz
cd lzo-2.06
./configure
make
make install
yum install -y openssl*
rpm -qa openssl*
2.5 安装openvpn
cd /home/brain/tool
rz -y openvpn-2.2.2.tar.gz
tar zxfopenvpn-2.2.2.tar.gz
cdopenvpn-2.2.2/
./configure--with-lzo-headers=/usr/local/include --with-lzo-lib=/usr/local/lib
make
make install
which openvpn
2.6 配置openvpn server -建立CA 证书(vpnserver执行)
cd easy-rsa/2.0/
cp vars vars.bak
cat >>vars<<EOF
export KEY_COUNTRY="CN"
export KEY_PROVINCE="BJ"
export KEY_CITY="Beijing"
export KEY_ORG="brain"
export KEY_EMAIL="brain_zhang@hotmail.com"
export KEY_EMAIL=brain_zhang@hotmail.com
export KEY_CN=CN
export KEY_NAME=brain
export KEY_OU=brain
export PKCS11_MODULE_PATH=changeme
export PKCS11_PIN=1234
EOF
tail -12 vars
source vars
./clean-all
./build-ca
2.7 生成服务端的密钥文件
./build-key-server server
2.8 生成客户端证书和key文件
./build-key test
2.9 建一个带拨号密码的CA
./build-key-pass ett
2.10 生成传输进行密钥交换时用到时的交换密钥协议文件
不能落下不执行,否则出错
./build-dh
2.11 为防止恶意攻击的文件
openvpn --genkey --secret keys/ta.key
2.12 详解服务器端vpn重要命令
vars 配置文件
clean-all 清除所有
build-ca 建ca证书
build-key-server 建服务器证书
build-key 建不带拨号密码的客端证书
build-key-pass 建带拨号密码的客端证书
build-dh 生成传输进行密钥交换时用到时的交换密钥协议文件
pkitool
2.13 详解服务器vpn server.conf 重要参数
mkdir -p /etc/openvpn
cd/home/brain/tool/openvpn-2.2.2/easy-rsa/2.0
cp -ap keys//etc/openvpn
cp /home/brain/tool/openvpn-2.2.2/sample-config-files/client.conf /etc/openvpn/
cp/home/brain/tool/openvpn-2.2.2/sample-config-files/server.conf /etc/openvpn/
cd /etc/openvpn
cp server.conf server.conf.bak
--grep -vE ";|#|^$"server.conf >tmp.log
--cat tmp.log >server.conf
rm -rf server.conf
cat >> /etc/openvpn/server.conf<<EOF
local 192.168.100.28
port 52115
proto tcp
dev tun
ca /etc/openvpn/keys/ca.crt
cert /etc/openvpn/keys/server.crt
dh /etc/openvpn/keys/dh1024.pem
key /etc/openvpn/keys/server.key
server 10.8.0.0 255.255.255.0
push "route 172.168.1.0255.255.255.0"
ifconfig-pool-persist ipp.txt
keepalive 10 120
comp-lzo
persist-key
persist-tun
status openvpn-status.log
verb 3
client-to-client
duplicate-cn
log /var/log/openvpn.log
EOF
2.14 启动服务端的vpn服务并检查
/usr/local/sbin/openvpn--config /etc/openvpn/server.conf &
netstat -tlnup |grep vpn
echo '/usr/local/sbin/openvpn--config /etc/openvpn/server.conf &' >>/etc/rc.local
tail -2 /etc/rc.local
tail -100 /var/log/openvpn.log
2.15 linux客户端的安装
2.15.1 软件安装方法和服务器一样
2.15.2 配置客户端
mkdir -p /etc/openvpn
cd /etc/openvpn
scp 192.168.100.28:/etc/openvpn/keys/{ca.*,test.*} .
cat >> /etc/openvpn/client.conf<<EOF
client
dev tun
proto tcp
remote 192.168.100.28 52115
resolv-retry infinite
nobind
persist-key
persist-tun
ca /etc/openvpn/ca.crt
cert /etc/openvpn/test.crt
key /etc/openvpn/test.key
ns-cert-type server
comp-lzo
verb 3
EOF
egrep -v"^#|^;|^$" client.conf
[root@shvpnserver openvpn]#egrep -v "^#|^;|^$" client.conf
client
dev tun
proto tcp
remote 192.168.100.28 52115
resolv-retry infinite
nobind
persist-key
persist-tun
ca /etc/openvpn/ca.crt
cert /etc/openvpn/tab.crt
key /etc/openvpn/tab.key
remote-cert-tls server
comp-lzo
verb 3
script-security 2
[root@shvpnserver openvpn]#
2.16 启动客户端的vpn服务并检查
/usr/local/sbin/openvpn--config /etc/openvpn/client.conf &
echo '/usr/local/sbin/openvpn--config /etc/openvpn/client.conf &' >>/etc/rc.local
tail -2 /etc/rc.local
到此为止,可以用客户端ping通vpn服务器IP
2.17 Vpn客户端ping通vpn内网机器, 加默认路由
缺点:所有应用服务器都要加路由,要将路由加静态路由不然重启后路由消失不通了。
注意加隧道ip网段
route add -net 10.8.0.0/24 gw 172.168.1.28
现在Ping通内网ip
2.18 Vpn客户端ping通vpn内网机器, 方法用vpn服务器转发
此方法优点,使用方便。
删除指定路由 shappserver
route del -net 10.8.0.0/24 gw 172.168.1.28
在防火墙上加NAT,vpn服务器设置
service iptables start
chkconfig iptables on
iptables -A INPUT -p tcp --dport 52115 -jACCEPT
iptables -t nat -A POSTROUTING -s10.8.0.0/24 -o eth2 -j SNAT --to-source 172.168.1.28
网卡为网络网卡
or 也可以使用伪装
iptables -t nat -A POSTROUTING -s10.8.0.0/24 -o eth2 -j MASQUERADE
注意将/etc/sysconfig/iptable中的不允许转发删除or注掉
#-A FORWARD -j REJECT --reject-withicmp-host-prohibited
sed -i 's/-A FORWARD -j REJECT--reject-with icmp-host-prohibited/#-A FORWARD -j REJECT --reject-withicmp-host-prohibited/g' /etc/sysconfig/iptables
保存重启
service iptables save
查看
iptables -t nat -L -n
iptables -L -n
service iptables start
chkconfig iptables on
iptables -A INPUT -p tcp--dport 52115 -j ACCEPT
iptables -t nat -A POSTROUTING-s 10.8.0.0/24 -o eth2 -j SNAT --to-source 172.168.1.28
service iptables save
sed -i 's/-A FORWARD -j REJECT --reject-withicmp-host-prohibited/#-A FORWARD -j REJECT --reject-withicmp-host-prohibited/g' /etc/sysconfig/iptables
service iptables restart
iptables -t nat -L -n
iptables -L -n
到此可以ping 通vpn服务器端内网机器了。
2.19 设置上海应用服务器和北京应用服务器互通
shvpnserver
mkdir -p /etc/openvpn/ccd
echo 'iroute 172.168.2.0255.255.255.0'>>/etc/openvpn/ccd/test
echo 'ifconfig-push 10.8.0.310.8.0.4'>>/etc/openvpn/ccd/test
echo 'client-config-dir /etc/openvpn/ccd'>>/etc/openvpn/server.conf
echo 'route 172.168.2.0255.255.255.0'>>/etc/openvpn/server.conf
sed -i 's/duplicate-cn/#duplicate-cn/g'/etc/openvpn/server.conf
pkill openvpn
/usr/local/sbin/openvpn--config /etc/openvpn/server.conf &
[root@shappserver ~]# ping 172.168.2.30
PING 172.168.2.30 (172.168.2.30) 56(84)bytes of data.
64 bytes from 172.168.2.30: icmp_seq=1ttl=62 time=40.9 ms
64 bytes from 172.168.2.30: icmp_seq=2ttl=62 time=1.47 ms
64 bytes from 172.168.2.30: icmp_seq=3ttl=62 time=1.47 ms
[root@brain ~]# ping 172.168.1.27
PING 172.168.1.27 (172.168.1.27) 56(84)bytes of data.
64 bytes from 172.168.1.27: icmp_seq=1ttl=62 time=1.56 ms
64 bytes from 172.168.1.27: icmp_seq=2ttl=62 time=1.62 ms
64 bytes from 172.168.1.27: icmp_seq=3ttl=62 time=1.34 ms
此时北京客户端应用服务器可以ping通上海应用服务器
