


1 部署架构
openGauss支持单机部署和HA部署两种部署方式。
HA部署主机和最少一台备机,备机一共最多4台的配置方式。
单机和HA均支持精简模式和兼容模式。精简模式下,您可以安装openGauss数据库并正常使用;兼容模式是在精简模式的基础上做了兼容增强,安装兼容包后会兼容主流数据库的接口名称。
2 单机安装概览
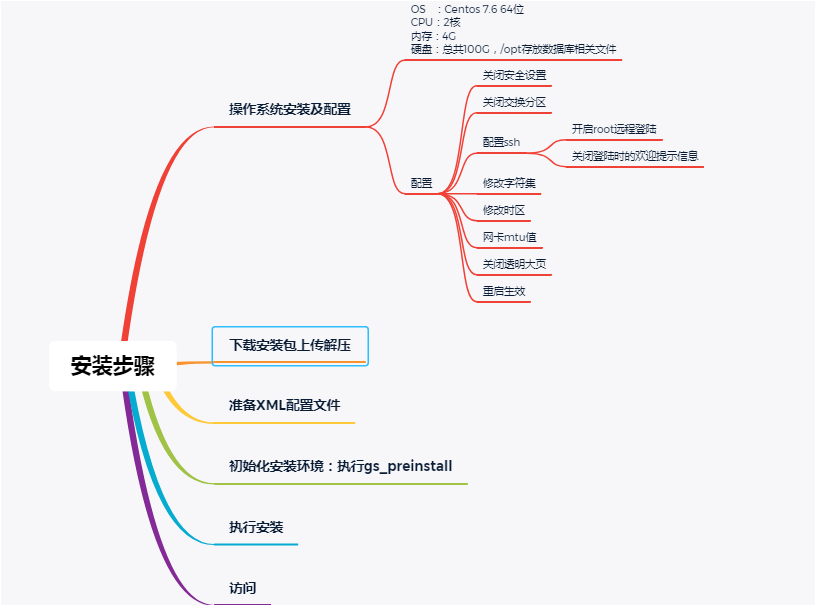
3 安装步骤
3.1 操作系统配置
本文中操作系统版本为Centos 7.6 64位
部署环境说明:
CPU :2核
内存:4G
硬盘:共100G,/opt存放数据库文件 40G
主机名:enmoedu1.enmotech.com
- 关闭安全设置:
[root@enmoedu1 ~]# systemctl disable firewalld.service [root@enmoedu1 ~]# systemctl stop firewalld.service [root@enmoedu1 ~]# cat /etc/selinux/config | grep disabled SELINUX=disabled复制
- 关闭交换分区
swapoff -a - 配置ssh
[root@enmoedu1 etc]# cat /etc/ssh/sshd_config | grep PermitRootLogin PermitRootLogin yes复制
修改Banner配置,去掉连接到系统时,系统提示的欢迎信息。欢迎信息会干扰安装时远程操作的返回结果,影响安装正常执行。
[root@enmoedu1 etc]# cat /etc/ssh/sshd_config | grep Banner Banner none复制
- 修改字符集
[root@enmoedu1 ~]# cat /etc/profile | grep LANG export LANG=Unicode复制
- 修改时区
[root@enmoedu1 ~]# cp /usr/share/zoneinfo/Asia/Shanghai /etc/localtime复制
-
网卡mtu值
ifconfig 查看网卡的mtu值,不小于1500

如果不符合,可以进行修改:ifconfig 网卡名 mtu 值 -
关闭透明大页
开机自关闭
vim /etc/rc.d/rc.local if test -f /sys/kernel/mm/transparent_hugepage/enabled; then echo never > /sys/kernel/mm/transparent_hugepage/enabled fi if test -f /sys/kernel/mm/transparent_hugepage/defrag; then echo never > /sys/kernel/mm/transparent_hugepage/defrag fi复制
查看是否关闭:
cat /sys/kernel/mm/transparent_hugepage/enabled cat /sys/kernel/mm/transparent_hugepage/defrag复制

- 重启生效
reboot
3.2 上传及解压安装包
创建目录
mkdir -p /opt/software/openGauss
chmod 755 -R /opt/software
使用xftp将openGauss_1.0.0_PACKAGES_RELEASE.tar.gz上传到/opt/software/openGauss目录
解压:tar -zxvf openGauss_1.0.0_PACKAGES_RELEASE.tar.gz

解压:数据库安装包 openGauss-1.0.0-CentOS-64bit.tar.gz
[root@enmoedu1 openGauss]# tar -zxvf openGauss-1.0.0-CentOS-64bit.tar.gz
3.3 编写XML配置文件
[omm@enmoedu1 ~]# cd /opt/software/openGauss [omm@enmoedu1 openGauss]# vim clusterconfig.xml <?xml version="1.0" encoding="UTF-8"?> <ROOT> <!-- openGaussinstall --> <CLUSTER> <PARAM name="clusterName" value="dbCluster" /> <PARAM name="nodeNames" value="enmoedu1.enmotech.com" /> <PARAM name="backIp1s" value="192.168.6.171"/> <PARAM name="gaussdbAppPath" value="/opt/gaussdb/app" /> <PARAM name="gaussdbLogPath" value="/var/log/gaussdb" /> <PARAM name="gaussdbToolPath" value="/opt/gaussdb/wisequery" /> <PARAM name="corePath" value="/opt/opengauss/corefile"/> <PARAM name="clusterType" value="single-inst"/> </CLUSTER> <!-- server --> <DEVICELIST> <!-- node1 server --> <DEVICE sn="1000001"> <PARAM name="name" value="enmoedu1.enmotech.com"/> <PARAM name="azName" value="AZ1"/> <PARAM name="azPriority" value="1"/> <!-- backIP1?sshIP1IP --> <PARAM name="backIp1" value="192.168.6.171"/> <PARAM name="sshIp1" value="192.168.6.171"/> <!--dbnode--> <PARAM name="dataNum" value="1"/> <PARAM name="dataPortBase" value="26000"/> <PARAM name="dataNode1" value="/opt/gaussdb/data/db1"/> </DEVICE> </DEVICELIST> </ROOT>复制
3.4 初始化
3.4.1 检查主机名
[root@enmoedu1 openGauss]# cat /etc/hostname enmoedu1.enmotech.com [root@enmoedu1 openGauss]# hostname enmoedu1.enmotech.com复制
3.4.2 设置lib库
export LD_LIBRARY_PATH=/opt/software/openGauss/script/gspylib/clib:$LD_LIBRARY_PATH
3.4.3 采用交互式初始化
python3 gs_preinstall -U omm -G dbgrp -X /opt/software/openGauss/clusterconfig.xml
[root@enmoedu1 openGauss]# python3 /opt/software/openGauss/script/gs_preinstall -U omm -G dbgrp -X /opt/software/openGauss/clusterconfig.xml Parsing the configuration file. Successfully parsed the configuration file. Installing the tools on the local node. Successfully installed the tools on the local node. Are you sure you want to create trust for root (yes/no)? yes Please enter password for root. Password: Creating SSH trust for the root permission user. Checking network information. All nodes in the network are Normal. Successfully checked network information. Creating SSH trust. Creating the local key file. Successfully created the local key files. Appending local ID to authorized_keys. Successfully appended local ID to authorized_keys. Updating the known_hosts file. Successfully updated the known_hosts file. Appending authorized_key on the remote node. Successfully appended authorized_key on all remote node. Checking common authentication file content. Successfully checked common authentication content. Distributing SSH trust file to all node. Successfully distributed SSH trust file to all node. Verifying SSH trust on all hosts. Successfully verified SSH trust on all hosts. Successfully created SSH trust. Successfully created SSH trust for the root permission user. Setting pssh path Successfully set core path. Distributing package. Begin to distribute package to tool path. Successfully distribute package to tool path. Begin to distribute package to package path. Successfully distribute package to package path. Successfully distributed package. Are you sure you want to create the user[omm] and create trust for it (yes/no)? yes Preparing SSH service. Successfully prepared SSH service. Installing the tools in the cluster. Successfully installed the tools in the cluster. Checking hostname mapping. Successfully checked hostname mapping. Creating SSH trust for [omm] user. Please enter password for current user[omm]. Password: Checking network information. All nodes in the network are Normal. Successfully checked network information. Creating SSH trust. Creating the local key file. Successfully created the local key files. Appending local ID to authorized_keys. Successfully appended local ID to authorized_keys. Updating the known_hosts file. Successfully updated the known_hosts file. Appending authorized_key on the remote node. Successfully appended authorized_key on all remote node. Checking common authentication file content. Successfully checked common authentication content. Distributing SSH trust file to all node. Successfully distributed SSH trust file to all node. Verifying SSH trust on all hosts. Successfully verified SSH trust on all hosts. Successfully created SSH trust. Successfully created SSH trust for [omm] user. Checking OS version. Successfully checked OS version. Creating cluster's path. Successfully created cluster's path. Setting SCTP service. Successfully set SCTP service. Set and check OS parameter. Setting OS parameters. Successfully set OS parameters. Warning: Installation environment contains some warning messages. Please get more details by "/opt/software/openGauss/script/gs_checkos -i A -h enmoedu1.enmotech.com". Set and check OS parameter completed. Preparing CRON service. Successfully prepared CRON service. Setting user environmental variables. Successfully set user environmental variables. Setting the dynamic link library. Successfully set the dynamic link library. Setting Core file Successfully set core path. Setting pssh path Successfully set pssh path. Set ARM Optimization. Successfully set ARM Optimization. Preinstalling secbox. No need to install secbox. Setting finish flag. Successfully set finish flag. Preinstallation succeeded.复制
此步骤自动完成以下内容:
自动设置Linux内核参数以达到提高服务器负载能力的目的。这些参数直接影响数据库系统的运行状态,请仅在确认必要时调整。
自动将openGauss配置文件、安装包拷贝到openGauss主机的相同目录下。
openGauss安装用户、用户组不存在时,自动创建安装用户以及用户组,并进行互信。
读取openGauss配置文件中的目录信息并创建,将目录权限授予安装用户。
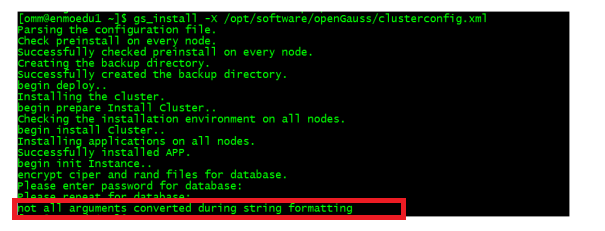
3.5 安装
上面的preinstall完成之后,此步很容易就可以成功,主要是注意输入密码时要符合密码复杂度要求即可。
su - omm
gs_install -X /opt/software/openGauss/clusterconfig.xml
设置的密码要符合复杂度要求:
最少包含8个字符;
不能和用户名和当前密码(ALTER)相同,或和当前密码反序;
至少包含大写字母(A-Z),小写字母(a-z),数字,非字母数字字符(限定为~!@#$%^&*()-_=+|[{}];:,<.>/?)四类字符中的三类字符。
如果密码不符合以上要求,在最后会报错:
4 登陆访问
查看版本信息:此端口为之前的XML文件中配置,-d 表示数据库
[omm@enmoedu1 ~]$ su - omm [omm@enmoedu1 ~]$ gsql -d postgres -p 26000 gsql ((openGauss 1.0.0 build 38a9312a) compiled at 2020-05-27 14:58:08 commit 472 last mr 549 ) Non-SSL connection (SSL connection is recommended when requiring high-security) Type "help" for help. postgres=# show server_version; server_version ---------------- 9.2.4 (1 row) postgres=# \q复制
