


来源:云计算AND容器技术
原文链接:https://www.toutiao.com/i6861075982917304844/?timestamp=1597798561&app=news_article_lite&group_id=6861075982917304844&use_new_style=1&req_id=20200819085600010020076098103E5A27
图片来自网络

最近公司发生了一次小小的数据安全事故,虽然最终结果是所有数据都安全的恢复回来了,对公司所有业务没有造成太大的影响。但是,事件过后仔细想来还是有些后怕。公司的所有业务和项目都是部署到云端,虚拟机,数据库和存储都是基于公有云的基础设施。公有云的数据库服务一般都具有数据备份和数据恢复等基本功能,当对数据表进行误操作或者发生黑客攻击删表,删库操作后,都可以基于备份数据在几分十分钟内恢复所有数据。因为时效性的原因恢复的数据可能会存在少许差异,但是不至于造成整个业务中断和系统崩溃。
目前大多数的企业一般都采用的是关系型数据库作为后端的数据存储,mysql数据库应该是大多数企业的首选,土豪点的企业也有采用oracle数据库的。由于最近公司发生了数据安全事故,所以笔者专门抽出点时间对mysql的数据恢复原理做大致的学习,并且把整个学习过程记录下来方便以后发生类似情况,能够快速解决问题和方便以后查阅。
mysql的数据恢复一般是基于数据备份和mysql的binlog实现的,查阅mysql的官方文档,对binlog是这样描述的:
The binary log contains “events” that describe database changes such as table creation operations or changes to table data. It also contains events for statements that potentially could have made changes (for example, a DELETE which matched no rows), unless row-based logging is used. The binary log also contains information about how long each statement took that updated data. The binary log has two important purposes:
- For replication, the binary log on a replication source server provides a record of the data changes to be sent to replicas. The source sends the events contained in its binary log to its replicas, which execute those events to make the same data changes that were made on the source. See Section 16.2, “Replication Implementation”.
- Certain data recovery operations require use of the binary log. After a backup has been restored, the events in the binary log that were recorded after the backup was made are re-executed. These events bring databases up to date from the point of the backup. See Section 7.5, “Point-in-Time (Incremental) Recovery”.
The binary log is not used for statements such as SELECT or SHOW that do not modify data. To log all statements (for example, to identify a problem query), use the general query log. See Section 5.4.3, “The General Query Log”.
大致意思是mysql的binlog只记录对mysql数据库和数据表的增,删,改操作的日志信息,binlog不记录select,show等不会造成数据改变指令的操作日志。还有就是mysql的主从集群部署也是基于binlog进行数据复制同步的。
官方文档:
https://dev.mysql.com/doc/refman/5.7/en/point-in-time-recovery.html
mysql基于binlog有两种方式实现数据的恢复:
- 基于binlog时间点的数据恢复;
- 基于binlog事件位置数据恢复;
下面我们就构建一个mysql数据库环境,模拟对数据进行了误操作,然后基于binlog的事件位置实现增量恢复数据。

为了方便演示我们使用docker构建一个简单的mysql数据库环境,其实仔细想想基于docker我们可以做很多事情,通过docker简单的两,三条命令一个我们想要的环境已经正式运行起来了,简直不要太方便了,笔者的大部分环境都是基于docker构建的,docker这个伟大的工具真是太好用了。
1docker pull mysql
2docker run --name mysqlserver -e MYSQL_ROOT_PASSWORD=root -p 3306:3306 -d mysql
复制
好了,一个mysql数据库已经运行起来了。
进入mysql容器中,查看binlog是否开启:
 1docker -exec it <CONTAINER ID> /bin/bash
 2mysql -u root -proot
 3mysql> show variables like '%log_bin%';
 4+---------------------------------+-----------------------------+
 5| Variable_name                   | Value                       |
 6+---------------------------------+-----------------------------+
 7| log_bin                         | ON                          |
 8| log_bin_basename                | /var/lib/mysql/binlog       |
 9| log_bin_index                   | /var/lib/mysql/binlog.index |
10| log_bin_trust_function_creators | OFF                         |
11| log_bin_use_v1_row_events       | OFF                         |
12| sql_log_bin                     | ON                          |
13+---------------------------------+-----------------------------+
146 rows in set (0.00 sec)
15
复制
可以看到,mysql docker容器的binlog默认是开启的。binlog默认存储在/var/lib/mysql/目录下,可以通过–log-bin配置选项进行修改。
1mysql> show binlog events in 'binlog.000009';
2+---------------+-----+----------------+-----------+-------------+-----------------------------------+
3| Log_name      | Pos | Event_type     | Server_id | End_log_pos | Info                              |
4+---------------+-----+----------------+-----------+-------------+-----------------------------------+
5| binlog.000003 |   4 | Format_desc    |         1 |         124 | Server ver: 8.0.18, Binlog ver: 4 |
6| binlog.000003 | 124 | Previous_gtids |         1 |         155 |                                   |
7+---------------+-----+----------------+-----------+-------------+-----------------------------------+
82 rows in set (0.00 sec)
9
复制
mysql的binlog可能会有多个文件,当执行flush logs时,mysql会重新生成一个binlog文件。
准备一个数据表:
 1mysql> select * from user;
 2+----+----------+-----+----------+
 3| id | name     | age | address  |
 4+----+----------+-----+----------+
 5|  1 | test     |   1 | test     |
 6|  2 | zhangsan |   2 | address1 |
 7|  3 | lisi     |   3 | addr1    |
 8|  4 | test1    |   4 | addr2    |
 9|  5 | test2    |   5 | addr3    |
10|  6 | test3    |   6 | address4 |
11|  7 | b1       |   7 | bb       |
12|  8 | a1       |  10 | add1     |
13|  9 | a2       |  11 | add2     |
14| 10 | a3       |  12 | add3     |
15| 11 | a4       |  13 | add4     |
16| 12 | a5       |  14 | add5     |
17+----+----------+-----+----------+
1812 rows in set (0.00 sec)
19
复制
将数据库进行备份:
1mysqldump -u root -proot --databases demo > db_demo_bak.sql
复制
重新生成一个binlog文件:
 1mysql> flush logs;
 2Query OK, 0 rows affected (0.01 sec)
 3
 4mysql> show binlog events in 'binlog.000009';
 5+---------------+-----+----------------+-----------+-------------+-----------------------------------+
 6| Log_name      | Pos | Event_type     | Server_id | End_log_pos | Info                              |
 7+---------------+-----+----------------+-----------+-------------+-----------------------------------+
 8| binlog.000009 |   4 | Format_desc    |         1 |         124 | Server ver: 8.0.18, Binlog ver: 4 |
 9| binlog.000009 | 124 | Previous_gtids |         1 |         155 |                                   |
10+---------------+-----+----------------+-----------+-------------+-----------------------------------+
112 rows in set (0.00 sec)
12
复制
插入一条数据:
 1mysql> INSERT INTO `demo`.`user`(`name`,`age`,`address`) VALUES ('c1',10,'c1');
 2Query OK, 1 row affected (0.00 sec)
 3
 4mysql> show binlog events in 'binlog.000009';
 5+---------------+-----+----------------+-----------+-------------+--------------------------------------+
 6| Log_name      | Pos | Event_type     | Server_id | End_log_pos | Info                                 |
 7+---------------+-----+----------------+-----------+-------------+--------------------------------------+
 8| binlog.000009 |   4 | Format_desc    |         1 |         124 | Server ver: 8.0.18, Binlog ver: 4    |
 9| binlog.000009 | 124 | Previous_gtids |         1 |         155 |                                      |
10| binlog.000009 | 155 | Anonymous_Gtid |         1 |         234 | SET @@SESSION.GTID_NEXT= 'ANONYMOUS' |
11| binlog.000009 | 234 | Query          |         1 |         309 | BEGIN                                |
12| binlog.000009 | 309 | Table_map      |         1 |         369 | table_id: 97 (demo.user)             |
13| binlog.000009 | 369 | Write_rows     |         1 |         421 | table_id: 97 flags: STMT_END_F       |
14| binlog.000009 | 421 | Xid            |         1 |         452 | COMMIT /* xid=1029 */                |
15+---------------+-----+----------------+-----------+-------------+--------------------------------------+
167 rows in set (0.00 sec)
复制
可以看到mysql的binlog发生变化了。
下面我们模拟一个误操作全表更新,全表更新后再插入一条数据:
 1mysql> update user set age=100;
 2Query OK, 13 rows affected (0.00 sec)
 3Rows matched: 13  Changed: 13  Warnings: 0
 4
 5mysql> INSERT INTO `demo`.`user`(`name`,`age`,`address`) VALUES ('d1',20,'d1');
 6Query OK, 1 row affected (0.01 sec)
 7
 8mysql> select * from user;
 9+----+----------+-----+----------+
10| id | name     | age | address  |
11+----+----------+-----+----------+
12|  1 | test     | 100 | test     |
13|  2 | zhangsan | 100 | address1 |
14|  3 | lisi     | 100 | addr1    |
15|  4 | test1    | 100 | addr2    |
16|  5 | test2    | 100 | addr3    |
17|  6 | test3    | 100 | address4 |
18|  7 | b1       | 100 | bb       |
19|  8 | a1       | 100 | add1     |
20|  9 | a2       | 100 | add2     |
21| 10 | a3       | 100 | add3     |
22| 11 | a4       | 100 | add4     |
23| 12 | a5       | 100 | add5     |
24| 18 | c1       | 100 | c1       |
25| 19 | d1       |  20 | d1       |
26+----+----------+-----+----------+
2714 rows in set (0.00 sec)
28
复制
查看mysql的binlog:
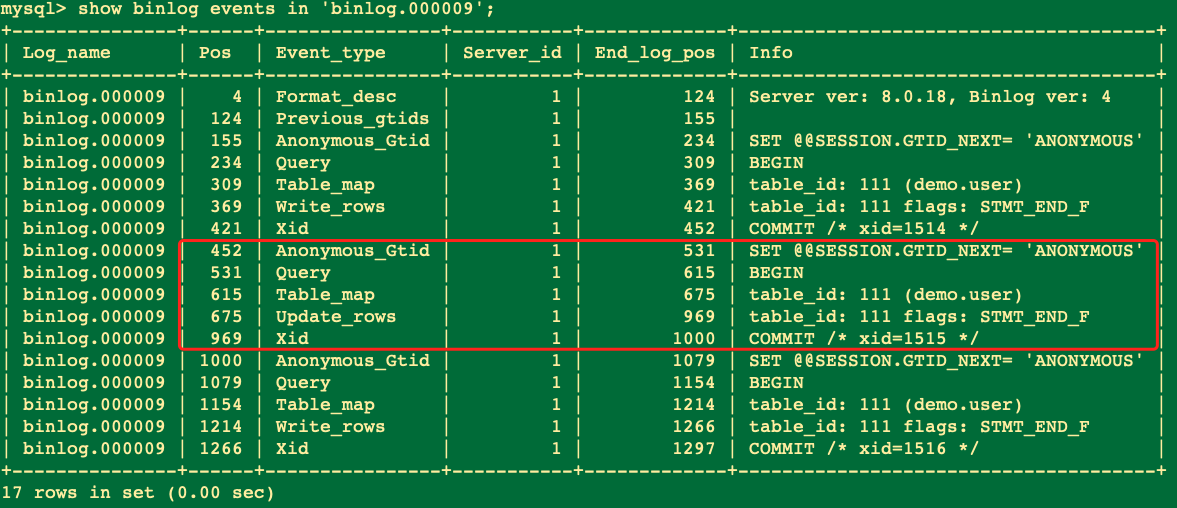
 1mysql> show binlog events in 'binlog.000009';
 2+---------------+------+----------------+-----------+-------------+--------------------------------------+
 3| Log_name      | Pos  | Event_type     | Server_id | End_log_pos | Info                                 |
 4+---------------+------+----------------+-----------+-------------+--------------------------------------+
 5| binlog.000009 |    4 | Format_desc    |         1 |         124 | Server ver: 8.0.18, Binlog ver: 4    |
 6| binlog.000009 |  124 | Previous_gtids |         1 |         155 |                                      |
 7| binlog.000009 |  155 | Anonymous_Gtid |         1 |         234 | SET @@SESSION.GTID_NEXT= 'ANONYMOUS' |
 8| binlog.000009 |  234 | Query          |         1 |         309 | BEGIN                                |
 9| binlog.000009 |  309 | Table_map      |         1 |         369 | table_id: 113 (demo.user)            |
10| binlog.000009 |  369 | Write_rows     |         1 |         421 | table_id: 113 flags: STMT_END_F      |
11| binlog.000009 |  421 | Xid            |         1 |         452 | COMMIT /* xid=1822 */                |
12| binlog.000009 |  452 | Anonymous_Gtid |         1 |         531 | SET @@SESSION.GTID_NEXT= 'ANONYMOUS' |
13| binlog.000009 |  531 | Query          |         1 |         615 | BEGIN                                |
14| binlog.000009 |  615 | Table_map      |         1 |         675 | table_id: 113 (demo.user)            |
15| binlog.000009 |  675 | Update_rows    |         1 |        1257 | table_id: 113 flags: STMT_END_F      |
16| binlog.000009 | 1257 | Xid            |         1 |        1288 | COMMIT /* xid=1825 */                |
17| binlog.000009 | 1288 | Anonymous_Gtid |         1 |        1367 | SET @@SESSION.GTID_NEXT= 'ANONYMOUS' |
18| binlog.000009 | 1367 | Query          |         1 |        1442 | BEGIN                                |
19| binlog.000009 | 1442 | Table_map      |         1 |        1502 | table_id: 113 (demo.user)            |
20| binlog.000009 | 1502 | Write_rows     |         1 |        1554 | table_id: 113 flags: STMT_END_F      |
21| binlog.000009 | 1554 | Xid            |         1 |        1585 | COMMIT /* xid=1826 */                |
22+---------------+------+----------------+-----------+-------------+--------------------------------------+
2317 rows in set (0.00 sec)
复制
从mysql的binlog我们可以大致看到两类操作:
- Write_rows:是插入数据时的事件;
- Update_rows:是更新数据时的事件;
- Query:是开启mysql的一个事务时使用;
这两类事件跟我们实际用sql操作数据是一致的,同时我们可以看到binlog中没有记录select的sql操作。

下面我们模拟将数据恢复到全表更新的之前的数据状态,通过分析mysql的binlog,我们发现全表更新的操作发生在如下的事件位置:
当我们发现全表更新后,我们需要对之前操作的binlog(binlog.000009)执行备份操作,执行如下命令即可:
1mysql> flush logs;
2Query OK, 0 rows affected (0.01 sec)
复制
这个时候mysql会自动重新生成一个binlog.000009,我们只需将binlog.000009的数据执行恢复即可。
先从数据库备份文件中恢复全表更新前的数据:
1mysql> drop table user;
2Query OK, 0 rows affected (0.01 sec)
3
4mysql>
5mysql> show tables;
6Empty set (0.00 sec)
7
8mysql> source /root/db_demo_bak.sql
复制
现在开始从binlog中增量恢复数据,需要从全表更新之前插入的数据:
 1mysqlbinlog --start-position=155 --stop-position=452 --database=demo  /var/lib/mysql/binlog.000009 | mysql -u root -proot
 2mysql> select * from user;
 3+----+----------+-----+----------+
 4| id | name     | age | address  |
 5+----+----------+-----+----------+
 6|  1 | test     |   1 | test     |
 7|  2 | zhangsan |   2 | address1 |
 8|  3 | lisi     |   3 | addr1    |
 9|  4 | test1    |   4 | addr2    |
10|  5 | test2    |   5 | addr3    |
11|  6 | test3    |   6 | address4 |
12|  7 | b1       |   7 | bb       |
13|  8 | a1       |  10 | add1     |
14|  9 | a2       |  11 | add2     |
15| 10 | a3       |  12 | add3     |
16| 11 | a4       |  13 | add4     |
17| 12 | a5       |  14 | add5     |
18| 22 | c1       |  10 | c1       |
19+----+----------+-----+----------+
2013 rows in set (0.00 sec)
21
复制
全表更新的c1数据已经恢复了,开始恢复全表更新后的数据:
 1mysqlbinlog --start-position=1288 --stop-position=1585 --database=demo  /var/lib/mysql/binlog.000009 | mysql -u root -proot
 2mysql> select * from user;
 3+----+----------+-----+----------+
 4| id | name     | age | address  |
 5+----+----------+-----+----------+
 6|  1 | test     |   1 | test     |
 7|  2 | zhangsan |   2 | address1 |
 8|  3 | lisi     |   3 | addr1    |
 9|  4 | test1    |   4 | addr2    |
10|  5 | test2    |   5 | addr3    |
11|  6 | test3    |   6 | address4 |
12|  7 | b1       |   7 | bb       |
13|  8 | a1       |  10 | add1     |
14|  9 | a2       |  11 | add2     |
15| 10 | a3       |  12 | add3     |
16| 11 | a4       |  13 | add4     |
17| 12 | a5       |  14 | add5     |
18| 18 | c1       |  10 | c1       |
19| 19 | d1       |  20 | d1       |
20+----+----------+-----+----------+
2114 rows in set (0.00 sec)
复制
可以看到,所有数据都恢复到全表更新之前的状态了。

这种增量恢复全表更新的方式可能会存在如下缺点:
- 基于备份的数据进行恢复,如果对数据备份不及时,可能达不到理想的效果;
- 可能会需要停止线上业务进行数据恢复,因为对表有drop操作;
- 如果全表更新发现不及时,恢复数据可能需要更长的时间;
- 如果有多个binlog文件,需要对每一个binlog进行恢复;
当然,也是有更安全更高效的恢复全表更新数据的方法,同样还是基于mysql的binlog和sed命令可以提取出当时执行全表更新的sql,然后对update的sql语句进行逆向操作,将更新后的数据再更新回之前的数据。
参考文档:https://dev.mysql.com/doc/refman/5.7/en/point-in-time-recovery.html
不积跬步,无以至千里;不积小流,无以成江海!
评论

 1
1 1
1


