


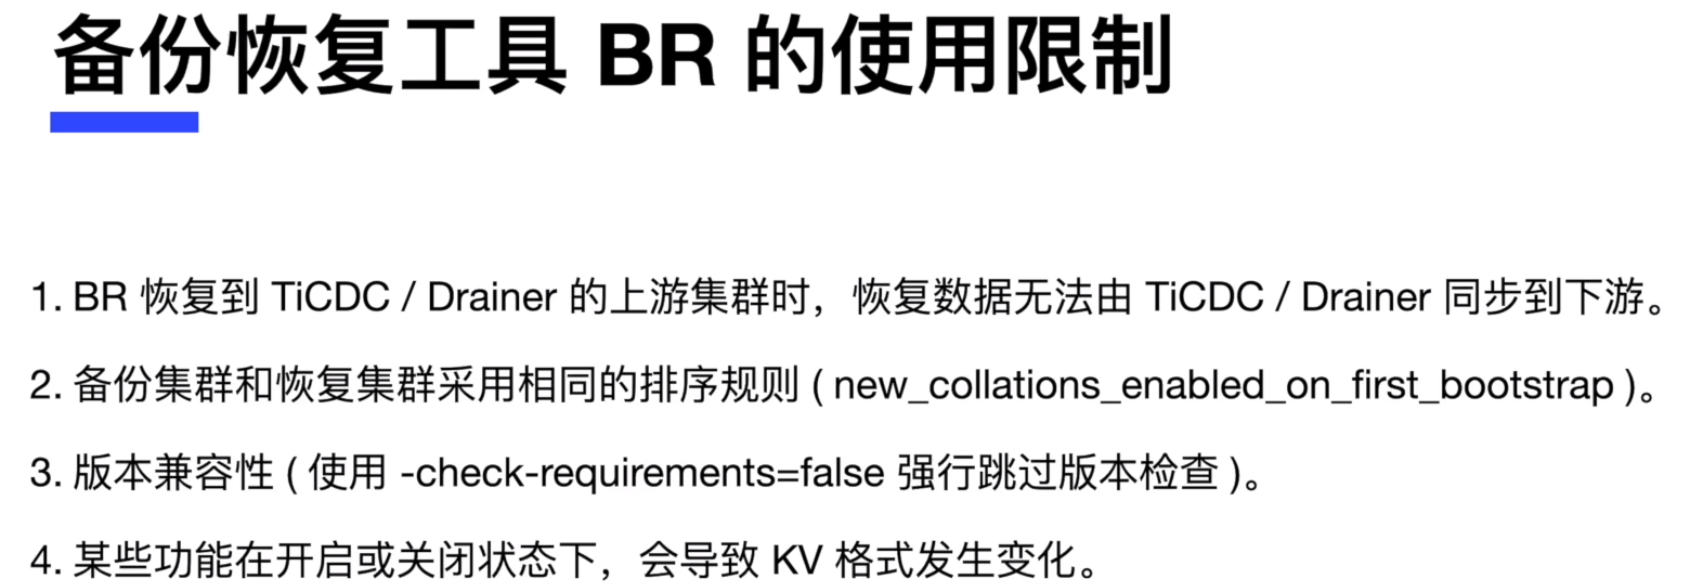
TiDB 的物理备份与恢复工具 BR
- BR全称为Backup & Restore,是TiDB分布式备份恢复的命令行工具,用于对TiDB集群进行数据备份和恢复。
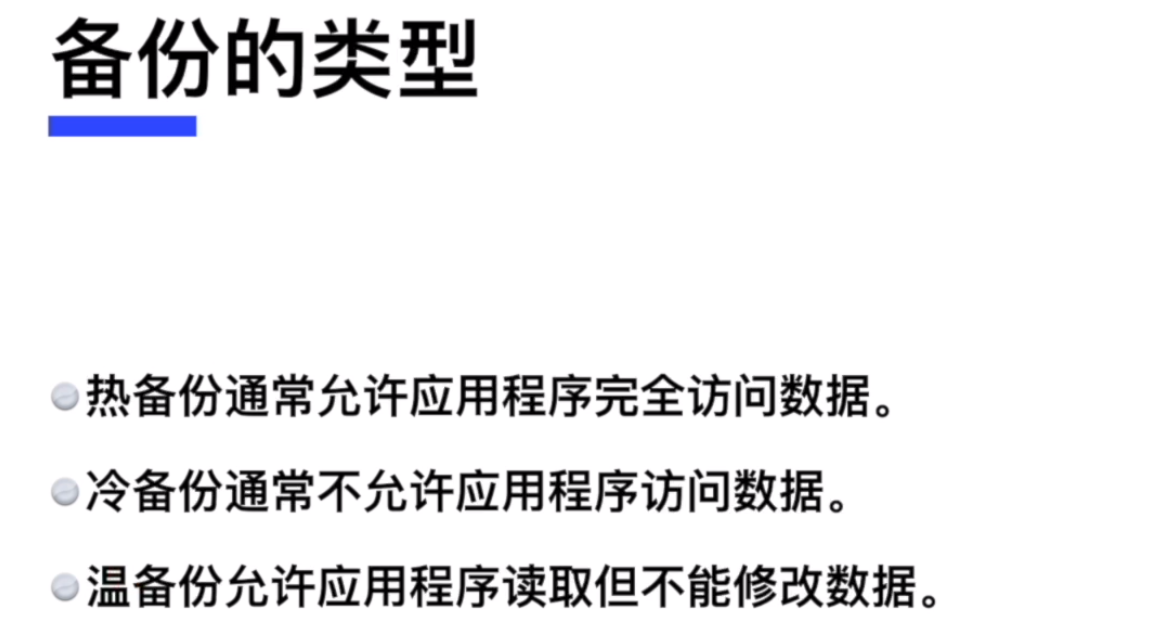
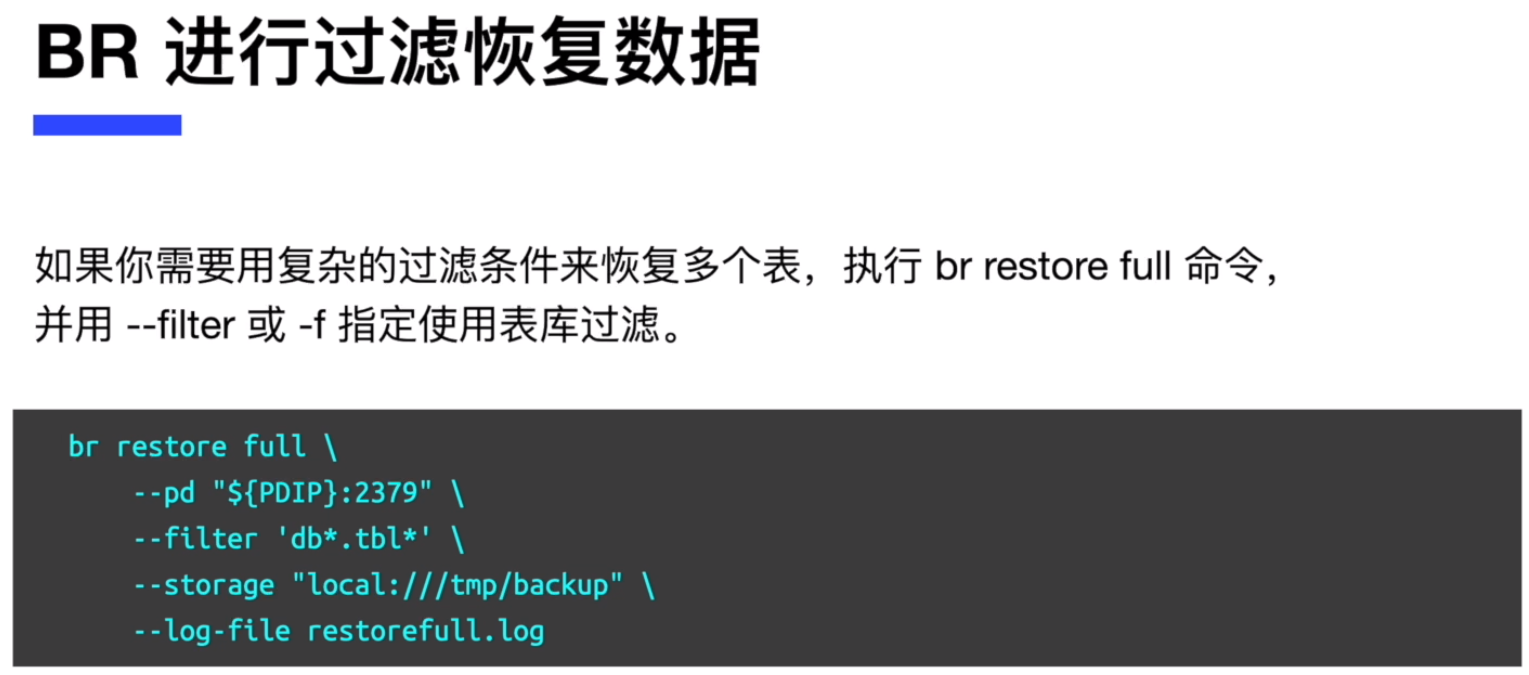
- 备份恢复工具BR的适用场景:
大数据量
速度较快
SST文件
只能恢复到TiDB数据库

部署备份恢复工具 BR
根据 BR 的最佳实践,我们最好将 BR 工具部署到 PD 节点上,这里我们选择 1 个 PD 节点进行 BR 的部署。
- 备份恢复工具 BR 集成在 tidb-toolkit 中,先进行下载
[root@pd1 ~]# yum install -y wget
[root@pd1 ~]# wget https://download.pingcap.org/tidb-toolkit-v5.0.1-linux-amd64.tar.gz
复制- 解压缩下载软件包
[root@pd1 ~]# tar xvf tidb-toolkit-v5.0.1-linux-amd64.tar.gz
复制- 进入目录,确认安装完毕。也可以将目录加入环境变量,方便后续执行
[root@pd1 ~]# cd tidb-toolkit-v5.0.1-linux-amd64/bin/
[root@pd1 bin]# ll
total 565656
-rwxr-xr-x. 1 root root 113956808 Apr 24 2021 br
-rwxr-xr-x. 1 root root 78663499 Apr 24 2021 dumpling
-rwxr-xr-x. 1 root root 12782776 Apr 24 2021 mydumper
-rwxr-xr-x. 1 root root 19219131 Apr 24 2021 pd-tso-bench
-rwxr-xr-x. 1 root root 74266927 Apr 24 2021 sync_diff_inspector
-rwxr-xr-x. 1 root root 125061248 Apr 24 2021 tidb-lightning
-rwxr-xr-x. 1 root root 120785240 Apr 24 2021 tidb-lightning-ctl
-rwxr-xr-x. 1 root root 34483064 Apr 24 2021 tikv-importer
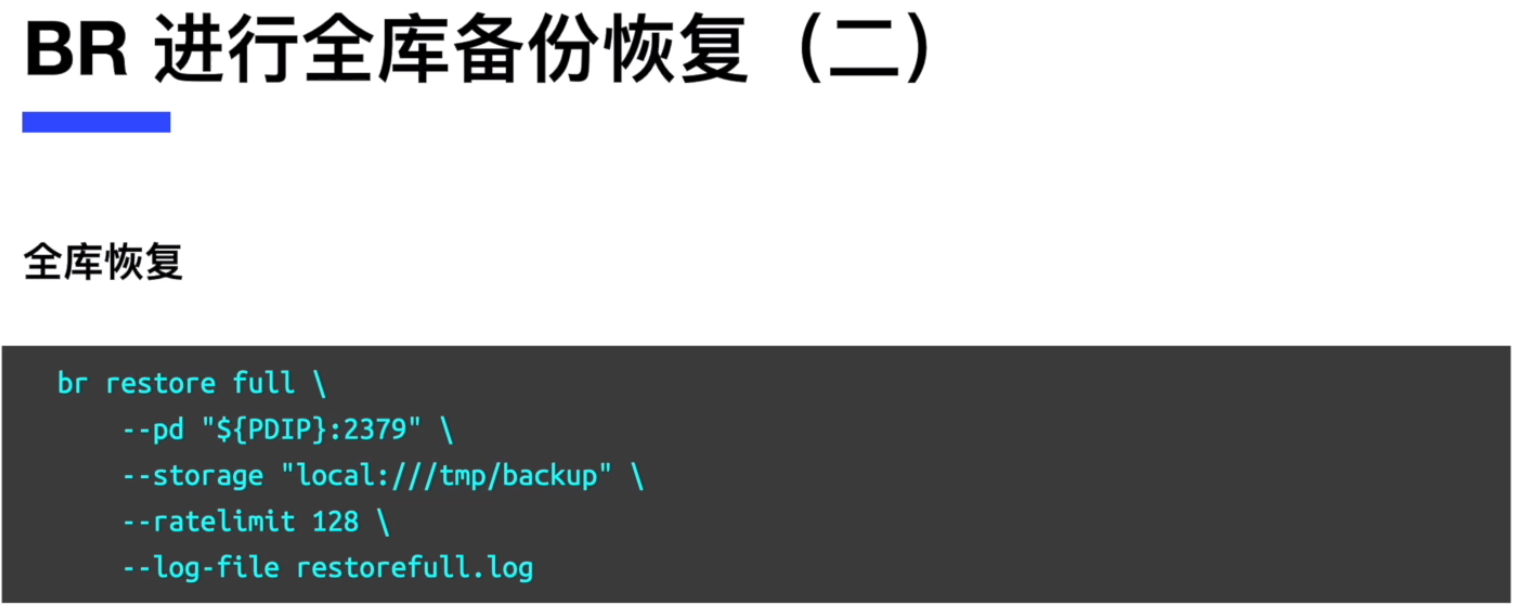
复制使用 BR 进行全库备份与恢复
- 在所有的 TiKV 节点创建文件夹 /tmp/backup, 用来存储本节点的备份文件(SST 文件)并将文件夹的权限设置为可以读写。
首先登录到所有 TiKV 节点,之后执行
[root@tikv1 ~]# mkdir /tmp/backup
[root@tikv1 ~]# chmod 777 /tmp/backup
复制- 连接到其中一个 PD 节点,进入到 tidb-toolkit-v5.0.1-linux-amd64/bin/ 目录,开始进行数据库全备份
[root@pd1 bin]# pwd
/root/tidb-toolkit-v5.0.1-linux-amd64/bin
[root@pd1 bin]# ./br backup full --pd "192.168.0.94:2379" --storage "local:///tmp/backup" --ratelimit 120 --log-file backupfull.log
Detail BR log in backupfull.log
Full backup <----------------------------------------> 100.00%
Checksum <-------------------------------------------> 100.00%
[2022/02/21 12:25:08.505 +08:00] [INFO] [collector.go:62] ["Full backup success summary"] [total-ranges=4] [ranges-succeed=4] [ranges-failed=0] [backup-fast-checksum=399.114µs] [backup-checksum=552.995502ms] [backup-total-regions=7] [BackupTS=431336327019233282] [Size=34306680] [total-take=1.795302285s] [total-kv=2097154] [data-size=137.3MB] [average-speed=114.3MB/s]
[root@pd1 bin]#
复制
对于参数解释如下:
–pd “192.168.0.94:2379” :连接 TiDB 数据库的 PD 节点, 最好在 PD 节点上执行, 即连接本节点。
–storage “local:///tmp/backup” :备份文件存储在 TiKV 节点上的位置。
–ratelimit 120 :对于备份所用存储带宽限速,以免影响线上业务。
–log-file backupfull.log : 备份日志文件。
- 备份结束后,可以到各个 TiKV 节点检查备份文件


- 同时,在执行备份的节点上,也会自动创建文件夹 /tmp/backup 用来存储元数据和锁信息

使用 BR 进行单库备份与恢复
- 在所有的 TiKV 节点创建文件夹 /tmp/testbk,用来存储本节点的备份文件(SST 文件),并将文件夹的权限设置为可以读写。
首先登录到所有 TiKV 节点,之后执行
[root@tikv1 ~]# mkdir /tmp/testbk
[root@tikv1 ~]# chmod 777 /tmp/testbk
复制- 连接到其中一个 PD 节点,进入到 tidb-toolkit-v5.0.1-linux-amd64/bin/ 目录,开始进行单库 test 的备份
[root@pd1 bin]# pwd
/root/tidb-toolkit-v5.0.1-linux-amd64/bin
[root@pd1 bin]# ./br backup db --pd "192.168.0.94:2379" --db test --storage "local:///tmp/testbk" --ratelimit 120 --log-file backupdb.log
Detail BR log in backupdb.log
Database backup <--------------------------------------------------------------> 100.00%
Checksum <---------------------------------------------------------------------> 100.00%
[2022/02/21 12:31:54.416 +08:00] [INFO] [collector.go:62] ["Database backup success summary"] [total-ranges=4] [ranges-succeed=4] [ranges-failed=0] [backup-checksum=442.532557ms] [backup-fast-checksum=500.557µs] [backup-total-regions=7] [BackupTS=431336433436327940] [Size=34306680] [total-take=1.755057337s] [total-kv=2097154] [data-size=137.3MB] [average-speed=107.7MB/s]
[root@pd1 bin]#
复制
对于参数解释如下:
–pd “192.168.0.94:2379” :连接 TiDB 数据库的 PD 节点, 最好在 PD 节点上执行,即连接本节点。
–storage “local:///tmp/testbk” :备份文件存储在 TiKV 节点上的位置。
–db test : 备份 test 库下面所有的表。
–ratelimit 120 :对于备份所用存储带宽限速,以免影响线上业务。
–log-file backupdb.log : 备份日志文件。
- 接下来, 登录到 tidb 上,将刚刚备份的 test 数据库删除,如下:
首先查看 test 数据库
[root@db1 ~]# mysql -h 192.168.0.97 -P 4000 -uroot
mysql> show databases;
复制
删除数据库 test :
mysql> drop database test;
Query OK, 0 rows affected (0.22 sec)

mysql> show databases;
+--------------------+
| Database           |
+--------------------+
| INFORMATION_SCHEMA |
| METRICS_SCHEMA     |
| PERFORMANCE_SCHEMA |
| mysql              |
+--------------------+
4 rows in set (0.00 sec)
复制- 接下来准备进行恢复,首先,将所有 TiKV 目录 /tmp/testbk 下面的备份文件先拷贝到其他节点,保证在所有的 TiKV 节点上都有所有的备份文件。如下:
登录到 TiKV 第2个节点,进入目录 cd /tmp/testbk/,将备份文件复制到 TiKV 第1个节点的/tmp/testbk目录下:
[root@tikv2 ~]# cd /tmp/testbk/
[root@tikv2 testbk]# scp * 192.168.0.91:/tmp/testbk/
复制
登录到 TiKV 其他节点,将备份文件都复制到 TiKV 第1个节点的/tmp/testbk目录下:
[root@tikv3 ~]# cd /tmp/testbk/
[root@tikv3 testbk]# scp * 192.168.0.91:/tmp/testbk/
复制
最后将 TiKV 第1个节点的/tmp/testbk目录下的备份文件都复制到其他节点,使所有节点都有所有的备份文件。
[root@tikv1 ~]# cd /tmp/testbk/
[root@tikv1 testbk]# scp * 192.168.0.92:/tmp/testbk/
[root@tikv1 testbk]# scp * 192.168.0.93:/tmp/testbk/
复制- 开始进行恢复
[root@pd1 bin]# pwd
/root/tidb-toolkit-v5.0.1-linux-amd64/bin
[root@pd1 bin]# ./br restore db --pd "192.168.0.94:2379" --db test --storage "local:///tmp/testbk" --log-file restoredb.log
Detail BR log in restoredb.log
Database restore <-------------------------------------------------------------> 100.00%
[2022/02/21 12:46:20.937 +08:00] [INFO] [collector.go:62] ["Database restore success summary"] [total-ranges=9] [ranges-succeed=9] [ranges-failed=0] [split-region=70.598852ms] [restore-checksum=501.54838ms] [restore-ranges=5] [Size=34306680] [total-take=5.652671251s] [data-size=137.3MB] [average-speed=38.1MB/s] [total-kv=2097154]
[root@pd1 bin]#
复制
对于参数解释如下:
–pd “192.168.0.94:2379” :连接 TiDB 数据库的 PD 节点,最好在 PD 节点上执行,即连接本节点。
–storage “local:///tmp/testbk” :备份文件存储在 TiKV 节点上的位置。
–log-file restoredb.log : 恢复日志文件。
- 最后,验证 test 库是否已经导入到 TiDB 数据库中
mysql> show databases;
+--------------------+
| Database           |
+--------------------+
| INFORMATION_SCHEMA |
| METRICS_SCHEMA     |
| PERFORMANCE_SCHEMA |
| mysql              |
| test               |
+--------------------+
5 rows in set (0.00 sec)

mysql> use test
Reading table information for completion of table and column names
You can turn off this feature to get a quicker startup with -A

Database changed
mysql> show tables;
+----------------+
| Tables_in_test |
+----------------+
| emp            |
| t              |
| tb1            |
| user_test      |
+----------------+
4 rows in set (0.00 sec)

mysql> select count(*) from t;
+----------+
| count(*) |
+----------+
|  2097152 |
+----------+
1 row in set (0.48 sec)

mysql>
复制
使用 BR 进行单表备份与恢复
- 在所有的 TiKV 节点创建文件夹 /tmp/tab_t_bak,用来存储本节点的备份文件(SST 文件),并将文件夹的权限设置为可以读写。
首先登录到所有 TiKV 节点,之后执行
[root@tikv1 ~]# mkdir /tmp/tab_t_bak
[root@tikv1 ~]# chmod 777 /tmp/tab_t_bak
复制- 连接到其中一个 PD 节点,进入到 tidb-toolkit-v5.0.1-linux-amd64/bin/ 目录,开始进行库 test 下的表 t 的备份
[root@pd1 bin]# pwd
/root/tidb-toolkit-v5.0.1-linux-amd64/bin
[root@pd1 bin]# ./br backup table --pd "192.168.0.94:2379" --db test --table t --storage "local:///tmp/tab_t_bak" --ratelimit 120 --log-file backuptable.log
Detail BR log in backuptable.log
Table backup <-----------------------------------------------------------------------> 100.00%
Checksum <---------------------------------------------------------------------------> 100.00%
[2022/02/21 12:53:16.101 +08:00] [INFO] [collector.go:62] ["Table backup success summary"] [total-ranges=1] [ranges-succeed=1] [ranges-failed=0] [backup-checksum=481.405758ms] [backup-fast-checksum=154.777µs] [backup-total-regions=4] [BackupTS=431336769387233282] [Size=34299618] [total-take=1.891174215s] [total-kv=2097152] [data-size=137.3MB] [average-speed=100.1MB/s]
[root@pd1 bin]#
复制
对于参数解释如下:
–pd “192.168.0.94:2379” :连接 TiDB 数据库的 PD 节点,最好在 PD 节点上执行,即连接本节点。
–storage “local:///tmp/tab_t_bak” :备份文件存储在 TiKV 节点上的位置。
–db test --table t : 备份 test 库下面的 t 表。
–ratelimit 120 :对于备份所用存储带宽限速,以免影响线上业务。
–log-file backuptable.log : 备份日志文件。
- 登录到 tidb 上,将刚刚备份的 test 库下的表 t 删除。
首先查看 test 库中的 t 表
mysql> show databases;
+--------------------+
| Database           |
+--------------------+
| INFORMATION_SCHEMA |
| METRICS_SCHEMA     |
| PERFORMANCE_SCHEMA |
| mysql              |
| test               |
+--------------------+
5 rows in set (0.00 sec)

mysql> use test
Reading table information for completion of table and column names
You can turn off this feature to get a quicker startup with -A

Database changed
mysql> show tables;
+----------------+
| Tables_in_test |
+----------------+
| emp            |
| t              |
| tb1            |
| user_test      |
+----------------+
4 rows in set (0.00 sec)

mysql> select count(*) from t;
+----------+
| count(*) |
+----------+
|  2097152 |
+----------+
1 row in set (0.48 sec)

mysql>
复制
删除库 test 库中的 t 表:
mysql> drop table t;
Query OK, 0 rows affected (0.22 sec)

mysql> show tables;
+----------------+
| Tables_in_test |
+----------------+
| emp            |
| tb1            |
| user_test      |
+----------------+
3 rows in set (0.00 sec)
复制- 接下来准备进行恢复,首先,将所有 TiKV 目录 /tmp/tab_t_bak 下面的备份文件先拷贝到其他节点,保证在所有的 TiKV 节点上都有所有的备份文件。如下:
登录到 TiKV 第2个节点,进入目录 cd /tmp/tab_t_bak/,将备份文件复制到 TiKV 第1个节点的/tmp/tab_t_bak目录下:
[root@tikv2 ~]# cd /tmp/tab_t_bak/
[root@tikv2 tab_t_bak]# scp * 192.168.0.91:/tmp/tab_t_bak/
复制
登录到 TiKV 其他节点,将备份文件都复制到 TiKV 第1个节点的/tmp/tab_t_bak目录下:
[root@tikv3 ~]# cd /tmp/tab_t_bak/
[root@tikv3 tab_t_bak]# scp * 192.168.0.91:/tmp/tab_t_bak/
复制
最后将 TiKV 第1个节点的/tmp/tab_t_bak目录下的备份文件都复制到其他节点,使所有节点都有所有的备份文件。
[root@tikv1 ~]# cd /tmp/tab_t_bak/
[root@tikv1 tab_t_bak]# scp * 192.168.0.92:/tmp/tab_t_bak/
[root@tikv1 tab_t_bak]# scp * 192.168.0.93:/tmp/tab_t_bak/
复制- 开始进行恢复
[root@pd1 bin]# pwd
/root/tidb-toolkit-v5.0.1-linux-amd64/bin
[root@pd1 bin]# ./br restore table --pd "192.168.0.94:2379" --db test --table t --storage "local:///tmp/tab_t_bak" --log-file restoretable.log
Detail BR log in restoretable.log
Table restore <---------------------------------------------------------------------> 100.00%
[2022/02/21 13:00:37.253 +08:00] [INFO] [collector.go:62] ["Table restore success summary"] [total-ranges=5] [ranges-succeed=5] [ranges-failed=0] [split-region=125.485707ms] [restore-checksum=571.619427ms] [restore-ranges=4] [Size=34299618] [total-take=5.559739625s] [total-kv=2097152] [data-size=137.3MB] [average-speed=33.2MB/s]
[root@pd1 bin]#
复制
对于参数解释如下:
–pd “192.168.0.94:2379” :连接 TiDB 数据库的 PD 节点,最好在 PD 节点上执行,即连接本节点。
–storage “local:///tmp/tab_t_bak” :备份文件存储在 TiKV 节点上的位置。
–db test --table t : 恢复 test 库下面的 t 表。
–log-file restoretable.log : 恢复日志文件。
- 最后,验证 test 库下面的 t 表是否已经导入到 TiDB 数据库中
mysql> show databases;
+--------------------+
| Database           |
+--------------------+
| INFORMATION_SCHEMA |
| METRICS_SCHEMA     |
| PERFORMANCE_SCHEMA |
| mysql              |
| test               |
+--------------------+
5 rows in set (0.00 sec)

mysql> use test
Reading table information for completion of table and column names
You can turn off this feature to get a quicker startup with -A

Database changed
mysql> show tables;
+----------------+
| Tables_in_test |
+----------------+
| emp            |
| t              |
| tb1            |
| user_test      |
+----------------+
4 rows in set (0.00 sec)

mysql> select count(*) from t;
+----------+
| count(*) |
+----------+
|  2097152 |
+----------+
1 row in set (0.48 sec)

mysql>
复制

TiDB 的逻辑备份工具 Dumpling 与恢复工具 Lightning
数据导出工具 Dumpling
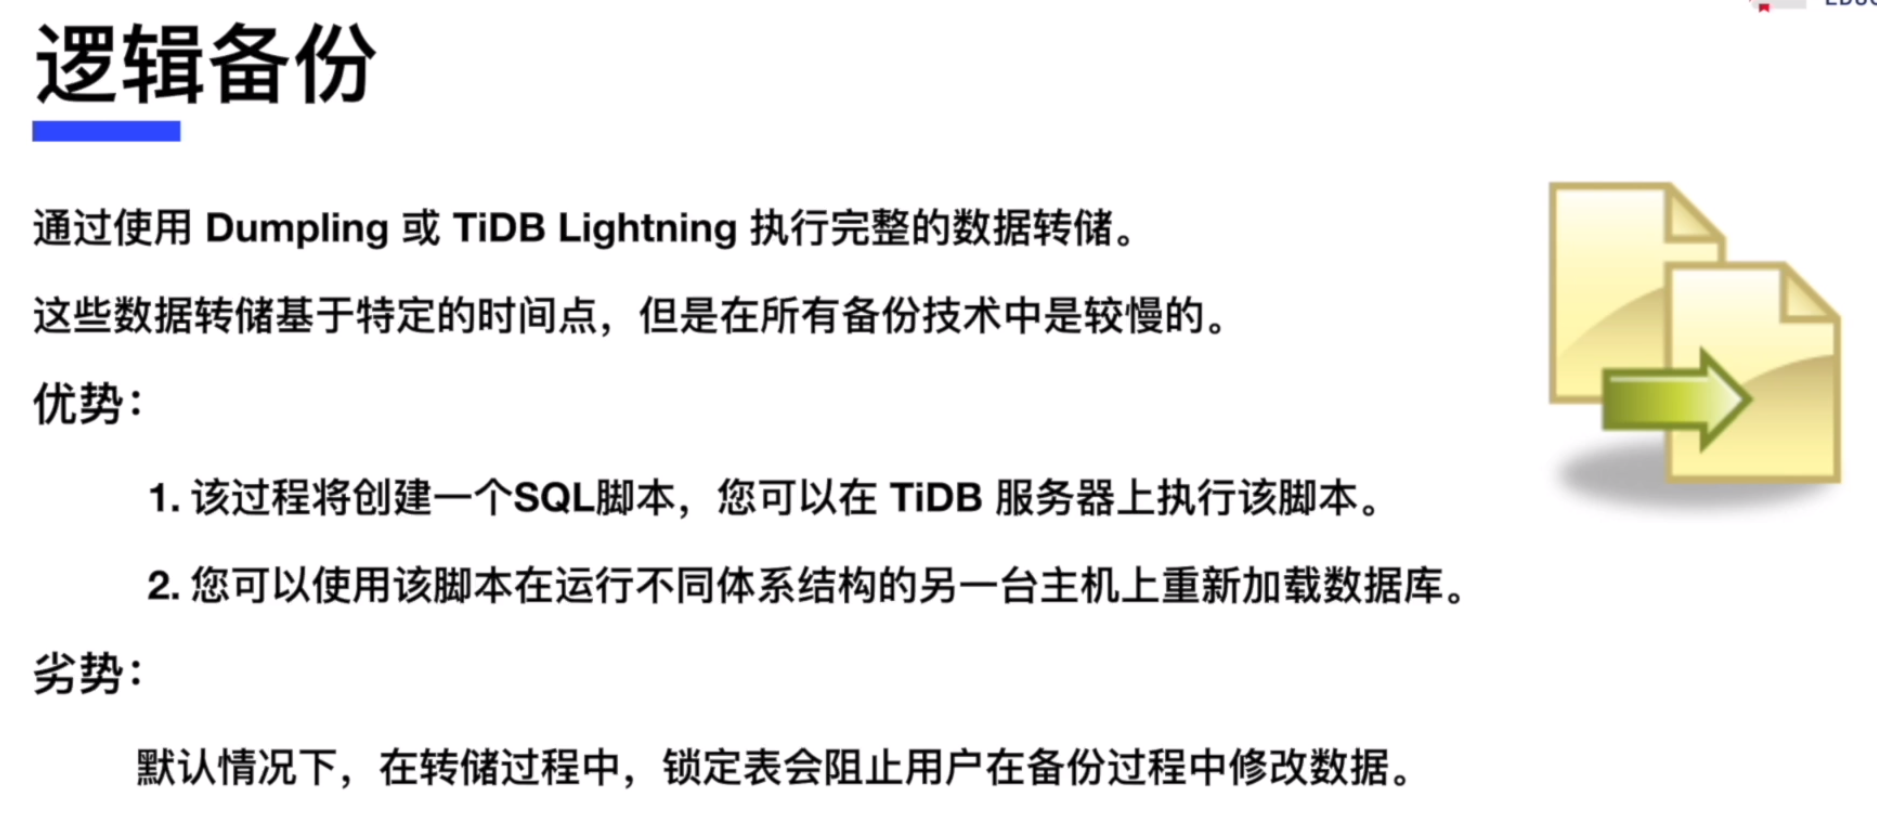
- 数据导出工具 Dumpling 可以把存储在 TiDB/MySQL 中的数据导出为 SQL 或者 CSV 格式,可以用于完成逻辑上的全量备份或者导出。
- Dumpling 架构与特点
1.支持导出多种数据形式,包括 SQL/CSV 。
2.逻辑导出。
3.支持全新的表过滤和数据过滤,筛选数据更加方便。
4.支持导出到 Amazon S3云盘。
5.针对TiDB进行的优化。 - Dumpling适用于以下场景:
1.导出数据量较小。
2.需要导出SQL语句或者CSV的场景,可以在异构数据库或者系统中进行迁移。
3.对于导出效率要求不高,由于需要读取数据和转换,所以比起物理导出效率低下。 - Dumpling不适用于以下场景:
1.需要直接导出TiDB数据库中的原始数据SST(键值对)
2.增量备份,目前只有全量导出,无法做到增量。
3.数据量较大场景。 - Dumpling所需最小权限要求:
. SELECT
· RELOAD
. LOCK TABLES
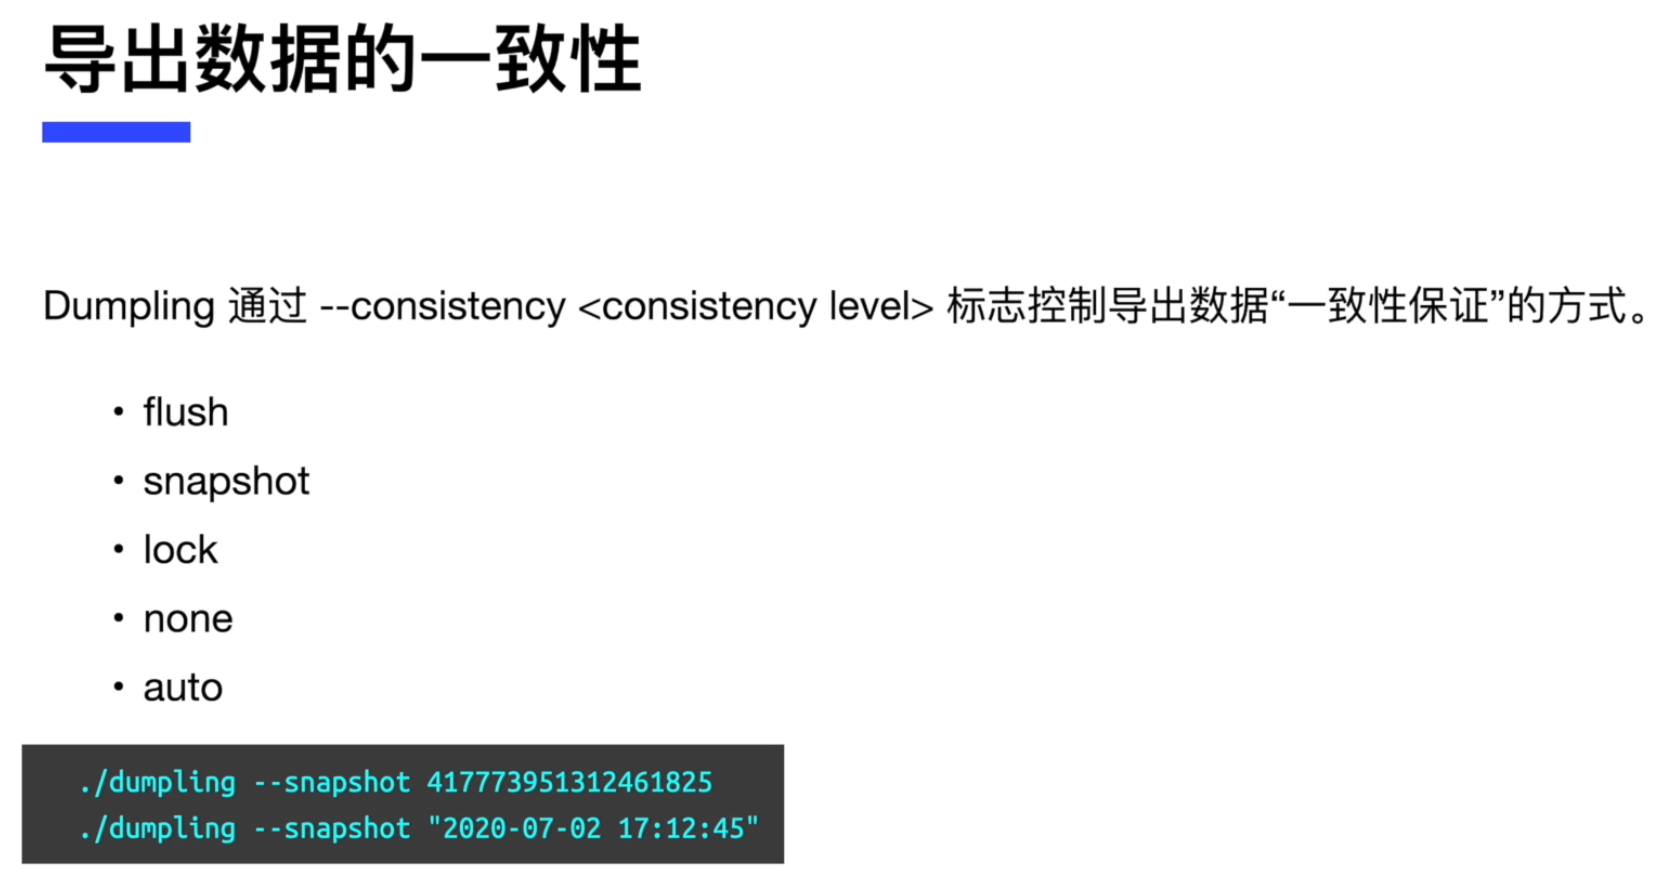
· REPLICATION CLIENT - 对导出数据进行筛选
. --where “id < 100”
. --filter “enployees."
. --filter ".workOrder”
部署 Dumpling 数据导出工具
- Dumpling 工具集成在 tidb-toolkit 中,先进行下载
[root@db1 ~]# yum install -y wget
[root@db1 ~]# wget https://download.pingcap.org/tidb-toolkit-v5.0.1-linux-amd64.tar.gz
复制- 解压缩下载软件包
[root@db1 ~]# tar xvf tidb-toolkit-v5.0.1-linux-amd64.tar.gz
复制- 进入目录,确认安装完毕。也可以将目录加入环境变量,方便后续执行
[root@db1 ~]# cd tidb-toolkit-v5.0.1-linux-amd64/bin/
[root@db1 bin]# ll
total 565656
-rwxr-xr-x. 1 root root 113956808 Apr 24  2021 br
-rwxr-xr-x. 1 root root  78663499 Apr 24  2021 dumpling
-rwxr-xr-x. 1 root root  12782776 Apr 24  2021 mydumper
-rwxr-xr-x. 1 root root  19219131 Apr 24  2021 pd-tso-bench
-rwxr-xr-x. 1 root root  74266927 Apr 24  2021 sync_diff_inspector
-rwxr-xr-x. 1 root root 125061248 Apr 24  2021 tidb-lightning
-rwxr-xr-x. 1 root root 120785240 Apr 24  2021 tidb-lightning-ctl
-rwxr-xr-x. 1 root root  34483064 Apr 24  2021 tikv-importer
复制
使用 Dumpling 从 TiDB 数据库中导出单张表数据
- 连接到 TiDB 数据库, 里面有实验数据库 test, 在 test 库中之前自己建了几张表。
[root@db1 ~]# mysql -h 192.168.0.97 -P 4000 -uroot
Welcome to the MySQL monitor.  Commands end with ; or \g.
Your MySQL connection id is 17
Server version: 5.7.25-TiDB-v5.0.0 TiDB Server (Apache License 2.0) Community Edition, MySQL 5.7 compatible

Copyright (c) 2000, 2022, Oracle and/or its affiliates.

Oracle is a registered trademark of Oracle Corporation and/or its
affiliates. Other names may be trademarks of their respective
owners.

Type 'help;' or '\h' for help. Type '\c' to clear the current input statement.

mysql> show databases;
+--------------------+
| Database           |
+--------------------+
| INFORMATION_SCHEMA |
| METRICS_SCHEMA     |
| PERFORMANCE_SCHEMA |
| mysql              |
| test               |
+--------------------+
5 rows in set (0.00 sec)

mysql> use test
Reading table information for completion of table and column names
You can turn off this feature to get a quicker startup with -A

Database changed
mysql> show tables;
+----------------+
| Tables_in_test |
+----------------+
| emp            |
| t              |
| tb1            |
| user_test      |
+----------------+
4 rows in set (0.00 sec)

mysql>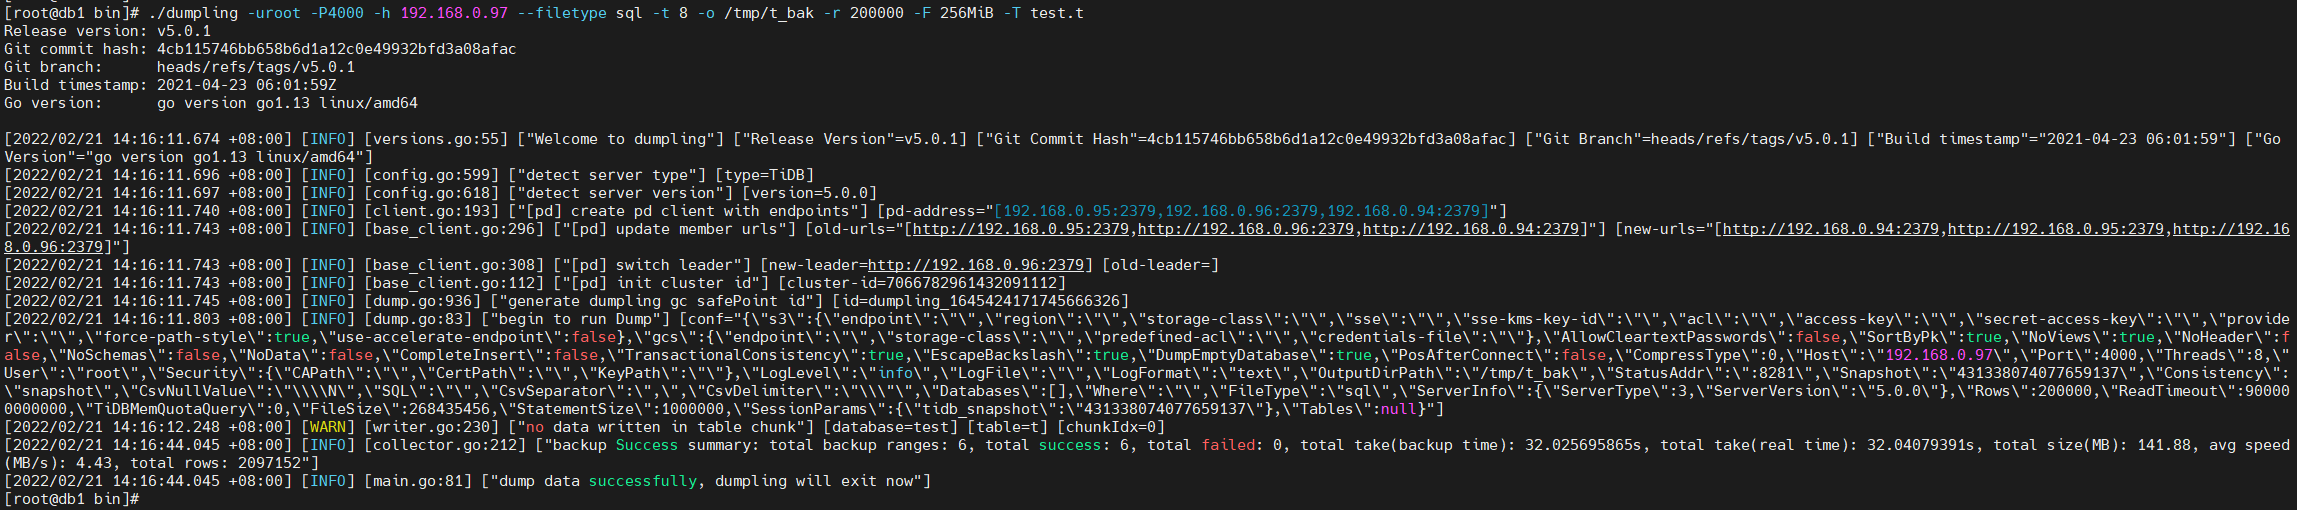
复制- 从 TiDB 集群中导出数据库 test 中的表 t
[root@db1 bin]# pwd
/root/tidb-toolkit-v5.0.1-linux-amd64/bin
[root@db1 bin]# ./dumpling -uroot -P4000 -h 192.168.0.97 --filetype sql -t 8 -o /tmp/t_bak -r 200000 -F 256MiB -T test.t
复制
各个参数的解释如下:
-uroot -P4000 -h 192.168.0.97 :用户名为 root, 端口号为4000,主机 IP 为 192.168.0.97;
–filetype sql :导出文件类型为 SQL 文件。
-t 8 :采用 8 线程同时导出。
-o /tmp/t_bak :导出文件保存在 /tmp/t_bak 中。
-r 200000 :每个导出文件最大容纳 200000 行数据。
-F 256MiB :每个导出文件最大 256 MiB。
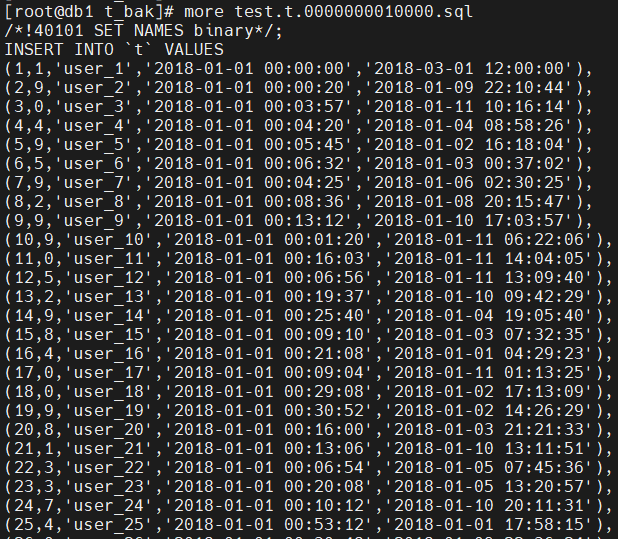
- 进入导出目录,查看导出文件
[root@db1 ~]# cd /tmp/t_bak
[root@db1 t_bak]# ll
total 145308
-rw-r--r--. 1 root root      146 Feb 21 14:16 metadata
-rw-r--r--. 1 root root       95 Feb 21 14:16 test-schema-create.sql
-rw-r--r--. 1 root root 72652012 Feb 21 14:16 test.t.0000000010000.sql
-rw-r--r--. 1 root root 37230663 Feb 21 14:16 test.t.0000000020000.sql
-rw-r--r--. 1 root root 38893598 Feb 21 14:16 test.t.0000000030000.sql
-rw-r--r--. 1 root root      508 Feb 21 14:16 test.t-schema.sql
[root@db1 t_bak]#
复制- test-schema-create.sql 为创建数据库脚本
[root@db1 t_bak]# cat test-schema-create.sql
/*!40101 SET NAMES binary*/;
CREATE DATABASE `test` /*!40100 DEFAULT CHARACTER SET utf8mb4 */;
复制- test.t-schema.sql 为建表脚本
[root@db1 t_bak]# cat test.t-schema.sql
/*!40101 SET NAMES binary*/;
CREATE TABLE `t` (
  `id` int(11) NOT NULL AUTO_INCREMENT COMMENT '自增主键',
  `dept` tinyint(4) NOT NULL COMMENT '部门id',
  `name` varchar(30) DEFAULT NULL COMMENT '用户名称',
  `create_time` datetime NOT NULL COMMENT '注册时间',
  `last_login_time` datetime DEFAULT NULL COMMENT '最后登录时间',
  PRIMARY KEY (`id`) /*T![clustered_index] CLUSTERED */
) ENGINE=InnoDB DEFAULT CHARSET=utf8mb4 COLLATE=utf8mb4_bin AUTO_INCREMENT=2100071 COMMENT='测试表';
复制- test.t.0000000010000.sql test.t.0000000020000.sql test.t.0000000030000.sql 为数据插入脚本
- metadata 为导出时的时间戳信息
[root@db1 t_bak]# cat metadata
Started dump at: 2022-02-21 14:16:11
SHOW MASTER STATUS:
        Log: tidb-binlog
        Pos: 431338074077659137
        GTID:

Finished dump at: 2022-02-21 14:16:44
复制
使用 Dumpling 从 TiDB 数据库中导出单个库的数据
- 从 TiDB 集群中导出数据库 test
[root@db1 bin]# pwd
/root/tidb-toolkit-v5.0.1-linux-amd64/bin
[root@db1 bin]# ./dumpling -uroot -P4000 -h 192.168.0.97 --filetype sql -t 8 -o /tmp/test_bak -r 200000 -F 256MiB -B test
复制
其中 -B test 表示导出 test 数据库。
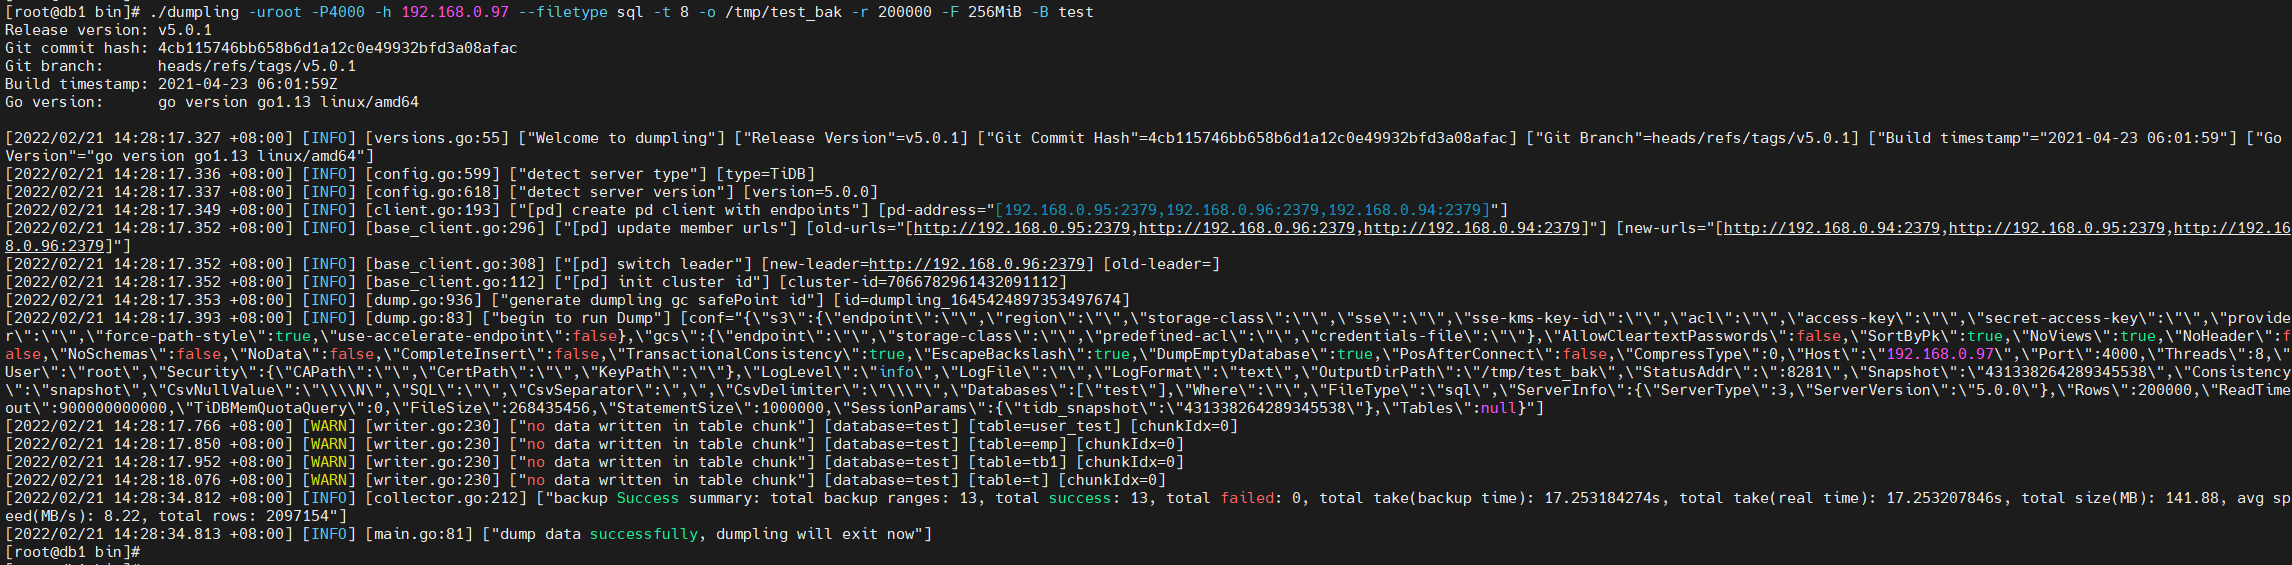
- 查看导出目录 /tmp/test_bak, 看到里面是各个表的 SQL 格式的导出文件
[root@db1 ~]# cd /tmp/test_bak
[root@db1 test_bak]# ll
total 145324
-rw-r--r--. 1 root root      146 Feb 21 14:28 metadata
-rw-r--r--. 1 root root       77 Feb 21 14:28 test.emp.0000000010000.sql
-rw-r--r--. 1 root root      174 Feb 21 14:28 test.emp-schema.sql
-rw-r--r--. 1 root root       95 Feb 21 14:28 test-schema-create.sql
-rw-r--r--. 1 root root 72652012 Feb 21 14:28 test.t.0000000010000.sql
-rw-r--r--. 1 root root 37230663 Feb 21 14:28 test.t.0000000020000.sql
-rw-r--r--. 1 root root 38893598 Feb 21 14:28 test.t.0000000030000.sql
-rw-r--r--. 1 root root      255 Feb 21 14:28 test.tb1-schema.sql
-rw-r--r--. 1 root root      508 Feb 21 14:28 test.t-schema.sql
-rw-r--r--. 1 root root      389 Feb 21 14:28 test.user_test-schema.sql
复制
使用 Dumpling 从 MySQL 数据库中导出数据
- 安装一个 MySQL 数据库,创建测试库,插入测试数据
[root@db1 ~]# yum -y install http://dev.mysql.com/get/mysql57-community-release-el7-10.noarch.rpm
[root@db1 ~]# rpm --import https://repo.mysql.com/RPM-GPG-KEY-mysql-2022
[root@db1 ~]# yum install -y mysql-server
[root@db1 ~]# systemctl start mysqld
[root@db1 ~]# grep password /var/log/mysqld.log
2022-02-21T06:35:48.116302Z 1 [Note] A temporary password is generated for root@localhost: S.D!8a)EhRDL
2022-02-21T06:35:52.990968Z 2 [Note] Access denied for user 'root'@'localhost' (using password: YES)
复制
[root@db1 ~]# mysql -uroot -p'S.D!8a)EhRDL' -h127.0.0.1 -P3306
mysql> ALTER USER 'root'@'localhost' IDENTIFIED BY '!QAZ2wsx';
mysql> exit
[root@db1 ~]# mysql -uroot -p'!QAZ2wsx' -h127.0.0.1 -P3306
mysql> create database mysql_db;
mysql> use mysql_db
drop table if exists t;
CREATE TABLE t (
id int NOT NULL AUTO_INCREMENT PRIMARY KEY comment '自增主键',
dept tinyint not null comment '部门id',
name varchar(30) comment '用户名称',
create_time datetime not null comment '注册时间',
last_login_time datetime comment '最后登录时间'
) comment '测试表';
insert into t values(1,1,'user_1', '2018-01-01 00:00:00', '2018-03-01 12:00:00');
set @i=1;
insert into t(id, dept, name, create_time, last_login_time)
select @i:=@i+1,
left(rand()*10,1) as dept, #随机生成1~10的整数
concat('user_',@i), #按序列生成不同的name
date_add(create_time,interval +@i*cast(rand()*100 as signed) SECOND), #生成有时间大顺序随机注册时间
date_add(date_add(create_time,interval +@i*cast(rand()*100 as signed) SECOND), interval + cast(rand()*1000000 as signed) SECOND) #生成有时间大顺序的随机的最后登录时间
from t;
复制- 进入 3306 端口处的 MySQL 实例,其中有 mysql_db 数据库
[root@db1 ~]# mysql -uroot -p'!QAZ2wsx' -h127.0.0.1 -P3306
mysql: [Warning] Using a password on the command line interface can be insecure.
Welcome to the MySQL monitor.  Commands end with ; or \g.
Your MySQL connection id is 4
Server version: 5.7.37 MySQL Community Server (GPL)

Copyright (c) 2000, 2022, Oracle and/or its affiliates.

Oracle is a registered trademark of Oracle Corporation and/or its
affiliates. Other names may be trademarks of their respective
owners.

Type 'help;' or '\h' for help. Type '\c' to clear the current input statement.

mysql> show databases;
+--------------------+
| Database           |
+--------------------+
| information_schema |
| mysql              |
| mysql_db           |
| performance_schema |
| sys                |
+--------------------+
5 rows in set (0.00 sec)

mysql> use mysql_db
Database changed

mysql> show tables;
+--------------------+
| Tables_in_mysql_db |
+--------------------+
| t                  |
+--------------------+
1 row in set (0.00 sec)
复制- 进入bin文件内使用 Dumpling 工具将 3306 端口的 MySQL 数据库的 mysql_db 库导出
[root@db1 bin]# pwd
/root/tidb-toolkit-v5.0.1-linux-amd64/bin
[root@db1 bin]# ./dumpling -uroot -p'!QAZ2wsx' -P3306 -h 127.0.0.1 --filetype sql -t 8 -o /tmp/mysql_db_bak -r 200000 -F 256MiB -B mysql_db
复制
- 查看导出文件
[root@db1 ~]# ll /tmp/mysql_db_bak
total 17716
-rw-r--r--. 1 root root       76 Feb 21 14:54 metadata
-rw-r--r--. 1 root root       98 Feb 21 14:54 mysql_db-schema-create.sql
-rw-r--r--. 1 root root 18128336 Feb 21 14:54 mysql_db.t.0000000000000.sql
-rw-r--r--. 1 root root      451 Feb 21 14:54 mysql_db.t-schema.sql
复制
数据导入工具 TiDB Lightning
- TiDB Lightning 是TiDB数据库的生态工具之一,可以将全量数据高速导入到TiDB集群中。
- TiDB Lightning 支持的数据格式:
·导入Dumpling、CSV 或 Amazon Aurora Parquet输出格式的数据源。
·从本地盘或Amazon S3云盘读取数据。
部署 TiDB Lightning 工具
- TiDB Lightning 工具集成在 tidb-toolkit 中,先进行下载
[root@db1 ~]# yum install -y wget
[root@db1 ~]# wget https://download.pingcap.org/tidb-toolkit-v5.0.1-linux-amd64.tar.gz
复制- 解压缩下载软件包
[root@db1 ~]# tar xvf tidb-toolkit-v5.0.1-linux-amd64.tar.gz
复制- 进入目录,确认安装完毕。也可以将目录加入环境变量,方便后续执行
[root@db1 ~]# cd tidb-toolkit-v5.0.1-linux-amd64/bin/
[root@db1 bin]# ll
total 565656
-rwxr-xr-x. 1 root root 113956808 Apr 24  2021 br
-rwxr-xr-x. 1 root root  78663499 Apr 24  2021 dumpling
-rwxr-xr-x. 1 root root  12782776 Apr 24  2021 mydumper
-rwxr-xr-x. 1 root root  19219131 Apr 24  2021 pd-tso-bench
-rwxr-xr-x. 1 root root  74266927 Apr 24  2021 sync_diff_inspector
-rwxr-xr-x. 1 root root 125061248 Apr 24  2021 tidb-lightning
-rwxr-xr-x. 1 root root 120785240 Apr 24  2021 tidb-lightning-ctl
-rwxr-xr-x. 1 root root  34483064 Apr 24  2021 tikv-importer
复制
使用 TiDB Lightning 工具将数据导入到 TiDB 数据库
在数据导出工具 Dumpling 的练习三中,我们使用 Dumpling 工具将 MySQL 数据库的 mysql_db 数据导出在实验环境的 /tmp/mysql_db_bak 目录中,这里我们将使用 TiDB Lightning 工具将其导入到 TiDB 数据库中。 注意: 如果 /tmp/mysql_db_bak 目录中没有数据, 请参考数据导出工具 Dumpling 的练习三中的步骤进行数据导出。
- 检查待导入数据
[root@db1 ~]# ll /tmp/mysql_db_bak
total 17716
-rw-r--r--. 1 root root       76 Feb 21 14:54 metadata
-rw-r--r--. 1 root root       98 Feb 21 14:54 mysql_db-schema-create.sql
-rw-r--r--. 1 root root 18128336 Feb 21 14:54 mysql_db.t.0000000000000.sql
-rw-r--r--. 1 root root      451 Feb 21 14:54 mysql_db.t-schema.sql
复制- 编辑 TiDB Lightning 工具的配置文件
[root@db1 bin]# pwd
/root/tidb-toolkit-v5.0.1-linux-amd64/bin
[root@db1 bin]# vi tidb-lightning.toml
[lightning]
# 转换数据的并发数,默认为逻辑CPU数量,不需要配置。
# 混合部署的情况下可以配置为逻辑CPU的75%大小。
# region-concurrency =

# 日志
level = "info"
file = "tidb-lightning.log"

[tikv-importer]
# 选择使用的 local 后端
backend = "local"
# 设置排序的键值对的临时存放地址,目标路径需要是一个空目录
sorted-kv-dir = "/tmp"

[mydumper]
# 源数据目录。
data-source-dir = "/tmp/mysql_db_bak/"

[tidb]
# 目标集群的信息,tidb-server 的监听地址,填一个即可
host = "192.168.0.97"
port = 4000
user = "root"
password = ""
# 表架构信息在从 TiDB 的“状态端口”获取。
status-port = 10080
# 集群 pd 的地址
pd-addr = "192.168.0.94:2379"
复制
注意如下:
(1) backend = "local”:表示直接导入到 TiKV-Server 中。
(2) pd-addr = "192.168.0.94:2379”:选择任意一个 PD 节点的 IP 和输入端口号
- 连接到TiDB,检查导入数据前的 TiDB 数据库
[root@db1 ~]# mysql -h 192.168.0.97 -P 4000 -uroot
Welcome to the MySQL monitor.  Commands end with ; or \g.
Your MySQL connection id is 67
Server version: 5.7.25-TiDB-v5.0.0 TiDB Server (Apache License 2.0) Community Edition, MySQL 5.7 compatible

Copyright (c) 2000, 2022, Oracle and/or its affiliates.

Oracle is a registered trademark of Oracle Corporation and/or its
affiliates. Other names may be trademarks of their respective
owners.

Type 'help;' or '\h' for help. Type '\c' to clear the current input statement.

mysql> show databases;
+--------------------+
| Database           |
+--------------------+
| INFORMATION_SCHEMA |
| METRICS_SCHEMA     |
| PERFORMANCE_SCHEMA |
| mysql              |
| test               |
+--------------------+
5 rows in set (0.00 sec)
复制- 开始使用 TiDB Lightning 工具进行数据导入
[root@db1 bin]# ! /bin/bash
[root@db1 bin]# nohup ./tidb-lightning -config tidb-lightning.toml > nohup.out &
[1] 81700
[root@db1 bin]# nohup: ignoring input and redirecting stderr to stdout
# 这里请注意:此时屏幕光标会悬停在最后一行,我们可以点击回车键“Enter”,来使 nohup 的 tidb-lighting 在后台工作。
[root@db1 bin]#
[root@db1 bin]#
[1]+  Done                    nohup ./tidb-lightning -config tidb-lightning.toml > nohup.out
[root@db1 bin]#
复制- 进入到 TiDB 数据库,发现 mysql_db 库被导入,其中有 1 张数据表
[root@db1 ~]# mysql -h 192.168.0.97 -P 4000 -uroot
Welcome to the MySQL monitor.  Commands end with ; or \g.
Your MySQL connection id is 71
Server version: 5.7.25-TiDB-v5.0.0 TiDB Server (Apache License 2.0) Community Edition, MySQL 5.7 compatible

Copyright (c) 2000, 2022, Oracle and/or its affiliates.

Oracle is a registered trademark of Oracle Corporation and/or its
affiliates. Other names may be trademarks of their respective
owners.

Type 'help;' or '\h' for help. Type '\c' to clear the current input statement.

mysql> show databases;
+--------------------+
| Database           |
+--------------------+
| INFORMATION_SCHEMA |
| METRICS_SCHEMA     |
| PERFORMANCE_SCHEMA |
| mysql              |
| mysql_db           |
| test               |
+--------------------+
6 rows in set (0.00 sec)

mysql> use mysql_db
Reading table information for completion of table and column names
You can turn off this feature to get a quicker startup with -A

Database changed
mysql> show tables;
+--------------------+
| Tables_in_mysql_db |
+--------------------+
| t                  |
+--------------------+
1 row in set (0.00 sec)

mysql> select count(*) from t;
+----------+
| count(*) |
+----------+
|   262144 |
+----------+
1 row in set (0.11 sec)
复制- 可以从 nohup.out 中监控 tidb-lightning 工具是否退出
[root@db1 bin]# cat nohup.out
Verbose debug logs will be written to tidb-lightning.log
tidb lightning exit
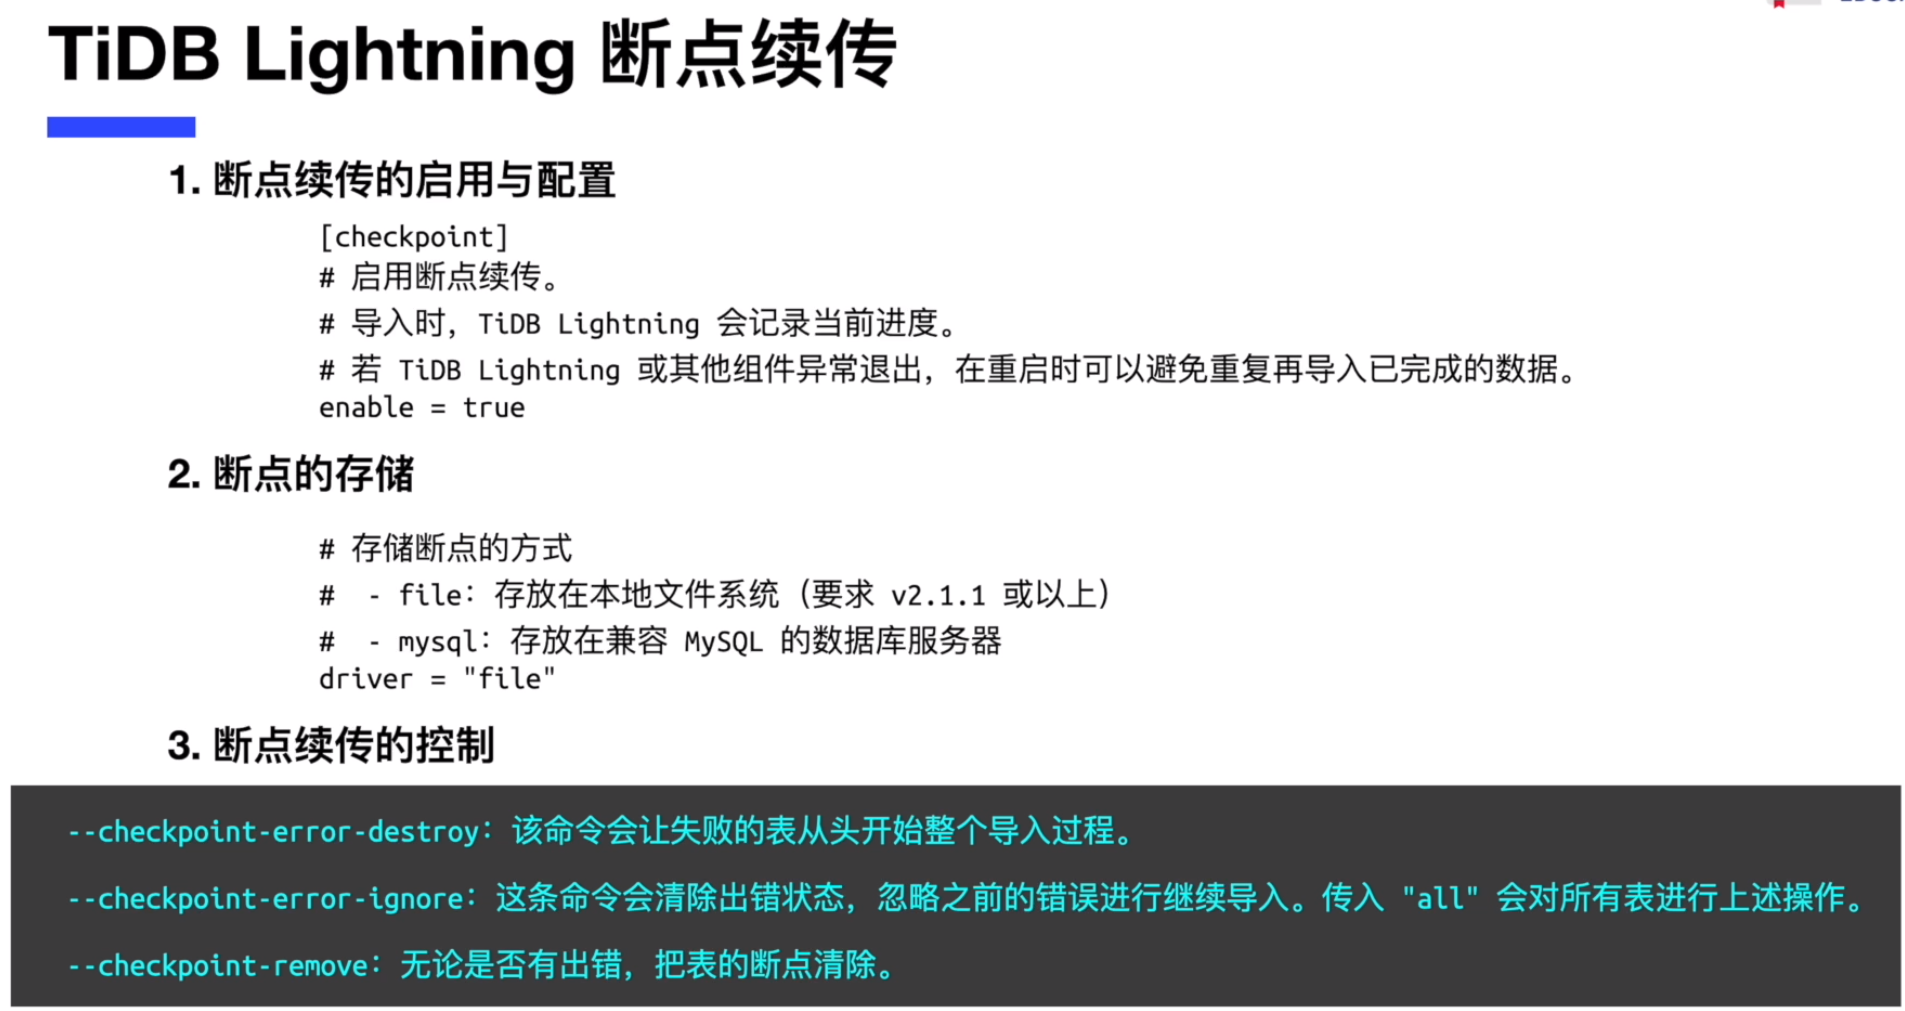
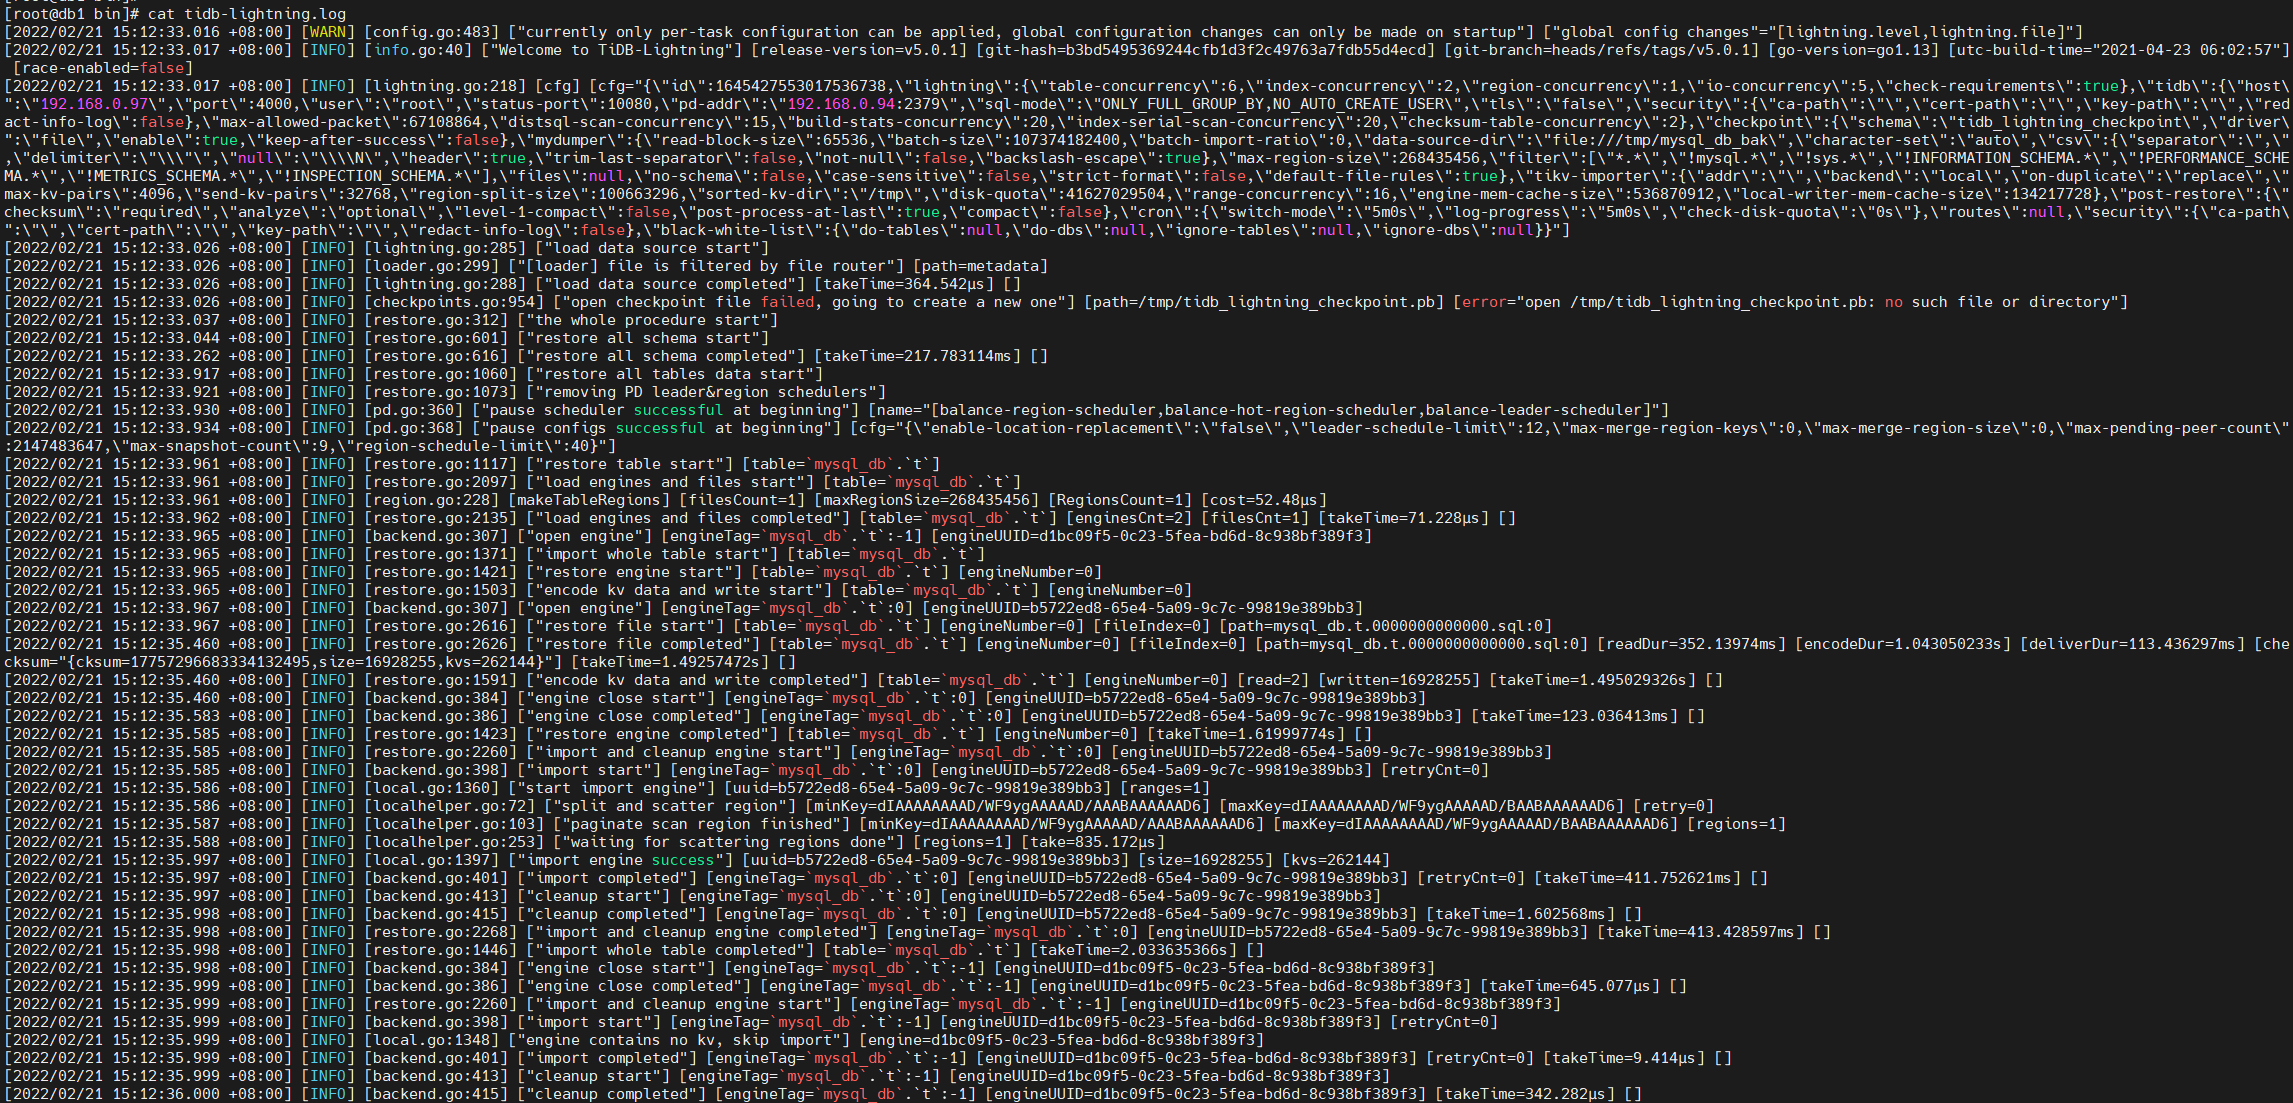
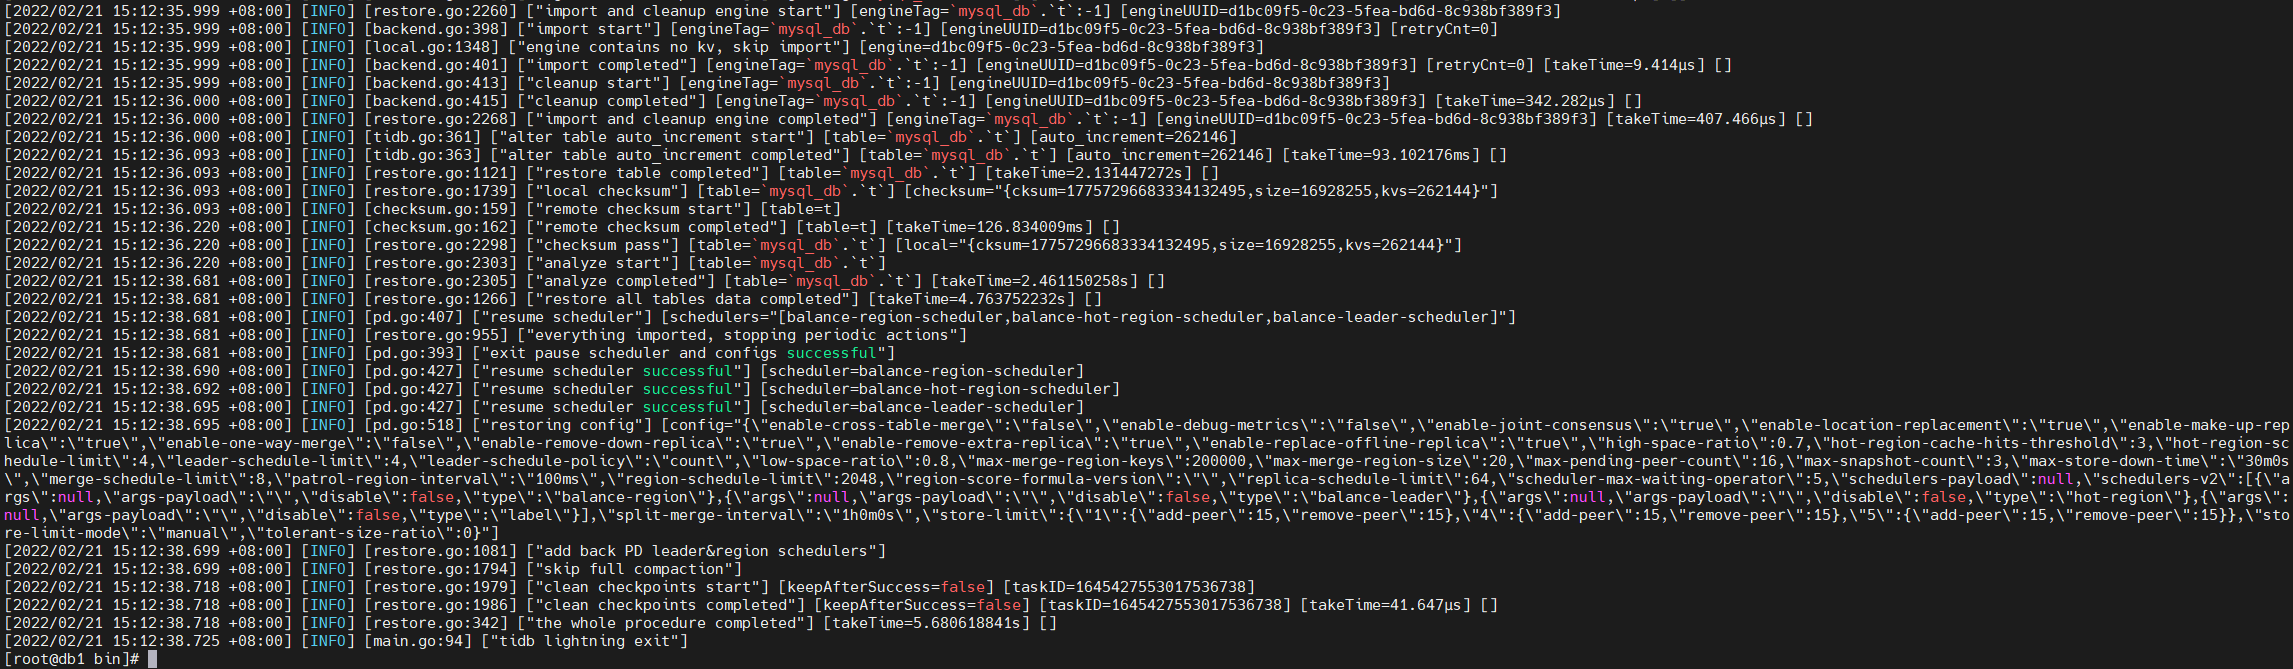
复制- 可以从 tidb-lightning 工具的详细日志中查看 tidb-lightning 的详细内容
评论

 0 点赞
0 点赞


