本文主要分享 openGauss 的单机部署过程,总体感觉非常方便。
openGauss 数据库简介
openGauss是一款开源关系型数据库管理系统,采用木兰宽松许可证v2发行。openGauss内核深度融合华为在数据库领域多年的经验,结合企业级场景需求,持续构建竞争力特性。openGauss 企业版下载
openGauss下载地址:https://opengauss.org/zh/download.html 。这里选择 Centos x86_64,openGuass 2.1 企业版本。wget https://opengauss.obs.cn-south-1.myhuaweicloud.com/2.1.0/x86/openGauss-2.1.0-CentOS-64bit-all.tar.gz
mkdir -p opt/software/openGauss
chmod 755 opt/software/
tar zxvfopenGauss-2.1.0-CentOS-64bit-all.tar.gz -C opt/software/openGauss
openGauss-2.1.0-CentOS-64bit-om.tar.gz
openGauss-2.1.0-CentOS-64bit.tar.bz2
openGauss-2.1.0-CentOS-64bit-om.sha256
openGauss-2.1.0-CentOS-64bit.sha256
upgrade_sql.tar.gz
upgrade_sql.sha256
tar zxvfopenGauss-2.1.0-CentOS-64bit-om.tar.gz
openGauss 部署
https://opengauss.org/zh/docs/2.1.0/docs/installation/%E5%AE%89%E8%A3%85%E5%87%86%E5%A4%87.html这里只展示关键的一些步骤。
环境准备
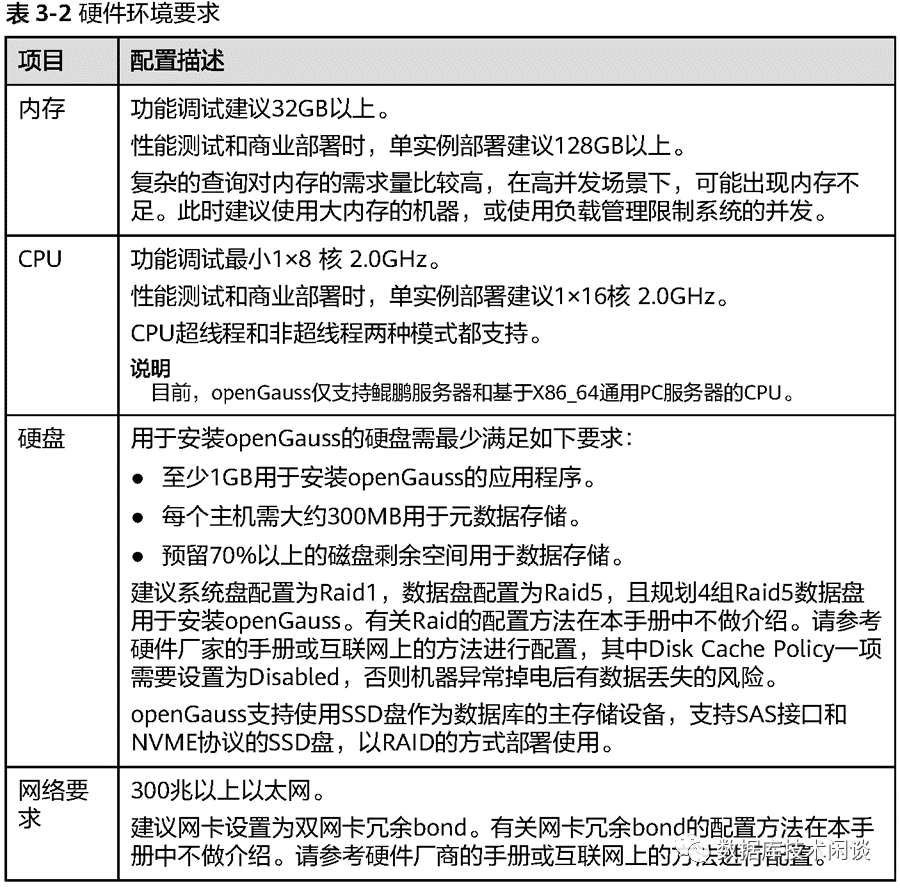
硬件
操作系统
systemctl disable firewalld.servicesystemctl stop firewalld.service软件包
yum install -y zlib-develbzip2-devel openssl-devel ncurses-devel sqlite-devel readline-devel tk-develgcc makeyum -y install libaio-devel flex bisonncurses-devel glibc-devel patch redhat-lsb-core readline-devel用户(可选)
可以手动创建用户,也可以在后面脚本里自动创建。建议手动创建,并打通 root到该用户的ssh免密通道。useradd omm -g dbgrp -G dbgrp安装openGauss
安装配置文件
配置文件(xml)指定安装的基本信息:集群名、目录、服务器等。这里安装的是单机版的openGauss,只有一台机器。cd opt/software/openGaussvim sfx_cluster_config.xml<?xml version="1.0"encoding="utf-8"?> <PARAM name="clusterName" value="ogsfx" > <PARAM name="nodeNames" value="sfx111188"/> <PARAM name="gaussdbAppPath"value="/opt/huawei/install/app" > <PARAM name="gaussdbLogPath"value="/home/omm/log" > <PARAM name="tmpMppdbPath"value="/data2/opengaussdb/tmp"/> <PARAM name="gaussdbToolPath" value="/opt/huawei/install/om"/> <PARAM name="corePath"value="/data2/opengaussdb/corefile"/> <PARAM name="backIp1s" value="192.168.111.188"/> <PARAM name="name" value="sfx111188"/> <PARAM name="azName" value="AZ1"/> <PARAM name="azPriority" value="1"/> <PARAM name="backIp1" value="192.168.111.188"/> <PARAM name="sshIp1" value="192.168.111.188"/> <PARAM name="dataNum" value="1"/> <PARAM name="dataPortBase" value="15400"/> <PARAM name="dataNode1"value="/data2/opengaussdb/dn"/> <PARAM name="dataNode1_syncNum" value="0"/> <PARAM name="dataNodeXlogPath1"value="/data2/opengaussdb/gauss_xlog" >初始化用户和数据库目录
cd opt/software/openGauss/script./gs_preinstall -U omm -G dbgrp -X ../sfx_cluster_config.xml执行安装
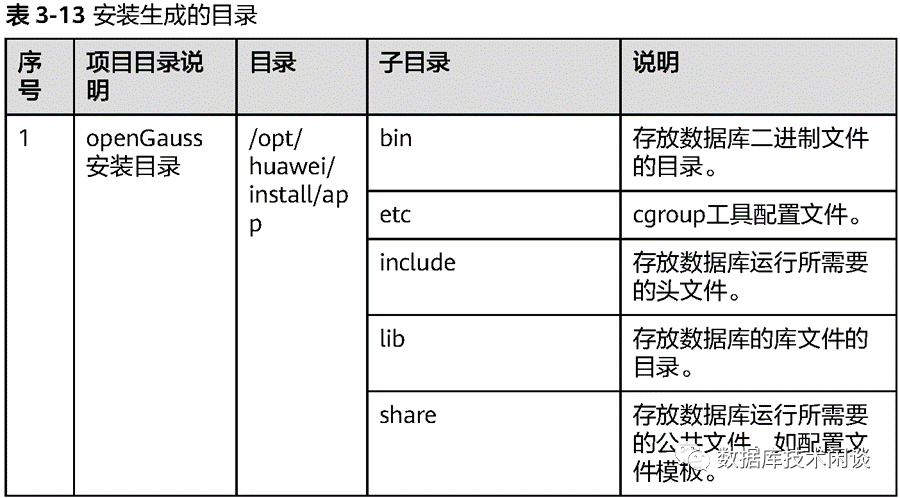
gs_install -X opt/software/openGauss/sfx_cluster_config.xml也可以查看安装状态。通过 gs_om 操作数据库状态。[omm@sfx111188 ~]$ gs_om -t status----------------------------------------------------------------------------------------------------------------------------------------------[omm@sfx111188 ~]$ gs_om -t stop=========================================Successfully stopped cluster.=========================================目录说明
数据库参数修改
数据库参数这里选择使用命令行下修改,重启实例后生效。这里参数不一定是最优的,仅供参考。gs_guc reload -N all -I all -c "random_page_cost = '2'"
gs_guc reload -N all -I all -c "max_parallel_workers_per_gather = '0'"
gs_guc reload -N all -I all -c "maintenance_work_mem = '2GB'"
gs_guc reload -N all -I all -c "wal_compression = on" --
gs_guc reload -N all -I all -c "checkpoint_completion_target = 0.9"
gs_guc reload -N all -I all -c "min_wal_size = '1GB'" ---
gs_guc reload -N all -I all -c "max_wal_size = '48GB'" ---
gs_guc reload -N all -I all -c "wal_keep_segments = 1000"
gs_guc reload -N all -I all -c "checkpoint_timeout='20min'"
gs_guc reload -N all -I all -c "log_statement = ddl"
gs_guc reload -N all -I all -c "effective_cache_size='90GB'"
gs_guc reload -N all -I all -c "checkpoint_segments=128"
gs_guc reload -N all -I all -c "password_encryption_type=0"
gs_guc reload -N all -I all -c "shared_buffers='40GB'"
gs_guc reload -N all -I all -c "max_process_memory='90GB'"
gs_guc reload -N all -I all -c "maintenance_work_mem='10GB'"
gs_guc reload -N all -I all -c "enable_wdr_snapshot=on"
gs_guc reload -N all -I all -c "autovacuum_max_workers=10"
BenchmarkSQL测试
数据库环境准备
新建用户和表空间
create user jack with sysadmin identifiedby 'gauss@123';create tablespace tbs1 location '/data/opengaussdb/data/tbs1';create tablespace tbs2 location '/data/opengaussdb/data/tbs2';配置用户连接权限
gs_guc reload -N all -I all -h "host tpcc1w jack 192.168.0.0/16 sha256"命令生效后会体现在数据目录下的配置文件 pg_hba.conf 里。建表语句
可以手动建表,也可以通过BenchmarkSQL的脚本runSQL.sh 建表。下面的几个大表,指定了填充因子 FILLFACTOR 为50,以提升更新性能。底层 SSD 使用可计算存储CSD时,CSD内部有压缩,所以实际存储空间不会浪费。create table bmsql_config ( cfg_name varchar(30) primarykey,create table bmsql_warehouse (create table bmsql_district (create table bmsql_customer ( c_credit_lim decimal(12,2), c_ytd_payment decimal(12,2),)WITH (FILLFACTOR=50) tablespace tbs1;create sequence bmsql_hist_id_seq;create table bmsql_history ()WITH (FILLFACTOR=50) tablespace tbs2;create table bmsql_new_order ()WITH (FILLFACTOR=50) tablespace tbs1;create table bmsql_oorder ()WITH (FILLFACTOR=50) tablespace tbs2;create table bmsql_order_line ( ol_number integer notnull,)WITH (FILLFACTOR=50) tablespace tbs2;create table bmsql_item (create table bmsql_stock ()WITH (FILLFACTOR=50) tablespace tbs1;
BenchmarkSQL 安装
Yum源修改
mkdir -p /etc/yum.repos.d/repo_bak/mv /etc/yum.repos.d/*.repo /etc/yum.repos.d/repo_bak/wget -O /etc/yum.repos.d/CentOS-Base.repo https://repo.huaweicloud.com/repository/conf/CentOS-7-reg.repoyum remove -y epel-releaseyum install -y https://repo.huaweicloud.com/epel/epel-release-latest-7.noarch.rpmsed -i "s/#baseurl/baseurl/g" /etc/yum.repos.d/epel.reposed -i "s/mirrorlist/#mirrorlist/g" /etc/yum.repos.d/epel.reposed -i "s@http://download.fedoraproject.org/pub@https://repo.huaweicloud.com@g" /etc/yum.repos.d/epel.repo安装依赖的软件包
yum install gcc glibc-headers gcc-c++gcc-gfortran readline-devel libXt-develpcre-devel libcurl libcurl-devel -yyum install ncurses ncurses-develautoconf automake zlib zlib-devel bzip2 bzip2-devel xz-devel -yyum install java-1.8.0-openjdk ant -y替换BenchmarkSQL中的驱动
BenchmarkSQL 从github开源网站下载。openGauss的JDBC驱动从官网下载,将里面的postgresql.jar复制到~ /benchmarksql-5.0/lib/postgres/ 下。编译安装
[root@sfx111188 ~]# cd /root/benchmarksql-5.0/[root@sfx111188 benchmarksql-5.0]# antBuildfile:/soft/benchmarksql-5.0/build.xml [mkdir] Created dir: /root/benchmarksql-5.0/build [javac] Compiling 11 source files to /root/benchmarksql-5.0/build [mkdir] Created dir: /root/benchmarksql-5.0/dist [jar] Building jar: /root/benchmarksql-5.0/dist/BenchmarkSQL-5.0.jarBenchmarkSQL运行
BenchmarkSQL配置文件
§ 参数warehouses决定了数据量的规模,这里选择10000仓,数据总量大小大概在1.7T 左右。§ 参数loadWorkers 决定了初始化的并发数。这里根据实际机器内存选择。如果内存不大,并发设置的太大,BenchmarkSQL写入速度太快,很可能会碰到机器可用内存不足(也可能是openGauss的某个内存参数这里设置的不合理导致)。[root@sfx111188run]# cat props.openGaussdriver=org.postgresql.Driverconn=jdbc:postgresql://127.1:15400/tpcc1w?prepareThreshold=1&batchMode=on&fetchsize=100terminalWarehouseFixed=falseresultDirectory=my_result_%tY-%tm-%td_%tH%tM%tSosCollectorScript=./misc/os_collector_linux.py建表(可选)
sh runSQL.sh props.openGausssql.common/tableCreates.sql初始化数据
sh runLoader.sh props.openGauss