


【系列文章】
重学ElasticSearch (ES) 系列(二):搜索外相关操作(集群、索引、文档)
重学ElasticSearch (ES) 系列(三):深入数据搜索
重学ElasticSearch (ES) 系列(四):ELK搭建SpringBoot日志实时分析系统
重学ElasticSearch (ES) 系列(五):常见面试题
目录
一、概述
1.1、什么是ES
一个开源的高扩展的分布式全文检索引擎,可近乎实时的存储、检索数据,可扩展性强,可处理PB级别的数据。
通过简单的Restful API, 来隐藏Luncee的复杂性,从而让全文搜索变得简单
1.2、倒排索引
1.2.1、什么是倒排索引
倒排索引是一种数据结构
Elasticsearch是通过Lucene的倒排索引技术实现比关系型数据库更快的过滤。
1、把每个文档拆分为独立的词
2、创建一个包含所有且不重复的词条列表
3、记录每个词条出现在哪些文档中

这样,搜索linux,就能快速定位到3、4文档
1.2.2、倒排索引的核心组成
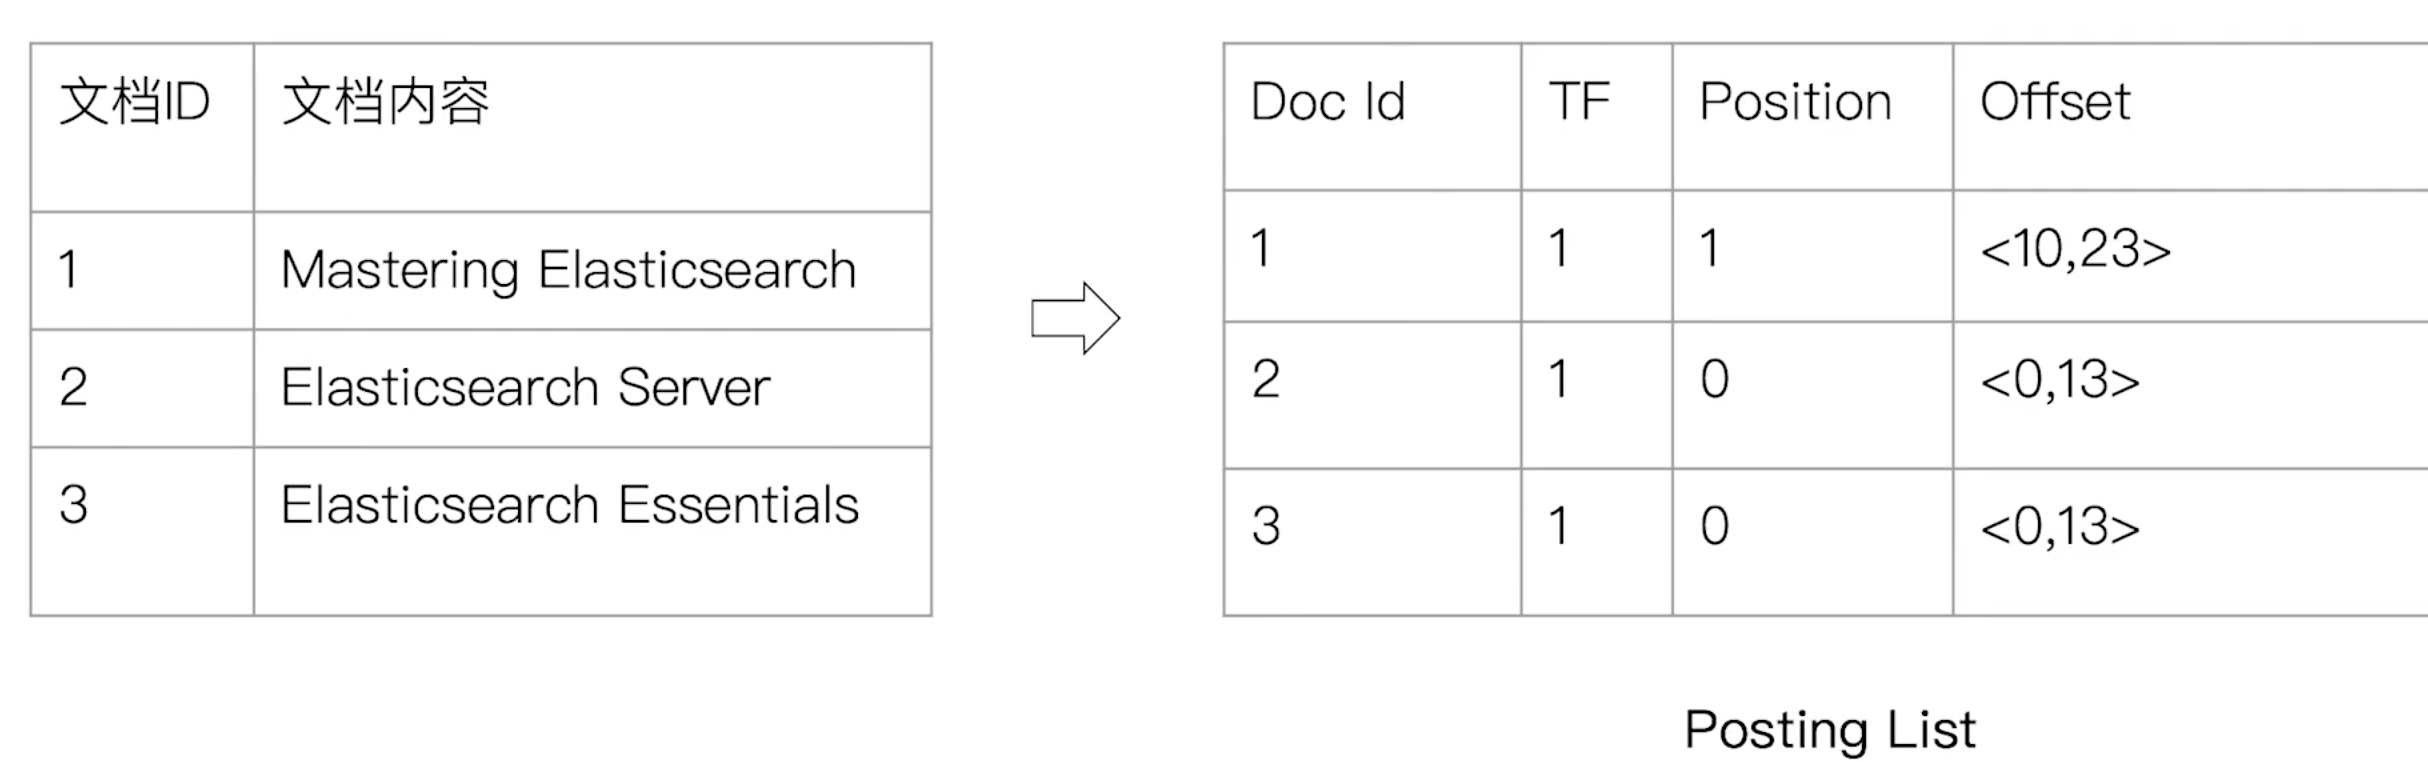
倒排索引包含2个部分:单词字典、倒排列表
-
单词字典(Term Dictionary)
单词字典记录所有文档的单词和倒排列表的关联关系
单词字典一般比较大,可以通过B+树或哈希拉链表实现,以满足高性能的插入和查询
-
倒排列表(Posting List)
倒排列表由索引项组成
- 索引项
- 文档id
- 词频TF:该单词在文档中出现的次数,用于相关性评分
- 位置:单词在文档中的分词位置,用于语句搜索
- 偏移:记录单词的在文档中的起始和结束位置,用于高亮显示
- 索引项
1.3、核心概念
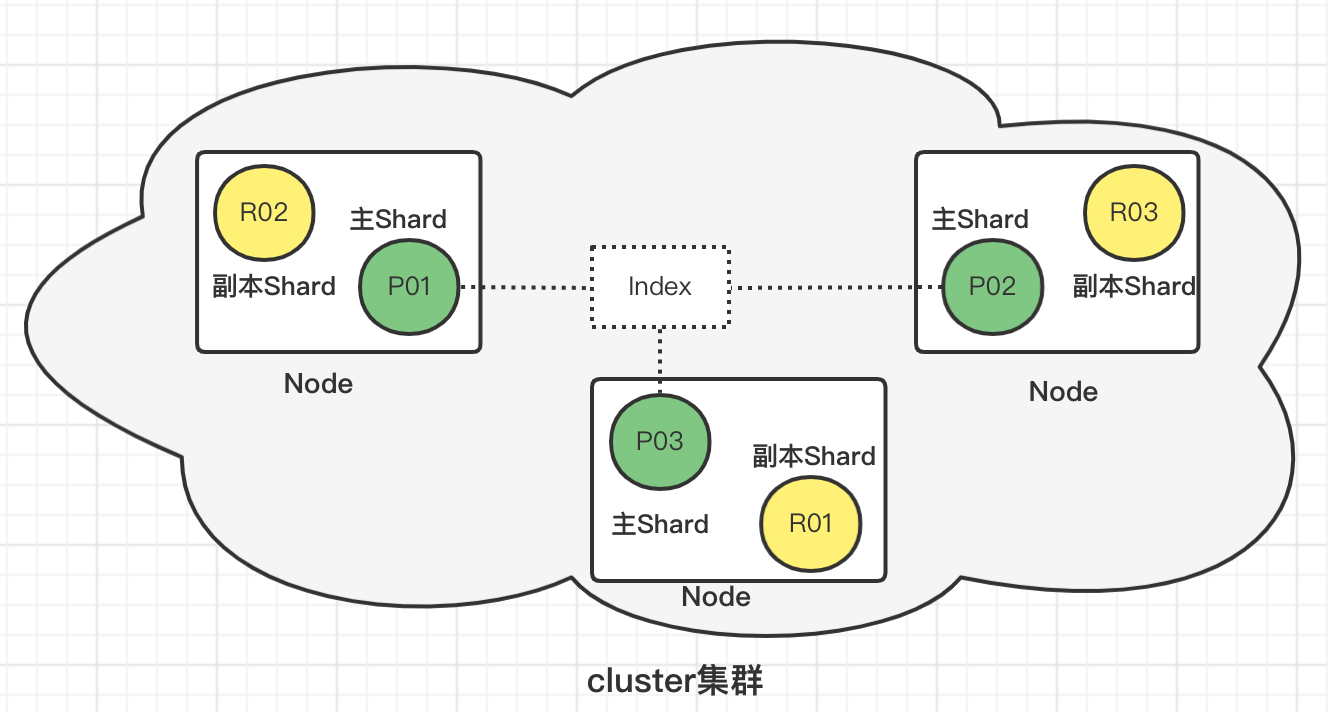
1、es提供了分布式集群(Cluster)的方式,保证高可用
2、多个节点(Node)组成一个集群
3、一个节点中分布着多个索引(index)/索引的一部分(分片Shard)
4、节点间多个分片组成一个index
Near Realtime(近实时)
Elasticsearch是一个近乎实时的搜索平台,这意味着从索引文档到可搜索文档之间只有一个轻微的延迟(通常是一秒钟)。
Cluster(集群)
群集是一个或多个节点的集合,它们一起保存整个数据,并提供跨所有节点的联合索引和搜索功能。每个群集都有自己的唯一群集名称,节点通过名称加入群集。
Node(节点)
节点是指属于集群的单个Elasticsearch实例,存储数据并参与集群的索引和搜索功能。可以将节点配置为按集群名称加入特定集群,默认情况下,每个节点都设置为加入一个名为elasticsearch的群集。
1.2.4、Index(索引)
索引是一些具有相似特征的文档集合,类似于MySql中数据库的概念。但是在Elasticsearch 6.0.0及更高的版本中,一个index只能包含一个type,其实也类似于一个Index就是一个表。
Type(类型)
类型是索引的逻辑类别分区,通常,为具有一组公共字段的文档类型,类似MySql中表的概念。注意:在Elasticsearch 6.0.0及更高的版本中,一个索引只能包含一个类型。
Document(文档)
文档是可被索引的基本信息单位,以JSON形式表示,类似于MySql中行记录的概念。
Shards(分片)
当索引存储大量数据时,可能会超出单个节点的硬件限制,为了解决这个问题,Elasticsearch提供了将索引细分为分片的概念。分片机制赋予了索引水平扩容的能力、并允许跨分片分发和并行化操作,从而提高性能和吞吐量。
- 主分片
主分片用于解决数据水平扩展问题。通过主分片,可以将数据分布到集群内的不同节点上。主分片在创建索引时指定,后续不允许修改
在可能出现故障的网络环境中,需要有一个故障切换机制,Elasticsearch提供了将索引的分片复制为一个或多个副本的功能,副本在某些节点失效的情况下提供高可用性。
- 副本分片(Replicas)
副本分片用于解决数据高可用问题。是主分片的拷贝。副本分片数可以动态调整。
二、安装
2.1、Linux下安装
2.1.1、安装ElasticSearch
-
下载解压
tar -zxvf elasticsearch-7.16.2.tar.gz -
修改配置文件
cd elasticsearch-7.16.2/config
vi elasticsearch.yml
# ---------------------------------- Cluster ----------------------------------- # 集群名称,默认是elasticsearch cluster.name: my-elasticsearch # ------------------------------------ Node ------------------------------------ node.name: node-1 cluster.initial_master_nodes: ["node-1"] # ----------------------------------- Paths ------------------------------------ path.data: /path/to/data path.logs: /path/to/logs # ---------------------------------- Network ----------------------------------- # 为es设置ip绑定,默认是127.0.0.1,也就是默认只能通过127.0.0.1 或者localhost才能访问,也可配置0.0.0.0全部可以访问 network.host: 192.168.0.1 # 为es设置自定义端口,默认是9200 http.port: 9200 -
创建用户及设置文件权限
# 创建用户和组 groupadd esuser useradd -g esuser esuser # 设置密码 passwd esuser # 设置文件权限 chown -R esuser:esuser /elasticsearch-7.16.2 -
启动
su - esuser cd /elasticsearch-7.16.2/bin ./elasticsearch -d -
关闭
ps -ef|grep elasticsearch
kill -9 pid
2.1.2、安装kibana
-
解压
tar -zxvf kibana-7.16.2-linux-x86_64.tar.gz -
修改配置
cd kibana-7.16.2-linux-x86_64/config

vi kibana.yml
server.port: 5601 server.host: "192.168.1.23" elasticsearch.hosts: ["http://192.168.111.133:9200"] elasticsearch.username: "kibana_system" elasticsearch.password: "elastic" il18n.locale: zh-CN -
修改权限
# 设置文件权限 chown -R esuser:esuser /kibana-7.16.2-linux-x86_64 -
启动
cd /kibana-7.16.2-linux-x86_64/bin
./kibana &
2.2、Docker安装
2.2.1、安装Elasticsearch
-
拉取镜像
docker pull elasticsearch:7.16.2 -
创建持久化文件
mkdir -p /root/elasticsearch/config mkdir -p /root/elasticsearch/data # 赋予权限 chmod 777 /root/elasticsearch/data -
初始化配置
echo "http.host: 0.0.0.0" >> elasticsearch/config/elasticsearch.yml -
启动镜像
docker run --name elasticsearch -p 9200:9200 -p 9300:9300 -e "discovery.type=single-node" -v /root/elasticsearch/config/elasticsearch.yml:/usr/share/elasticsearch/config/elasticsearch.yml -v /root/elasticsearch/data:/usr/share/elasticsearch/data -v /root/elasticsearch/plugins:/usr/share/elasticsearch/plugins -d elasticsearch:7.16.2- p: 端口映射
- -e: 单点模式启动
- -v: 目录挂载
- -d: 后台运行
-
测试访问
localhost:9200
{
  "name" : "1915d6ba7ccb",
  "cluster_name" : "elasticsearch",
  "cluster_uuid" : "E017hynLQvi28mpqUmU00w",
  "version" : {
    "number" : "7.16.2",
    "build_flavor" : "default",
    "build_type" : "docker",
    "build_hash" : "ef48eb35cf30adf4db14086e8aabd07ef6fb113f",
    "build_date" : "2020-03-26T06:34:37.794943Z",
    "build_snapshot" : false,
    "lucene_version" : "8.4.0",
    "minimum_wire_compatibility_version" : "6.8.0",
    "minimum_index_compatibility_version" : "6.0.0-beta1"
  },
  "tagline" : "You Know, for Search"
}
2.2.2、安装kibana
kibana 是 Elasticsearch 的最佳拍档
用于Query DSL的编写,也可以做各式各样的数据报表
-
拉取镜像
docker pull kibana:7.16.2 -
配置文件
mkdir kibana
vi kibana.yml
server.host: 0.0.0.0 elasticsearch.hosts: http://localhost:9200 -
启动
docker run --name kibana -v /Users/yangmeng/kibana/kibana.yml:/usr/share/kibana/config/kibana.yml -p 5601:5601 -d kibana:7.16.2-
若遇到该容器已经存在,rm掉,重现启动即可
docker rm a71a11a3a30fd6bfc
-
-
访问
localhost:5601 【Kibana server is not ready yet】
-
排错
按照以上做法,访问localhost:5601会报错 【Kibana server is not ready yet】
原因是:1、ElasticSearch和kibana版本不匹配
2、kibana.yml错误
-
更改kibana.yml
server.host: 0.0.0.0 elasticsearch.hosts: http://192.168.0.102:9200 -
重启kibana
docker restart 80118c57cabc
-
三、分词
3.1、概述
ES 中处理分词的部分被称作分词器,英文是
Analyzer,它决定了分词的规则。ES 自带了很多默认的分词器,比如Standard、Keyword、Whitespace等等,默认是Standard。当我们在读时或者写时分词时,均可以指定要使用的分词器。
-
分词原理
分词器的组成如下:
- Character Filters:针对原始文本进行处理,比如去除html标签
- Tokenizer:将原始文本按照一定规则切分为单词
- Token Filters:针对Tokenizer处理的单词进行再加工,比如转小写、删除或增新等处理
-
分词器种类
-
默认分词器:standard
POST _analyze { "analyzer": "standard", "text": "往事知多少" } -
停用词分词器:stop
POST _analyze { "analyzer": "stop", "text": ["The 2 QUICK Brown Foxes jumped over the lazy dog's bone."] } -
中文分词器:ik分词器
POST _analyze
{
  "analyzer": "ik_smart",
  "text": "春花秋月何时"
}

POST _analyze
{
  "analyzer": "ik_max_word",
  "text": "往事知多少"
}
-
3.2、写入时分词
当创建文档时,ES会进行分词,用于倒排索引,存储在服务器磁盘中
-
默认写入时分词
写入时,分词默认使用的是
Standard。会将中文分成单个字当索引PUT mapping_test { "mappings": { "properties": { "title": { "type": "text" } } } } -
指定分词器
写入时,也可以指定分词器
PUT mapping_test
{
  "mappings": {
    "properties": {
      "title": {
        "type": "text",
  	    "analyzer": "ik_max_word"
      }
    }
  }
}
3.3、搜索时分词
用户搜索时,也会对搜索词进行分词,存储在内存中(查询结束则消失)
-
默认分词器
读时分词器默认与写时分词器默认保持一致(读写采用一致的分词器,才能尽最大可能保证分词的结果是可以匹配的。)
-
指定分词器
ES 允许也读时分词器单独设置
POST test/_search
{
  "query":{
    "match":{
      "msg":{
        "query": "eating",
        "analyzer": "english"
      }
    }
  }
}
3.4、IK分词器
对中文的分词进行了优化
3.4.1、安装IK分词器插件
进入ElasticSearch容器,安装插件,重启容器
需要跟ElasticSearch相同版本
// 进入容器
docker exec -it es /bin/bash
// 下载相同版本的ik插件
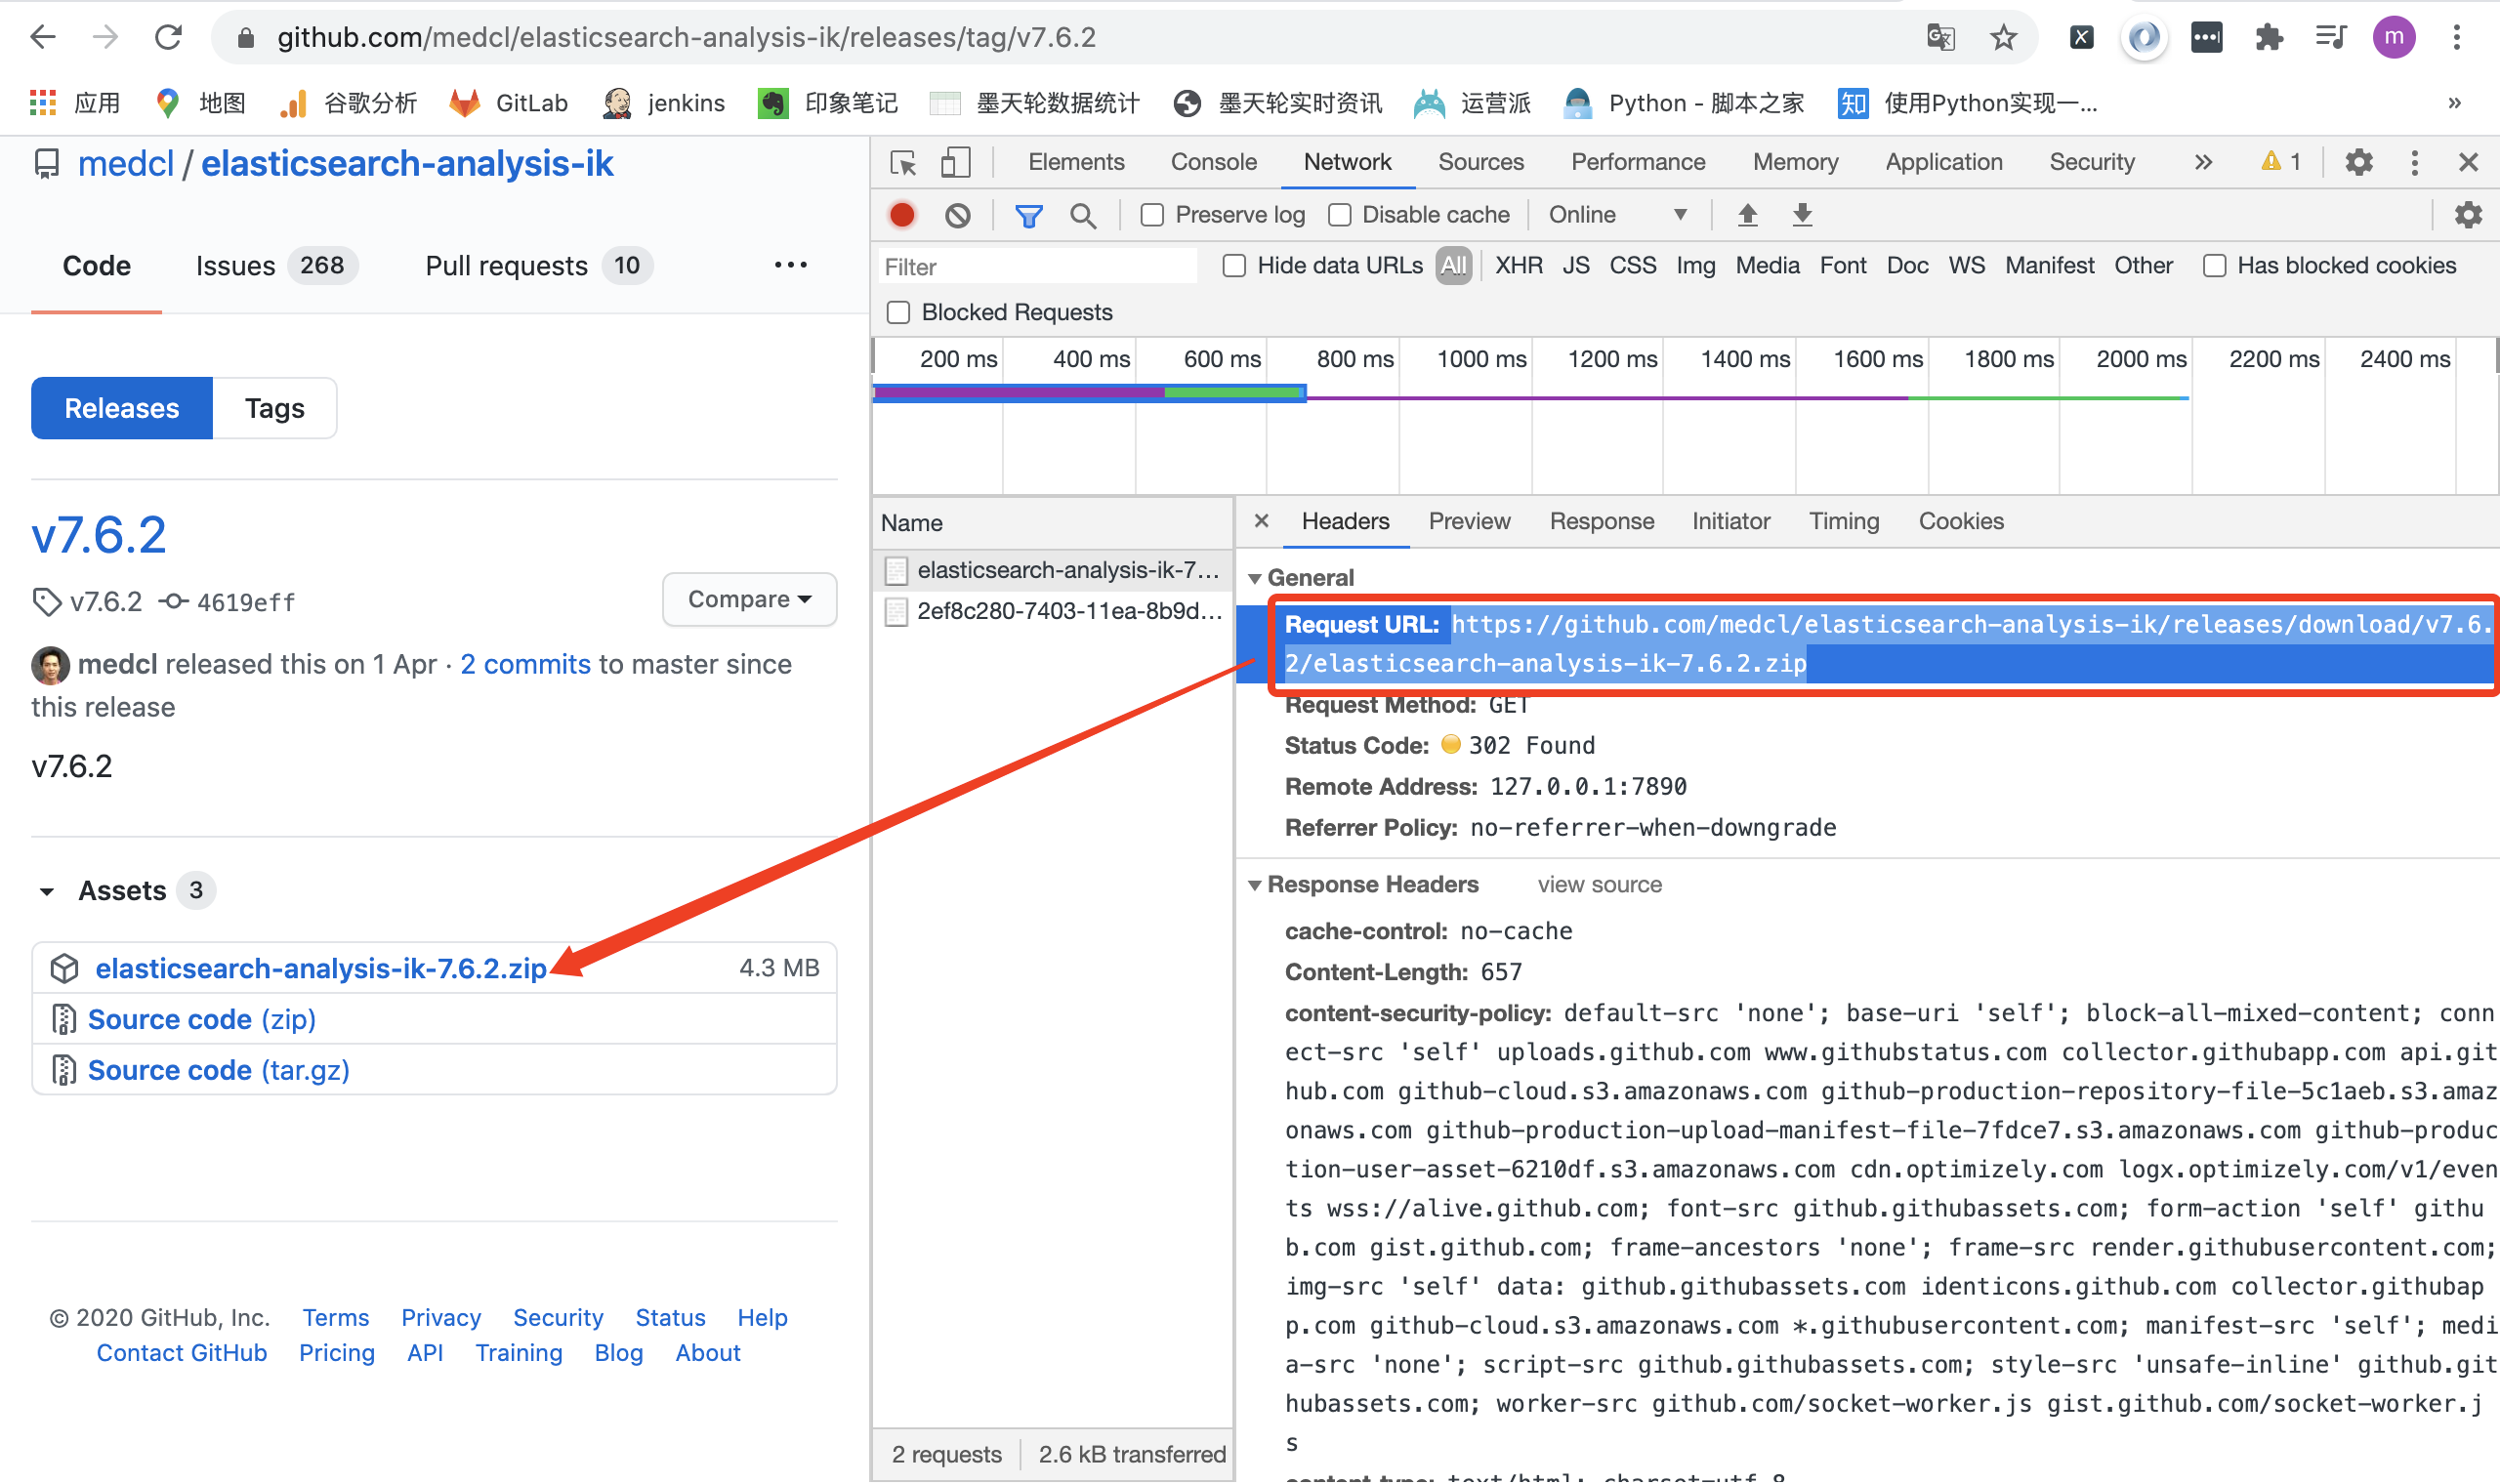
elasticsearch-plugin install https://github.com/medcl/elasticsearch-analysis-ik/releases/download/v7.16.2/elasticsearch-analysis-ik-7.16.2.zip
// 重启容器
docker restart es
3.4.2、使用
3.4.2.1、测试分词效果
一个中文分词器插件,提供了两个分词算法:ik_smart:最小切分、ik_max_word:最小粒度划分
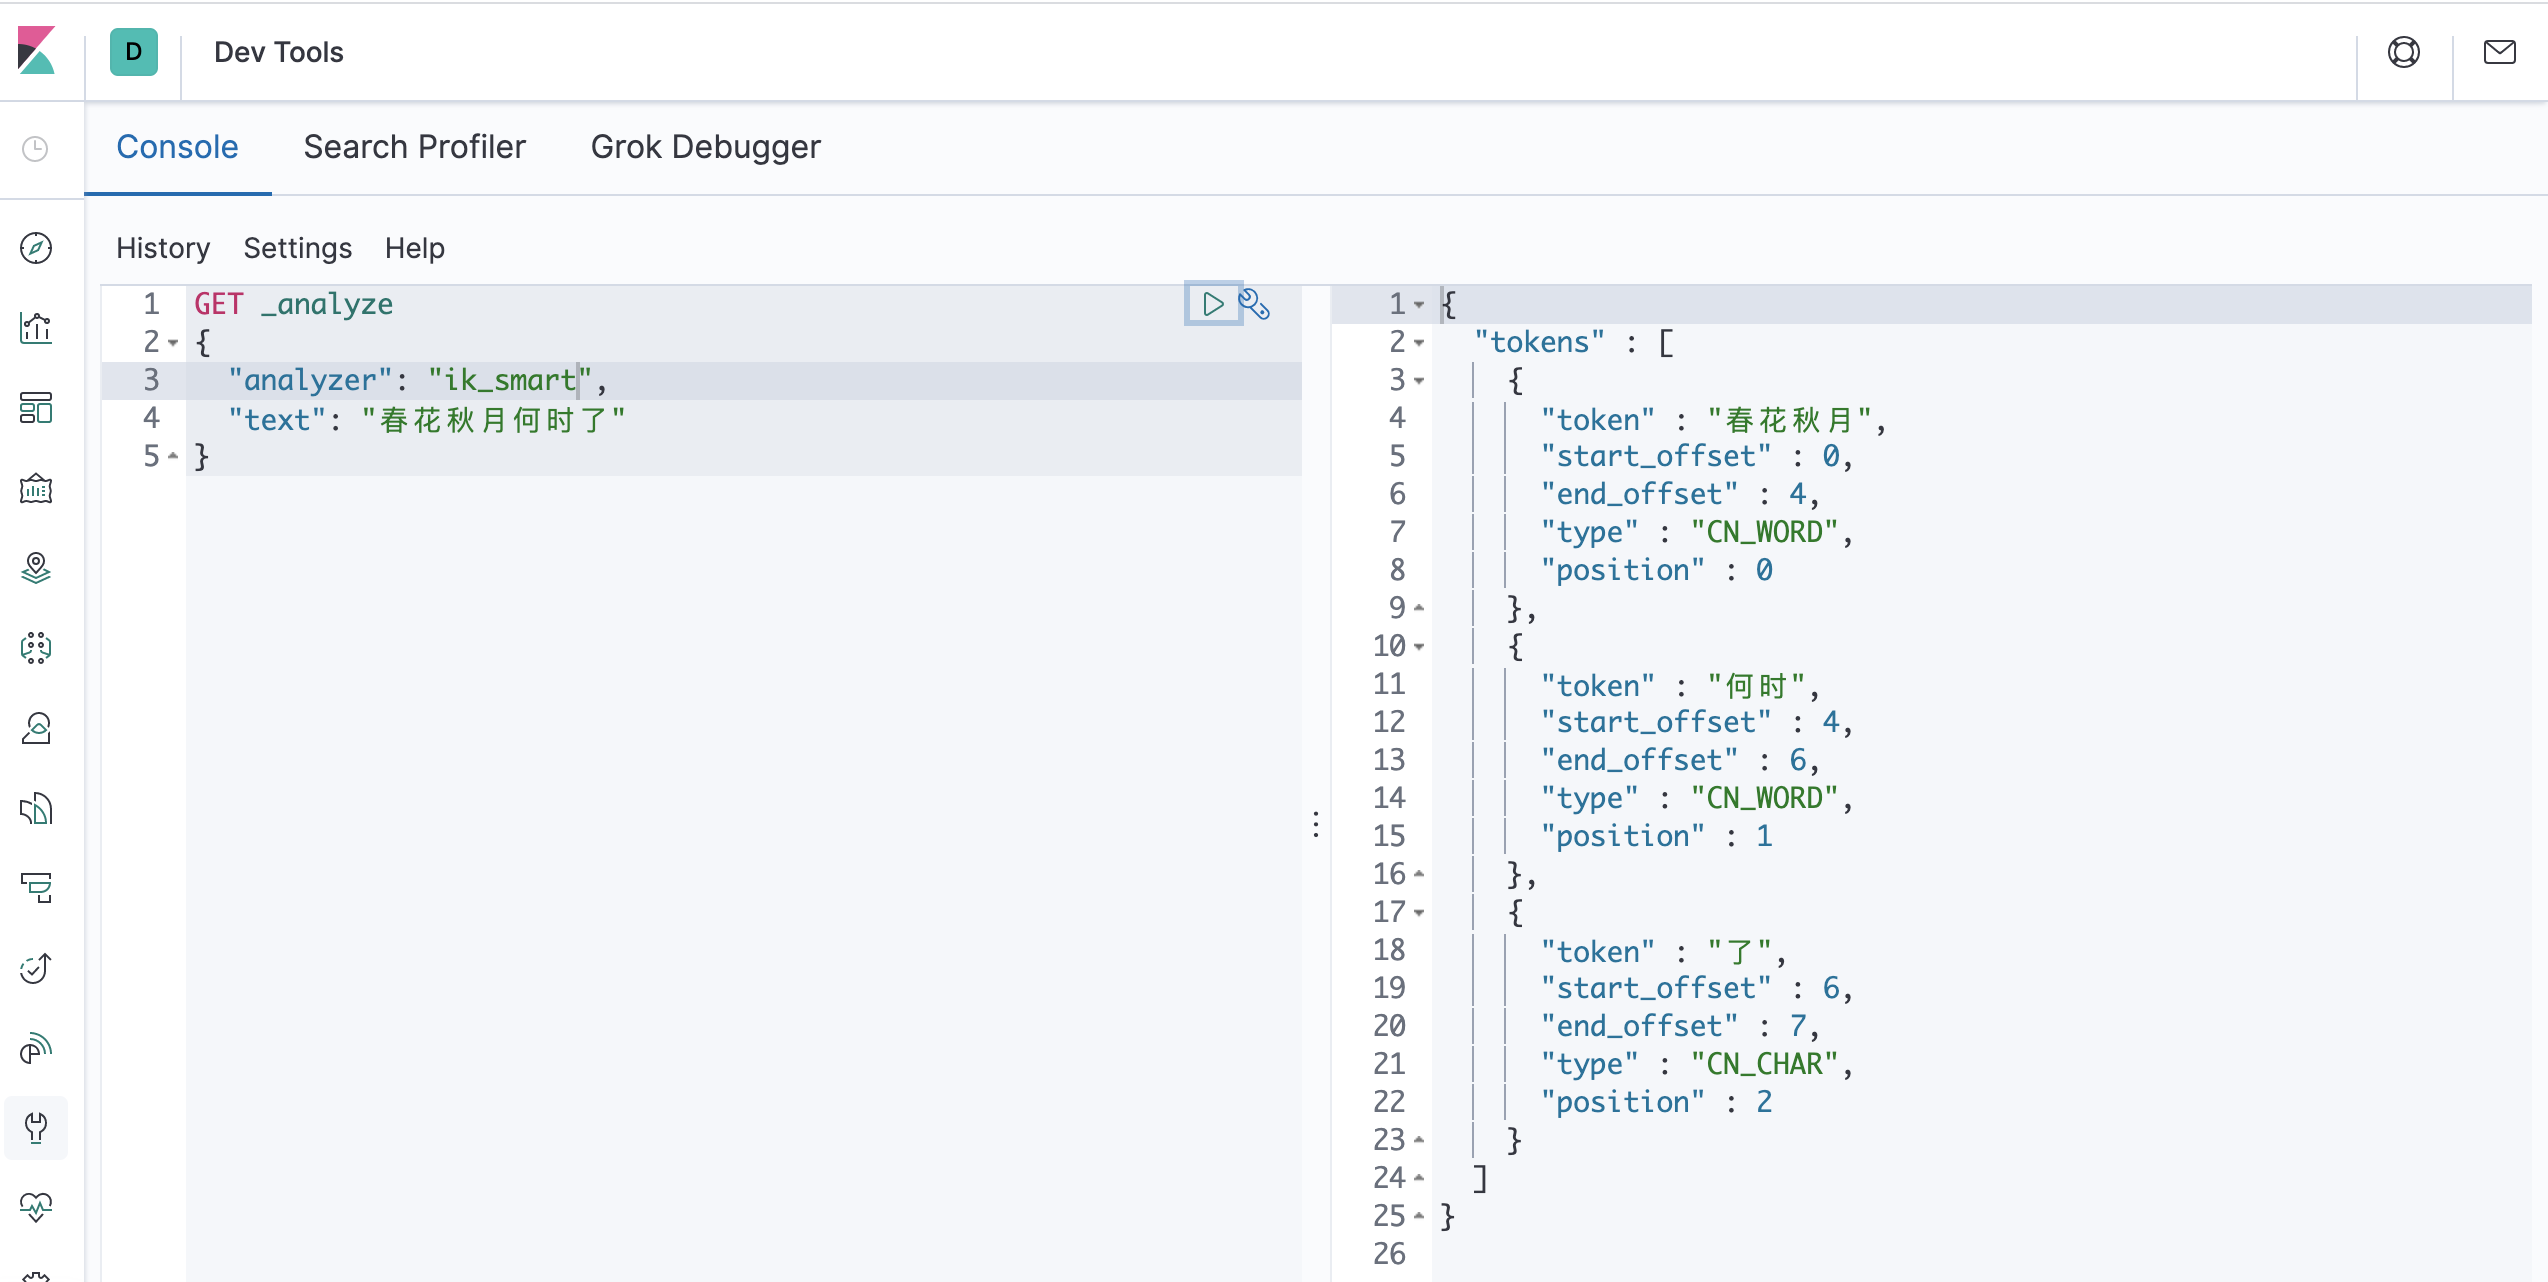
GET _analyze
{
  "analyzer": "ik_smart",
  "text": "春花秋月何时了"
}

GET _analyze
{
  "analyzer": "ik_max_word",
  "text": "春花秋月何时了"
}
# 补充:curl携带body发送请求测试ik分词器
curl -X POST \
'http://127.0.0.1:9200/_analyze?pretty=true' \
-H 'Content-Type: application/json' \
-d '{"text":"我们是软件工程师","tokenizer":"ik_smart"}'
3.4.2.1、自定义扩展词
-
修改配置文件IKAnalyzer.cfg.xml
<?xml version="1.0" encoding="UTF-8"?> <!DOCTYPE properties SYSTEM "http://java.sun.com/dtd/properties.dtd"> <properties> <comment>IK Analyzer 扩展配置</comment> <!--用户可以在这里配置自己的扩展字典 --> <entry key="ext_dict">myself.dic</entry> <!--用户可以在这里配置自己的扩展停止词字典--> <entry key="ext_stopwords"></entry> <!--用户可以在这里配置远程扩展字典 --> <!--<entry key="remote_ext_dict">http://localhost/es_new_word.txt</entry>--> <!--用户可以在这里配置远程扩展停止词字典--> <!-- <entry key="remote_ext_stopwords">words_location</entry> --> </properties> -
编写自定义dic(myself.dic)
春花秋
3.4.3、实操
3.4.3.1、与默认分词器对比
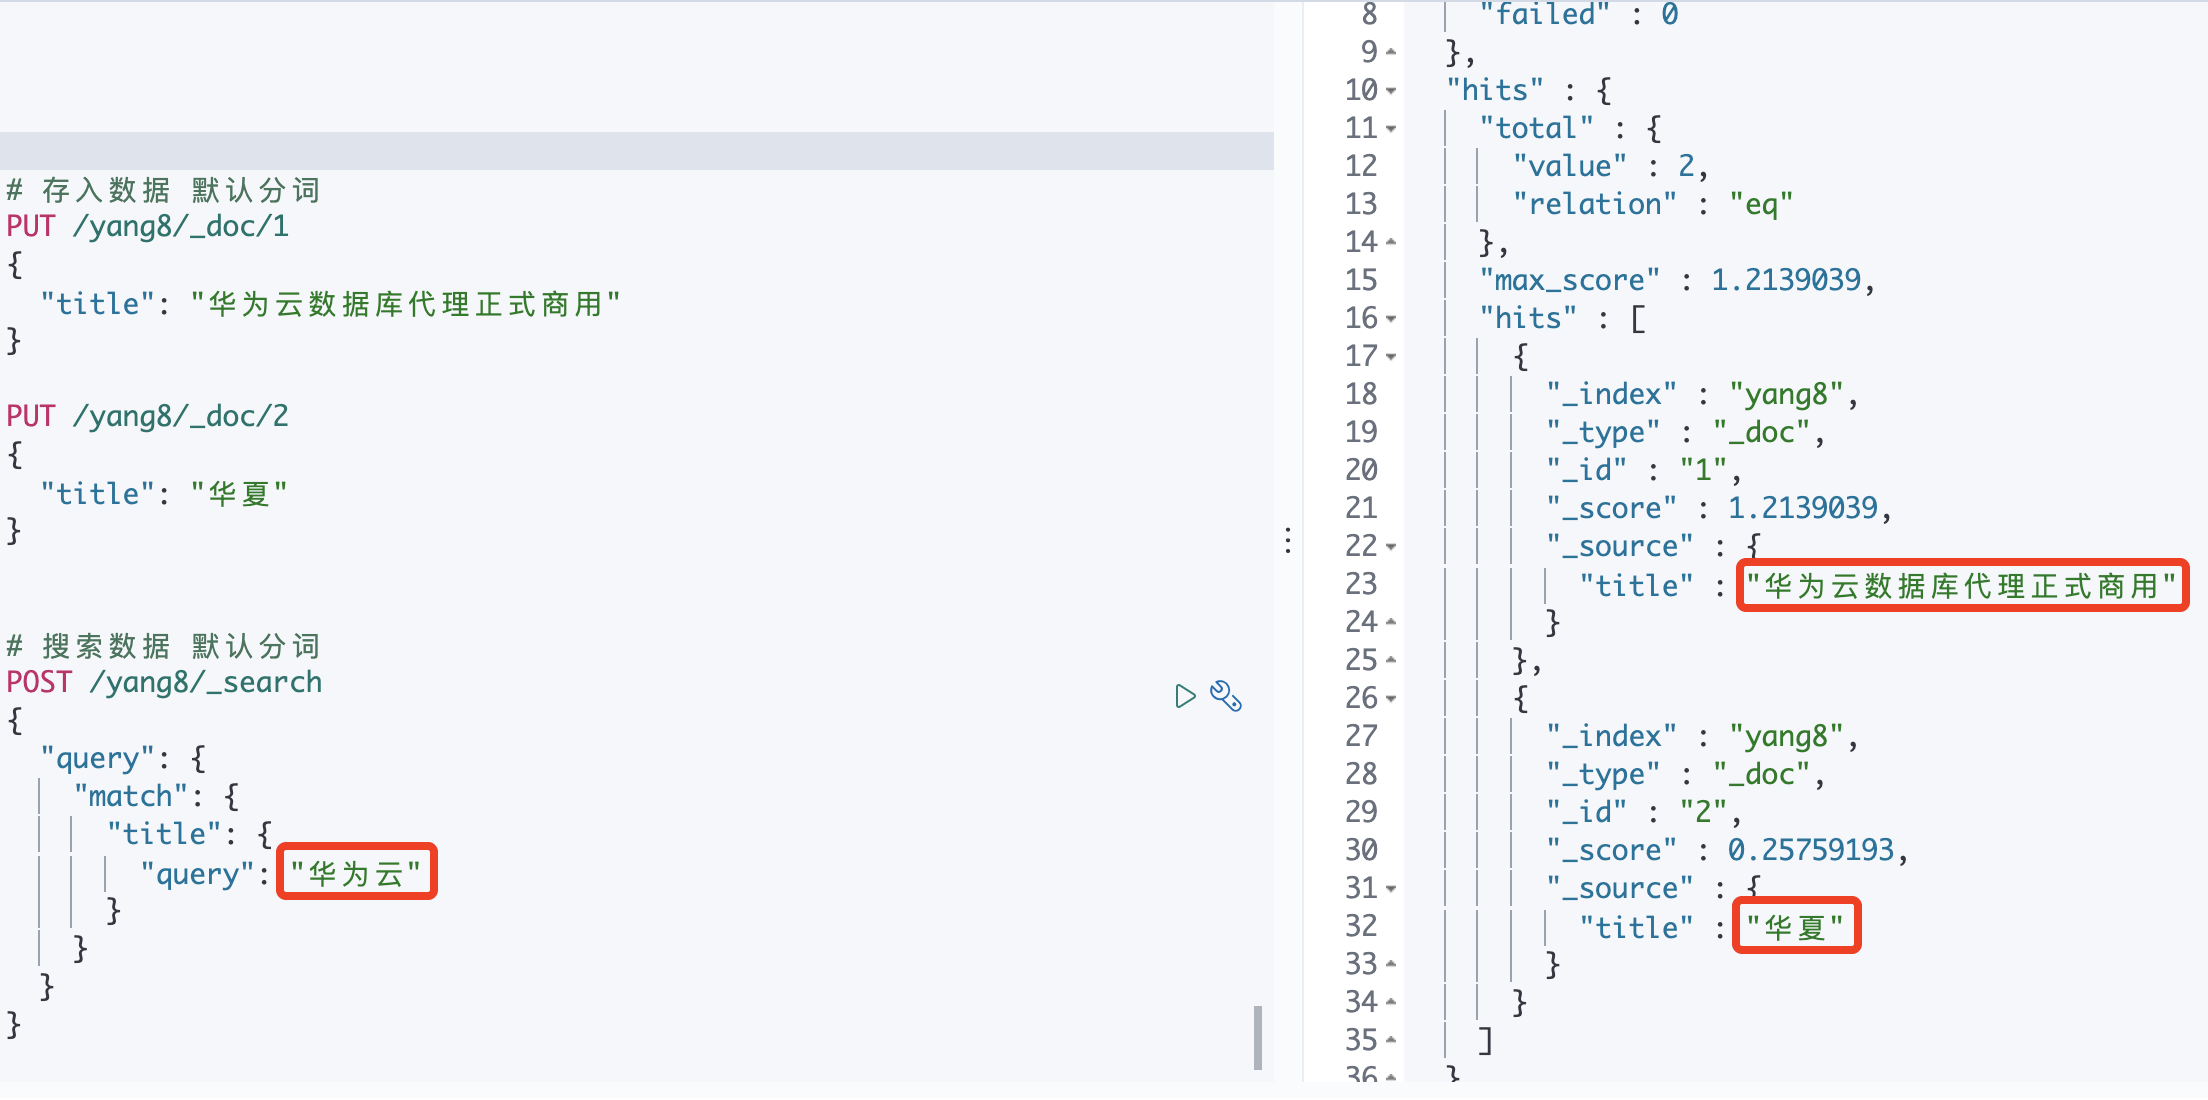
【默认分词器】
存入时:把华夏拆分为"华" “夏”
搜索时:把华为云拆分为"华" “为” “云”
因此,把华夏也匹配到了
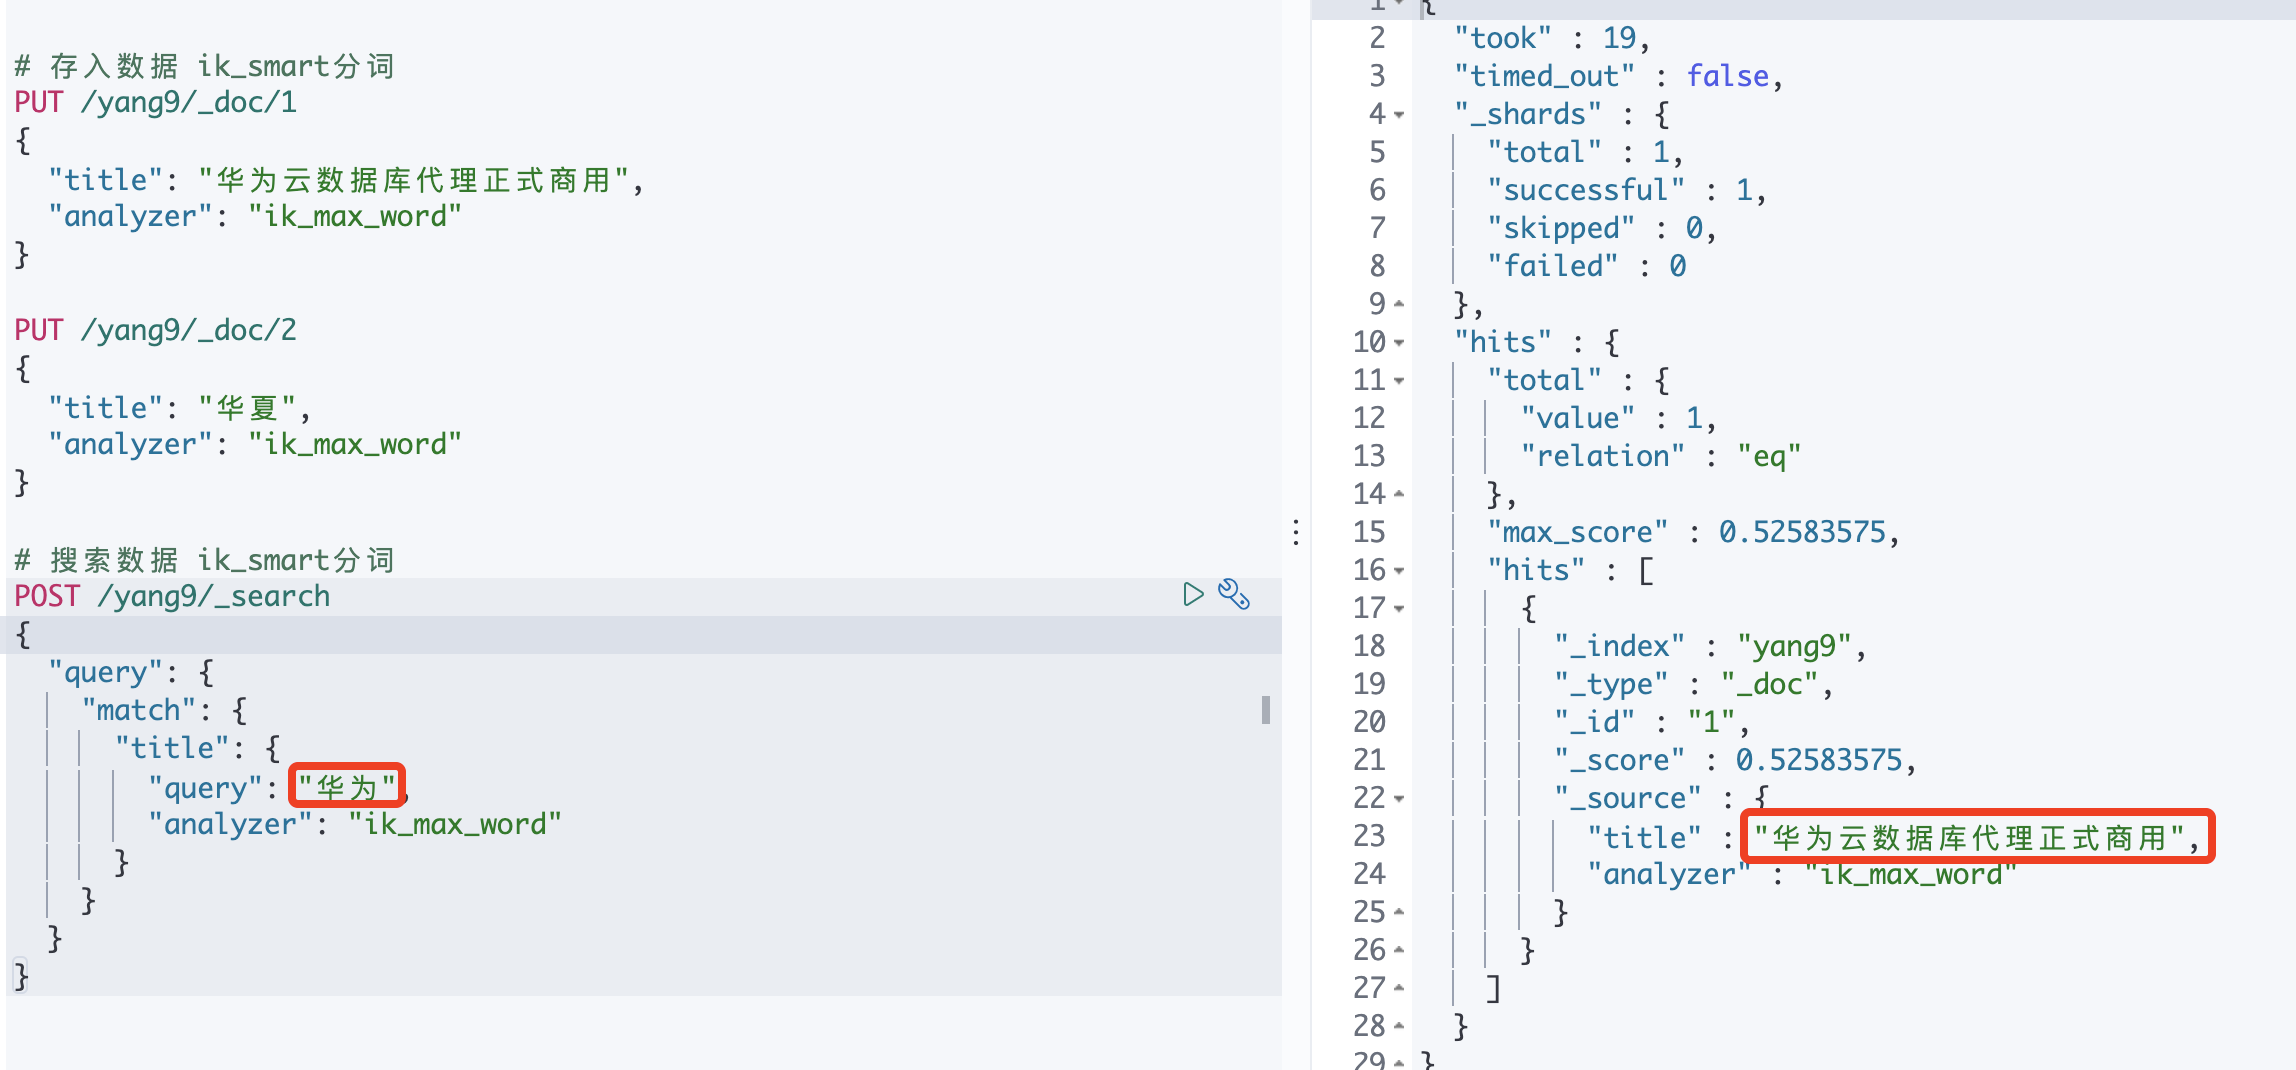
【ik分词器】
存入时:把华夏拆分为"华夏"
搜索时:把华为云拆分为"华为" “云”
因此,不会把华夏匹配进去
3.4.3.2、使用ik分词器分词
-
创建索引
【注意】一定要在创建索引时指定ik分词器,才会生效
# 【一定要在创建索引时指定ik分词器,才会生效】 PUT /yang9 { "mappings": { "properties": { "title": { "type": "text", "analyzer": "ik_max_word" } } } } -
存入数据
PUT /yang9/_doc/1 { "title": "华为云数据库代理正式商用", "analyzer": "ik_max_word" # 可以省略,默认跟索引设置的分词器一致 } PUT /yang9/_doc/2 { "title": "华夏", "analyzer": "ik_max_word" # 可以省略,默认跟索引设置的分词器一致 } -
搜索数据
POST /yang9/_search
{
  "query": {
    "match": {
      "title": {
        "query": "华为",
        "analyzer": "ik_max_word" # 可以省略,默认跟存入数据分词器一致
      }
    }
  }
}
