


大家好,这次大表哥带来的是 MYSQL innodb cluster.
Innodb cluster 也是官方TAF(Transparent Application Failover))的解决方案
目前市面上支持应用程序自动感知MGR的TAF大致有如下几种方式:
1)官方的解决方案: innodb cluster (router + mysql shell + mgr ). 属于mysql 的亲儿子。
2)开源的路由组件 像是 proxySQL 等等
3)公司自研的集成在 像是 springboot l里面 数据库驱动层的代码逻辑里面,基本上还会集成sharding 分片等逻辑,需要专业的开发来维护。
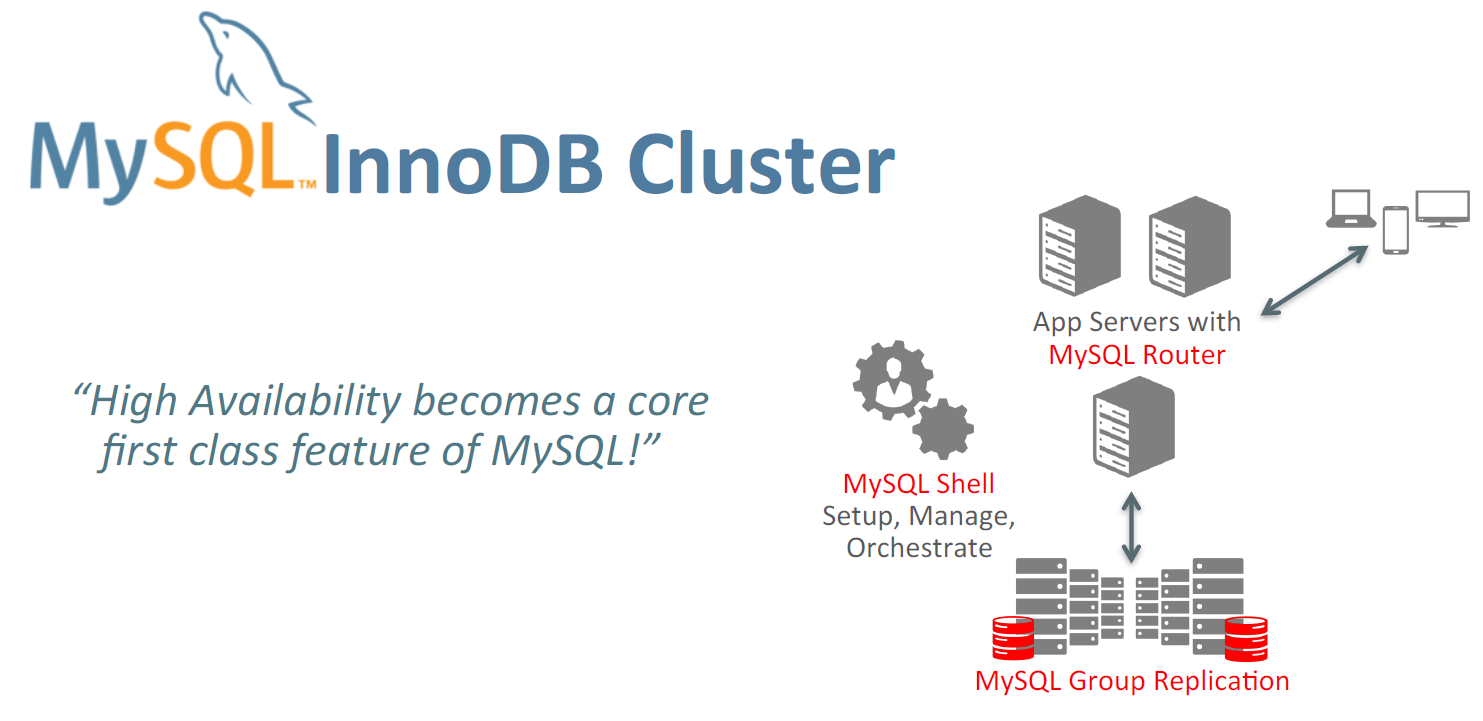
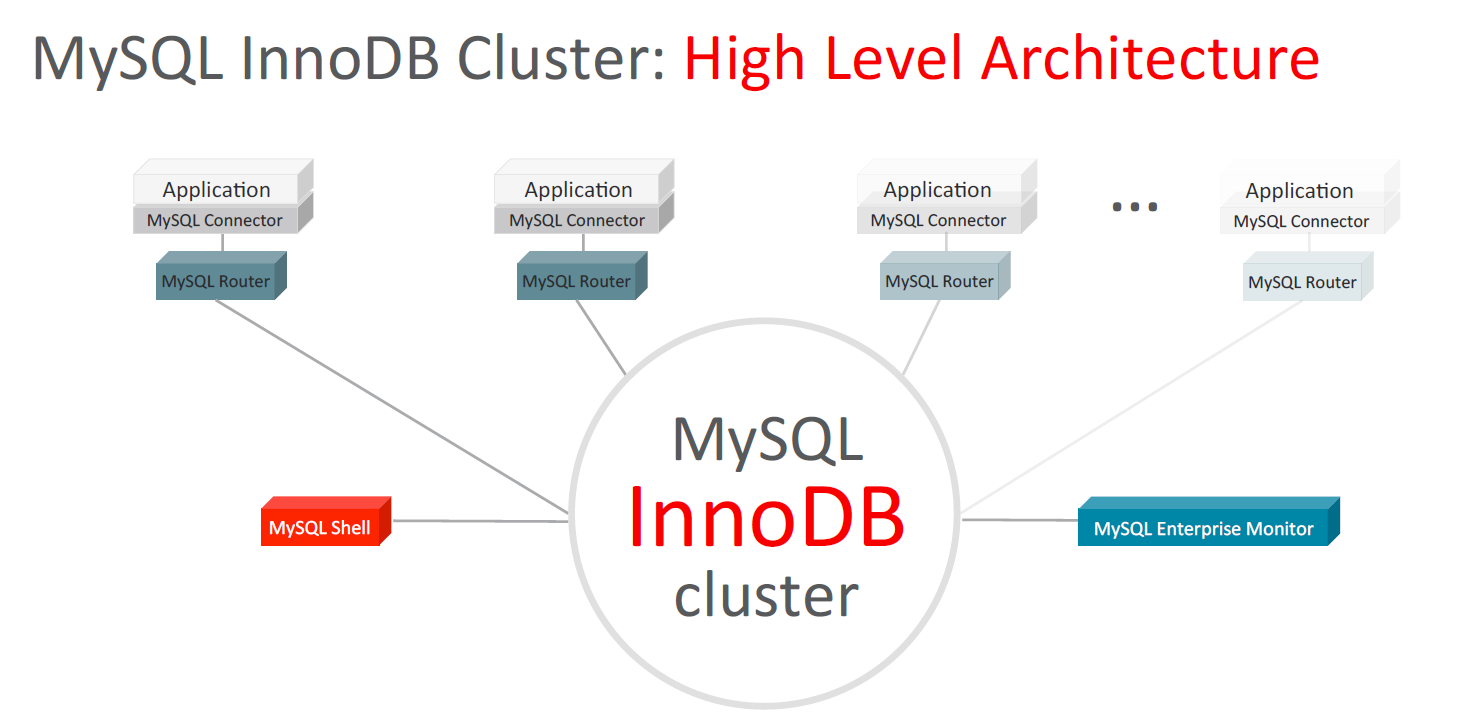
我们先来看看官方的架构图: MGR 集群 + mysql shell + mysql router
Mysql shell 是 innodb cluster 的管理客户端。 支持JS,SQL, PYTHON 等多种语法 对数据库进行运维操作。
Mysql router 是一个高性能的路由组件,初始化的时候会读取innodb cluster 集群的metadata信息,保存在data 目录下。
并实时像集群发送心跳,记录状态来支持 应用的自动故障转移。
官方的宣传卖点:
1内置HA的解决方案
2)黑盒解决方案,整合你想要的所有,不需要关注内部实现
3)高性能扩展性,添加新的节点只需要一个命令

我们可以看到 官方推荐的是 mysql router 安装在application 端。
下面我们来体验一下:
一 )Mysql shell 安装步骤:
官方文档: https://dev.mysql.com/doc/mysql-shell/8.0/en/
安装我们参考的官方文档: https://dev.mysql.com/doc/mysql-shell/8.0/en/mysql-shell-install-linux-quick.html 中的Installing MySQL Shell on Unix/Linux Using Generic Binaries 部分:
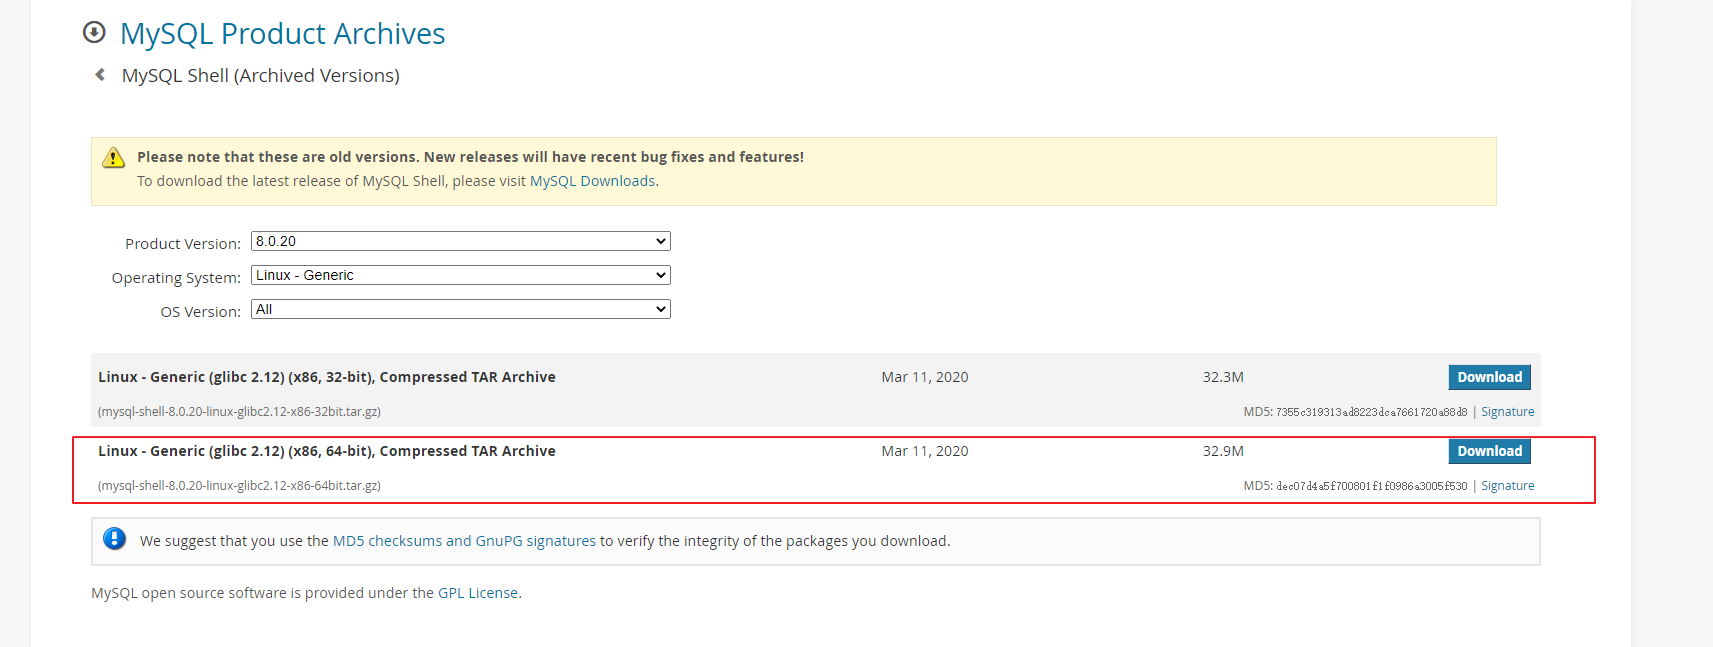
a)下载 mysql shell 软件
https://downloads.mysql.com/archives/shell/
这里我们选择 mysql shell 的版本是 8.0.20 版本, 应该是版本向下兼容的。
b)上传软件到服务器并解压
uat mysql@wqdcsrv3352[10:51:00]:/data/software $ ls -lhtr
-rw-r--r-- 1 mysql mysql  33M Apr 28 10:43 mysql-shell-8.0.20-linux-glibc2.12-x86-64bit.tar.gz
-rw-r--r-- 1 mysql mysql  37M Apr 28 10:45 mysql-router-8.0.20-linux-glibc2.12-x86_64.tar.xz

uat mysql@wqdcsrv3352[10:55:40]:/data/software $ tar -xvf mysql-shell-8.0.20-linux-glibc2.12-x86-64bit.tar.gz
uat mysql@wqdcsrv3352[10:56:11]:/data/software $ mv mysql-shell-8.0.20-linux-glibc2.12-x86-64bit mysql-shell-8.0.20
c)配置环境变量
uat mysql@wqdcsrv3352[10:58:36]:~ $ vi .bash_profile
MYSQLSHELL_HOME=/data/software/mysql-shell-8.0.20
PATH=$PATH:$HOME/.local/bin:$HOME/bin:$MYSQLSHELL_HOME/bin
d)测试mysql shell 的版本
uat mysql@wqdcsrv3352[11:00:24]:~ $ mysqlsh
MySQL Shell 8.0.20


Copyright (c) 2016, 2020, Oracle and/or its affiliates. All rights reserved.
Oracle is a registered trademark of Oracle Corporation and/or its affiliates.
Other names may be trademarks of their respective owners.


Type '\help' or '\?' for help; '\quit' to exit.
MySQL  JS >
二)Mysql router 安装步骤:
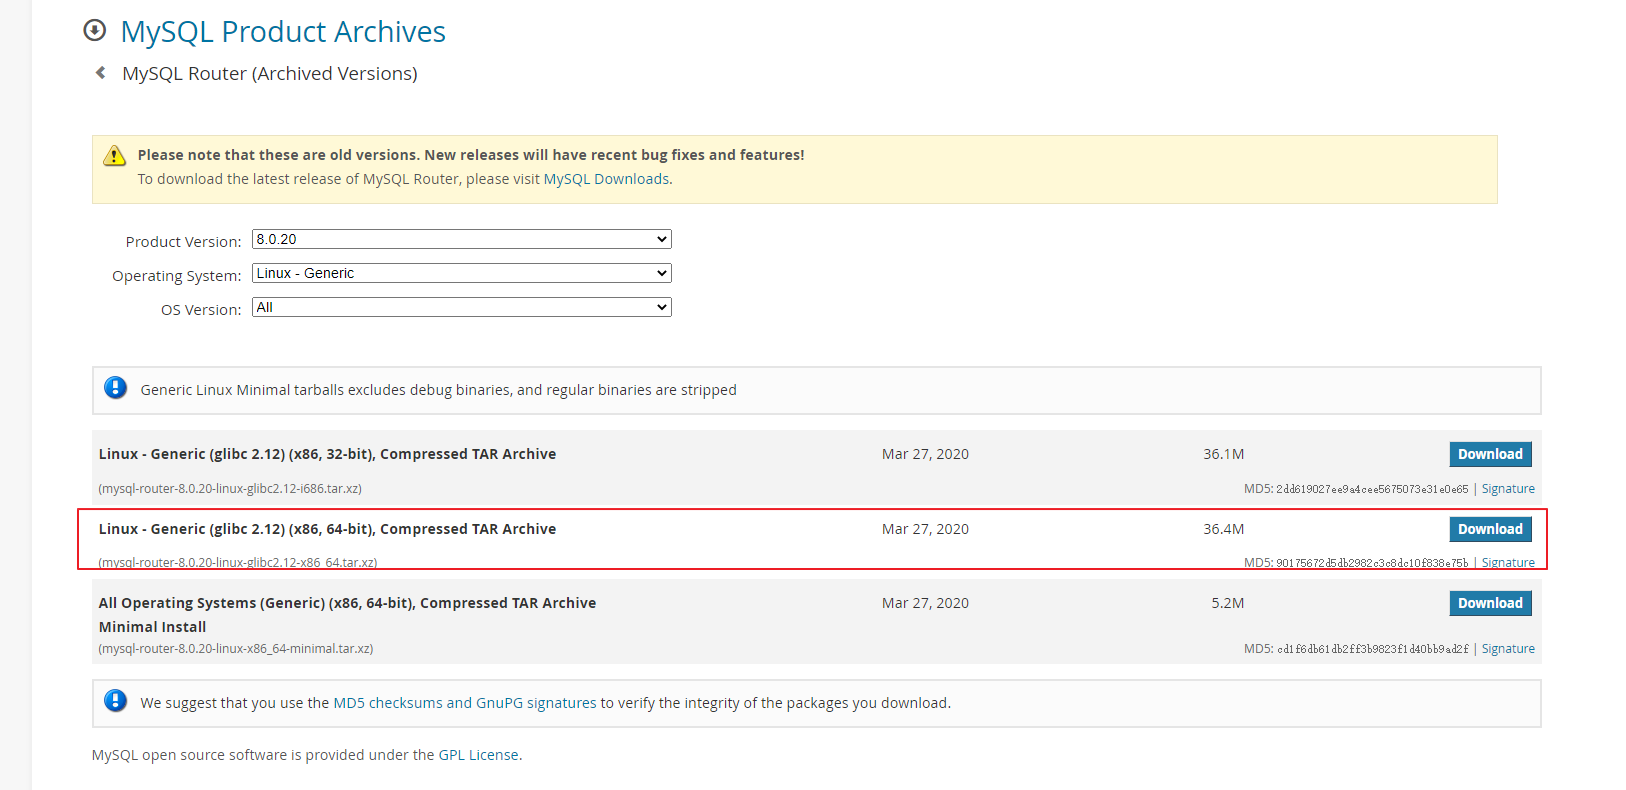
a)下载 mysql router 软件
下载地址: https://downloads.mysql.com/archives/router/
这里我们选择 router 的版本是 8.0.20 版本, 应该是版本向下兼容的。
b)上传软件到服务器并解压
uat mysql@wqdcsrv3352[10:51:00]:/data/software $ ls -lhtr
-rw-r--r-- 1 mysql mysql  33M Apr 28 10:43 mysql-shell-8.0.20-linux-glibc2.12-x86-64bit.tar.gz
-rw-r--r-- 1 mysql mysql  37M Apr 28 10:45 mysql-router-8.0.20-linux-glibc2.12-x86_64.tar.xz

uat mysql@wqdcsrv3352[10:54:26]:/data/software $ tar -xvf mysql-router-8.0.20-linux-glibc2.12-x86_64.tar.xz

uat mysql@wqdcsrv3352[10:55:06]:/data/software $ mv mysql-router-8.0.20-linux-glibc2.12-x86_64 mysql-router-8.0.20
c)配置环境变量
MYSQLSHELL_HOME=/data/software/mysql-shell-8.0.20
MYSQL_ROUTER_HOME=/data/software/mysql-router-8.0.20
PATH=$PATH:$HOME/.local/bin:$HOME/bin:$MYSQLSHELL_HOME/bin:$MYSQL_ROUTER_HOME/bin
三)安装沙箱sandbox 的测试实例
a)创建沙箱测试实例的目录
uat mysql@wqdcsrv3352[11:45:19]:/data $ sudo mkdir -p /data/mysql-sandboxes
uat mysql@wqdcsrv3352[11:49:34]:/data $ sudo chown -R mysql:mysql /data/mysql-sandboxes/
b)安装沙箱实例
MySQL  JS > shell.options.sandboxDir='/data/mysql-sandboxes'
/data/mysql-sandboxes
MySQL  JS > dba.deploySandboxInstance(3310);
A new MySQL sandbox instance will be created on this host in
/data/mysql-sandboxes/3310


Warning: Sandbox instances are only suitable for deploying and
running on your local machine for testing purposes and are not
accessible from external networks.


Please enter a MySQL root password for the new instance: ********


Deploying new MySQL instance...


Instance localhost:3310 successfully deployed and started.
Use shell.connect('root@localhost:3310') to connect to the instance.


MySQL  JS > dba.deploySandboxInstance(3320);
A new MySQL sandbox instance will be created on this host in
/data/mysql-sandboxes/3320


Warning: Sandbox instances are only suitable for deploying and
running on your local machine for testing purposes and are not
accessible from external networks.


Please enter a MySQL root password for the new instance: ********


Deploying new MySQL instance...


Instance localhost:3320 successfully deployed and started.
Use shell.connect('root@localhost:3320') to connect to the instance.


MySQL  JS > dba.deploySandboxInstance(3330);
A new MySQL sandbox instance will be created on this host in
/data/mysql-sandboxes/3330


Warning: Sandbox instances are only suitable for deploying and
running on your local machine for testing purposes and are not
accessible from external networks.


Please enter a MySQL root password for the new instance: ********


Deploying new MySQL instance...


Instance localhost:3330 successfully deployed and started.
Use shell.connect('root@localhost:3330') to connect to the instance.
四)构建 innodb cluster
a)连接到实例3310中
MySQL  JS > shell.connect('root@localhost:3310');
Creating a session to 'root@localhost:3310'
ERROR: Failed to retrieve the password: Logger: Tried to log to an uninitialized logger.
Logger: Tried to log to an uninitialized logger.
Invalid entry: root3838. Entry has a socket and a host which resolves to non-local address.
Please provide the password for 'root@localhost:3310': ********
Save password for 'root@localhost:3310'? [Y]es/[N]o/Ne[v]er (default No): Y
Fetching schema names for autocompletion... Press ^C to stop.
Your MySQL connection id is 12
Server version: 8.0.27-18 Percona Server (GPL), Release 18, Revision 24801e21b45
No default schema selected; type \use <schema> to set one.
<ClassicSession:root@localhost:3310>
b)创建 innodb cluster : mgrCluster
MySQL  localhost:3310 ssl  JS > var cluster = dba.createCluster('mgrCluster');
A new InnoDB cluster will be created on instance 'localhost:3310'.


Validating instance configuration at localhost:3310...
NOTE: Instance detected as a sandbox.
Please note that sandbox instances are only suitable for deploying test clusters for use within the same host.


This instance reports its own address as 127.0.0.1:3310


Instance configuration is suitable.
NOTE: Group Replication will communicate with other members using '127.0.0.1:33101'. Use the localAddress option to override.


Creating InnoDB cluster 'mgrCluster' on '127.0.0.1:3310'...


Adding Seed Instance...
Cluster successfully created. Use Cluster.addInstance() to add MySQL instances.
At least 3 instances are needed for the cluster to be able to withstand up to
one server failure.
c)加入另外2个实例 3320,3330
cluster.addInstance('root@localhost:3320');
cluster.addInstance('root@localhost:3330');
d)我们查看一下 innodb cluster 的状态
我们可以看到主节点 是 127.0.0.1:3310 读写的状态 “mode”: “R/W”
MySQL  localhost:3310 ssl  JS > cluster.status();
{
   "clusterName": "mgrCluster",
   "defaultReplicaSet": {
       "name": "default",
       "primary": "127.0.0.1:3310",
       "ssl": "REQUIRED",
       "status": "OK",
       "statusText": "Cluster is ONLINE and can tolerate up to ONE failure.",
       "topology": {
           "127.0.0.1:3310": {
               "address": "127.0.0.1:3310",
               "mode": "R/W",
               "readReplicas": {},
               "replicationLag": null,
               "role": "HA",
               "status": "ONLINE",
               "version": "8.0.27"
           },
           "127.0.0.1:3320": {
               "address": "127.0.0.1:3320",
               "mode": "R/O",
               "readReplicas": {},
               "replicationLag": null,
               "role": "HA",
               "status": "ONLINE",
               "version": "8.0.27"
           },
           "127.0.0.1:3330": {
               "address": "127.0.0.1:3330",
               "mode": "R/O",
               "readReplicas": {},
               "replicationLag": null,
               "role": "HA",
               "status": "ONLINE",
               "version": "8.0.27"
           }
       },
       "topologyMode": "Single-Primary"
   },
   "groupInformationSourceMember": "127.0.0.1:3310"
}
至此, 我们用MYSQL SHELL 构建了3 个 sandbox 的实例:
mysql> select * from replication_group_members;
+---------------------------+--------------------------------------+-------------+-------------+--------------+-------------+----------------+----------------------------+
| CHANNEL_NAME              | MEMBER_ID                            | MEMBER_HOST | MEMBER_PORT | MEMBER_STATE | MEMBER_ROLE | MEMBER_VERSION | MEMBER_COMMUNICATION_STACK |
+---------------------------+--------------------------------------+-------------+-------------+--------------+-------------+----------------+----------------------------+
| group_replication_applier | 6b7a0fd9-c6a8-11ec-9586-005056aeb15f | 127.0.0.1   |        3310 | ONLINE       | PRIMARY     | 8.0.27         | XCom                       |
| group_replication_applier | 759e66ea-c6a8-11ec-9afb-005056aeb15f | 127.0.0.1   |        3320 | ONLINE       | SECONDARY   | 8.0.27         | XCom                       |
| group_replication_applier | 7e43cca4-c6a8-11ec-9f5e-005056aeb15f | 127.0.0.1   |        3330 | ONLINE       | SECONDARY   | 8.0.27         | XCom                       |
+---------------------------+--------------------------------------+-------------+-------------+--------------+-------------+----------------+----------------------------+
3 rows in set (0.00 sec)
四)启动mysql router
a) mysql router 第一次启动需要 Bootstrapping
创建mysql router 的home 目录
uat mysql@wqdcsrv3352[13:36:10]:/data/mysql-sandboxes/3310/sandboxdata $ sudo mkdir /data/mysqlrouter
uat mysql@wqdcsrv3352[13:36:44]:/data/mysql-sandboxes/3310/sandboxdata $ sudo chown -R mysql:mysql  /data/mysqlrouter
Bootstrapping mysql router : 这个操作会读取MGR的集群信息 保存在 router 的 Home 目录中
mysqlrouter --bootstrap root@localhost:3310 -d /data/mysqlrouter

uat mysql@wqdcsrv3352[13:36:50]:/data/mysql-sandboxes/3310/sandboxdata $ mysqlrouter --bootstrap root@localhost:3310 -d /data/mysqlrouter
Please enter MySQL password for root:
# Bootstrapping MySQL Router instance at '/data/mysqlrouter'...


- Creating account(s) (only those that are needed, if any)
- Verifying account (using it to run SQL queries that would be run by Router)
- Storing account in keyring
- Adjusting permissions of generated files
- Creating configuration /data/mysqlrouter/mysqlrouter.conf


# MySQL Router configured for the InnoDB Cluster 'mgrCluster'


After this MySQL Router has been started with the generated configuration


   $ mysqlrouter -c /data/mysqlrouter/mysqlrouter.conf


the cluster 'mgrCluster' can be reached by connecting to:


## MySQL Classic protocol


- Read/Write Connections: localhost:6446
- Read/Only Connections:  localhost:6447


## MySQL X protocol


- Read/Write Connections: localhost:64460
- Read/Only Connections:  localhost:64470
b)初始化集群的信息之后, 我们可以按照上面的提示来启动一下 mysql router:
mysqlrouter -c /data/mysqlrouter/mysqlrouter.conf
我们可以观察启动的日志:
uat mysql@wqdcsrv3352[13:44:22]:/data/mysqlrouter/log $ tail -f mysqlrouter.log
2022-04-28 13:42:45 metadata_cache INFO [7ff1b0fa8700] Potential changes detected in cluster 'mgrCluster' after metadata refresh
2022-04-28 13:42:45 metadata_cache INFO [7ff1b0fa8700] Metadata for cluster 'mgrCluster' has 1 replicasets:
2022-04-28 13:42:45 metadata_cache INFO [7ff1b0fa8700] 'default' (3 members, single-master)
2022-04-28 13:42:45 metadata_cache INFO [7ff1b0fa8700]     127.0.0.1:3310 / 33100 - role=HA mode=RW
2022-04-28 13:42:45 metadata_cache INFO [7ff1b0fa8700]     127.0.0.1:3320 / 33200 - role=HA mode=RO
2022-04-28 13:42:45 metadata_cache INFO [7ff1b0fa8700]     127.0.0.1:3330 / 33300 - role=HA mode=RO
2022-04-28 13:42:45 routing INFO [7ff1b0fa8700] Routing routing:mgrCluster_x_ro listening on 64470 got request to disconnect invalid connections: metadata change
2022-04-28 13:42:45 routing INFO [7ff1b0fa8700] Routing routing:mgrCluster_x_rw listening on 64460 got request to disconnect invalid connections: metadata change
2022-04-28 13:42:45 routing INFO [7ff1b0fa8700] Routing routing:mgrCluster_rw listening on 6446 got request to disconnect invalid connections: metadata change
2022-04-28 13:42:45 routing INFO [7ff1b0fa8700] Routing routing:mgrCluster_ro listening on 6447 got request to disconnect invalid connections: metadata change
我们可以看到 RW 的读写端口是 6446 , RO 的只读端口是 6447
c)我们可以通过 mysql shell 来连接测试一下 端口 6446 对应是主节点 3310
uat mysql@wqdcsrv3352[13:47:44]:/data/mysqlrouter/log $ mysqlsh root@localhost:6446
Please provide the password for 'root@localhost:6446': ********

MySQL  localhost:6446 ssl  JS > \sql
Switching to SQL mode... Commands end with ;
MySQL  localhost:6446 ssl  SQL > select @@port;
+--------+
| @@port |
+--------+
|   3310 |
+--------+
1 row in set (0.0004 sec)
再次测试一下 只读端口: 6447
我们可以看到 指向了 secondary 节点 3330
uat mysql@wqdcsrv3352[14:02:24]:/data/mysqlrouter/log $ mysqlsh root@localhost:6447

MySQL  localhost:6447 ssl  JS > \sql
Switching to SQL mode... Commands end with ;
MySQL  localhost:6447 ssl  SQL > select @@port;
+--------+
| @@port |
+--------+
|   3330 |
+--------+
1 row in set (0.0004 sec)
五)TAF自动切换测试
a)准备一段简单的python 连接 mysql router 的代码片段
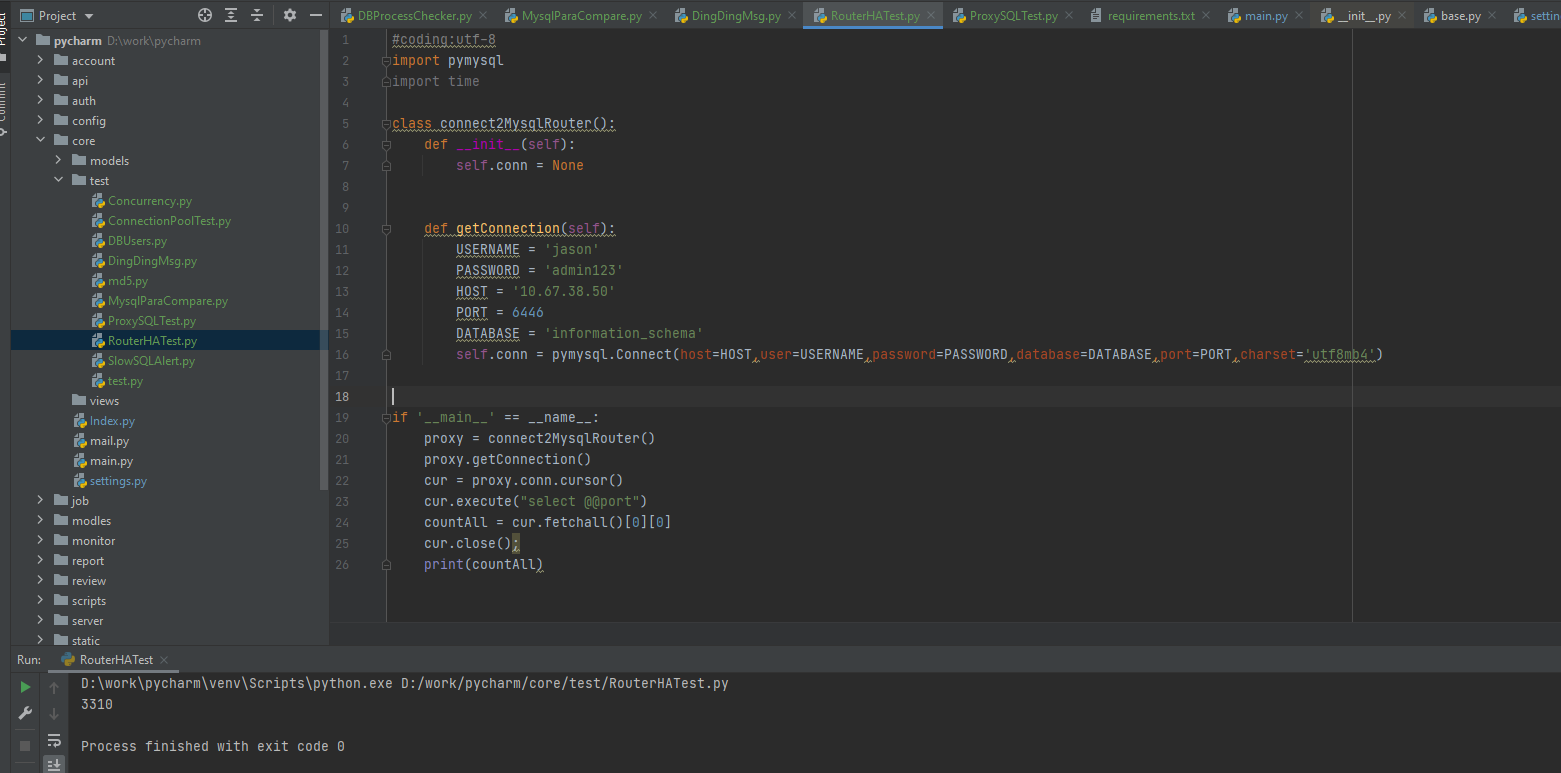
我们现在 kill 掉主节点:
MySQL  localhost:6446 ssl  JS > shell.options.sandboxDir='/data/mysql-sandboxes'
/data/mysql-sandboxes
MySQL  localhost:6446 ssl  JS > dba.killSandboxInstance(3310);


Killing MySQL instance...


Instance localhost:3310 successfully killed.
我们再次执行程序: mysql router 重定向到了 3320这个端口
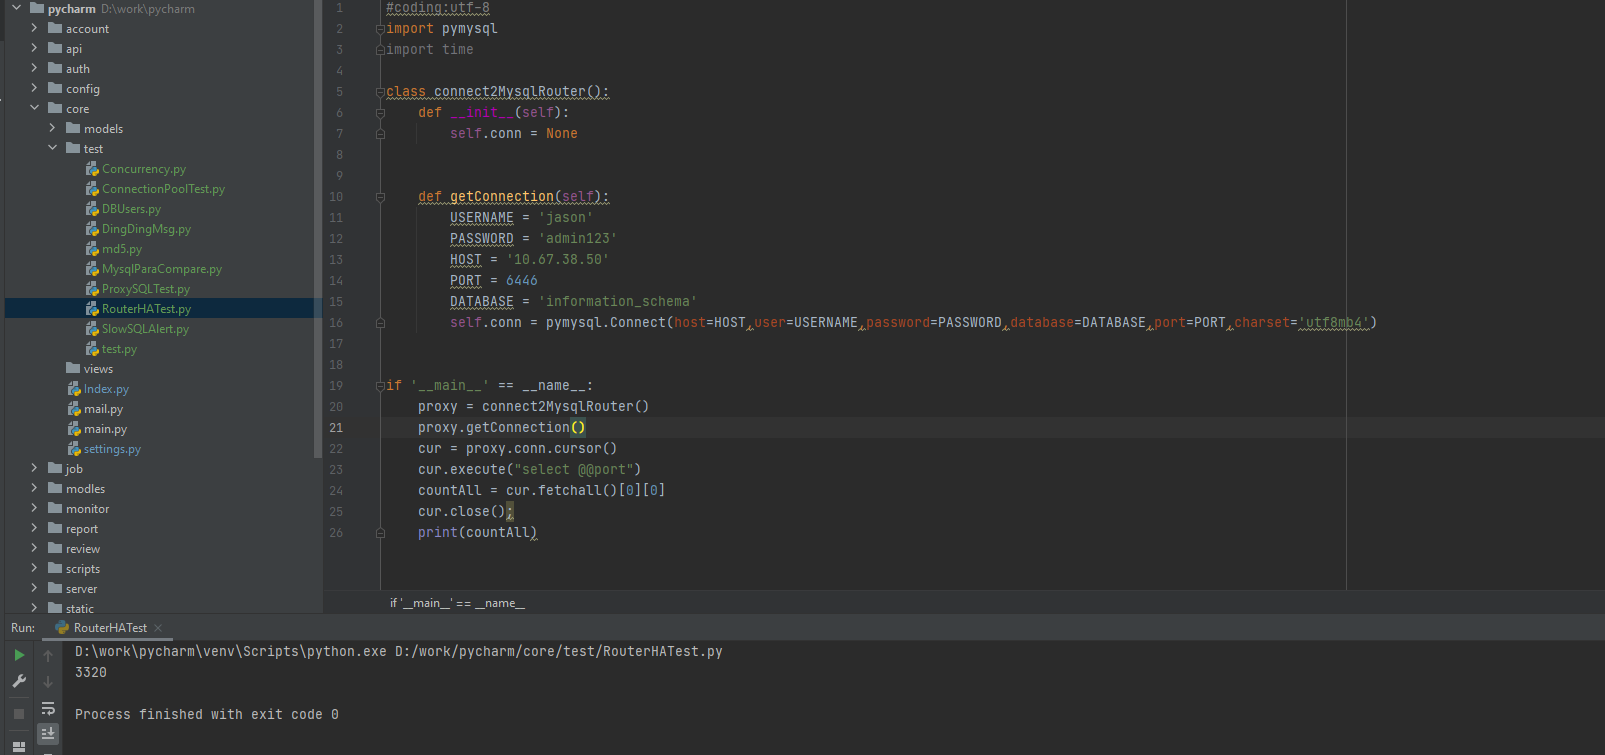
我们通过MYSQL shell 查询一下 3320 已经升级为 primary 节点了
MySQL  localhost:6446 ssl  JS > dba.getCluster().status();
{
   "clusterName": "mgrCluster",
   "defaultReplicaSet": {
       "name": "default",
       "primary": "127.0.0.1:3320",
       "ssl": "REQUIRED",
       "status": "OK_NO_TOLERANCE",
       "statusText": "Cluster is NOT tolerant to any failures. 1 member is not active",
       "topology": {
           "127.0.0.1:3310": {
               "address": "127.0.0.1:3310",
               "mode": "n/a",
               "readReplicas": {},
               "role": "HA",
               "shellConnectError": "MySQL Error 2003 (HY000): Can't connect to MySQL server on '127.0.0.1' (111)",
               "status": "(MISSING)"
           },
           "127.0.0.1:3320": {
               "address": "127.0.0.1:3320",
               "mode": "R/W",
               "readReplicas": {},
               "replicationLag": null,
               "role": "HA",
               "status": "ONLINE",
               "version": "8.0.27"
           },
           "127.0.0.1:3330": {
               "address": "127.0.0.1:3330",
               "mode": "R/O",
               "readReplicas": {},
               "replicationLag": null,
               "role": "HA",
               "status": "ONLINE",
               "version": "8.0.27"
           }
       },
       "topologyMode": "Single-Primary"
   },
   "groupInformationSourceMember": "127.0.0.1:3320"
}
六)手动主从switch over 切换
命令很简单: dba.getCluster().setPrimaryInstance(‘root@localhost:3330’);
MySQL  localhost:6446 ssl  JS > dba.getCluster().setPrimaryInstance('root@localhost:3330');
Setting instance 'localhost:3330' as the primary instance of cluster 'mgrCluster'...


Instance '127.0.0.1:3310' was switched from PRIMARY to SECONDARY.
Instance '127.0.0.1:3320' remains SECONDARY.
Instance '127.0.0.1:3330' was switched from SECONDARY to PRIMARY.


WARNING: The cluster internal session is not the primary member anymore. For cluster management operations please obtain a fresh cluster handle using dba.getCluster().


The instance 'localhost:3330' was successfully elected as primary.
我们再次查看3330 的角色: 已经是R/W的节点了
MySQL  localhost:6446 ssl  JS > dba.getCluster().status().defaultReplicaSet.topology;
{
   "127.0.0.1:3310": {
       "address": "127.0.0.1:3310",
       "mode": "R/O",
       "readReplicas": {},
       "replicationLag": null,
       "role": "HA",
       "status": "ONLINE",
       "version": "8.0.27"
   },
   "127.0.0.1:3320": {
       "address": "127.0.0.1:3320",
       "mode": "R/O",
       "readReplicas": {},
       "replicationLag": null,
       "role": "HA",
       "status": "ONLINE",
       "version": "8.0.27"
   },
   "127.0.0.1:3330": {
       "address": "127.0.0.1:3330",
       "mode": "R/W",
       "readReplicas": {},
       "replicationLag": null,
       "role": "HA",
       "status": "ONLINE",
       "version": "8.0.27"
   }
}
最后总结:
1)安装,部署 整体感觉很轻量级,后续运维可以通过mysql shell ,大大简化了DBA登录多台机器的工作。
2) mysql rounter 是需要企业license的, 如果你的公司有预算的话,是个不错的选择。
