


MVC这种架构,在开发中,其实用的最多的,就是数据库操作。
如何在一分钟内,将普通的JSP页面修改为Spring MVC架构的那,我们一步步来。
(这是个学习贴,但是项目中大家也基本都是这么做的)
本文为red_hope原创,供开始学习spring MVC的小白使用。
前提
我们新建了一个普通的动态网页工程,工程名为:JspToSpringMVC。
注意,不是MAVEN工程,入门先别说MAVEN。
一、看一看原始JSP页面
<%@ taglib prefix="c" uri="http://java.sun.com/jsp/jstl/core" %>
<%@ page language="java" import="com.geotest.model.Question,java.util.*" contentType="text/html; charset=UTF-8" pageEncoding="UTF-8"%>
<!DOCTYPE html>
<html>
<head>
<meta charset="UTF-8">
<title>Insert title here</title>
</head>
<body>
<%
ArrayList<Question> questions = new ArrayList<Question>();
Question Question1=new Question("0001",0,"宁夏首府是银川","correct");
Question Question2=new Question("0002",0,"银川科技学院位于西夏区大学城","correct");
Question Question3=new Question("0003",0,"贺兰山位于宁夏平原东部","wrong");
questions.add(Question1);
questions.add(Question2);
questions.add(Question3);
request.setAttribute("questions", questions);
%>
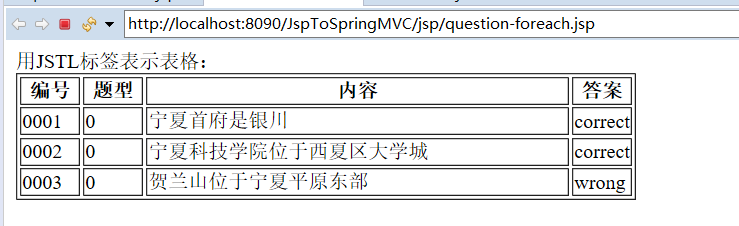
用JSTL标签表示表格:
<table border="1">
<tr>
<th width=10%>编号</th>
<th width=10%>题型</th>
<th width=70%>内容</th>
<th width=10%>答案</th>
</tr>
<c:forEach items="${questions}" var="question_jstl">
<tr>
<td>${question_jstl.questionId}</td>
<td>${question_jstl.questionClass}</td>
<td>${question_jstl.questionContent}</td>
<td>${question_jstl.questionAnswer}</td>
</tr>
</c:forEach>
</table>
<br>
</body>
</html>
这是一个标准的JSP页面,除了Question类,所有代码都写在了这个JSP页面里面。
另外,这个页面用到了JSTL标签:
<%@ taglib prefix="c" uri="http://java.sun.com/jsp/jstl/core" %>
<c:forEach items="${questions}" var="question_jstl">
<tr>
<td>${question_jstl.questionId}</td>
<td>${question_jstl.questionClass}</td>
<td>${question_jstl.questionContent}</td>
<td>${question_jstl.questionAnswer}</td>
</tr>
</c:forEach>
Question类的代码如下(该类放在com.geotest.model;):
package com.geotest.model;
/*标准JavaBean定义示例*/
public class Question {
/* 变量定义,都是私有的 */
private String questionId;
private int questionClass;
private String questionContent;
private String questionAnswer;
/*
* 如果有一个一个自定义的构造函数,那么空构造函数必须有 如果没有自定义的构造函数,空构造函数可以省略
*/
public Question() {
}
public Question(String questionId, int questionClass, String questionContent, String questionAnswer) {
this.questionId = questionId;
this.questionClass = questionClass;
this.questionContent = questionContent;
this.questionAnswer = questionAnswer;
}
public String getQuestionId() {
return questionId;
}
public void setQuestionId(String questionId) {
this.questionId = questionId;
}
public int getQuestionClass() {
return questionClass;
}
public void setQuestionClass(int questionClass) {
this.questionClass = questionClass;
}
public String getQuestionContent() {
return questionContent;
}
public void setQuestionContent(String questionContent) {
this.questionContent = questionContent;
}
public String getQuestionAnswer() {
return questionAnswer;
}
public void setQuestionAnswer(String questionAnswer) {
this.questionAnswer = questionAnswer;
}
/* 使用Eclipse快速生成get和set方法 */
}
页面的运行效果:
二、改造目标
1、实现Spring MVC架构实现页面访问
2、JSP页面里面,不出现java代码,java代码应放置在控制层及控制层以下的业务逻辑里
三、开始改造
第一步(10秒):将Spring MVC依赖的20+1(logging包体)个包体,拷贝到“WebContent\WEB-INF\lib”目录下
如下图:
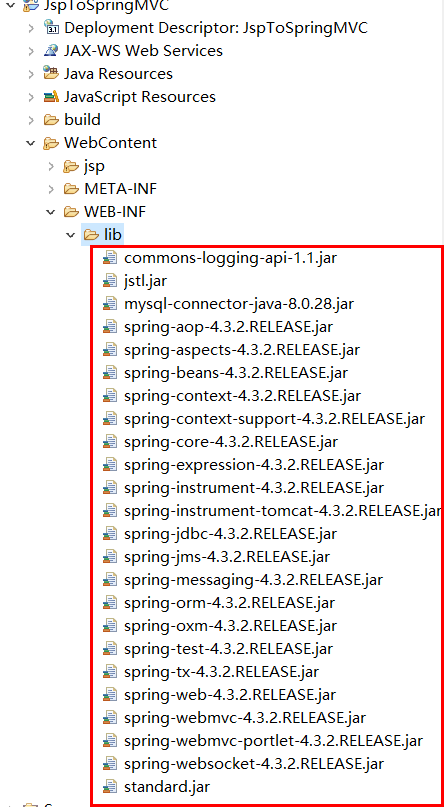
注意,上面除了Spring的相关包体外,还有JSTL的两个包体:JSTL.jar、Standard.jar
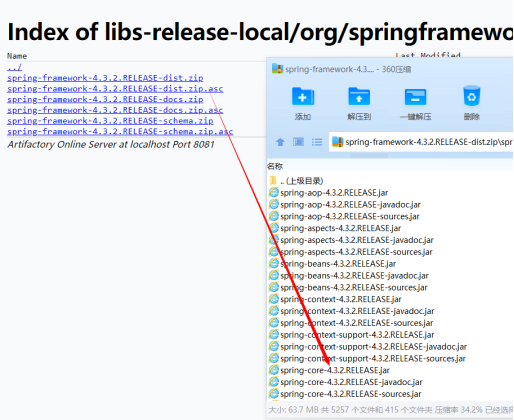
注:Spring包下载地址为:
https://repo.spring.io/ui/native/libs-release-local/org/springframework/spring/
备注:下载不算在时间类。
第二步(10秒):配置相关XML文件
第一个:web.xml
<?xml version="1.0" encoding="UTF-8"?>
<web-app xmlns:xsi="http://www.w3.org/2001/XMLSchema-instance"
xmlns="http://xmlns.jcp.org/xml/ns/javaee"
xsi:schemaLocation="http://xmlns.jcp.org/xml/ns/javaee http://xmlns.jcp.org/xml/ns/javaee/web-app_3_1.xsd" id="WebApp_ID" version="3.1">
<display-name>GeoTest</display-name>
<welcome-file-list id="idvalue0">
<welcome-file>index.html</welcome-file>
<welcome-file>index.htm</welcome-file>
<welcome-file>index.jsp</welcome-file>
<welcome-file>default.html</welcome-file>
<welcome-file>default.htm</welcome-file>
<welcome-file>default.jsp</welcome-file>
</welcome-file-list>
<!-- 配置Spring MVC分发器 -->
<servlet>
<servlet-name>springmvc</servlet-name>
<servlet-class>org.springframework.web.servlet.DispatcherServlet</servlet-class>
<load-on-startup>1</load-on-startup>
</servlet>
<!-- 配置请求映射,将所有请求分发到DispatcherServlet -->
<servlet-mapping>
<servlet-name>springmvc</servlet-name>
<url-pattern>/</url-pattern>
</servlet-mapping>
</web-app>
springmvc-servlet.xml
<?xml version="1.0" encoding="UTF-8"?>
<beans xmlns="http://www.springframework.org/schema/beans"
xmlns:xsi="http://www.w3.org/2001/XMLSchema-instance"
xmlns:mvc="http://www.springframework.org/schema/mvc"
xmlns:context="http://www.springframework.org/schema/context"
xsi:schemaLocation="http://www.springframework.org/schema/beans
http://www.springframework.org/schema/beans/spring-beans.xsd
http://www.springframework.org/schema/mvc
http://www.springframework.org/schema/mvc/spring-mvc.xsd
http://www.springframework.org/schema/context
http://www.springframework.org/schema/context/spring-context.xsd">
<mvc:resources mapping="/css/**" location="/css/" />
<mvc:resources mapping="/image/**" location="/image/" />
<mvc:resources mapping="/*.html" location="/" />
<!-- 开启注解模式驱动 ,通过扫描注解寻找控制类-->
<context:component-scan base-package="com.geotest.controller" />
<context:component-scan base-package="com.geotest.service" />
<mvc:annotation-driven />
<!-- 指定页面存放的路径 -->
<bean id="viewResolver" class="org.springframework.web.servlet.view.InternalResourceViewResolver">
<property name="prefix" value="/WEB-INF/jsp/" />
<!-- 文件的后缀 -->
<property name="suffix" value=".jsp" />
</bean>
</beans>
直接复制来用
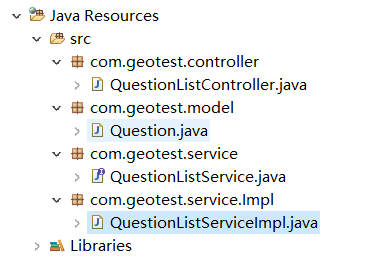
第三步(20秒):新建控制类包体、服务类包体、接口类包体
com.geotest.controller:MVC中的C,控制类的包体存放位置
com.geotest.service:接口类存放位置
com.geotest.service.Impl:接口实现类存放位置
控制层类QuestionListController:
package com.geotest.controller;
import java.util.ArrayList;
import org.springframework.beans.factory.annotation.Autowired;
import org.springframework.stereotype.Controller;
import org.springframework.web.bind.annotation.RequestMapping;
import org.springframework.web.servlet.ModelAndView;
import com.geotest.model.Question;
import com.geotest.service.QuestionListService;
@Controller
public class QuestionListController {
@Autowired
/* 通过接口方式进行注入 */
private QuestionListService questionListService;
@RequestMapping(value="/QuestionList")
public ModelAndView QuestinList() {
ArrayList<Question> questions = new ArrayList<Question>();
questions = questionListService.List();
//request.setAttribute("questions", questions);
/* 实际上返回的是WEB-INF/jsp/下的question-foreach.jsp */
return new ModelAndView("question-foreach","questions_zzz",questions);
}
}
服务层(接口)的类:
package com.geotest.service;
import java.util.ArrayList;
import com.geotest.model.Question;
public interface QuestionListService {
ArrayList<Question> List();
}
接口实现层:
package com.geotest.service.Impl;
import java.util.ArrayList;
import org.springframework.stereotype.Service;
import com.geotest.model.Question;
import com.geotest.service.QuestionListService;
@Service
public class QuestionListServiceImpl implements QuestionListService {
public ArrayList<Question> List()
{
ArrayList<Question> questions = new ArrayList<Question>();
Question Question1=new Question("0001",0,"宁夏首府是银川","correct");
Question Question2=new Question("0002",0,"宁夏科技学院位于西夏区大学城","correct");
Question Question3=new Question("0003",0,"贺兰山位于宁夏平原东部","wrong");
questions.add(Question1);
questions.add(Question2);
questions.add(Question3);
return questions;
}
}
这个接口实现层,没有读取数据库,如果读取数据库,只需要加入数据库操作,稍微改造一下即可
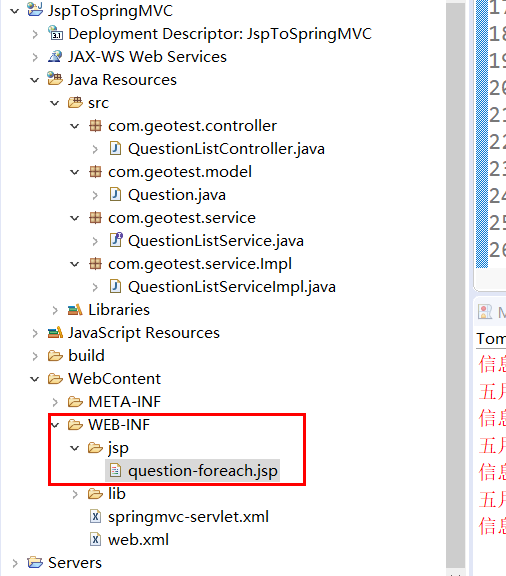
各种类,按照包体分类管理,最终效果,如下图:
好了,有了上述代码,我们的JSP页面,就不需要有JAVA代码了。
第四步:修改原来的JSP页面
我们把jsp目录拖拽到WEB-INF目录下,并修改代码:
<%@ taglib prefix="c" uri="http://java.sun.com/jsp/jstl/core" %>
<%@ page language="java" import="com.geotest.model.Question,java.util.*" contentType="text/html; charset=UTF-8"
pageEncoding="UTF-8"%>
<!DOCTYPE html>
<html>
<head>
<meta charset="UTF-8">
<title>Insert title here</title>
</head>
<body>
用JSTL标签表示表格:
<table border="1">
<tr>
<th width=10%>编号</th>
<th width=10%>题型</th>
<th width=70%>内容</th>
<th width=10%>答案</th>
</tr>
<c:forEach items="${questions_zzz}" var="question_jstl">
<tr>
<td>${question_jstl.questionId}</td>
<td>${question_jstl.questionClass}</td>
<td>${question_jstl.questionContent}</td>
<td>${question_jstl.questionAnswer}</td>
</tr>
</c:forEach>
</table>
<br>
</body>
</html>
上述页面,已经没有明显的JAVA代码了。
拖拽到WEB-INF目录是为了保护该JSP页面,只能通过Servlet来访问该页面。
第五步(10S):运行,查看效果
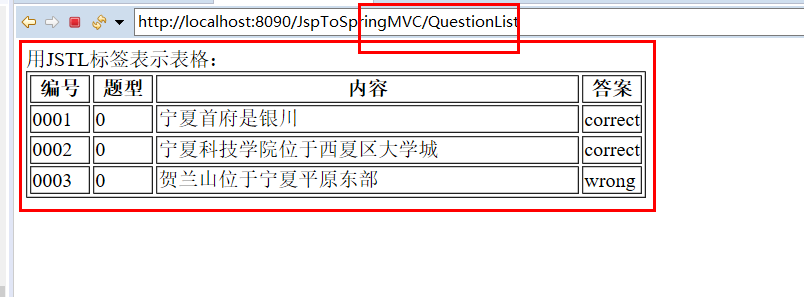
完成。
当然,一分钟有点夸张,但是在几分钟内,可是通过该例子,了解到Spring MVC架构的使用过程。
