


作者
digoal
日期
2021-10-15
标签
PostgreSQL , nbd , network block device , 网络块设备
视频回放: https://www.bilibili.com/video/BV14P4y1t7zB/
网络块设备nbd是一种廉价的共享存储解决方案. nbd也可以作为轻量化的共享存储测试方案, 用于部署学习Oracle RAC, PolarDB for PostgreSQL等.
nbd除了支持tcp协议, 还支持sdp(rdma)协议, 也能测出高性能.
PolarDB for PostgreSQL 开源地址如下: https://github.com/ApsaraDB

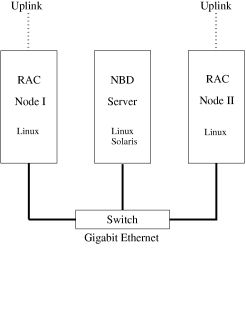
使用nbd构建Oracle-RAC :
http://www.fi.muni.cz/~kripac/orac-nbd/
需要注意的问题, 例如操作系统层缓存, 当从nbd-server切换到另一个nbd-server时, 如果有缓存为写入镜像文件的话, 会导致数据丢失. 这个问题可以通过nbd-server sync export模式解决.
1台server(2块100G云盘vdb, vdc), 2台client. centos 7.9环境.
yum install -y https://dl.fedoraproject.org/pub/epel/epel-release-latest-7.noarch.rpm yum install -y https://download.postgresql.org/pub/repos/yum/reporpms/EL-7-x86_64/pgdg-redhat-repo-latest.noarch.rpm yum install -y centos-release-scl yum install -y postgresql14*复制
内核参数
vi /etc/sysctl.conf # add by digoal.zhou fs.aio-max-nr = 1048576 fs.file-max = 76724600 # 可选:kernel.core_pattern = /data01/corefiles/core_%e_%u_%t_%s.%p # /data01/corefiles 事先建好,权限777,如果是软链接,对应的目录修改为777 kernel.sem = 4096 2147483647 2147483646 512000 # 信号量, ipcs -l 或 -u 查看,每16个进程一组,每组信号量需要17个信号量。 kernel.shmall = 107374182 # 所有共享内存段相加大小限制 (建议内存的80%),单位为页。 kernel.shmmax = 274877906944 # 最大单个共享内存段大小 (建议为内存一半), >9.2的版本已大幅降低共享内存的使用,单位为字节。 kernel.shmmni = 819200 # 一共能生成多少共享内存段,每个PG数据库集群至少2个共享内存段 net.core.netdev_max_backlog = 10000 net.core.rmem_default = 262144 # The default setting of the socket receive buffer in bytes. net.core.rmem_max = 4194304 # The maximum receive socket buffer size in bytes net.core.wmem_default = 262144 # The default setting (in bytes) of the socket send buffer. net.core.wmem_max = 4194304 # The maximum send socket buffer size in bytes. net.core.somaxconn = 4096 net.ipv4.tcp_max_syn_backlog = 4096 net.ipv4.tcp_keepalive_intvl = 20 net.ipv4.tcp_keepalive_probes = 3 net.ipv4.tcp_keepalive_time = 60 net.ipv4.tcp_mem = 8388608 12582912 16777216 net.ipv4.tcp_fin_timeout = 5 net.ipv4.tcp_synack_retries = 2 net.ipv4.tcp_syncookies = 1 # 开启SYN Cookies。当出现SYN等待队列溢出时,启用cookie来处理,可防范少量的SYN攻击 net.ipv4.tcp_timestamps = 1 # 减少time_wait net.ipv4.tcp_tw_recycle = 0 # 如果=1则开启TCP连接中TIME-WAIT套接字的快速回收,但是NAT环境可能导致连接失败,建议服务端关闭它 net.ipv4.tcp_tw_reuse = 1 # 开启重用。允许将TIME-WAIT套接字重新用于新的TCP连接 net.ipv4.tcp_max_tw_buckets = 262144 net.ipv4.tcp_rmem = 8192 87380 16777216 net.ipv4.tcp_wmem = 8192 65536 16777216 net.nf_conntrack_max = 1200000 net.netfilter.nf_conntrack_max = 1200000 vm.dirty_background_bytes = 409600000 # 系统脏页到达这个值,系统后台刷脏页调度进程 pdflush(或其他) 自动将(dirty_expire_centisecs/100)秒前的脏页刷到磁盘 # 默认为10%,大内存机器建议调整为直接指定多少字节 vm.dirty_expire_centisecs = 3000 # 比这个值老的脏页,将被刷到磁盘。3000表示30秒。 vm.dirty_ratio = 95 # 如果系统进程刷脏页太慢,使得系统脏页超过内存 95 % 时,则用户进程如果有写磁盘的操作(如fsync, fdatasync等调用),则需要主动把系统脏页刷出。 # 有效防止用户进程刷脏页,在单机多实例,并且使用CGROUP限制单实例IOPS的情况下非常有效。 vm.dirty_writeback_centisecs = 100 # pdflush(或其他)后台刷脏页进程的唤醒间隔, 100表示1秒。 vm.swappiness = 0 # 不使用交换分区 vm.mmap_min_addr = 65536 vm.overcommit_memory = 0 # 在分配内存时,允许少量over malloc, 如果设置为 1, 则认为总是有足够的内存,内存较少的测试环境可以使用 1 . vm.overcommit_ratio = 90 # 当overcommit_memory = 2 时,用于参与计算允许指派的内存大小。 vm.swappiness = 0 # 关闭交换分区 vm.zone_reclaim_mode = 0 # 禁用 numa, 或者在vmlinux中禁止. net.ipv4.ip_local_port_range = 40000 65535 # 本地自动分配的TCP, UDP端口号范围 fs.nr_open=20480000 # 单个进程允许打开的文件句柄上限 # 以下参数请注意 # vm.extra_free_kbytes = 4096000 # vm.min_free_kbytes = 6291456 # vm.min_free_kbytes 建议每32G内存分配1G vm.min_free_kbytes # 如果是小内存机器,以上两个值不建议设置 # vm.nr_hugepages = 66536 # 建议shared buffer设置超过64GB时 使用大页,页大小 /proc/meminfo Hugepagesize # vm.lowmem_reserve_ratio = 1 1 1 # 对于内存大于64G时,建议设置,否则建议默认值 256 256 32 # 生效 # sysctl -p复制
配置限制
vi /etc/security/limits.conf # nofile超过1048576的话,一定要先将sysctl的fs.nr_open设置为更大的值,并生效后才能继续设置nofile. # 注释其他行 , 添加如下 * soft nofile 1024000 * hard nofile 1024000 * soft nproc unlimited * hard nproc unlimited * soft core unlimited * hard core unlimited * soft memlock unlimited * hard memlock unlimited复制
同时修改(若有)
/etc/security/limits.d/20-nproc.conf复制
关闭透明大页(可选)
echo never > /sys/kernel/mm/transparent_hugepage/enabled复制
配置永久生效
chmod +x /etc/rc.d/rc.local vi /etc/rc.local touch /var/lock/subsys/local if test -f /sys/kernel/mm/transparent_hugepage/enabled; then echo never > /sys/kernel/mm/transparent_hugepage/enabled fi复制
修改时钟(可选)
vi /etc/rc.local touch /var/lock/subsys/local if test -f /sys/kernel/mm/transparent_hugepage/enabled; then echo never > /sys/kernel/mm/transparent_hugepage/enabled fi echo tsc > /sys/devices/system/clocksource/clocksource0/current_clocksource复制
支持的时钟:
cat /sys/devices/system/clocksource/clocksource0/available_clocksource kvm-clock tsc acpi_pm复制
修改时钟:
echo tsc > /sys/devices/system/clocksource/clocksource0/current_clocksource复制
服务端可以直接使用nbd包, 客户端需要编译一下内核(可能centos 7的内核没有默认把nbd模块带进去).
yum install -y nbd复制
服务端
[root@iZbp1eo3op9s5gxnvc7aokZ ~]# ifconfig eth0: flags=4163<UP,BROADCAST,RUNNING,MULTICAST> mtu 1500 inet 172.17.164.66 netmask 255.255.240.0 broadcast 172.17.175.255 inet6 fe80::216:3eff:fe00:851f prefixlen 64 scopeid 0x20<link> ether 00:16:3e:00:85:1f txqueuelen 1000 (Ethernet) RX packets 159932 bytes 229863288 (219.2 MiB) RX errors 0 dropped 0 overruns 0 frame 0 TX packets 30124 bytes 3706650 (3.5 MiB) TX errors 0 dropped 0 overruns 0 carrier 0 collisions 0复制
[root@iZbp1eo3op9s5gxnvc7aokZ ~]# lsblk NAME MAJ:MIN RM SIZE RO TYPE MOUNTPOINT vda 253:0 0 100G 0 disk └─vda1 253:1 0 100G 0 part / vdb 253:16 0 100G 0 disk vdc 253:32 0 100G 0 disk复制
编写nbd-server配置文件, 详见man 5 nbd-server
注意每行配置末尾不能有空格, 解析有问题
vi /root/nbd.conf # This is a comment [generic] # The [generic] section is required, even if nothing is specified # there. # When either of these options are specified, nbd-server drops # privileges to the given user and group after opening ports, but # _before_ opening files. # user = nbd # group = nbd listenaddr = 0.0.0.0 port = 1921 [export1] exportname = /dev/vdb readonly = false multifile = false copyonwrite = false flush = true fua = true sync = true [export2] exportname = /dev/vdc readonly = false multifile = false copyonwrite = false flush = true fua = true sync = true复制
启动nbd-server
[root@iZbp1eo3op9s5gxnvc7aokZ ~]# nbd-server -C /root/nbd.conf复制
客户端
需要额外编译nbd模块到内核中, 编译参考:
https://www.jianshu.com/p/d7813321e0ee
https://blog.csdn.net/mshxuyi/article/details/100610074
https://blog.csdn.net/wendowswd/article/details/79067935
yum install -y kernel-devel kernel-headers elfutils-libelf-devel gcc+ gcc-c++ [root@iZbp1eo3op9s5gxnvc7aolZ ~]# uname -r 3.10.0-1160.42.2.el7.x86_64复制
理论上42.2小版本也要一致, 但是没找到rpm包. 3.10.0-1160.el7好像也能用.
PS: 后来在 https://vault.centos.org/7.9.2009/updates/Source/SPackages/ 找到了更新小版本的src.
curl https://vault.centos.org/7.9.2009/os/Source/SPackages/kernel-3.10.0-1160.el7.src.rpm -o ./kernel-3.10.0-1160.el7.src.rpm 修改为: curl https://vault.centos.org/7.9.2009/updates/Source/SPackages/kernel-3.10.0-1160.42.2.el7.src.rpm -o ./kernel-3.10.0-1160.42.2.el7.src.rpm rpm -ivh kernel-3.10.0-1160.el7.src.rpm 修改为: rpm -ivh kernel-3.10.0-1160.42.2.el7.src.rpm cd rpmbuild/SOURCES/ tar xvf linux-3.10.0-1160.el7.tar.xz -C /usr/src/kernels/ 修改为: tar xvf linux-3.10.0-1160.42.2.el7.tar.xz -C /usr/src/kernels/ cd /usr/src/kernels/linux-3.10.0-1160.el7 修改为: cd /usr/src/kernels/linux-3.10.0-1160.42.2.el7 make mrproper cp /usr/src/kernels/3.10.0-1160.42.2.el7.x86_64/Module.symvers ./ cp /boot/config-3.10.0-1160.el7.x86_64 ./.config 修改为: cp /boot/config-3.10.0-1160.42.2.el7.x86_64 ./.config make oldconfig make prepare make scripts复制
下面是修复编译错误的一段(因为没有include blkdev.h头文件, 缺少变量定义而报错):
在 /usr/src/kernels/linux-3.10.0-1160.el7/include/linux/blkdev.h 中定义了 REQ_TYPE_SPECIAL = 7 修改为: 在 /usr/src/kernels/linux-3.10.0-1160.42.2.el7/include/linux/blkdev.h 中定义了 REQ_TYPE_SPECIAL = 7 /* * request command types */ enum rq_cmd_type_bits { REQ_TYPE_FS = 1, /* fs request */ REQ_TYPE_BLOCK_PC, /* scsi command */ REQ_TYPE_SENSE, /* sense request */ REQ_TYPE_PM_SUSPEND, /* suspend request */ REQ_TYPE_PM_RESUME, /* resume request */ REQ_TYPE_PM_SHUTDOWN, /* shutdown request */ #ifdef __GENKSYMS__ REQ_TYPE_SPECIAL, /* driver defined type */ #else REQ_TYPE_DRV_PRIV, /* driver defined type */ #endif /* * for ATA/ATAPI devices. this really doesn't belong here, ide should * use REQ_TYPE_DRV_PRIV and use rq->cmd[0] with the range of driver * private REQ_LB opcodes to differentiate what type of request this is */ REQ_TYPE_ATA_TASKFILE, REQ_TYPE_ATA_PC, };复制
修改下文件
vi drivers/block/nbd.c 修改 sreq.cmd_type = REQ_TYPE_SPECIAL; 为 sreq.cmd_type = 7;复制
继续编译
make CONFIG_BLK_DEV_NBD=m M=drivers/block CONFIG_STACK_VALIDATION= cp drivers/block/nbd.ko /lib/modules/3.10.0-1160.42.2.el7.x86_64/kernel/drivers/block/复制
加载nbd模块
depmod -a modinfo nbd modprobe nbd复制
配置自动加载nbd模块
#cd /etc/sysconfig/modules/ #vi nbd.modules 在文件中添加如下内容 #!/bin/sh /sbin/modinfo -F filename nbd > /dev/null 2>&1 if [ $? -eq 0 ]; then /sbin/modprobe nbd fi #chmod 755 nbd.modules //这一步至关重要 #reboot复制
挂载网络块设备
[root@iZbp1eo3op9s5gxnvc7aomZ ~]# nbd-client 172.17.164.66 1921 -N export1 /dev/nbd0 Negotiation: ..size = 102400MB bs=1024, sz=107374182400 bytes [root@iZbp1eo3op9s5gxnvc7aomZ ~]# nbd-client 172.17.164.66 1921 -N export2 /dev/nbd1 Negotiation: ..size = 102400MB bs=1024, sz=107374182400 bytes复制
格式化文件系统, 挂载
mkfs.ext4 /dev/nbd0 mkfs.ext4 /dev/nbd1 mkdir /data01 mkdir /data02 mount /dev/nbd0 /data01 mount /dev/nbd1 /data02复制
写测试
# dd if=/dev/zero of=/data01/test oflag=direct bs=1M count=1000 1000+0 records in 1000+0 records out 1048576000 bytes (1.0 GB) copied, 4.90611 s, 214 MB/s # dd if=/dev/zero of=/data02/test oflag=direct bs=1M count=1000 1000+0 records in 1000+0 records out 1048576000 bytes (1.0 GB) copied, 4.90611 s, 214 MB/s复制
df -h /dev/nbd0 99G 1.1G 93G 2% /data01 /dev/nbd1 99G 1.1G 93G 2% /data02复制
服务端iotop可以看到一些IO操作
13899 be/4 root 0.00 B/s 42.56 M/s 0.00 % 73.39 % nbd-server -C /root/nbd.conf [pool] 13901 be/4 root 0.00 B/s 42.81 M/s 0.00 % 73.00 % nbd-server -C /root/nbd.conf [pool] 13897 be/4 root 0.00 B/s 42.56 M/s 0.00 % 72.95 % nbd-server -C /root/nbd.conf [pool] 13900 be/4 root 0.00 B/s 42.32 M/s 0.00 % 72.47 % nbd-server -C /root/nbd.conf [pool]复制
fsync测试
[root@iZbp1eo3op9s5gxnvc7aomZ data01]# /usr/pgsql-14/bin/pg_test_fsync -f /data01/test 5 seconds per test O_DIRECT supported on this platform for open_datasync and open_sync. Compare file sync methods using one 8kB write: (in wal_sync_method preference order, except fdatasync is Linux's default) open_datasync 1056.250 ops/sec 947 usecs/op fdatasync 1032.631 ops/sec 968 usecs/op fsync 404.807 ops/sec 2470 usecs/op fsync_writethrough n/a open_sync 414.387 ops/sec 2413 usecs/op Compare file sync methods using two 8kB writes: (in wal_sync_method preference order, except fdatasync is Linux's default) open_datasync 553.453 ops/sec 1807 usecs/op fdatasync 1011.726 ops/sec 988 usecs/op fsync 404.171 ops/sec 2474 usecs/op fsync_writethrough n/a open_sync 208.758 ops/sec 4790 usecs/op Compare open_sync with different write sizes: (This is designed to compare the cost of writing 16kB in different write open_sync sizes.) 1 * 16kB open_sync write 405.717 ops/sec 2465 usecs/op 2 * 8kB open_sync writes 208.324 ops/sec 4800 usecs/op 4 * 4kB open_sync writes 106.849 ops/sec 9359 usecs/op 8 * 2kB open_sync writes 52.999 ops/sec 18868 usecs/op 16 * 1kB open_sync writes 26.657 ops/sec 37513 usecs/op Test if fsync on non-write file descriptor is honored: (If the times are similar, fsync() can sync data written on a different descriptor.) write, fsync, close 413.350 ops/sec 2419 usecs/op write, close, fsync 417.832 ops/sec 2393 usecs/op Non-sync'ed 8kB writes: write 608345.462 ops/sec 2 usecs/op复制
另一台客户端服务器操作类似, 除了不需要mkfs, 其他都一样. 如果要挂载集群文件系统(可以反映出写变化, 支持分布式锁), 可以使用linux的gfs2.
断开nbd设备
先umount umount /data01 umount /data02 然后 nbd-client -d /dev/nbd0 nbd-client -d /dev/nbd1复制
NBD在WIKI中的介绍 :
Network block device From Wikipedia, the free encyclopedia In Linux, a network block device is a device node whose content is provided by a remote machine. Typically, network block devices are used to access a storage device that does not physically reside in the local machine but on a remote one. As an example, the local machine can access a fixed disk that is attached to another computer. Contents [hide] 1 Kernel client/userspace server 2 Example 3 Availability 4 See also 5 References 6 External links Kernel client/userspace server[edit] Technically, a network block device is realized by two components. In the client machine, where the device node is to work, a kernel module named nbd controls the device. Whenever a program tries to access the device, this kernel module forwards the request to the server machine, where the data physically resides. On the server machine, requests from the client are handled by a userspace program called nbd-server. This program is not implemented as a kernel module because all it has to do is to serve network requests, which in turn just requires regular access to the server filesystem. Example[edit] If the file /tmp/xxx on ComputerA has to be made accessible on ComputerB, one performs the following steps: On ComputerA: nbd-server 2000 /tmp/xxx On ComputerB: modprobe nbd nbd-client ComputerA 2000 /dev/nbd0 The file is now accessible on ComputerB as device /dev/nbd0. If the original file was for example a disk image, it could be mounted for example via mount /dev/nbd0 /mnt/whatever. The command modprobe nbd is not necessary if module loading is done automatically. Once the module is in the kernel, nbd-client is used to send commands to it, such as associating a given remote file to a given local nb device. To finish using /dev/nbd0, that is, to destroy its association with the file on other computer, one can run nbd-client -d /dev/nbd0 on ComputerB. In this example, 2000 is the number of the server port through which the file is made accessible. Any available port could be used. Availability[edit] The network block device client module is available on Linux and GNU Hurd. Since the server is a userspace program, it can potentially run on every Unix-like platform. It was ported to Solaris.[1] 在CentOS或RHEL下可以使用EPEL附加仓库安装nbd : [root@150 postgresql-9.3.5]# yum install -y nbd Loaded plugins: fastestmirror, refresh-packagekit, security, versionlock Loading mirror speeds from cached hostfile epel/metalink | 5.4 kB 00:00 * base: mirrors.skyshe.cn * epel: mirrors.ustc.edu.cn * extras: mirrors.163.com * updates: centos.mirror.cdnetworks.com base | 3.7 kB 00:00 extras | 3.3 kB 00:00 updates | 3.4 kB 00:00 updates/primary_db | 5.3 MB 00:21 Setting up Install Process Resolving Dependencies --> Running transaction check ---> Package nbd.x86_64 0:2.9.20-7.el6 will be installed --> Finished Dependency Resolution Dependencies Resolved ==================================================================================================================================== Package Arch Version Repository Size ==================================================================================================================================== Installing: nbd x86_64 2.9.20-7.el6 epel 43 k Transaction Summary ==================================================================================================================================== Install 1 Package(s) Total download size: 43 k Installed size: 83 k Downloading Packages: nbd-2.9.20-7.el6.x86_64.rpm | 43 kB 00:00 Running rpm_check_debug Running Transaction Test Transaction Test Succeeded Running Transaction Installing : nbd-2.9.20-7.el6.x86_64 1/1 Verifying : nbd-2.9.20-7.el6.x86_64 1/1 Installed: nbd.x86_64 0:2.9.20-7.el6 Complete! 包含的内容 : [root@iZbp1eo3op9s5gxnvc7aokZ ~]# rpm -ql nbd /etc/sysconfig/nbd-server /usr/bin/gznbd /usr/bin/nbd-server /usr/bin/nbd-trdump /usr/lib/systemd/system/nbd-server.service /usr/lib/systemd/system/nbd@.service /usr/sbin/nbd-client /usr/share/doc/nbd-3.14 /usr/share/doc/nbd-3.14/README.md /usr/share/doc/nbd-3.14/proto.md /usr/share/doc/nbd-3.14/todo.txt /usr/share/licenses/nbd-3.14 /usr/share/licenses/nbd-3.14/COPYING /usr/share/man/man1/nbd-server.1.gz /usr/share/man/man1/nbd-trdump.1.gz /usr/share/man/man5/nbd-server.5.gz /usr/share/man/man5/nbdtab.5.gz /usr/share/man/man8/nbd-client.8.gz复制
- http://en.wikipedia.org/wiki/Network_block_device
- http://www.fi.muni.cz/~kripac/orac-nbd/
- http://www.fi.muni.cz/~kripac/oracle-altix/
- http://sourceforge.net/projects/nbd/
- https://github.com/NetworkBlockDevice/nbd
- http://nbd.sourceforge.net/
- http://web.freenas.org/images/resources/freenas9.2.1/freenas9.2.1_guide.pdf
- http://fedoraproject.org/wiki/EPEL
- https://www.jianshu.com/p/d7813321e0ee
- https://blog.csdn.net/mshxuyi/article/details/100610074
- https://blog.csdn.net/wendowswd/article/details/79067935
- man 1 nbd-server
- man 5 nbd-server
- man 8 nbd-client
期望 PostgreSQL 增加什么功能?
类似Oracle RAC架构的PostgreSQL已开源: 阿里云PolarDB for PostgreSQL云原生分布式开源数据库!
PostgreSQL 解决方案集合
德哥 / digoal's github - 公益是一辈子的事.

