随着社交媒体、零售、电商、金融、物联网等行业的迅速发展,不知不觉形成了一张巨大的关系网。我们之前使用过的传统型数据库已经无法承载巨大的运算量来分析这张网中元素之间的关系,所以图数据库应运而生。在很多领域图数据库都得到了广泛地应用。比如Facebook、Twitter、Linkedin使用图数据库来管理成员之间的关系,并实现好友推荐。国内多家著名电商平台使用图数据库在APP上为用户实时推荐商品,带来更好的购物体验。著名酒店集团使用图数据库管理复杂且变化迅速的库存等,在流行病学当中,图数据分析也发挥着重要的作用。
今天我们就通过实验的方式分析一个金融系统中储户的转账关系来了解如何使用Oracle的图计算技术解决实际问题。
在今天的实验中,我们将使用Oracle免费的云账户。实验环境包括两部分:免费的Oracle自治数据库(ATP)和永久免费(Always Free)计算节点上安装的Oracle Graph Server。

实验1:创建ATP及计算节点on OCI
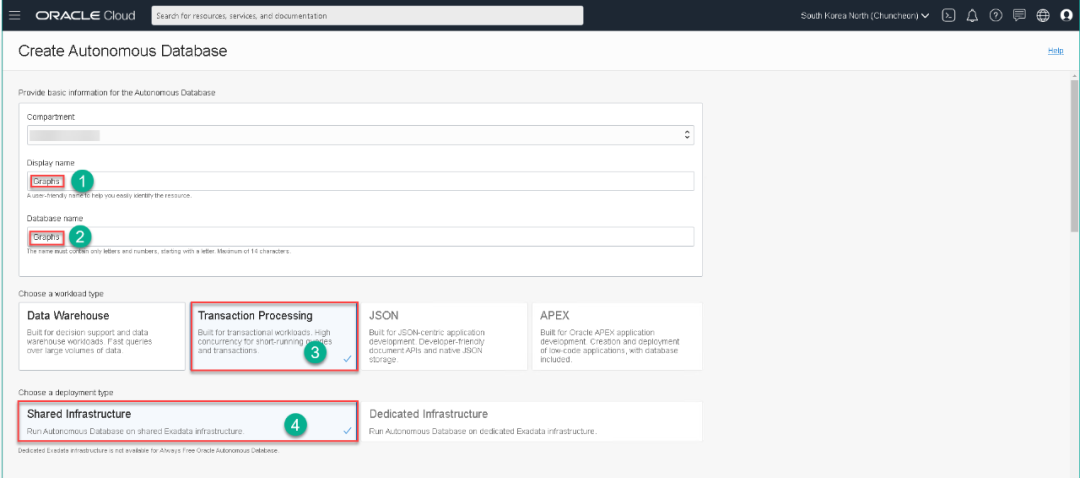
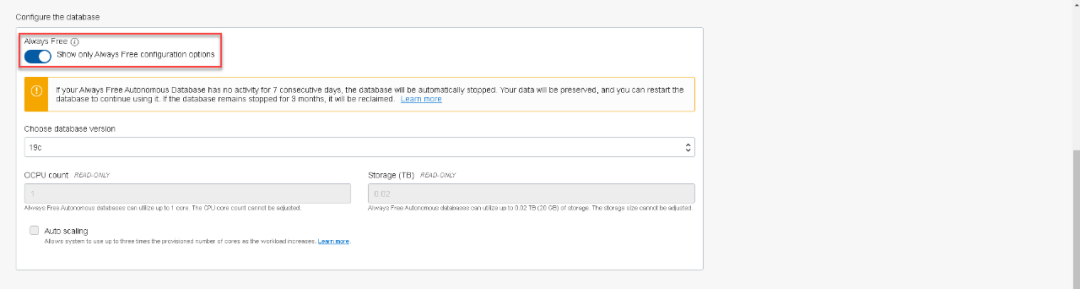
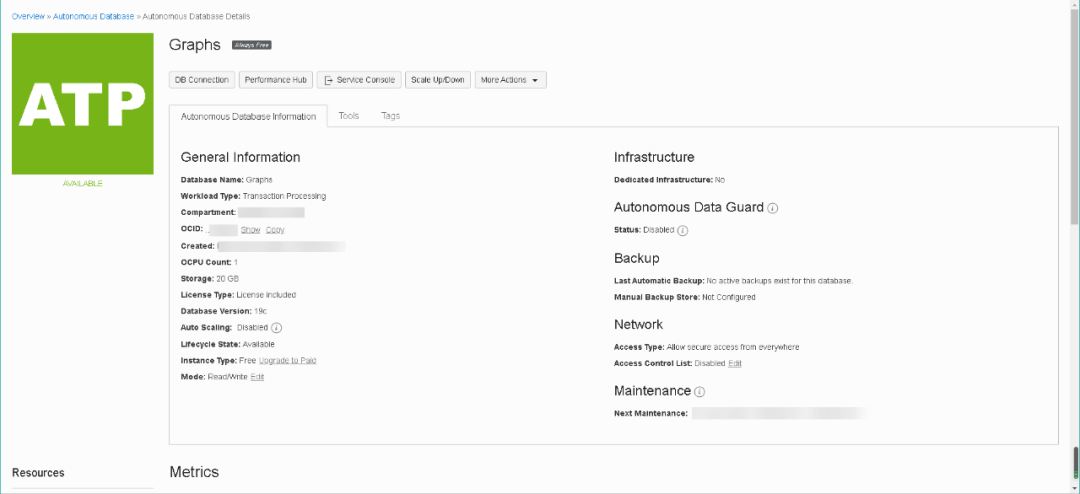
每个测试账号都可以创建两个自治数据库,ADW和ATP各一个。我们今天所使用的环境是将ATP作为我们的数据容器。关于ATP和ADW的创建,在我们之前的文章中介绍过多次,您只需要给出数据库名称及密码,很快就能创建完毕。今天我们在创建ATP时,选择了Always Free,将创建一个1 OCPU,20GB存储的云端自治数据库供大家永久使用。需要注意的是,如果该数据库7天没有活动,数据库将被暂停,90天没有活动,将被删除。这样可以腾出资源为更多用户提供优质服务。
经过几分钟的等待,ATP就创建完毕了。并且可以通过在数据库名字旁边的灰色标记看出,这是一个永久免费的云端自治数据库。
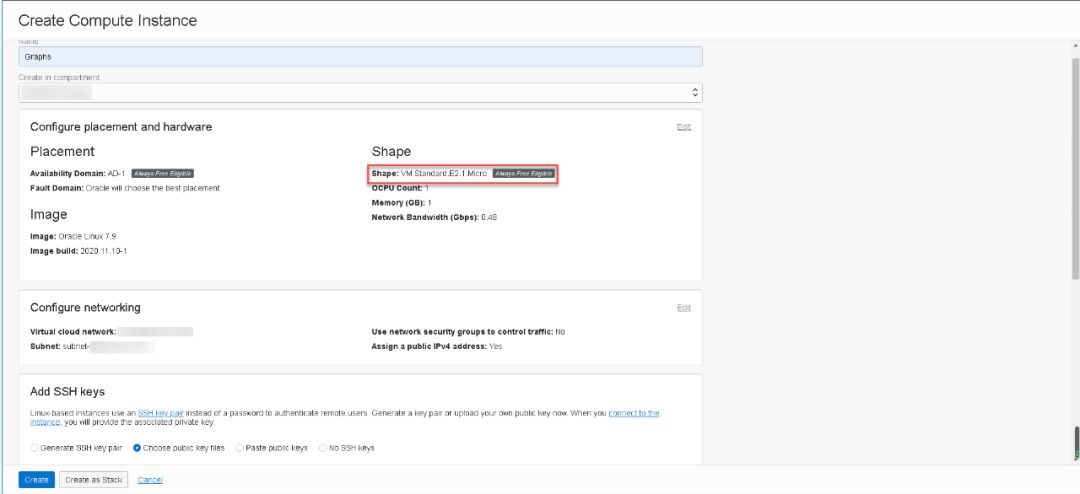
接下来我们创建用于安装Oracle Graph Server的计算节点,Oracle永久免费账户为大家提供2个Always Free的Linux环境,这与其他云服务商给出的1年免费要慷慨许多。每个Always Free的环境将为大家提供1 OCPU的计算能力,1GB内存和46GB存储和480Mbps的带宽,这个带宽已经远远超出好多云服务商的付费带宽,与其他服务商提供的1-10Mbps的带宽相比,在网络传输速度方面Oracle有较大的优势。
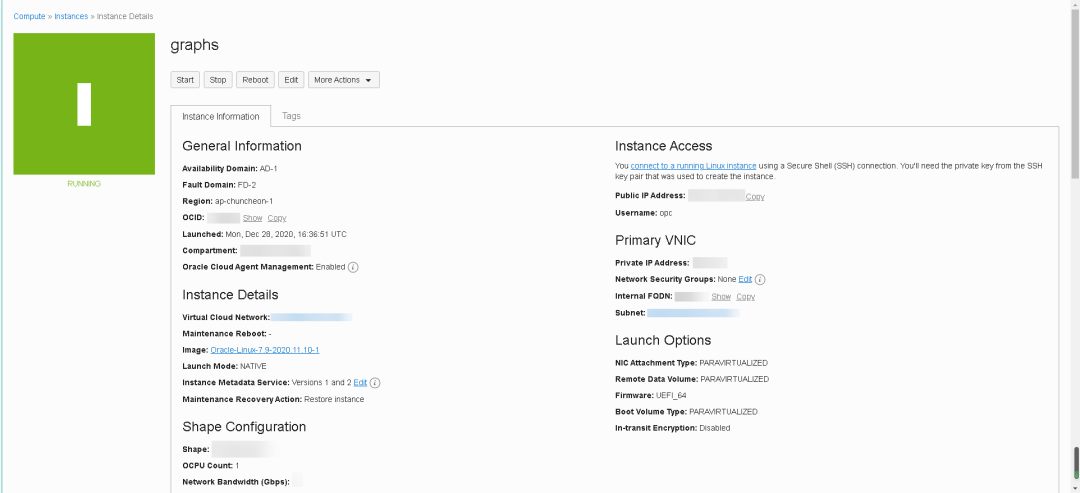
经过几分钟的等待,我们的计算节点就创建完成了。
接下来我们来配置我们的计算节点并安装Oracle Graph Server。首先我们创建oracle用户并设定密码。然后创建oraclegraph用户组并修改oracle用户的附加群组信息。
[root@graphs opc]# useradd oracle[root@graphs opc]# passwd oracleNew password:Retype new password:passwd: all authentication tokens updated successfully.[root@graphs opc]# groupadd oraclegraph[root@graphs opc]# usermod -a -G oraclegraph oracle
Oracle Graph Server会使用到Java环境。我们的计算节点在云端,所以直接使用yum安装即可,大家可以看到我们安装了两个版本的jdk,一个是11.0.5,一个是1.8。安装完毕之后我们将jdk1.8设定为主环境。
[root@graphs opc]# yum install jdk1.8.x86_64 jdk-11.0.5.x86_64[root@graphs opc]# alternatives --listlibnssckbi.so.x86_64 auto usr/lib64/pkcs11/p11-kit-trust.sold auto usr/bin/ld.bfdmta auto usr/sbin/sendmail.postfixcifs-idmap-plugin auto usr/lib64/cifs-utils/cifs_idmap_sss.soksh auto bin/ksh93java auto usr/java/jdk-11.0.5/bin/java[root@graphs opc]# alternatives --config javaThere are 2 programs which provide 'java'.Selection Command-----------------------------------------------*+ 1 usr/java/jdk-11.0.5/bin/java2 usr/java/jdk1.8.0_271-amd64/bin/javaEnter to keep the current selection[+], or type selection number: 2[root@graphs opc]# java -versionjava version "1.8.0_271"Java(TM) SE Runtime Environment (build 1.8.0_271-b09)Java HotSpot(TM) 64-Bit Server VM (build 25.271-b09, mixed mode)
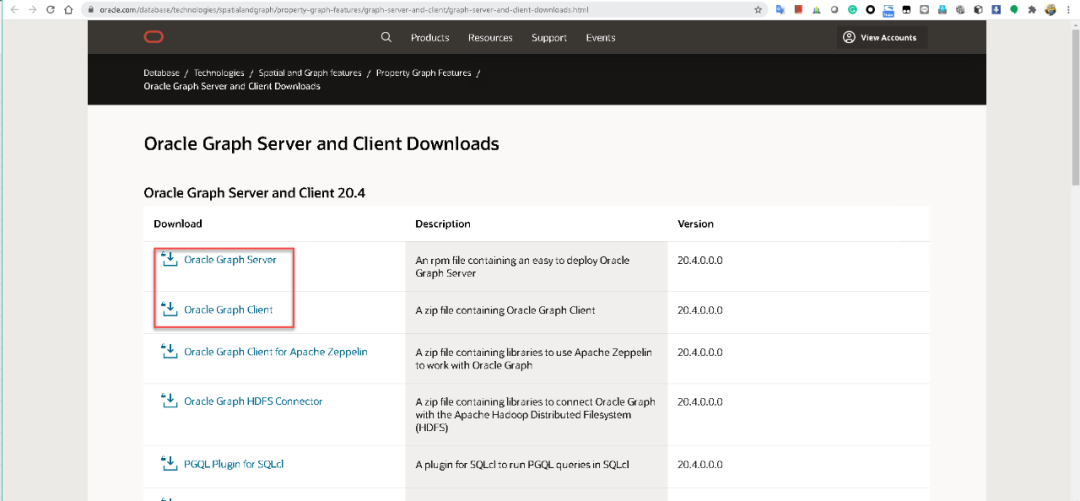
接下来下载Oracle Graph Server,下载地址可以点击本文末尾的“阅读原文”。目前Oracle Graph Server的最新版本是20.4,但我们今天使用的环境是20.2,大家在该页面的下半部就可以找到20.2的下载地址。
接下来我们部署Oracle Graph Server,我们只需要通过yum即可安装Oracle Graph Server,在此之前先安装numactl。
Oracle Graph Server安装之后,将从ATP控制台下载的wallet文件解压并放入/home/oracle/wallet当中。当然,我们也可以将它放在其他位置。
[root@graphs u01]# yum -y install numactl[root@graphs u01]# yum -y install oracle-graph-20.2.0.x86_64.rpmLoaded plugins: langpacks, ulninfoExamining oracle-graph-20.2.0.x86_64.rpm: oracle-graph-20.2.0-0.x86_64Marking oracle-graph-20.2.0.x86_64.rpm to be installedResolving Dependencies--> Running transaction check---> Package oracle-graph.x86_64 0:20.2.0-0 will be installed--> Finished Dependency ResolutionDependencies Resolved==============================================================================================================================================================================================================Package Arch Version Repository Size==============================================================================================================================================================================================================Installing:oracle-graph x86_64 20.2.0-0 oracle-graph-20.2.0.x86_64 523 MTransaction Summary==============================================================================================================================================================================================================Install 1 PackageTotal size: 523 MInstalled size: 523 MDownloading packages:Running transaction checkRunning transaction testTransaction test succeededRunning transactionInstalling : oracle-graph-20.2.0-0.x86_64 1/1Verifying : oracle-graph-20.2.0-0.x86_64 1/1Installed:oracle-graph.x86_64 0:20.2.0-0Complete![root@graphs u01]# chown oracle Wallet_Graphs.zip[root@graphs u01]# chgrp oraclegraph Wallet_Graphs.zip[root@graphs u01]# mv Wallet_Graphs.zip home/oracle[root@graphs u01]# su - oracle[oracle@graphs ~]$ mkdir wallets[oracle@graphs ~]$ mv Wallet_Graphs.zip home/oracle/wallets[oracle@graphs ~]$ cd wallets/[oracle@graphs wallets]$ unzip Wallet_Graphs.zipArchive: Wallet_Graphs.zipinflating: READMEinflating: cwallet.ssoinflating: tnsnames.orainflating: truststore.jksinflating: ojdbc.propertiesinflating: sqlnet.orainflating: ewallet.p12inflating: keystore.jks
设定oracle用户的概要文件,加入JAVA_HOME和JAVA11_HOME,这两个jdk的地址,在上面安装并设定默认jdk的时候可以看到。
[oracle@graphs ~]$ cat .bash_profile# .bash_profile# Get the aliases and functionsif [ -f ~/.bashrc ]; then. ~/.bashrcfi# User specific environment and startup programsexport JAVA_HOME=/usr/java/jdk1.8.0_271-amd64export JAVA11_HOME=/usr/java/jdk-11.0.5PATH=$PATH:$HOME/.local/bin:$HOME/binexport PATH[oracle@graphs ~]$
我们从ATP下载的wallet文件解压之后,可以看到tnsnames.ora文件,我们找到其中的连接名并记录它,稍后在Oracle Graph Server连接ATP的时候会使用到。
[oracle@graphs wallets]$ cat tnsnames.oragraphs_high = (description= (retry_count=20)(retry_delay=3)(address=(protocol=tcps)(port=1522)(host=adb.ap-chuncheon-1.oraclecloud.com))(connect_data=(service_name=hahahadouniwan_graphs_high.adb.oraclecloud.com))(security=(ssl_server_cert_dn="CN=adb.ap-chuncheon-1.oraclecloud.com,OU=Oracle ADB CHUNCHEON,O=Oracle Corporation,L=Redwood City,ST=California,C=US")))
在今天的实验当中,我们要分析一个金融机构当中的转账关系,我们要使用到7张表(customer, account, merchant, ownedby, purchased, transfer, parentof),这些表的关系如下:

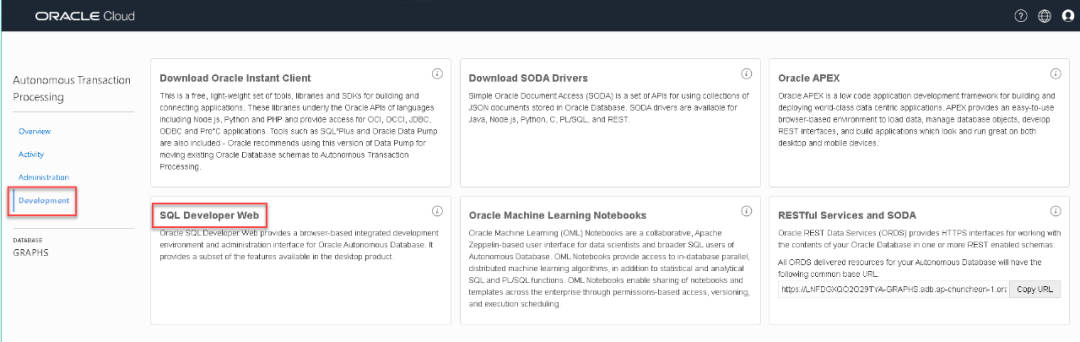
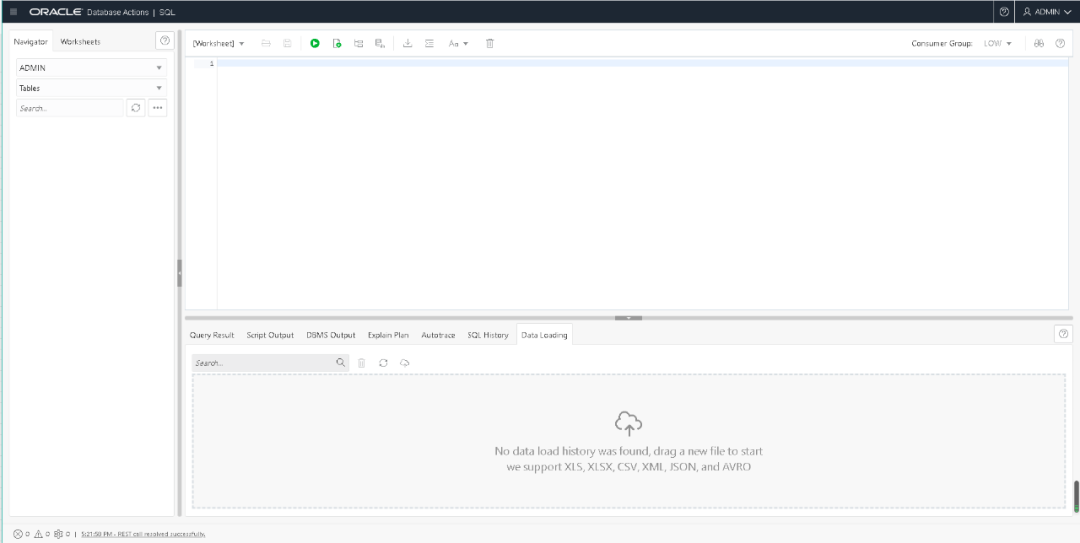
我们登陆ATP的控制台,并启动SQL Developer Web版。

接下来我们使用下面代码创建用户customer_360。
CREATE USER customer_360IDENTIFIED BY bugaosunibugaosuniDEFAULT TABLESPACE dataTEMPORARY TABLESPACE tempQUOTA UNLIMITED ON data;GRANT connect, resource TO customer_360;

接下来为刚刚创建的customer_360用户启用SQL Developer Web。稍后使用customer_360登陆的时候,在URL当中就会出现我们在下面设定的c360标记。
BEGINORDS_ADMIN.ENABLE_SCHEMA(p_enabled => TRUE,p_schema => 'CUSTOMER_360',p_url_mapping_type => 'BASE_PATH',p_url_mapping_pattern => 'c360',p_auto_rest_auth => TRUE);COMMIT;END;/
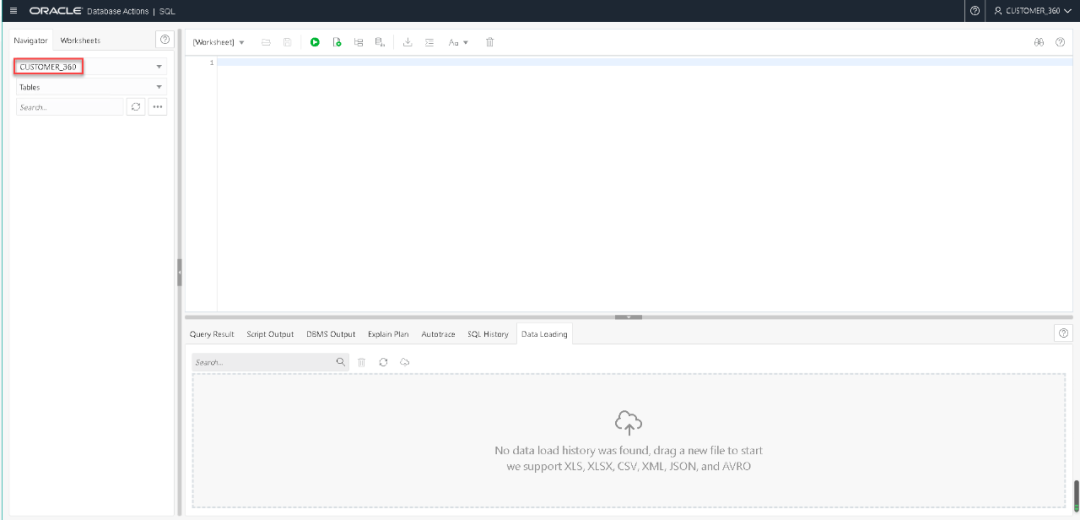
使用刚才创建的CUSTOMER_360用户登录,选择SQL,进入SQL Developer Web。

如我们上面所说,我们要创建7张表。先做环境清理,如果这些表已经存在,先删除。
DROP TABLE account;DROP TABLE customer;DROP TABLE merchant;DROP TABLE owned_by;DROP TABLE parent_of;DROP TABLE purchased;DROP TABLE transfer;
接下来创建这7张表并插入记录。
CREATE TABLE account (id NUMBER NOT NULL, type VARCHAR2(20), account_no VARCHAR2(20), balance NUMBER, CONSTRAINT account_pk PRIMARY KEY (id));INSERT INTO account (id,type,account_no,balance) VALUES (201,'account','xxx-yyy-201',1500);INSERT INTO account (id,type,account_no,balance) VALUES (202,'account','xxx-yyy-202',200);INSERT INTO account (id,type,account_no,balance) VALUES (203,'account','xxx-yyy-203',2100);INSERT INTO account (id,type,account_no,balance) VALUES (204,'account','xxx-yyy-204',100);INSERT INTO account (id,type,account_no,balance) VALUES (211,'account','xxx-zzz-211',NULL);INSERT INTO account (id,type,account_no,balance) VALUES (212,'account','xxx-zzz-212',NULL);COMMIT;
CREATE TABLE customer (id NUMBER NOT NULL,type VARCHAR2(20),name VARCHAR2(20),age NUMBER,location VARCHAR2(20),gender VARCHAR2(20),student VARCHAR2(20), CONSTRAINT customer_pk PRIMARY KEY (id));INSERT INTO customer (id,type,name,age,location,gender,student) VALUES (101,'customer','John',10,'Boston',NULL,NULL);INSERT INTO customer (id,type,name,age,location,gender,student) VALUES (102,'customer','Mary',NULL,NULL,'F',NULL);INSERT INTO customer (id,type,name,age,location,gender,student) VALUES (103,'customer','Jill',NULL,'Boston',NULL,NULL);INSERT INTO customer (id,type,name,age,location,gender,student) VALUES (104,'customer','Todd',NULL,NULL,NULL,'true');COMMIT;
CREATE TABLE merchant (id NUMBER NOT NULL, type VARCHAR2(20), name VARCHAR2(20), CONSTRAINT merchant_pk PRIMARY KEY (id));INSERT INTO merchant (id,type,name) VALUES (301,'merchant','Apple Store');INSERT INTO merchant (id,type,name) VALUES (302,'merchant','PC Paradise');INSERT INTO merchant (id,type,name) VALUES (303,'merchant','Kindle Store');INSERT INTO merchant (id,type,name) VALUES (304,'merchant','Asia Books');INSERT INTO merchant (id,type,name) VALUES (305,'merchant','ABC Travel');COMMIT;
CREATE TABLE owned_by (from_id NUMBER,to_id NUMBER,since VARCHAR2(20));INSERT INTO owned_by (from_id,to_id,since) VALUES (201,101,'2015-10-04');INSERT INTO owned_by (from_id,to_id,since) VALUES (202,102,'2012-09-13');INSERT INTO owned_by (from_id,to_id,since) VALUES (203,103,'2016-02-04');INSERT INTO owned_by (from_id,to_id,since) VALUES (204,104,'2018-01-05');COMMIT;
CREATE TABLE parent_of (from_id NUMBER, to_id NUMBER);INSERT INTO parent_of (from_id,to_id) VALUES (103,104);COMMIT;
CREATE TABLE purchased (from_id NUMBER,to_id NUMBER,amount NUMBER);INSERT INTO purchased (from_id,to_id,amount) VALUES (201,301,800);INSERT INTO purchased (from_id,to_id,amount) VALUES (201,302,15);INSERT INTO purchased (from_id,to_id,amount) VALUES (202,301,150);INSERT INTO purchased (from_id,to_id,amount) VALUES (202,302,20);INSERT INTO purchased (from_id,to_id,amount) VALUES (202,304,10);INSERT INTO purchased (from_id,to_id,amount) VALUES (203,301,350);INSERT INTO purchased (from_id,to_id,amount) VALUES (203,302,20);INSERT INTO purchased (from_id,to_id,amount) VALUES (203,303,15);INSERT INTO purchased (from_id,to_id,amount) VALUES (204,303,10);INSERT INTO purchased (from_id,to_id,amount) VALUES (204,304,15);INSERT INTO purchased (from_id,to_id,amount) VALUES (204,305,450);COMMIT;
CREATE TABLE transfer (from_id NUMBER, to_id NUMBER, amount NUMBER, "DATE" VARCHAR2(20));INSERT INTO transfer (from_id,to_id,amount,"DATE") VALUES (201,202,200,'2018-10-05');INSERT INTO transfer (from_id,to_id,amount,"DATE") VALUES (211,202,900,'2018-10-06');INSERT INTO transfer (from_id,to_id,amount,"DATE") VALUES (202,212,850,'2018-10-06');INSERT INTO transfer (from_id,to_id,amount,"DATE") VALUES (201,203,500,'2018-10-07');INSERT INTO transfer (from_id,to_id,amount,"DATE") VALUES (203,204,450,'2018-10-08');INSERT INTO transfer (from_id,to_id,amount,"DATE") VALUES (204,201,400,'2018-10-09');INSERT INTO transfer (from_id,to_id,amount,"DATE") VALUES (202,203,100,'2018-10-10');INSERT INTO transfer (from_id,to_id,amount,"DATE") VALUES (202,201,300,'2018-10-10');COMMIT;
在启动Oracle Graph Server之前,修改配置参数。将 "enable_tls": true,改成 "enable_tls": false,下面是修改好的。至此,我们的实验环境搭建完毕。
[oracle@graphs wallets]$ cat etc/oracle/graph/server.conf{"port": 7007,"enable_tls": false,"enable_client_authentication": false,"working_dir": "/opt/oracle/graph/pgx/tmp_data"}[oracle@graphs wallets]$
实验2:创建图
首先我们使用oracle用户启动Oracle Graph Server。需要注意的是,当Oracle Graph Server启动之后,这个session会一直处于被占用状态,不要关闭。或者在下面命令后面加一个 &,但这不是推荐的做法,因为服务器运行过程中会时不时输出日志,如果使用同一个窗口,这样影响我们使用,并且不方便阅读。
[oracle@graphs wallets]$ /opt/oracle/graph/pgx/bin/start-server
接下来我们启动客户端jshell,我们连接本机的7007端口。因为Oracle Graph Server就运行在本机的7007端口上,我们可以通过上面Oracle Graph Server启动时的输出日志查看到,就是上面那个窗口的输出内容中。
客户端登录成功之后,我们使用客户端连接我们的云端自治数据库ATP。大家观察下面的第二段代码。在第一行设定了连接数据库的连接串"jdbc:oracle:thin:@刚才在tnsnames.ora当中查到的名字?TNS_ADMIN=从ATP下载的wallet解压的位置"。然后在下面设定了连接数据库时,使用的用户名和口令。最后声明一个conn的对象,创建连接。
[oracle@graphs wallets]$ opt/oracle/graph/bin/opg-jshell --base_url http://localhost:7007For an introduction type: help introOracle Graph Server Shell 20.2.0PGX server version: 20.0.2 type: SMPGX server API version: 3.7.2PGQL version: 1.3Variables instance, session, and analyst ready to use.opg-jshell>
opg-jshell> var jdbcUrl = "jdbc:oracle:thin:@graphs_high?TNS_ADMIN=/home/oracle/wallets";jdbcUrl ==> "jdbc:oracle:thin:@graphs_high?TNS_ADMIN=/home/oracle/wallets"opg-jshell> var user = "customer_360";user ==> "customer_360"opg-jshell> var pass = "bugaosunibugaosuni";pass ==> "bugaosunibugaosuni"opg-jshell> var conn = DriverManager.getConnection(jdbcUrl, user, pass) ;conn ==> oracle.jdbc.driver.1111111111111111opg-jshell>
接下来设置自动提交关闭,并创建连接pgql。
opg-jshell> conn.setAutoCommit(false);opg-jshell> var pgql = PgqlConnection.getConnection(conn);pgql ==> oracle.pg.rdbms.pgql.PgqlConnection@6e92f150
下面这段代码其实是一个变量,叫做cpgStmtStr,这段代码的作用是创建一个叫做customer_360的图。这只是一个变量,目前还没有执行。
opg-jshell> var cpgStmtStr = "CREATE PROPERTY GRAPH customer_360 " +...> " VERTEX TABLES (" +...> " customer " +...> " PROPERTIES (type, name, age, location, gender, student) " +...> " , account " +...> " PROPERTIES (type, account_no, balance) " +...> " , merchant " +...> " PROPERTIES (type, name) " +...> " ) " +...> " EDGE TABLES ( " +...> " owned_by " +...> " SOURCE KEY(from_id) REFERENCES account " +...> " DESTINATION KEY(to_id) REFERENCES customer " +...> " LABEL owned_by " +...> " PROPERTIES (since) " +...> " , parent_of " +...> " SOURCE KEY(from_id) REFERENCES customer " +...> " DESTINATION KEY(to_id) REFERENCES customer " +...> " LABEL parent_of " +...> " , purchased " +...> " SOURCE KEY(from_id) REFERENCES account " +...> " DESTINATION KEY(to_id) REFERENCES merchant " +...> " LABEL purchased " +...> " PROPERTIES (amount) " +...> " , transfer " +...> " SOURCE KEY(from_id) REFERENCES account " +...> " DESTINATION KEY(to_id) REFERENCES account " +...> " LABEL transfer " +...> " PROPERTIES (amount, date)" +...> " )" ;cpgStmtStr ==> "CREATE PROPERTY GRAPH customer_360 VERTEX TABLES ( customer PROPERTIES (type, name, age, location, gender, student) , account PROPERTIES (type, account_no, balance) , merchant PROPERTIES (type, name) ) EDGE TABLES ( owned_by SOURCE KEY(from_id) REFERENCES account DESTINATION KEY(to_id) REFERENCES customer LABEL owned_by PROPERTIES (since) , parent_of SOURCE KEY(from_id) REFERENCES customer DESTINATION KEY(to_id) REFERENCES customer LABEL parent_of , purchased SOURCE KEY(from_id) REFERENCES account DESTINATION KEY(to_id) REFERENCES merchant LABEL purchased PROPERTIES (amount) , transfer SOURCE KEY(from_id) REFERENCES account DESTINATION KEY(to_id) REFERENCES account LABEL transfer PROPERTIES (amount, date) )"
我们创建另外一个变量,里面的代码是DROP PROPERTY GRAPH customer_360,如果这个图已经存在,那么就将它删除。接下来,使用刚才创建的数据库连接对象pgql来执行这段代码。大家看到,这里使用的是和JAVA当中很类似的prepareStatement。并对这个prepareStatement对象使用execute()方法。下面代码执行过程中报错是正常的,因为之前我们没有创建过customer_360这个图。然后通过pgql.prepareStatement(cpgStmtStr).execute();创建这个图。
opg-jshell> var dropPgStmt = "DROP PROPERTY GRAPH customer_360";dropPgStmt ==> "DROP PROPERTY GRAPH customer_360"opg-jshell> pgql.prepareStatement(dropPgStmt).execute();| Exception oracle.pg.rdbms.pgql.PgqlToSqlException: Graph CUSTOMER_360 does not exist.| at PgqlExecution.checkTableOrViewDoesNotExistError (PgqlExecution.java:3022)| at PgqlExecution.execute (PgqlExecution.java:1090)| at PgqlExecution.execute (PgqlExecution.java:831)| at PgqlPreparedStatement.execute (PgqlPreparedStatement.java:380)| at (#17:1)opg-jshell> pgql.prepareStatement(cpgStmtStr).execute();$18 ==> falseopg-jshell>
我们可以通过一段空代码,测试刚才创建的图是否已经成功创建,如果输出不报错就表明成功创建。
opg-jshell> Consumer<String> query = q -> { try(var s = pgql.prepareStatement(q)) { s.execute(); s.getResultSet().print(); } catch(Exception e) { throw new RuntimeException(e); } }query ==> $Lambda$613/0x0000000800aed440@7f6cf9b2opg-jshell>
接下来我们做几个查询,如果大家觉得数据结果不够美观,稍后我们可以通过web界面进行分析和查询。
opg-jshell> query.accept("select distinct label(e) from customer_360 match ()-[e]->()");+-----------+| label(e) |+-----------+| PARENT_OF || TRANSFER || OWNED_BY || PURCHASED |+-----------+opg-jshell>
实验3:使用jshell进行图查询和分析
很多朋友比较排斥使用jshell,觉得写法复杂而且输出的结果不够直观。jshell确实是这样,但就想我们之前做DBA,只会图形工具,不会命令行是不行的。在这个实验中,我们通过jshell和Oracle Graph Visualization两个工具一起查询。Oracle Graph Visualization的登录地址就是Oracle为大家的计算节点分配的公网ip:7007/ui。

一般的步骤为:
连接数据库
指定图配置
将图载入内存
首先启动客户端并登录云端自治数据库,下面的代码与之前一样,没有新知识点。
[oracle@graphs ~]$ opt/oracle/graph/bin/opg-jshell --base_url http://localhost:7007For an introduction type: help introOracle Graph Server Shell 20.2.0PGX server version: 20.0.2 type: SMPGX server API version: 3.7.2PGQL version: 1.3Variables instance, session, and analyst ready to use.opg-jshell> session.getGraphs();$1 ==> {}opg-jshell> var user = "customer_360";user ==> "customer_360"opg-jshell> var pass = "123123";pass ==> "123123"opg-jshell> var jdbcUrl = "jdbc:oracle:thin:@graphs_high?TNS_ADMIN=/home/oracle/wallets";jdbcUrl ==> "jdbc:oracle:thin:@graphs_high?TNS_ADMIN=/home/oracle/wallets"opg-jshell> var conn = DriverManager.getConnection(jdbcUrl, user, pass) ;conn ==> oracle.jdbc.driver.T4CConnection@1f1fcb32
接下来使用session.getGraphs()指定图。
opg-jshell> var graph = session.getGraph("Customer_360");graph ==> PgxGraph[name=Customer_360,N=15,E=24,created=1609209340952]| update replaced variable sg, reset to null| update replaced variable cs, reset to null| update replaced variable rs, reset to null| update replaced variable vertexSet, reset to null| update replaced variable ppr, reset to null| update replaced variable result, reset to nullopg-jshell> session.getGraphs();$37 ==> {sub-graph_6=PgxGraph[name=sub-graph_6,N=6,E=8,created=1609209590856], Customer_360=PgxGraph[name=Customer_360,N=15,E=24,created=1609209340952], sub-graph_10=PgxGraph[name=sub-graph_10,N=9,E=11,created=1609209801574], sub-graph_4=PgxGraph[name=sub-graph_4,N=6,E=8,created=1609209515757], anonymous_graph_12=PgxGraph[name=anonymous_graph_12,N=9,E=22,created=1609209931379]}
下面是对图进行配置,大家可以看到有数据库的连接信息以及属性设置。
opg-jshell> Supplier<GraphConfig> pgxConfig = () -> { return GraphConfigBuilder.forPropertyGraphRdbms()...> .setJdbcUrl(jdbcUrl)...> .setUsername(user)...> .setPassword(pass)...> .setName("Customer_360")...> .addVertexProperty("TYPE", PropertyType.STRING)...> .addVertexProperty("NAME", PropertyType.STRING)...> .addVertexProperty("LOCATION", PropertyType.STRING)...> .addVertexProperty("GENDER", PropertyType.STRING)...> .addVertexProperty("STUDENT", PropertyType.STRING)...> .addVertexProperty("ACCOUNT_NO", PropertyType.STRING)...> .addVertexProperty("AGE", PropertyType.INTEGER)...> .addVertexProperty("BALANCE", PropertyType.DOUBLE)...> .addEdgeProperty("SINCE", PropertyType.STRING)...> .addEdgeProperty("DATE", PropertyType.STRING)...> .addEdgeProperty("AMOUNT", PropertyType.DOUBLE)...> .setLoadVertexLabels(false)...> .setLoadEdgeLabel(true)...> .setKeystoreAlias("alias")...> .build(); }pgxConfig ==> $Lambda$601/0x00000008006b9c40@7f49df25opg-jshell>
使用session.readGraphWithProperties调用刚才的图配置,将图载入内存当中。因为目前我们实验使用的Linux和ATP自治数据库都在Oracle公有云,所以速度极快,几秒钟就可以载入完毕。如果大家将Oracle Graph Server安装在本地或者其他公有云,那么根据所处理的数据量不同以及网络带宽不同,会消耗2-3分钟的时间。
opg-jshell> var graph = session.readGraphWithProperties(pgxConfig.get()) ;graph ==> PgxGraph[name=Customer_360,N=15,E=24,created=1609209340952]
使用PGQL Query可以方便地检测特定模式。之前我们已经创建了图对象graph, 对这个graph对象使用queryPgql()方法,关于图查询语句的写法,大家可以参考https://pgql-lang.org

opg-jshell> graph.queryPgql(...> " SELECT a.ACCOUNT_NO, a.BALANCE, t1.AMOUNT, t2.AMOUNT, t1.DATE " +...> " MATCH (a)<-[t1:TRANSFER]-(a1) " +...> " , (a)-[t2:TRANSFER]->(a2) " +...> " WHERE t1.DATE = t2.DATE " +...> " AND t1.AMOUNT > 500 " +...> " AND t2.AMOUNT > 500 "...> ).print();+---------------------------------------------------------------+| a.ACCOUNT_NO | a.BALANCE | t1.AMOUNT | t2.AMOUNT | t1.DATE |+---------------------------------------------------------------+| xxx-yyy-202 | 200.0 | 900.0 | 850.0 | 2018-10-06 |+---------------------------------------------------------------+$9 ==> PgqlResultSetImpl[graph=Customer_360,numResults=1]
我们也可以在Oracle Graph Visualization图形界面中查询。查询的时候,将上面的select语句复制出来即可。
接下来我们做一个cycle检测的例子,在今天的转账的例子当中,什么叫做cycle?A转给B,B再转给A。或者A转给B,B转给C,C再转给A。大家可能会问,这有什么用?在商业风险探测的应用中,这种检测极为有用。另外商家也可以通过这样技术,找出那些“点数达人”,比如现在(2020年12月29日22:53:09)临近年底,一年来积攒下来的消费点数马上就要清零,今天晚上某电视台采访点数达人如何处理让点数不浪费,达人给出的解决方案是,将点数转给亲友,虽然手续费会扣除4点,但是点数的有效期自动延长两年,如果不想真的转赠,那么在点数过期(两年后)之前,请亲友再转赠回来,同时扣除4点。商家可以通过Graph进行检测,如果发现大家都通过这种方式延长点数的有效期,那么可以通过策略的更改更好地服务消费者,避免消费者的点数浪费,同时也不至于挤压过多的待兑换点数。
我们首先查询A->B->A的情形。
通过jshell的查询语句如下:
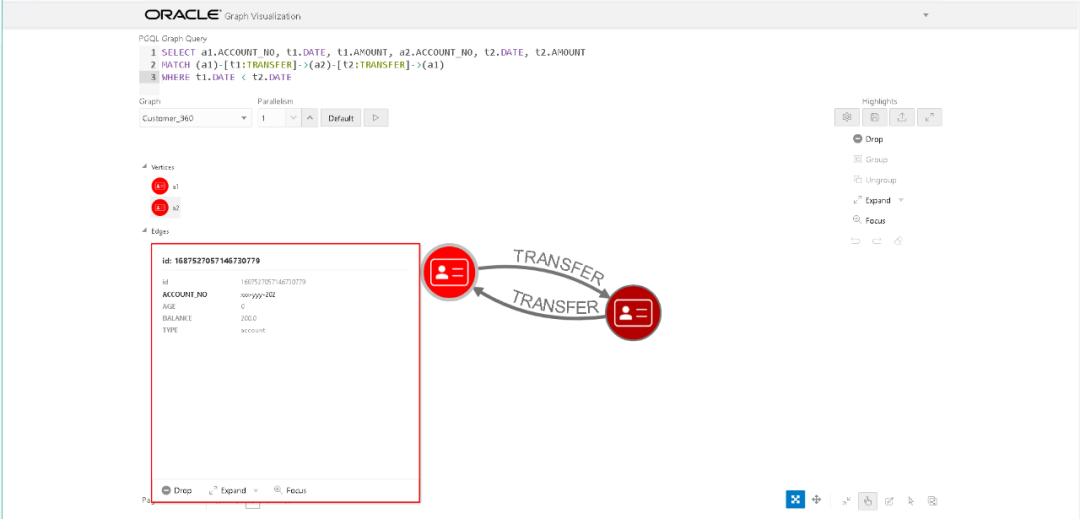
opg-jshell> graph.queryPgql(...> " SELECT a1.ACCOUNT_NO, t1.DATE, t1.AMOUNT, a2.ACCOUNT_NO, t2.DATE, t2.AMOUNT " +...> " MATCH (a1)-[t1:TRANSFER]->(a2)-[t2:TRANSFER]->(a1) " +...> " WHERE t1.DATE < t2.DATE"...> ).print();+---------------------------------------------------------------------------------+| a1.ACCOUNT_NO | t1.DATE | t1.AMOUNT | a2.ACCOUNT_NO | t2.DATE | t2.AMOUNT |+---------------------------------------------------------------------------------+| xxx-yyy-201 | 2018-10-05 | 200.0 | xxx-yyy-202 | 2018-10-10 | 300.0 |+---------------------------------------------------------------------------------+$10 ==> PgqlResultSetImpl[graph=Customer_360,numResults=1]
通过Oracle Graph Visualization查询的结果如下,我觉得这样的结果更加直观。
接下来我们看看A->B->C->A的情形:
首先还是使用jshell进行查询:
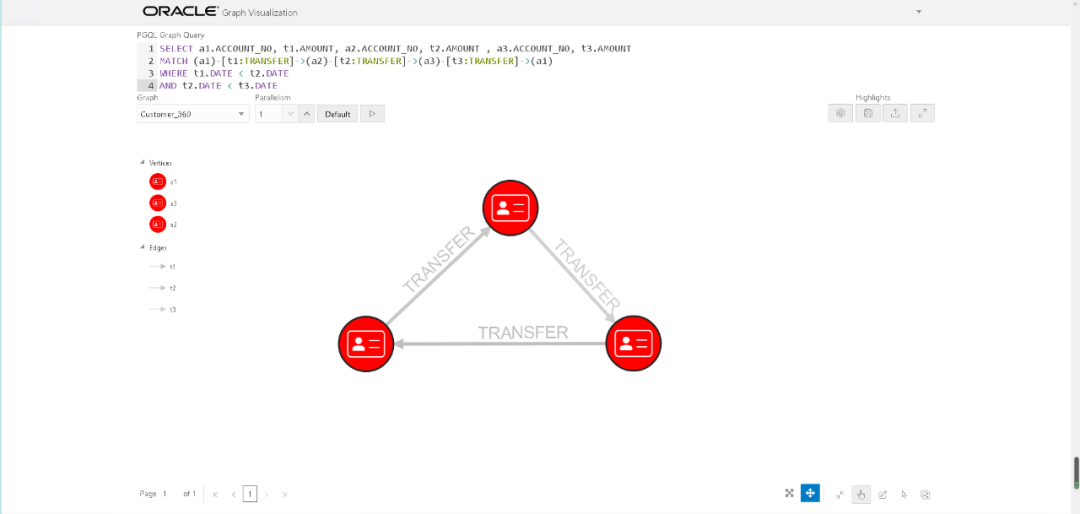
opg-jshell> graph.queryPgql(...> " SELECT a1.ACCOUNT_NO, t1.AMOUNT, a2.ACCOUNT_NO, t2.AMOUNT " +...> " , a3.ACCOUNT_NO, t3.AMOUNT " +...> " MATCH (a1)-[t1:TRANSFER]->(a2)-[t2:TRANSFER]->(a3)-[t3:TRANSFER]->(a1) " +...> " WHERE t1.DATE < t2.DATE " +...> " AND t2.DATE < t3.DATE "...> ).print();+-----------------------------------------------------------------------------------+| a1.ACCOUNT_NO | t1.AMOUNT | a2.ACCOUNT_NO | t2.AMOUNT | a3.ACCOUNT_NO | t3.AMOUNT |+-----------------------------------------------------------------------------------+| xxx-yyy-201 | 500.0 | xxx-yyy-203 | 450.0 | xxx-yyy-204 | 400.0 |+-----------------------------------------------------------------------------------+$11 ==> PgqlResultSetImpl[graph=Customer_360,numResults=1]
通过Oracle Graph Visualization查询的结果如下
接下来我们使用pagerank算法找出那些有影响力的账户。关于pagerank算法,大家可以网路上查询,这个算法一开始是由Google提出的,用来给网页排名,如果一个页面被很多页面链接,那么这个页面的权值就大,权值大的网页在排序的时候就靠前。其实这个算法在我们发表论文时,也是非常有用的,你写的文章被多人引用,那么你的论文就够更高的价值。在今天的例子当中我们使用这个算法找出那些交易较多的有影响力的用户。首先我们通过对graph对象使用filter方法进行过滤,将过滤的结果给变量sg。
opg-jshell> var sg = graph.filter(new EdgeFilter("edge.label()='TRANSFER'"));sg ==> PgxGraph[name=sub-graph_4,N=6,E=8,created=1609209515757]
接下来我们对上一步过滤好的变量使用analyst.pagerank()方法进行权值计算。
opg-jshell> analyst.pagerank(sg);$13 ==> VertexProperty[name=pagerank,type=double,graph=sub-graph_4]
最后我们将计算的结果打印出来。
opg-jshell> sg.queryPgql(...> " SELECT a.ACCOUNT_NO, a.PAGERANK " +...> " MATCH (a) " +...> " ORDER BY a.PAGERANK DESC "...> ).print();+-------------------------------------+| a.ACCOUNT_NO | a.PAGERANK |+-------------------------------------+| xxx-yyy-201 | 0.18012007557258927 || xxx-yyy-204 | 0.1412461615467829 || xxx-yyy-203 | 0.1365633635065475 || xxx-yyy-202 | 0.12293884324085073 || xxx-zzz-212 | 0.05987452026569676 || xxx-zzz-211 | 0.025000000000000005 |+-------------------------------------+$14 ==> PgqlResultSetImpl[graph=sub-graph_4,numResults=6]
接下来让我们来看看哪些账户子集形成了社区。也就是说,同一个子集中的帐户之间的转账次数要多于这些帐户与另一个子集中的帐户之间的转账次数。我们将使用内置的弱/强连接组件算法把他们找出来。首先还是生成一个变量sg,我们只关心转账操作。
opg-jshell> var sg = graph.filter(new EdgeFilter("edge.label()='TRANSFER'"));sg ==> PgxGraph[name=sub-graph_6,N=6,E=8,created=1609209590856]
使用弱连接组件(WCC)算法只检测一个分区。分区值存储在一个名为WCC的属性中。在下面的结果中看出,使用WCC算法,6个账号形成了一个分区。
opg-jshell> var result = analyst.wcc(sg);result ==> Partition[graph=sub-graph_6]opg-jshell> sg.queryPgql(...> " SELECT a.WCC, COUNT(a) MATCH (a) GROUP BY a.WCC"...> ).print();+------------------+| a.WCC | COUNT(a) |+------------------+| 0 | 6 |+------------------+$17 ==> PgqlResultSetImpl[graph=sub-graph_6,numResults=1]
我们运行强连接组件算法SCC Kosaraju。强连接组件(SCC)算法检测三个分区。
opg-jshell> result = analyst.sccKosaraju(sg);result ==> Partition[graph=sub-graph_6]
我们看看通过强连接组件算法找到的3个分区。列出分区和每个分区中vertices的数量
opg-jshell> sg.queryPgql(...> " SELECT a.SCC_KOSARAJU, COUNT(a) MATCH (a) GROUP BY a.SCC_KOSARAJU"...> ).print();+---------------------------+| a.SCC_KOSARAJU | COUNT(a) |+---------------------------+| 1 | 4 || 2 | 1 || 0 | 1 |+---------------------------+$19 ==> PgqlResultSetImpl[graph=sub-graph_6,numResults=3]
列出与John的帐户相同的连接组件(分区)中的其他帐户。将分区(或组件)id作为一个名为SCC_KOSARAJU的属性添加,并用于PGQL查询。
opg-jshell> sg.queryPgql(...> " SELECT a.SCC_KOSARAJU as component, COUNT(a.ACCOUNT_NO), MAX(a.ACCOUNT_NO) " +...> " MATCH (a) " +...> " GROUP BY component " +...> " ORDER BY component"...> ).print();+-----------------------------------------------------+| component | COUNT(a.ACCOUNT_NO) | MAX(a.ACCOUNT_NO) |+-----------------------------------------------------+| 0 | 1 | xxx-zzz-211 || 1 | 4 | xxx-yyy-204 || 2 | 1 | xxx-zzz-212 |+-----------------------------------------------------+$20 ==> PgqlResultSetImpl[graph=sub-graph_6,numResults=3]
最后我们通过分析与John有关的人群经常购物的商店,向John做个性化推荐。这与Twitter、抖音和其他社交软体当中的好友推荐和相关视频推荐一样。比如都某短视频平台,如果它发现你经常观看某一类视频之后,就会在“推荐”中显示相关的视频,一开始大家以为只是简单的类别推荐。其实不是的,以女士美妆类视频为例,在男士看来美妆应该算作一个视频种类,但事实上美妆播主被系统细分成好多好多种类,针对客户喜欢观看的某一细分种类,甚至是为该客户定制的某一小众种类进行视频推送。有些时候大家在各种社交软体上放飞自我,慢慢地,了解你的人,不再是人,而是一套经过不断演进的算法。下次有人说:“我很了解你”。你大可以回复TA:“别扯了,你还没有短视频软件了解我呢。”
首先我们对图进行过滤:
opg-jshell> var sg = graph.filter(new EdgeFilter("edge.label()='PURCHASED'"));sg ==> PgxGraph[name=sub-graph_10,N=9,E=11,created=1609209801574]| update replaced variable result, reset to null
添加反向边。
opg-jshell> var cs = sg.<Long>createChangeSet();cs ==> Graph change set for graph sub-graph_10 with added vertices: 0, modified vertices: 0, removed vertices: 0, added edges: 0, modified edges: 0, removed edges: 0opg-jshell>opg-jshell> var rs = sg.queryPgql("SELECT id(a), id(x) MATCH (a)-[]->(x)");rs ==> PgqlResultSetImpl[graph=sub-graph_10,numResults=11]opg-jshell> for (var r : rs) {...> var e = cs.addEdge(r.getLong(2),r.getLong(1)).setLabel("PURCHASED_BY");...> }opg-jshell>opg-jshell> sg = cs.build();sg ==> PgxGraph[name=anonymous_graph_12,N=9,E=22,created=1609209931379]opg-jshell>opg-jshell> sg.queryPgql(...> " SELECT ID(r), x.NAME, LABEL(r), a.ACCOUNT_NO" +...> " MATCH (x)-[r:PURCHASED_BY]->(a)" +...> " LIMIT 3"...> ).print();+---------------------------------------------------+| ID(r) | x.NAME | LABEL(r) | a.ACCOUNT_NO |+---------------------------------------------------+| 11 | Apple Store | PURCHASED_BY | xxx-yyy-201 || 16 | Apple Store | PURCHASED_BY | xxx-yyy-202 || 19 | Apple Store | PURCHASED_BY | xxx-yyy-203 |+---------------------------------------------------+$26 ==> PgqlResultSetImpl[graph=anonymous_graph_12,numResults=3]opg-jshell>
我们针对account no. xxx-yyy-201(John的账号)运行Personalized Page Rank (PPR)。
opg-jshell> sg.queryPgql("select id(a) match (a) where a.ACCOUNT_NO='xxx-yyy-201'").print();+---------------------+| id(a) |+---------------------+| 3244710687574720295 |+---------------------+$27 ==> PgqlResultSetImpl[graph=anonymous_graph_12,numResults=1]
opg-jshell> var vertexSet = sg.<Long>createVertexSet();vertexSet ==> VertexSet[name=vertex_collection_set_15,graph=anonymous_graph_12]opg-jshell> vertexSet.addAll(3244710687574720295L);opg-jshell> var ppr = analyst.personalizedPagerank(sg, vertexSet);ppr ==> VertexProperty[name=pagerank,type=double,graph=anonymous_graph_12]opg-jshell>
最后显示结果,通过分析,我们看John的pagerank,asia books和kindle store权值很高。说明他更倾向于这两类消费。于是我们可以针对他进行这两类商品的推荐。
opg-jshell> sg.queryPgql(...> " SELECT ID(x), x.NAME, x.PAGERANK " +...> " MATCH (x) " +...> " WHERE x.TYPE = 'merchant' " +...> " AND NOT EXISTS ( " +...> " SELECT * " +...> " MATCH (x)-[:PURCHASED_BY]->(a) " +...> " WHERE ID(a) = 3244710687574720295 " +...> " ) " +...> " ORDER BY x.PAGERANK DESC"...> ).print();+----------------------------------------------------------+| ID(x) | x.NAME | x.PAGERANK |+----------------------------------------------------------+| 6541727421521309923 | Asia Books | 0.04932640133302745 || 8574591124594145469 | Kindle Store | 0.04932640133302745 || 8664546881222905044 | ABC Travel | 0.01565535511504672 |+----------------------------------------------------------+$31 ==> PgqlResultSetImpl[graph=anonymous_graph_12,numResults=3]opg-jshell>
最后我们将图发布出去,这样其他session也可以使用到这个图。
opg-jshell> graph.publish(VertexProperty.ALL, EdgeProperty.ALL) ;
实验4:图的可视化
在上面的实验3中,我们就看到了通过Oracle Graph Visualization对图进行可视化显示。这个工具的访问地址是:Oracle Graph Server的IP地址:7007/ui
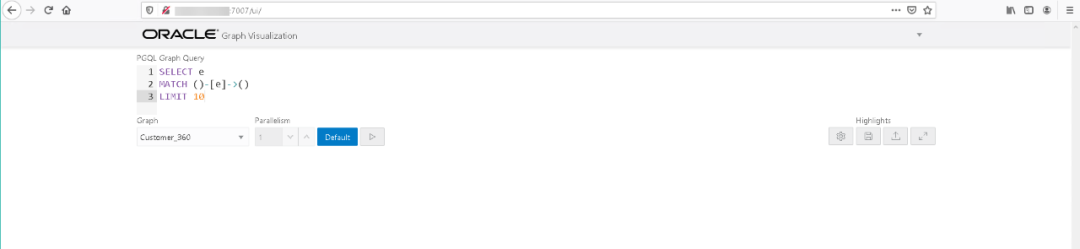
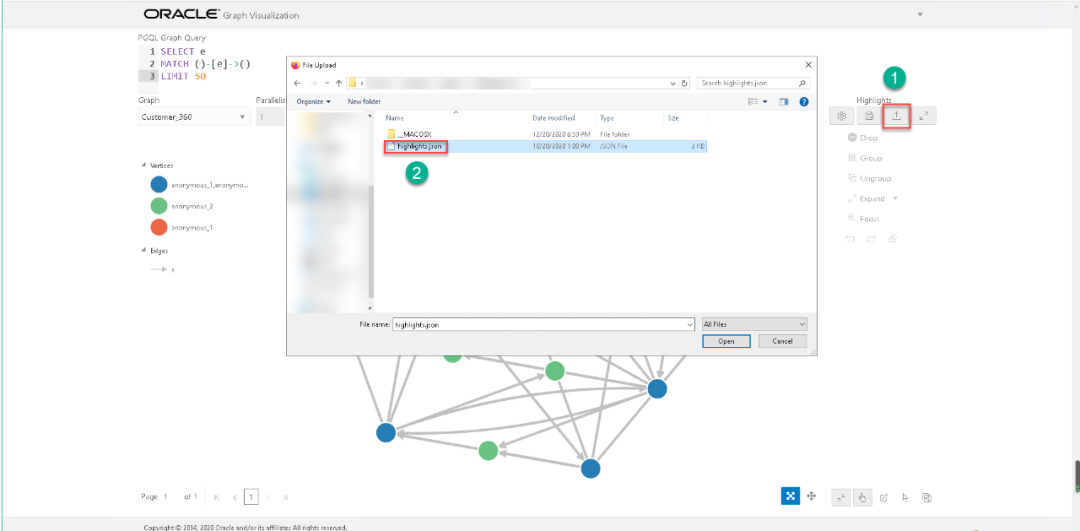
可以在上面的查询区给出PGQL查询语句,比如下面的语句:
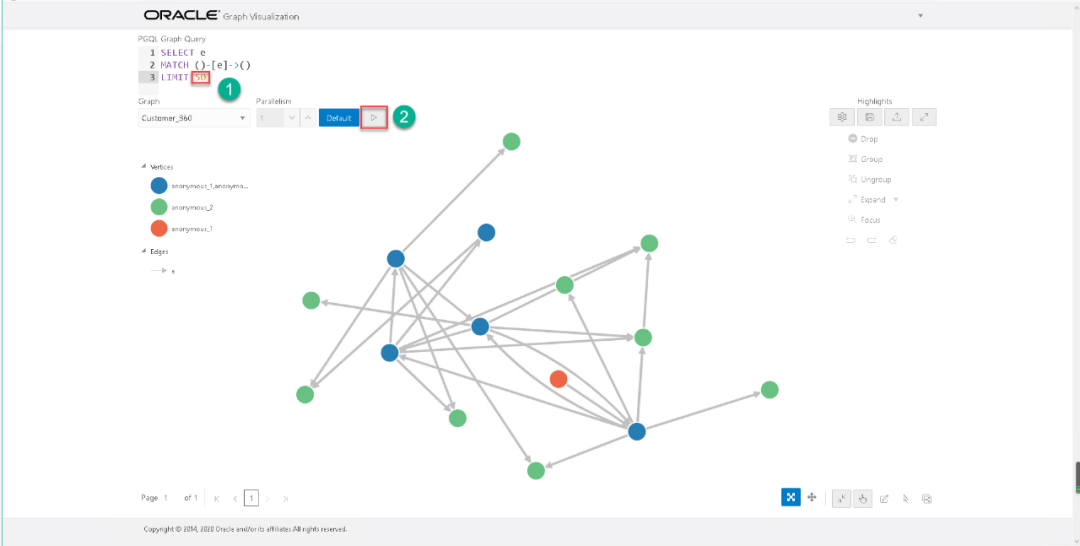
select ematch ()-[e]->()limit 50
按下图中②所示的执行按钮进行查询。
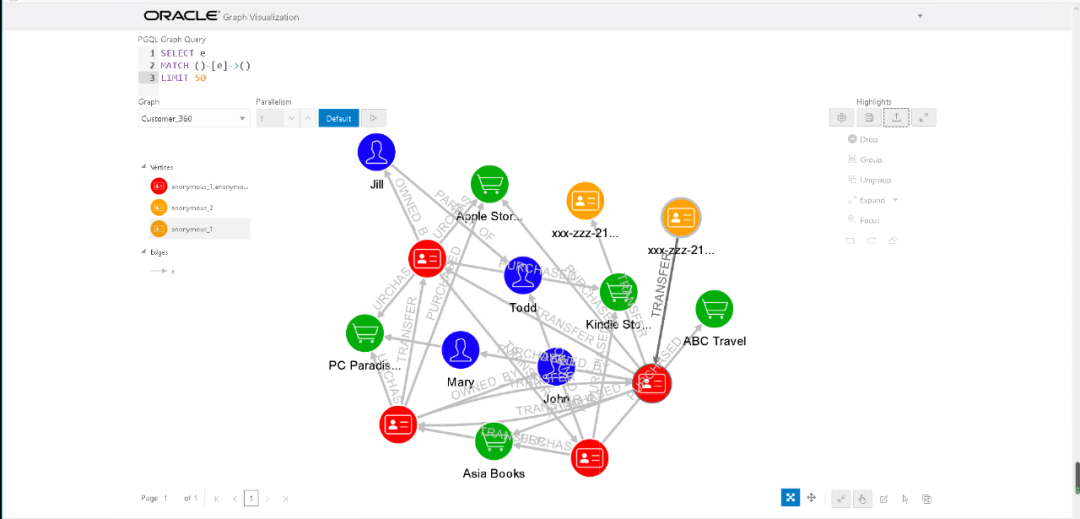
我们可以通过JSON的形式为我们的图添加label和其他可视化组件,关于JSON文件的内容,已经放入下方的代码块。
[{"_id":1553836264517,"conditionsOperator":"and","conditions":[{"property":"TYPE","operator":"=","value":"account"}],"component":"vertex","target":"vertex","properties":{"colors":["red"],"sizes":[16],"icons":["fa-address-card-o"],"iconColors":["rgb(255, 255, 255)"],"label":["ACOUNT_NO"]}},{"_id":1553836346451,"conditionsOperator":"and","conditions":[{"property":"TYPE","operator":"=","value":"customer"}],"component":"vertex","target":"vertex","properties":{"colors":["rgb(21, 0, 255)"],"sizes":[16],"icons":["fa-user-man"],"iconColors":["white"],"label":["NAME"]}},{"_id":1553836414230,"conditionsOperator":"and","conditions":[{"property":"TYPE","operator":"=","value":"merchant"}],"component":"vertex","target":"vertex","properties":{"colors":["rgb(3, 173, 11)"],"sizes":[16],"icons":["fa-shopping-cart"],"iconColors":["white"],"label":["NAME"]}},{"_id":1553836846437,"conditionsOperator":"and","conditions":[{"property":"TYPE","operator":"=","value":"account"},{"property":"ACCOUNT_NO","operator":"~","value":"xxx-zzz."}],"component":"vertex","target":"vertex","properties":{"colors":["rgb(255, 162, 0)"],"sizes":[16],"icons":["fa-address-card-o"],"iconColors":["white"],"label":["ACCOUNT_NO"]}},{"_id":1554773861505,"conditionsOperator":"and","conditions":[],"component":"edge","target":"edge","properties":{"label":["label"]}}]
接下来我们使用PGQL来做模式匹配。PGQL的具体内容大家可以参考pgql-lang.org给出的官方文档。PGQL的大致格式如下:
SELECT <select list>FROM <graph_name>MATCH <graph_pattern>WHERE <condition>
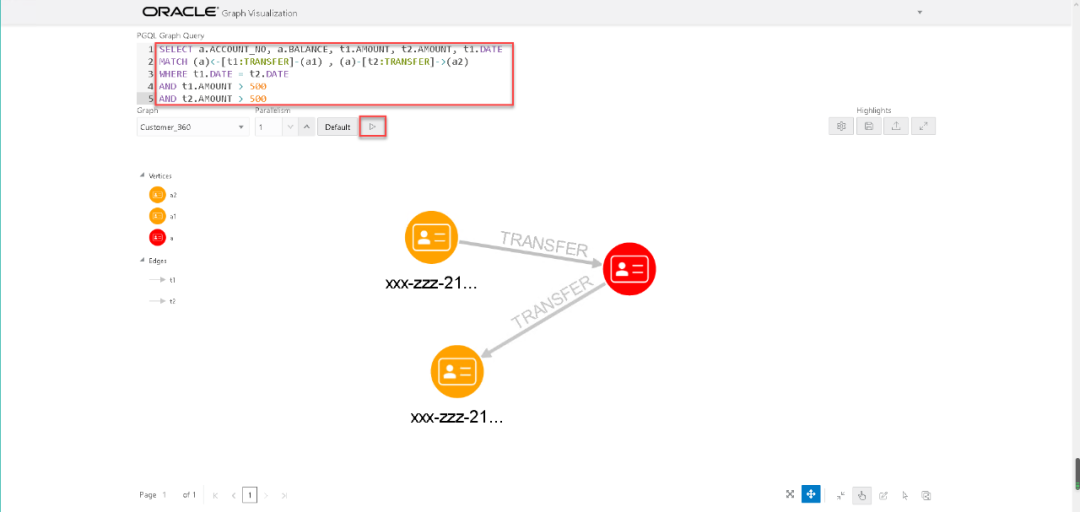
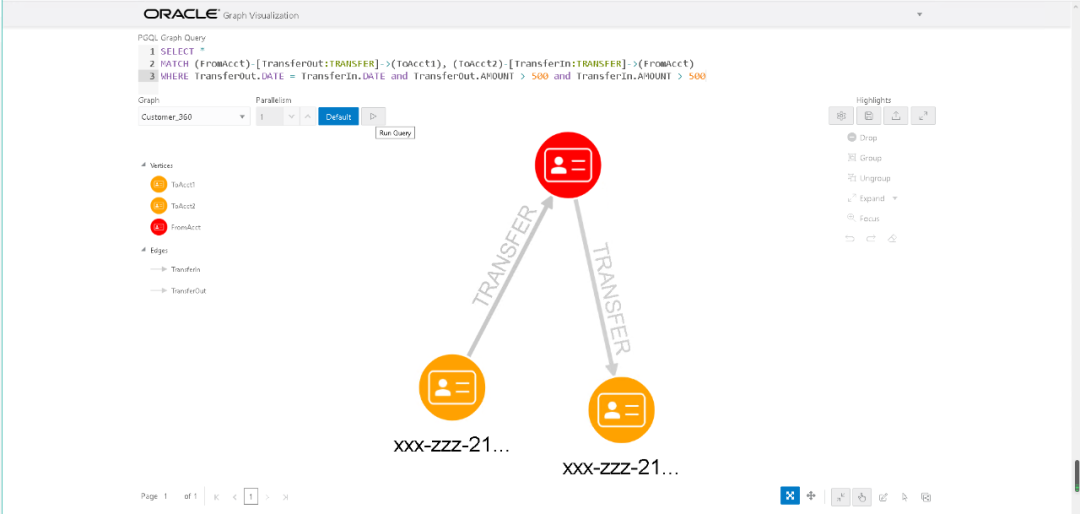
我们举个例子,找出一天内,转入和转出超过500的用户。
SELECT *MATCH (FromAcct)-[TransferOut:TRANSFER]->(ToAcct1), (ToAcct2)-[TransferIn:TRANSFER]->(FromAcct)WHERE TransferOut.DATE = TransferIn.DATE and TransferOut.AMOUNT > 500 and TransferIn.AMOUNT > 500
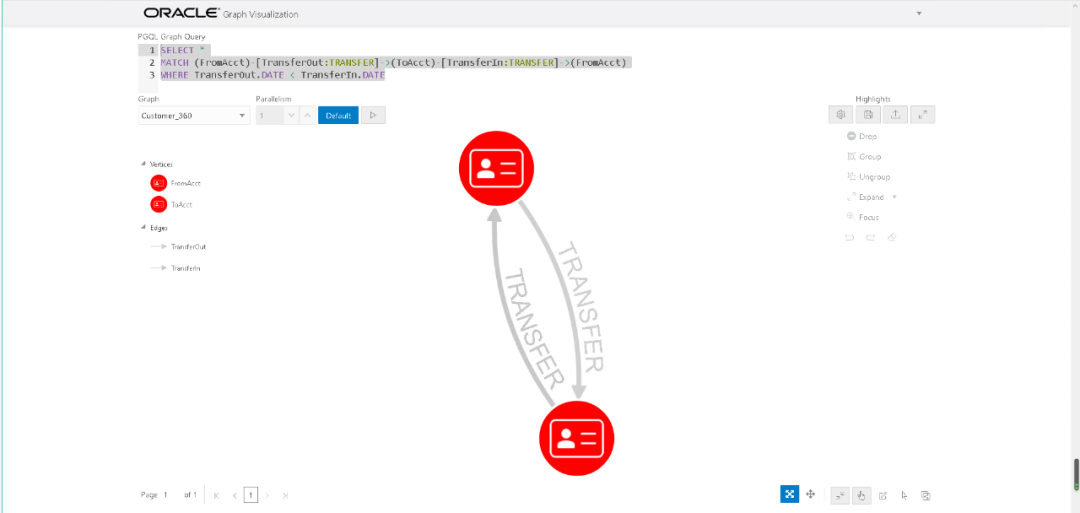
接下来找出cycle,也就是我们之前说的A转账给B,B又转账给A。
SELECT *MATCH (FromAcct)-[TransferOut:TRANSFER]->(ToAcct)-[TransferIn:TRANSFER]->(FromAcct)WHERE TransferOut.DATE < TransferIn.DATE
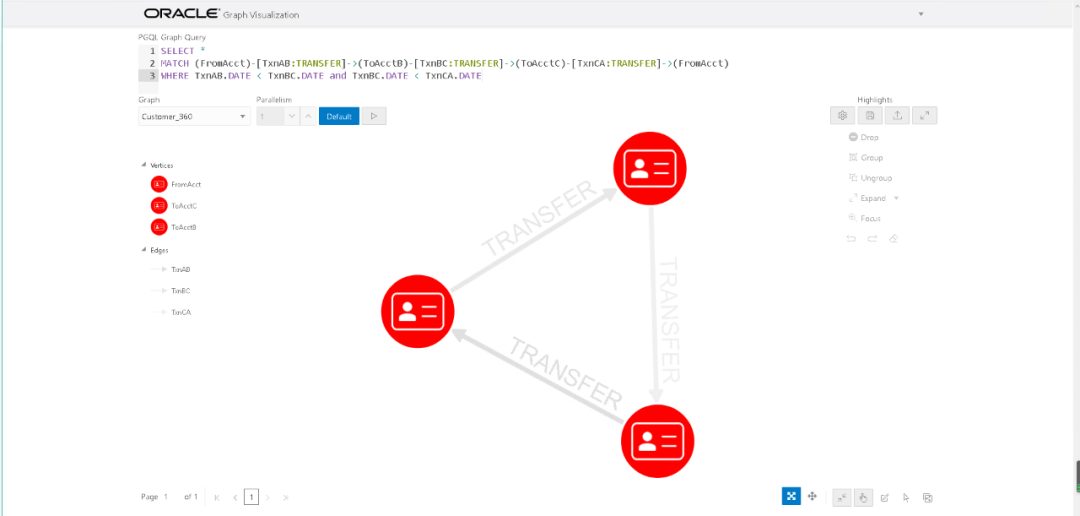
最后找出A->B->C-A的用户,jshell代码我们在上面已经讲过,这里是通过PGQL来实现。
SELECT *MATCH (FromAcct)-[TxnAB:TRANSFER]->(ToAcctB)-[TxnBC:TRANSFER]->(ToAcctC)-[TxnCA:TRANSFER]->(FromAcct)WHERE TxnAB.DATE < TxnBC.DATE and TxnBC.DATE < TxnCA.DATE
关于使用Oracle永久免费账号搭建图数据查询的环境及示例就讲到这里。更多的信息,大家可以在https://pgql-lang.org/获取更多资讯。
编辑:殷海英