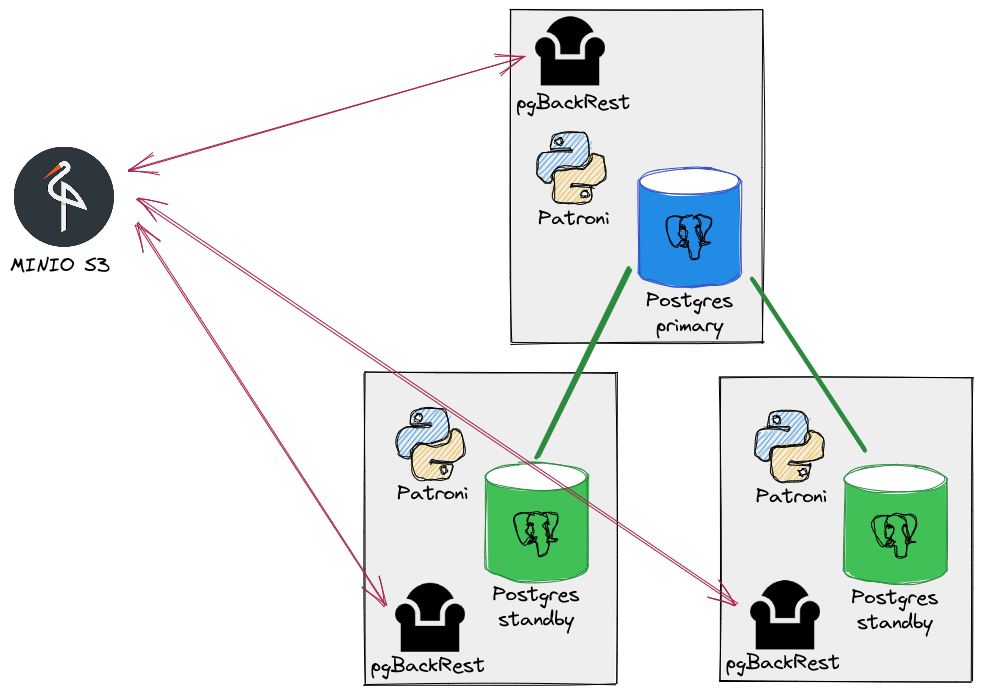
pgBackRest 存储库位置
您必须做出的第一个决定是知道在哪里存储您的 pgBackRest 存储库。 它可以是任何受支持的 repo 类型,带或不带专用备份服务器(又名 repo-host)。 要记住的最重要的事情是存储库应该可以从您的所有 PostgreSQL/Patroni 节点平等地访问。
基于该决定,您将不得不考虑如何安排备份命令。 使用 repo-host 很容易,因为 pgBackRest 将能够确定哪个 PostgreSQL 节点是主节点(或者如果您想从备用节点获取备份,则为备用节点)。 如果您使用的是直接附加的存储(即 NFS 挂载点或 S3 存储桶),最简单的解决方案可能是测试 cron 作业中 pg_is_in_recovery() 的返回。
出于此演示设置的目的,我将使用带有自签名证书的 MinIO docker 容器和已创建的名为 pgbackrest 的存储桶。

设施
pgBackRest 安装和配置
在所有 PostgreSQL 节点上安装 pgBackRest:
$ sudo dnf install -y epel-release
$ sudo dnf install -y pgbackrest
$ pgbackrest version
pgBackRest 2.39
然后,配置 /etc/pgbackrest.conf:
$ cat <<EOF | sudo tee /etc/pgbackrest.conf
[global]
repo1-type=s3
repo1-storage-verify-tls=n
repo1-s3-endpoint=192.168.121.1
repo1-s3-uri-style=path
repo1-s3-bucket=pgbackrest
repo1-s3-key=minioadmin
repo1-s3-key-secret=minioadmin
repo1-s3-region=eu-west-3

repo1-path=/repo1
repo1-retention-full=2
start-fast=y
log-level-console=info
log-level-file=debug
delta=y
process-max=2

[demo-cluster-1]
pg1-path=/var/lib/pgsql/14/data
pg1-port=5432
pg1-user=postgres
EOF
在上一篇文章中,我们定义了要在 Patroni 的范围配置中使用的集群名称。 我们将为节名重用相同的名称。
让我们初始化节:
$ sudo -iu postgres pgbackrest --stanza=demo-cluster-1 stanza-create
INFO: stanza-create command begin 2.39: ...
INFO: stanza-create for stanza 'demo-cluster-1' on repo1
INFO: stanza-create command end: completed successfully (684ms)
配置 Patroni 以使用 pgBackRest
让我们在 Patroni 配置中调整 archive_command:
$ sudo -iu postgres patronictl -c /etc/patroni.yml edit-config
## adjust the following lines
postgresql:
  parameters:
    archive_command: pgbackrest --stanza=demo-cluster-1 archive-push "%p"
    archive_mode: "on"

$ sudo -iu postgres patronictl -c /etc/patroni.yml reload demo-cluster-1
检查归档系统是否正常工作:
$ sudo -iu postgres pgbackrest --stanza=demo-cluster-1 check
INFO: check command begin 2.39: ...
INFO: check repo1 configuration (primary)
INFO: check repo1 archive for WAL (primary)
INFO: WAL segment 000000010000000000000004 successfully archived to '...' on repo1
INFO: check command end: completed successfully (1083ms)
进行第一次备份
让我们不要进行第一次完整备份:
$ sudo -iu postgres pgbackrest --stanza=demo-cluster-1 backup --type=full
P00   INFO: backup command begin 2.39: ...
P00   INFO: execute non-exclusive pg_start_backup():
  backup begins after the requested immediate checkpoint completes
P00   INFO: backup start archive = 000000010000000000000006, lsn = 0/6000028
P00   INFO: check archive for prior segment 000000010000000000000005
P00   INFO: execute non-exclusive pg_stop_backup() and wait for all WAL segments to archive
P00   INFO: backup stop archive = 000000010000000000000006, lsn = 0/6000100
P00   INFO: check archive for segment(s) 000000010000000000000006:000000010000000000000006
P00   INFO: new backup label = 20220711-075256F
P00   INFO: full backup size = 25.2MB, file total = 957
P00   INFO: backup command end: completed successfully
所有 Patroni 节点现在应该能够看到 pgBackRest 存储库的内容:
$ pgbackrest info
stanza: demo-cluster-1
    status: ok
    cipher: none

    db (current)
        wal archive min/max (14): 000000010000000000000006/000000010000000000000006

        full backup: 20220711-075256F
            timestamp start/stop: 2022-07-11 07:52:56 / 2022-07-11 07:53:02
            wal start/stop: 000000010000000000000006 / 000000010000000000000006
            database size: 25.2MB, database backup size: 25.2MB
            repo1: backup set size: 3.2MB, backup size: 3.2MB
“恢复”部分
现在归档系统正在工作,我们可以配置 restore_command。 可能,我们也可以禁用 Patroni 的复制槽,因为我们现在将存档作为复制的安全网。
让我们编辑引导配置部分:
$ sudo -iu postgres patronictl -c /etc/patroni.yml edit-config
## adjust the following lines
loop_wait: 10
maximum_lag_on_failover: 1048576
postgresql:
  parameters:
    archive_command: pgbackrest --stanza=demo-cluster-1 archive-push "%p"
    archive_mode: 'on'
  recovery_conf:
    recovery_target_timeline: latest
    restore_command: pgbackrest --stanza=demo-cluster-1 archive-get %f "%p"
  use_pg_rewind: false
  use_slots: true
retry_timeout: 10
ttl: 30

$ sudo -iu postgres patronictl -c /etc/patroni.yml reload demo-cluster-1
要使用 pgBackRest 创建(或重新初始化)副本,我们需要调整 Patroni 配置文件。
在所有节点上,在 /etc/patroni.yml 中,找到以下部分:
postgresql:
  listen: "0.0.0.0:5432"
  connect_address: "$MY_IP:5432"
  data_dir: /var/lib/pgsql/14/data
  bin_dir: /usr/pgsql-14/bin
  pgpass: /tmp/pgpass0
  authentication:
    replication:
      username: replicator
      password: confidential
    superuser:
      username: postgres
      password: my-super-password
    rewind:
      username: rewind_user
      password: rewind_password
  parameters:
    unix_socket_directories: '/var/run/postgresql,/tmp'
并且加上
create_replica_methods:
    - pgbackrest
    - basebackup
  pgbackrest:
    command: pgbackrest --stanza=demo-cluster-1 restore --type=none
    keep_data: True
    no_params: True
  basebackup:
    checkpoint: 'fast'
不要忘记重新加载配置:
$ sudo systemctl reload patroni
使用 pgBackRest 创建副本
这是我们目前的情况:
$ sudo -iu postgres patronictl -c /etc/patroni.yml list
+--------+-----------------+---------+---------+----+-----------+
| Member | Host            | Role    | State   | TL | Lag in MB |
+ Cluster: demo-cluster-1 (7119014497759128647) ----+-----------+
| srv1   | 192.168.121.2   | Replica | running |  1 |         0 |
| srv2   | 192.168.121.254 | Leader  | running |  1 |           |
| srv3   | 192.168.121.89  | Replica | running |  1 |         0 |
+--------+-----------------+---------+---------+----+-----------+
我们已经有 2 个正在运行的副本。 所以我们需要在一个节点上停止 Patroni 并删除它的数据目录来触发一个新的副本创建:
$ sudo systemctl stop patroni
$ sudo rm -rf /var/lib/pgsql/14/data
$ sudo systemctl start patroni
$ sudo journalctl -u patroni.service -f
...
INFO: trying to bootstrap from leader 'srv2'
...
INFO: replica has been created using pgbackrest
INFO: bootstrapped from leader 'srv2'
...
INFO: no action. I am (srv3), a secondary, and following a leader (srv2)
从上面的日志中我们可以看到,已经使用 pgBackRest 成功创建了副本:
$ sudo -iu postgres patronictl -c /etc/patroni.yml list
+--------+-----------------+---------+---------+----+-----------+
| Member | Host            | Role    | State   | TL | Lag in MB |
+ Cluster: demo-cluster-1 (7119014497759128647) ----+-----------+
| srv1   | 192.168.121.2   | Replica | running |  1 |         0 |
| srv2   | 192.168.121.254 | Leader  | running |  1 |           |
| srv3   | 192.168.121.89  | Replica | running |  1 |         0 |
+--------+-----------------+---------+---------+----+-----------+
现在,让我们在 srv2 上插入一些数据,并通过暂停 VM 网络接口几秒钟来模拟事件。
将发生故障转移,旧的主数据库将完全不同步,并且在主数据库上添加新数据时复制将滞后:
$ sudo -iu postgres patronictl -c /etc/patroni.yml list
+--------+-----------------+---------+---------+----+-----------+
| Member | Host            | Role    | State   | TL | Lag in MB |
+ Cluster: demo-cluster-1 (7119014497759128647) ----+-----------+
| srv1   | 192.168.121.2   | Leader  | running |  2 |           |
| srv2   | 192.168.121.254 | Replica | running |  1 |       188 |
| srv3   | 192.168.121.89  | Replica | running |  2 |         0 |
+--------+-----------------+---------+---------+----+-----------+
由于我们没有配置 pg_rewind,我们需要手动重新初始化失败的节点:
$ sudo -iu postgres patronictl -c /etc/patroni.yml reinit demo-cluster-1 srv2
+--------+-----------------+---------+---------+----+-----------+
| Member | Host            | Role    | State   | TL | Lag in MB |
+ Cluster: demo-cluster-1 (7119014497759128647) ----+-----------+
| srv1   | 192.168.121.2   | Leader  | running |  2 |           |
| srv2   | 192.168.121.254 | Replica | running |  1 |       188 |
| srv3   | 192.168.121.89  | Replica | running |  2 |         0 |
+--------+-----------------+---------+---------+----+-----------+
Are you sure you want to reinitialize members srv2? [y/N]: y
Success: reinitialize for member srv2

$ sudo -iu postgres patronictl -c /etc/patroni.yml list
+--------+-----------------+---------+---------+----+-----------+
| Member | Host            | Role    | State   | TL | Lag in MB |
+ Cluster: demo-cluster-1 (7119014497759128647) ----+-----------+
| srv1   | 192.168.121.2   | Leader  | running |  2 |           |
| srv2   | 192.168.121.254 | Replica | running |  2 |         0 |
| srv3   | 192.168.121.89  | Replica | running |  2 |         0 |
+--------+-----------------+---------+---------+----+-----------+
以下跟踪显示 pgBackRest 已成功用于重新初始化旧的主节点:
INFO: replica has been created using pgbackrest
INFO: bootstrapped from leader 'srv1'
...
INFO: Lock owner: srv1; I am srv2
INFO: establishing a new patroni connection to the postgres cluster
INFO: no action. I am (srv2), a secondary, and following a leader (srv1)
总结
将 Patroni 配置为使用 pgBackRest 非常简单方便。 显然,拥有备份是一件好事,但能够将这些备份用作副本创建或重新初始化的源则更好。
像往常一样,最难的部分是明确定义 pgBackRest 存储库的存储位置。
原文标题:Patroni and pgBackRest combined
原文作者:Stefan Fercot
原文地址:https://pgstef.github.io/2022/07/12/patroni_and_pgbackrest_combined.html


