


一、概述
MogDB的CM特性:
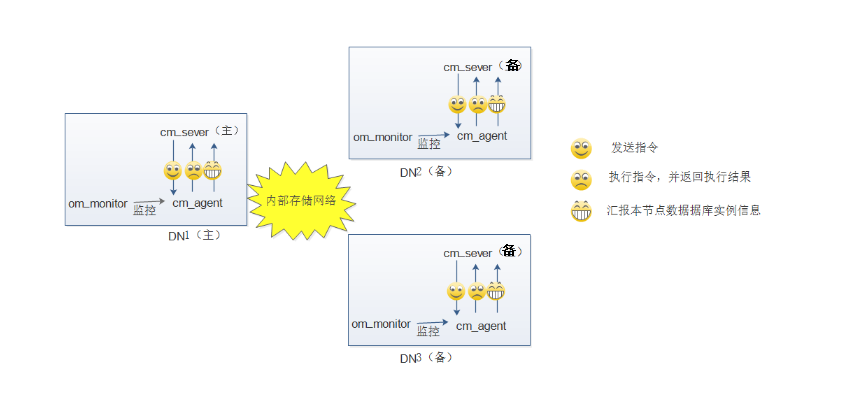
CM(Cluster Manager)是一款数据库集群资源管理软件,提供数据库主备状态监控、网络通信故障监控、文件系统故障监控、故障自动主备切换等能力,支持集群、节点、实例级的启停,集群状态查询、主备切换、日志管理等功能。分为四大模块:cm_server, cm_agent, om_monitor, cm_ctl。它们的关系如下图所示:
 ![image.png]
各个模块的功能简单介绍:
cm_ctl:CM集群管理软件的客户端工具.
cm_server:
(1)向各个节点上cm_agent发送指令(如数据库实例的启动、停止、状态查询、switchover和failover),并接收响应;
(2)接收各个节点上cm_agent上报的数据库实例状态信息;
(3)各个节点上cm_server自身高可用仲裁;
(4)各个节点上数据库实例的高可用仲裁。
cm_agent:
(1)接收并执行cm_server下发的指令,如数据库实例的启动、停止、状态查询、switchover和failover;
(2)监控本节点上运行的数据库实例的状态并上报给cm_server。
注意:一主一备模式下,CM只支持基本的安装,启停,检测能力,其他功能不支持。
二、安装部署MogDB3.0.1一主两备环境
ptk安装部署MogDB一主两备环境:
对于MogDB安装前的操作系统配置这里就不做赘述,这里直接使用ptk快速搭建MogDB一主两备的集群环境,如果在安装之前,你不确定自己的配置是否全面,是否会影响MogDB的安装,那么可以通过以下命令来对操作系统相关配置做检查和修复:
# 1.检查操作系统配置,并生成修复脚本,执行完之后会在当前目录下生成一个shell脚本
# 当然,该脚本只会在命令执行的主机上产生,其他主机则需要手工拷贝过去
ptk checkos --gen-warning-fix -f config.yaml

# 2.拷贝脚本文件到其他主机
scp root_fix_os.2022.0815.154346.sh 10.0.0.202:~
scp root_fix_os.2022.0815.154346.sh 10.0.0.203:~

# 3.在每台主机上执行该脚本:
sh root_fix_os.2022.0815.154346.sh
1.下载ptk:
[root@mogdb-test1 ~]$ curl --proto '=https' --tlsv1.2 -sSf https://cdn-mogdb.enmotech.com/ptk/install.sh | sh
Downloading ptk package...
Detected shell: bash
Shell profile:  /root/.bash_profile
ptk has been added to PATH in /root/.bash_profile
open a new terminal or source /root/.bash_profile to active it
Installed path: /root/.ptk/bin/ptk
# 重新加载配置文件.bash_profile,使得环境变量PATH设置成功
[root@mogdb-test1 ~]$ source .bash_profile
# 查看一下ptk的版本信息:
[root@mogdb-test1 ~]$ ptk -v
PTK Version: v0.3.4
Go Version: go1.17.1
Build Date: 2022-08-13T08:41:23Z
Git Hash: 273b260
2.生成安装拓扑配置文件:
# ptk template命令的作用就是打印出默认的模板配置信息。然后我们将输出信息
# 重定向到config.yaml文件中
ptk template > config.yaml

# 编辑config.yaml文件(一主两备配置文件)
vim config.yaml
global:
  cluster_name: "mogdb_cluster"
  user: "omm"
  group: "omm"
  db_port: 26000
  # 如果需要安装CM工具,需要设置该参数的值为yes,默认不安装CM工具
  enable_cm: yes
  cm_server_port: 16000
  base_dir: "/opt/mogdb3.0.1"
  cm_dir: "/opt/mogdb3.0.1/cm"
  # 由于其他主机的root用户和密码都是一样的,所以这里就将ssh连接信息配置在global下共用。
  # 如果连接信息不一样,需要在每个host下单独配置。
  ssh_option:
    port: 22
    user: root
  ## SSH password, use 'ptk encrypt' to encrypt it if not empty,root用户密码需要通过提示命令加密之后复制过来
    password: "pTk6ZTIzYTM5NGY8RD1BPUE/QTIxbVRMYkpnNFVBd3lvUkI5QXh5UHQydXYwWk5YaHRPOTVBMnowQlZIc1U="


db_servers:
  - host: "10.0.0.201"
    db_port: 26000
    ha_port: 26001
    # # database role, options: primary, standby, cascade_standby
    role: "primary"
  - host: "10.0.0.202"
    db_port: 26000
    ha_port: 26001
    role: "standby"
  - host: "10.0.0.203"
    db_port: 26000
    ha_port: 26001
    role: "standby"
3.执行安装
# 如果没有通过-p选项来指定MogDB安装包的路径,那么默认会到MogDB官网上下载并安装
# 默认版本的MogDB安装包。(ptk install -h命令输出中:--db-version选项描述中有默认版本信息)
ptk install -f config.yaml

# 如果输出信息最后显示如下,表示安装成功(省略了前面大部分信息):
INFO[2022-08-15T16:10:28.476] [stage=launch]: successful                    host=10.0.0.201
INFO[2022-08-15T16:10:28.476] primary startuped, start build current db     host=10.0.0.202
INFO[2022-08-15T16:10:28.476] build 10.0.0.202 database by gs_ctl           host=10.0.0.202
⣾ executing...INFO[2022-08-15T16:10:28.476] primary startuped, start build current db     host=10.0.0.203
INFO[2022-08-15T16:10:28.476] build 10.0.0.203 database by gs_ctl           host=10.0.0.203
INFO[2022-08-15T16:10:50.609] [stage=launch]: successful                    host=10.0.0.203
INFO[2022-08-15T16:10:55.042] [stage=launch]: successful                    host=10.0.0.202
INFO[2022-08-15T16:10:55.042] Time elapsed: 4m25s
   cluste_name  |    host    | user | port  | stage  |    status     | message
----------------+------------+------+-------+--------+---------------+----------
  mogdb_cluster | 10.0.0.201 | omm  | 26000 | launch | start_success | success
                | 10.0.0.203 | omm  | 26000 | launch | start_success | success
                | 10.0.0.202 | omm  | 26000 | launch | start_success | success

# 从输出信息可以看到,在我的机器上一主两备的搭建也是花费了4m25s
注:执行完该命令之后,记得观察输出信息,通过输出信息我们会发现ptk工具在我们的系统上干了哪些事。
补充:
简单总结一下,执行上述命令大致做了如下事情:
(1)检查操作系统配置信息
(2)下载MogDB安装包
(3)询问你拓扑配置文件信息是否正确
(4)开始安装(例如:分发MogDB安装包,创建用户和用户组,创建相关目录,初始化数据库等等)
(5)启动数据库,先启动主库,然后重建备库,并启动备库
更加详细信息请参考执行命令的输出信息。
命令执行成功之后会创建omm用户,并在omm用户家目录下创建一个名为.ptk_mogdb_env隐藏文件,内容为与MogDB相关的各种环境变量信息(值得注意的是,该文件中设置了PGPORT,PGUSER,PGDATABASE环境变量,使得我们切换到omm用户只需输入gsql就可以连接到数据库),并且会在omm用户家目录下的.bashrc配置文件中添加一条命令:
[ -f /home/omm/.ptk_mogdb_env ] && . /home/omm/.ptk_mogdb_env # ptk added
如此,我们每次切换到omm用户时,这些环境变量就会被设置。
当然为了更好的在gsql端中编辑命令,可以在上述文件中添加一条命令:
alias gsql='gsql -r'
4.查看相关服务监听状态
su - omm
netstat -lntup | grep -E '(mogdb|cm+)'
(Not all processes could be identified, non-owned process info
 will not be shown, you would have to be root to see it all.)
tcp        0      0 0.0.0.0:26000           0.0.0.0:*               LISTEN      18982/mogdb
tcp        0      0 0.0.0.0:26001           0.0.0.0:*               LISTEN      18982/mogdb
tcp        0      0 10.0.0.201:26005        0.0.0.0:*               LISTEN      18982/mogdb
tcp        0      0 10.0.0.201:16000        0.0.0.0:*               LISTEN      18971/cm_server
tcp        0      0 10.0.0.201:16001        0.0.0.0:*               LISTEN      18971/cm_server
tcp6       0      0 :::26000                :::*                    LISTEN      18982/mogdb
tcp6       0      0 :::26001                :::*                    LISTEN      18982/mogdb
# 查看CM相关进程信息
ps aux | grep -E  c[m]+
omm        7019  0.3  0.5  44564 11620 ?        S    09:30   0:08 /opt/mogdb3.0.1/app/bin/om_monitor -L /opt/mogdb3.0.1/log/cm/om_monitor
omm        7020  2.4  0.7 856040 15140 ?        Sl   09:30   0:50 /opt/mogdb3.0.1/app/bin/cm_agent
omm        7033 14.0 19.4 5223844 395472 ?      Sl   09:30   4:48 /opt/mogdb3.0.1/app/bin/cm_server
注意:通过观察我们可以发现,om_monitor、cm_agent、cm_server进程在每个节点上都有运行,其中cm_server进程在一个节点上是primary,其他节点的角色为standby。从而也间接的反应了cm_sever不仅可以自身高可用仲裁,也可以保证数据库集群的高可用仲裁。
三、通过CM工具管理MogDB集群
1,查看数据库集群状态信息
cm_ctl query -v -C
[  CMServer State   ]

node           instance state
-------------------------------
1  mogdb-test1 1        Primary
2  mogdb-test2 2        Standby
3  mogdb-test3 3        Standby

[   Cluster State   ]

cluster_state   : Normal
redistributing  : No
balanced        : Yes
current_az      : AZ_ALL

[  Datanode State   ]

node           instance state            | node           instance state            | node           instance state
---------------------------------------------------------------------------------------------------------------------------------
1  mogdb-test1 6001     P Primary Normal | 2  mogdb-test2 6002     S Standby Normal | 3  mogdb-test3 6003     S Standby Normal

# 注:使用-C选项时,需要加上-v选项
2.通过cm_ctl工具关闭指定数据库实例
cm_ctl stop -n 1 -D /opt/mogdb3.0.1/data/
# 注:-n选项用于指定节点id,也就是查看数据库集群状态信息时node项对应的值。
# -D选项用于指定节点的数据目录,对于单个节点或实例的停止命令不能带上-m选项来指定关闭模式。
# 再次查看数据库集群的状态
cm_ctl query -v -C
[  CMServer State   ]

node           instance state
-------------------------------
1  mogdb-test1 1        Primary
2  mogdb-test2 2        Standby
3  mogdb-test3 3        Standby

[   Cluster State   ]

cluster_state   : Degraded
redistributing  : No
balanced        : No
current_az      : AZ_ALL

[  Datanode State   ]

node           instance state            | node           instance state            | node           instance state
---------------------------------------------------------------------------------------------------------------------------------
1  mogdb-test1 6001     P Down    Manually stopped | 2  mogdb-test2 6002     S Primary Normal | 3  mogdb-test3 6003     S Standby Normal

# 可以发现,节点1已经关闭,其他两节点运行正常,整个数据库集群的状态变为Degraded。节点2的角色由standby变为primary.
# 节点2可以正常写入数据。此时cm_server在节点1上仍处于运行的状态,且角色还是为primary.
# 上述表明了,cm_server可以对数据库集群进行高可用仲裁。
补充: 当集群中主库(节点1)down掉之后,节点2上的cm_server进程会向cm_agent进程发送指令进行故障转移,cm_agent就会调用gs_ctl工具进行故障转移。故障转移成功之后节点2就变成了主库。在节点3上,cm_server会向cm_agent发送指令,重新启动节点3,并会调用gs_ctl工具执行notify子命令,探知当前集群主库在哪个服务器上,然后重新指定主备关系。节点1(原主库)启动过程和节点2一样,角色会变为standby. cm_agent进程对于系统工具的调用日志会记录在/opt/mogdb3.0.1/cm/cm_agent/log/system_call-current.log文件下。
3.启动指定的数据库实例
cm_ctl start -n 1 -D /opt/mogdb3.0.1/data

# 再次查看数据库集群的状态
cm_ctl query -v -C
[  CMServer State   ]

node           instance state
-------------------------------
1  mogdb-test1 1        Primary
2  mogdb-test2 2        Standby
3  mogdb-test3 3        Standby

[   Cluster State   ]

cluster_state   : Normal
redistributing  : No
balanced        : No
current_az      : AZ_ALL

[  Datanode State   ]

node           instance state            | node           instance state            | node           instance state
---------------------------------------------------------------------------------------------------------------------------------
1  mogdb-test1 6001     P Standby Normal | 2  mogdb-test2 6002     S Primary Normal | 3  mogdb-test3 6003     S Standby Normal

# 节点1的角色变为standby
4.停止整个数据库集群
cm_ctl stop -z AZ1 -m smart

# -z选项指定整个数据库集群的AZ名字,-m选项指定关闭的模式(smart表示等待用户业务结束之后,关闭所有的数据库实例)
更多详细信息请查看cm_ctl帮助信息(cm_ctl --help)。
