


大家好,我是邵奈一,一个不务正业的程序猿、正儿八经的斜杠青年。1、世人称我为:被代码耽误的诗人、没天赋的书法家、五音不全的歌手、专业跑龙套演员、不合格的运动员... 2、这几年,我整理了很多IT技术相关的教程给大家,爱生活、爱分享。3、如果您觉得文章有用,请收藏,转发,评论,并关注我,谢谢!博客导航跳转(请收藏):邵奈一的技术博客导航| 公众号 | 微信 | CSDN | 掘金 | 51CTO | 简书 | 微博 |
00x0 目标
搭建SSM框架,并且能够打通前后端,是一个稍微进阶但是又非常基础的教程。
学习前提
几乎是零基础都可以,当然,如果你有学过一些 SSM
和 Vue
基础内容,那这篇教程更加适合你!
教程亮点与难点
1、搭建通用的SSM框架 2、直接集成CDN的Vue,脱离Node.js使用Vue 3、实现跨域问题,为后端工程师进阶全栈提供思路
在开始确定题目的时候,我专门去搜了一下百度,看有没有类似的文章,发现很多都是 SpringBoot+SSM+Vue
的,好坑,可能小伙伴们就只是学了 SSM
,能不能快速入门,实现一个增删改查案例呢,答案自然是有的!那让我来实现一下吧,小伙伴们如果觉得文章写得不错,请一键三连,甚至扫个二维码防走丢哈!
00x1 后端代码实现
步骤总览
1、功能需求分析 2、新建数据库表 3、SSM后台代码实现 4、部署Tomcat 5、编写测试用例
步骤实现
1、功能需求分析
因为需求比较简单,我给张图大家应该就清楚了: 就是实现增删改查功能,数据表
 product
,字段如下:
| 字段 | 说明 |
|---|---|
| productName | 商品名称 |
| num | 数量 |
其实,这个需求是来源于博主的另外一篇博客:Vue2.x案例之商品增删改查的实现。
只不过呢,这篇博客是没有对接后台的,只是在前端实现了功能而已。而我们这一次,相当于要把后端打通!期不期待呢?!
2、新建数据库表
把下面的语句丢去执行即可,当然,你用 navicat
直接填也可以:
DROP TABLE IF EXISTS `product`;
CREATE TABLE `product` (
`id` int(11) NOT NULL AUTO_INCREMENT,
`productname` varchar(255),
`num` int(11) NULL DEFAULT NULL,
PRIMARY KEY (`id`)
) ENGINE = InnoDB AUTO_INCREMENT = 3 CHARACTER SET = utf8;
INSERT INTO `product` VALUES (1, '鞋子', 100);
INSERT INTO `product` VALUES (2, '衬衫', 200);复制
注意:我这里写的字段名是 productname
,注意大小写!
3、SSM后台代码实现
步骤比较多,总体思路:
新建Maven项目,我们这里选择 空模板
,本意是为了让大家一步一步上手(当然,你也可以选择 webapp
模板),构建好后,结构如下图所示: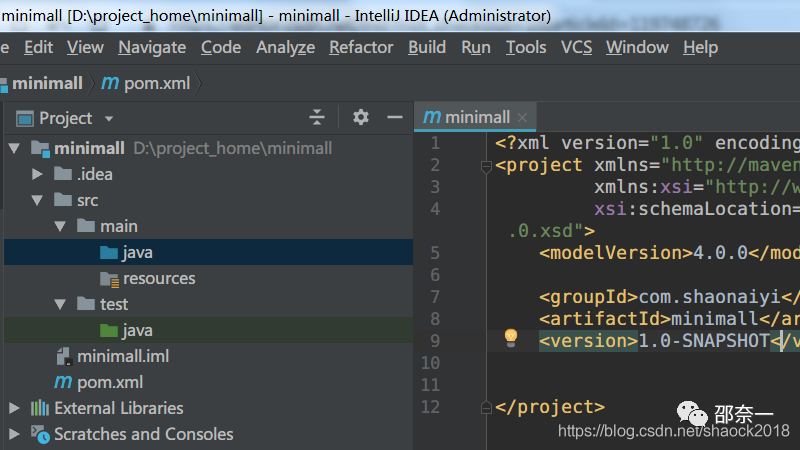 接着引入SSM依赖,
 pom.xml
文件中的完整依赖如下:
<?xml version="1.0" encoding="UTF-8"?>
<project xmlns="http://maven.apache.org/POM/4.0.0"
xmlns:xsi="http://www.w3.org/2001/XMLSchema-instance"
xsi:schemaLocation="http://maven.apache.org/POM/4.0.0 http://maven.apache.org/xsd/maven-4.0.0.xsd">
<modelVersion>4.0.0</modelVersion>
<groupId>com.shaonaiyi</groupId>
<artifactId>minimall</artifactId>
<version>1.0-SNAPSHOT</version>
<packaging>war</packaging>
<properties>
<project.build.sourceEncoding>UTF-8</project.build.sourceEncoding>
<maven.compiler.source>1.8</maven.compiler.source>
<maven.compiler.target>1.8</maven.compiler.target>
<spring.version>5.2.5.RELEASE</spring.version>
<mybatis.version>3.5.3</mybatis.version>
<jackson.version>2.9.8</jackson.version>
</properties>
<dependencies>
<!--javaWeb组件库-->
<dependency>
<groupId>javax</groupId>
<artifactId>javaee-web-api</artifactId>
<version>8.0.1</version>
<scope>provided</scope>
</dependency>
<!-- Spring核心-->
<dependency>
<groupId>org.springframework</groupId>
<artifactId>spring-core</artifactId>
<version>${spring.version}</version>
</dependency>
<!--Spring 应用上下文,进行注解、xml、config加载-->
<dependency>
<groupId>org.springframework</groupId>
<artifactId>spring-context</artifactId>
<version>${spring.version}</version>
</dependency>
<!--Spring提供的Web上下文,可与Web框架集成,如struts-->
<dependency>
<groupId>org.springframework</groupId>
<artifactId>spring-web</artifactId>
<version>${spring.version}</version>
</dependency>
<!--Spring IOC-->
<dependency>
<groupId>org.springframework</groupId>
<artifactId>spring-beans</artifactId>
<version>${spring.version}</version>
</dependency>
<!--SpringMVC-->
<dependency>
<groupId>org.springframework</groupId>
<artifactId>spring-webmvc</artifactId>
<version>${spring.version}</version>
</dependency>
<!--持久层框架支持-->
<dependency>
<groupId>org.springframework</groupId>
<artifactId>spring-orm</artifactId>
<version>${spring.version}</version>
</dependency>
<!--AOP支持-->
<dependency>
<groupId>org.springframework</groupId>
<artifactId>spring-aop</artifactId>
<version>${spring.version}</version>
</dependency>
<dependency>
<groupId>org.springframework</groupId>
<artifactId>spring-aspects</artifactId>
<version>${spring.version}</version>
</dependency>
<!--spring事务-->
<dependency>
<groupId>org.springframework</groupId>
<artifactId>spring-tx</artifactId>
<version>${spring.version}</version>
</dependency>
<!-- DBCP数据库连接池,SSM框架一般搭配DBCP连接池 -->
<dependency>
<groupId>commons-dbcp</groupId>
<artifactId>commons-dbcp</artifactId>
<version>1.4</version>
</dependency>
<!--MyBatis-->
<dependency>
<groupId>org.mybatis</groupId>
<artifactId>mybatis</artifactId>
<version>${mybatis.version}</version>
</dependency>
<!--MyBatis与Spring的集成-->
<dependency>
<groupId>org.mybatis</groupId>
<artifactId>mybatis-spring</artifactId>
<version>2.0.0</version>
</dependency>
<!--MySql数据库-->
<dependency>
<groupId>mysql</groupId>
<artifactId>mysql-connector-java</artifactId>
<version>5.1.48</version>
</dependency>
<!-- Json -->
<dependency>
<groupId>com.fasterxml.jackson.core</groupId>
<artifactId>jackson-databind</artifactId>
<version>${jackson.version}</version>
</dependency>
<dependency>
<groupId>com.fasterxml.jackson.core</groupId>
<artifactId>jackson-core</artifactId>
<version>${jackson.version}</version>
</dependency>
<dependency>
<groupId>com.fasterxml.jackson.core</groupId>
<artifactId>jackson-annotations</artifactId>
<version>${jackson.version}</version>
</dependency>
<dependency>
<groupId>junit</groupId>
<artifactId>junit</artifactId>
<version>4.11</version>
<scope>test</scope>
</dependency>
</dependencies>
</project>复制
注意的地方:1、添加了 <packaging>
标签,我们是打包成 war
包,后面是集成 Tomcat
部署。
添加依赖后,需要构建目录结构,把相应的包和文件夹建好: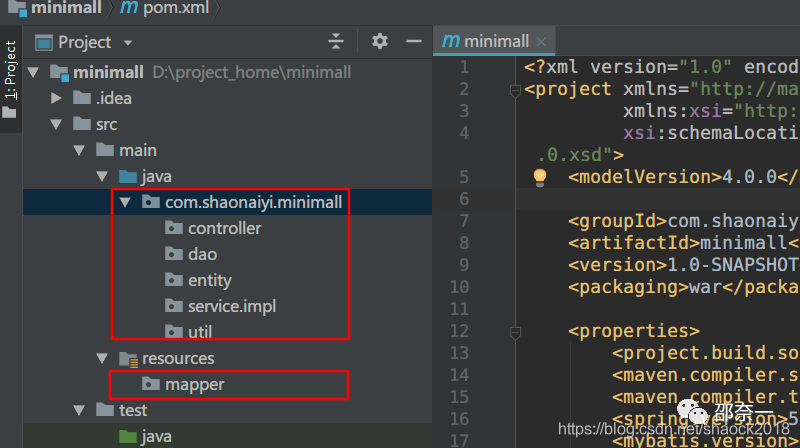 除此之外,因为选择的是 Maven
 空模板
项目,所以要设置成 web 项目。先新建 webapp
文件夹和 WEB-INF
子文件夹(不清楚可以看下面第二张图):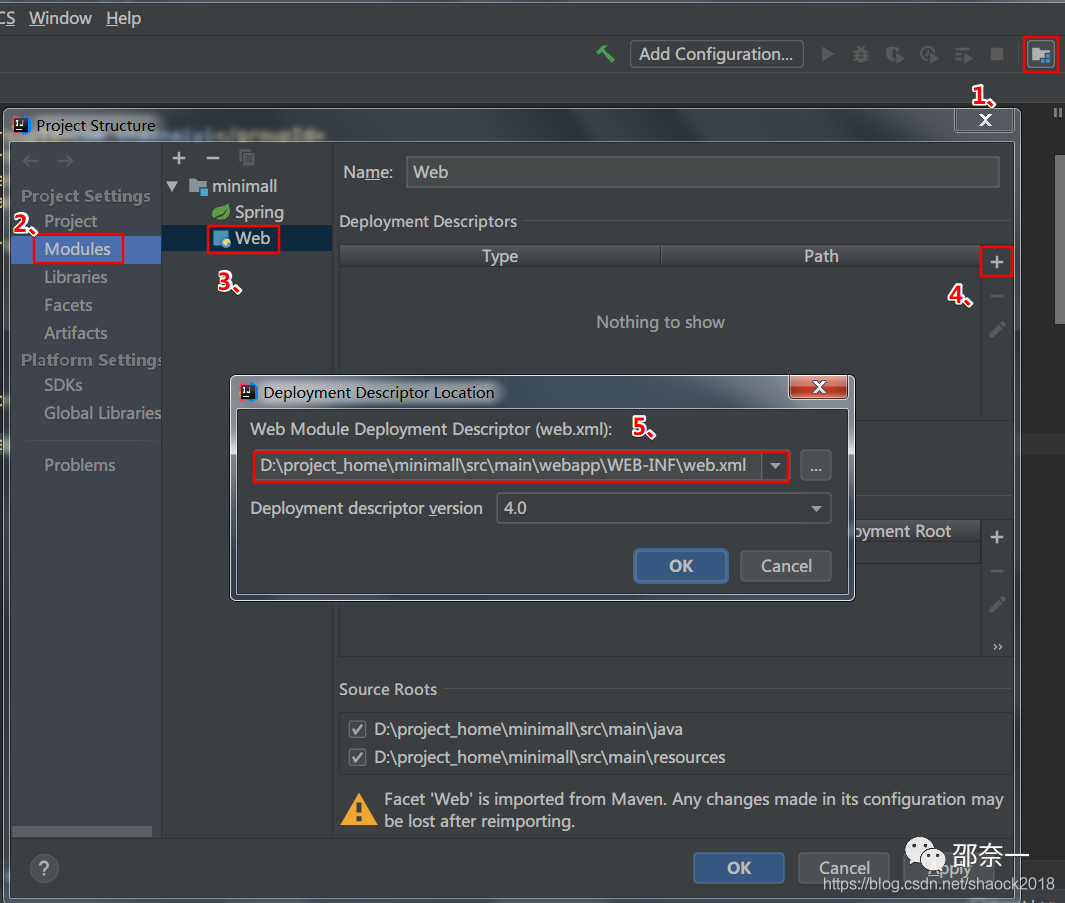 新建好后,如图所示:
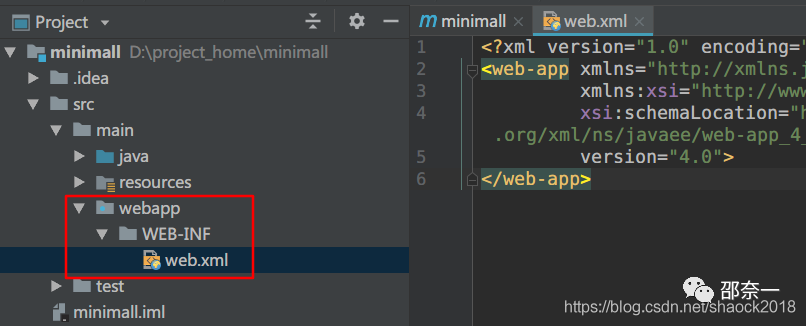 接着,就是要新建相应的配置文件了,小伙伴们可以直接复制粘贴,都是新建在
 resources
文件夹里。最终目录结构,可以参考这张图: 先拷贝
先拷贝 web.xml
的内容:
<context-param>
<param-name>contextConfigLocation</param-name>
<param-value>classpath:applicationContext.xml</param-value>
</context-param>
<listener>
<listener-class>org.springframework.web.context.ContextLoaderListener</listener-class>
</listener>
<servlet>
<servlet-name>SpringMVC</servlet-name>
<servlet-class>org.springframework.web.servlet.DispatcherServlet</servlet-class>
<init-param>
<param-name>contextConfigLocation</param-name>
<param-value>classpath:springmvc.xml</param-value>
</init-param>
</servlet>
<servlet-mapping>
<servlet-name>SpringMVC</servlet-name>
<url-pattern>/</url-pattern>
</servlet-mapping>
<filter>
<filter-name>characterEncodingFilter</filter-name>
<filter-class>org.springframework.web.filter.CharacterEncodingFilter</filter-class>
<init-param>
<param-name>encoding</param-name>
<param-value>UTF-8</param-value>
</init-param>
<init-param>
<param-name>forceEncoding</param-name>
<param-value>true</param-value>
</init-param>
</filter>
<filter-mapping>
<filter-name>characterEncodingFilter</filter-name>
<url-pattern>/*</url-pattern>
</filter-mapping>
<welcome-file-list>
<welcome-file>index.html</welcome-file>
<welcome-file>index.htm</welcome-file>
<welcome-file>index.jsp</welcome-file>
<welcome-file>default.html</welcome-file>
<welcome-file>default.htm</welcome-file>
<welcome-file>default.jsp</welcome-file>
</welcome-file-list>复制
拷贝完会报错,没关系,因为还没有其他文件,可以不用管它,继续操作。接着继续新建 applicationContext.xml
文件:
<beans xmlns="http://www.springframework.org/schema/beans"
xmlns:xsi="http://www.w3.org/2001/XMLSchema-instance" xmlns:mvc="http://www.springframework.org/schema/mvc"
xmlns:context="http://www.springframework.org/schema/context"
xmlns:aop="http://www.springframework.org/schema/aop" xmlns:tx="http://www.springframework.org/schema/tx"
xsi:schemaLocation="http://www.springframework.org/schema/beans
http://www.springframework.org/schema/beans/spring-beans-3.2.xsd
http://www.springframework.org/schema/mvc
http://www.springframework.org/schema/mvc/spring-mvc-3.2.xsd
http://www.springframework.org/schema/context
http://www.springframework.org/schema/context/spring-context-3.2.xsd
http://www.springframework.org/schema/aop
http://www.springframework.org/schema/aop/spring-aop-3.2.xsd
http://www.springframework.org/schema/tx
http://www.springframework.org/schema/tx/spring-tx-3.2.xsd ">
<!-- 加载db.properties-->
<context:property-placeholder location="classpath:db.properties" />
<!-- 扫描包,将标注Spring注解的类自动转化对象,同时完成Bean的注入 -->
<context:component-scan base-package="com.shaonaiyi.minimall"/>
<!-- 启动对@AspectJ注解的支持 -->
<aop:aspectj-autoproxy></aop:aspectj-autoproxy>
<!-- 配置数据源 ,使用dbcp数据库连接池 -->
<bean id="dataSource" class="org.apache.commons.dbcp.BasicDataSource"
destroy-method="close">
<property name="driverClassName" value="${jdbc.driver}" />
<property name="url" value="${jdbc.url}" />
<property name="username" value="${jdbc.username}" />
<property name="password" value="${jdbc.password}" />
<property name="maxActive" value="30" />
<property name="maxIdle" value="20" />
</bean>
<!--配置sqlSessionFactory -->
<bean id="sqlSessionFactory" class="org.mybatis.spring.SqlSessionFactoryBean">
<property name="dataSource" ref="dataSource" />
<property name="mapperLocations" value="classpath:mapper/*.xml"></property>
</bean>
<!-- mapper扫描器 -->
<bean class="org.mybatis.spring.mapper.MapperScannerConfigurer">
<property name="basePackage" value="com.shaonaiyi.minimall.dao"></property>
<property name="sqlSessionFactoryBeanName" value="sqlSessionFactory" />
</bean>
<!-- 事务管理器 对mybatis操作数据库事务控制,spring使用jdbc的事务控制类 -->
<bean id="transactionManager"
class="org.springframework.jdbc.datasource.DataSourceTransactionManager">
<property name="dataSource" ref="dataSource" />
</bean>
<!-- 通知 -->
<tx:advice id="txAdvice" transaction-manager="transactionManager">
<tx:attributes>
<!-- 传播行为 -->
<tx:method name="save*" propagation="REQUIRED" />
<tx:method name="delete*" propagation="REQUIRED" />
<tx:method name="add*" propagation="REQUIRED" />
<tx:method name="modify*" propagation="REQUIRED" />
<tx:method name="update*" propagation="REQUIRED" />
<tx:method name="find*" propagation="SUPPORTS" read-only="true" />
<tx:method name="get*" propagation="SUPPORTS" read-only="true" />
<tx:method name="select*" propagation="SUPPORTS" read-only="true" />
<tx:method name="search*" propagation="SUPPORTS" read-only="true" />
<tx:method name="list*" propagation="SUPPORTS" read-only="true" />
</tx:attributes>
</tx:advice>
<!-- aop -->
<aop:config>
<aop:advisor advice-ref="txAdvice"
pointcut="execution(* com.shaonaiyi.minimall.service.impl.*.*(..))" />
</aop:config>
</beans>复制
*.xml
处会报红,是因为还没有xml文件,先不用管。
新建 springmvc.xml
文件:
<?xml version="1.0" encoding="UTF-8"?>
<beans default-lazy-init="true"
xmlns="http://www.springframework.org/schema/beans" xmlns:p="http://www.springframework.org/schema/p"
xmlns:xsi="http://www.w3.org/2001/XMLSchema-instance" xmlns:context="http://www.springframework.org/schema/context"
xmlns:mvc="http://www.springframework.org/schema/mvc"
xsi:schemaLocation="
http://www.springframework.org/schema/beans
http://www.springframework.org/schema/beans/spring-beans-3.0.xsd
http://www.springframework.org/schema/mvc
http://www.springframework.org/schema/mvc/spring-mvc-3.0.xsd
http://www.springframework.org/schema/context
http://www.springframework.org/schema/context/spring-context-3.0.xsd">
<!-- 扫描带注解的包下的类,注册Bean-->
<context:component-scan base-package="com.shaonaiyi.minimall.controller" />
<!-- 通过注解,把URL映射到Controller上,该标签默认注册DefaultAnnotationHandlerMapping和AnnotationMethodHandlerAdapter -->
<mvc:annotation-driven />
</beans>复制
新建 db.properties
文件
jdbc.driver=com.mysql.jdbc.Driver
jdbc.url=jdbc:mysql://localhost:3306/minimall?characterEncoding=utf-8
jdbc.username=root
jdbc.password=123456复制
配置文件都搞定之后,就可以敲代码了,说实话,用过SpringBoot之后,再用起SSM来,就像说一个字:绝!(真繁琐...)
编写代码的顺序一般是这样的,先把对应的实体类给建好,必须清楚自己到底想干啥,然后你可以从 Controller
再到 Service
再到 Dao
层,再把 MyBatis
的xml文件搞定。
但实际上开发要比这个轻松很多,因为一般都会用代码生成工具,把很多琐碎的代码都自动生成了,可以减少很多工作,比如增删改查,只需要写少量 Controller
和 Service
层代码就可以了。
当然,在实际开发上,还可以继续再简化,这个就需要衡量一下你项目的够不够大了,如果项目比较小,复制粘贴就可以搞定了,但如果体量比较大,复制粘贴都非常繁琐。当然,你也可以选择一些低代码开发平台,配置一下、跑一下,很多功能都可以实现,具体大家也可以去了解一下:
其实只有写教程是最费时间的:!在这里插入图片描述我不忍了,你们在学校学的都是......没有没有,只是太基础而已。
!在这里插入图片描述彩蛋:打印日志实现
为了使用日志,我们在util包里编写工具类:
package com.shaonaiyi.minimall.util;
import org.aspectj.lang.JoinPoint;
import org.aspectj.lang.annotation.After;
import org.aspectj.lang.annotation.Aspect;
import org.aspectj.lang.annotation.Before;
import org.springframework.stereotype.Component;
/**
* @Auther: shaonaiyi@163.com
* @Date: 2021/8/17 23:58
* @Description:
*/
@Component
@Aspect
public class LogPrint {
@Before("execution(* com.shaonaiyi.minimall.service.impl.*.*(..))")
public void methodBegin(JoinPoint joinPoint){
System.out.println("方法开始了");
}
@After("execution(* com.shaonaiyi.minimall.service.impl.*.*(..))")
public void methodEnd(){
System.out.println("方法结束了");
}
@Before("execution(* com.shaonaiyi.minimall.service.impl.*.*(..))")
public void methodBegin1(JoinPoint joinPoint){
System.out.println(joinPoint.getTarget()+" "+joinPoint.getSignature().getName()+"方法开始了");
}
}复制
增删改查实现
先把实体类构建好,然后的写代码顺序可以灵活处理,一般是先写Controller,然后是Service接口,接着是Service实现,然后是Dao层接口,然后是Dao的xml文件。简单来说就是:entity
=> XxxController
=> iXxxService
=> XxxServiceImpl
=> XxxDao.java
=> XxxDao.xml
。
代码结构请参考下图,以免有些小伙伴不知道要复制到哪里: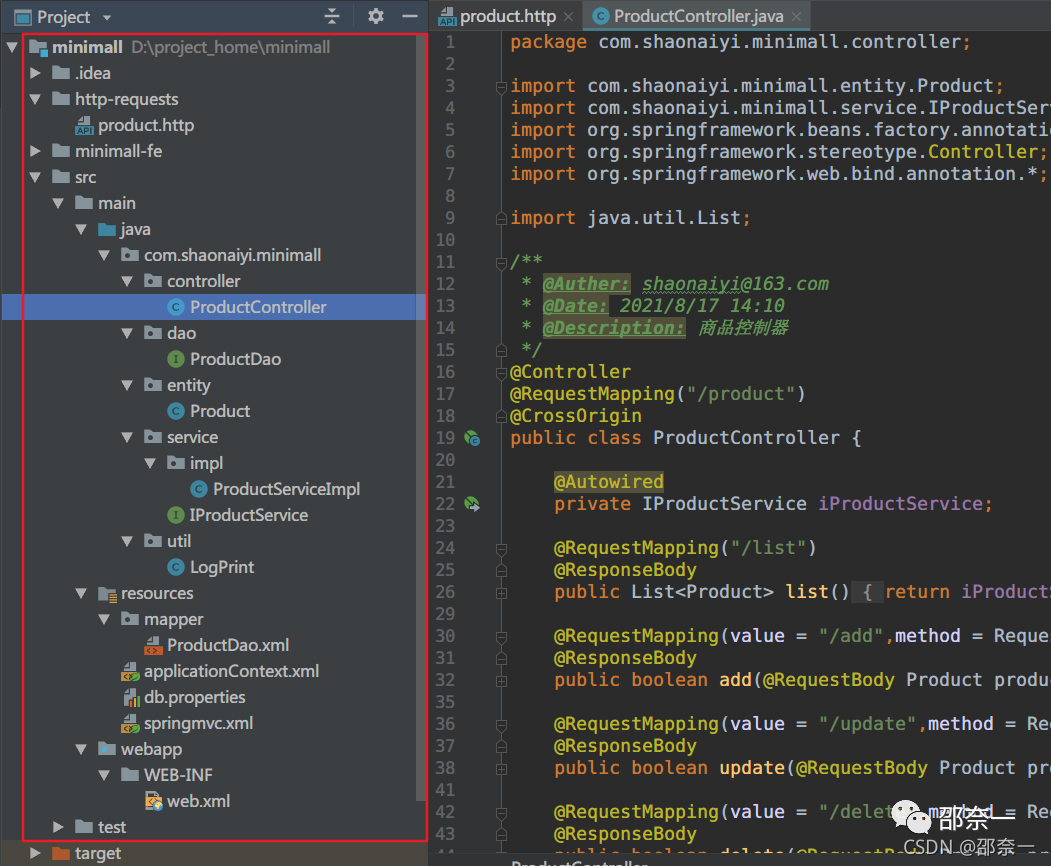
编写 Product.java
完整代码:
package com.shaonaiyi.minimall.entity;
/**
* @Auther: shaonaiyi@163.com
* @Date: 2021/8/17 14:09
* @Description: 商品实体类
*/
public class Product {
private Integer id;
private String productName;
private Integer nums;
public Integer getId() {
return id;
}
public void setId(Integer id) {
this.id = id;
}
public String getProductName() {
return productName;
}
public void setProductName(String productName) {
this.productName = productName;
}
public Integer getNums() {
return nums;
}
public void setNums(Integer nums) {
this.nums = nums;
}
@Override
public String toString() {
final StringBuffer sb = new StringBuffer("Product{");
sb.append("id=").append(id);
sb.append(", productName='").append(productName).append('\'');
sb.append(", nums=").append(nums);
sb.append('}');
return sb.toString();
}
}复制
注意:数据库里商品名称为 productname
,而实体类里字段为 productName
,所以后面操作要额外注意,这里写不同,方便各位小伙伴有个区别。
编写 ProductController.java
完整代码:
package com.shaonaiyi.minimall.controller;
import com.shaonaiyi.minimall.entity.Product;
import com.shaonaiyi.minimall.service.IProductService;
import org.springframework.beans.factory.annotation.Autowired;
import org.springframework.stereotype.Controller;
import org.springframework.web.bind.annotation.*;
import java.util.List;
/**
* @Auther: shaonaiyi@163.com
* @Date: 2021/8/17 14:10
* @Description: 商品控制器
*/
@Controller
@RequestMapping("/product")
@CrossOrigin
public class ProductController {
@Autowired
private IProductService iProductService;
@RequestMapping("/list")
@ResponseBody
public List<Product> list() {
return iProductService.list();
}
@RequestMapping(value = "/add",method = RequestMethod.POST)
@ResponseBody
public boolean add(@RequestBody Product product) {
return iProductService.add(product);
}
@RequestMapping(value = "/update",method = RequestMethod.POST)
@ResponseBody
public boolean update(@RequestBody Product product) {
return iProductService.update(product);
}
@RequestMapping(value = "/delete",method = RequestMethod.POST)
@ResponseBody
public boolean delete(@RequestBody Product product) {
return iProductService.delete(product);
}
@RequestMapping(value = "/add-test",method = RequestMethod.POST)
@ResponseBody
public boolean addTest(String productName,Integer nums) {
Product product = new Product();
product.setProductName(productName);
product.setNums(nums);
return iProductService.add(product);
}
@RequestMapping(value = "/delete-test",method = RequestMethod.POST)
@ResponseBody
public boolean deleteTest(int id) {
Product product = new Product();
product.setId(id);
return iProductService.delete(product);
}
}复制
说明:1、这里提供多了两个接口:/add-test
、 /delete-test
,方便大家对比学习,两种方式的接受参数的方式不一样, Content-Type
一个是 JSON
,一个是 application/x-www-form-urlencoded
,方式不同,如果不对应上,会报400错误,后面有测试用例,可以看后面内容。2、目前的开发模式一般都是前后端分离开发,所以用 JSON
格式进行交互是最常见的;如果想按照自己的风格,没有前后端分离的话,可以使用另外一种。初学者比较容易对这里的内容有误解,可以查阅相关资料。
编写 IProductService.java
完整代码:
package com.shaonaiyi.minimall.service;
import com.shaonaiyi.minimall.entity.Product;
import java.util.List;
/**
* @Auther: shaonaiyi@163.com
* @Date: 2021/8/17 14:13
* @Description: 商品逻辑接口
*/
public interface IProductService {
List<Product> list();
boolean add(Product product);
boolean update(Product product);
boolean delete(Product product);
}复制
编写 ProductServiceImpl.java
完整代码:
package com.shaonaiyi.minimall.service.impl;
import com.shaonaiyi.minimall.dao.ProductDao;
import com.shaonaiyi.minimall.entity.Product;
import com.shaonaiyi.minimall.service.IProductService;
import org.springframework.beans.factory.annotation.Autowired;
import org.springframework.stereotype.Service;
import java.util.List;
/**
* @Auther: shaonaiyi@163.com
* @Date: 2021/8/17 14:13
* @Description: 商品逻辑实现
*/
@Service
public class ProductServiceImpl implements IProductService {
@Autowired
private ProductDao productDao;
@Override
public List<Product> list() {
return productDao.list();
}
@Override
public boolean add(Product product) {
int result = productDao.add(product);
return result > 0;
}
@Override
public boolean update(Product product) {
int result = productDao.update(product);
return result > 0;
}
@Override
public boolean delete(Product product) {
int result = productDao.delete(product.getId());
return result > 0;
}
}复制
编写 ProductDao.java
完整代码:
package com.shaonaiyi.minimall.dao;
import com.shaonaiyi.minimall.entity.Product;
import java.util.List;
/**
* @Auther: shaonaiyi@163.com
* @Date: 2021/8/17 14:18
* @Description: 商品Dao接口
*/
public interface ProductDao {
List<Product> list();
int add(Product product);
int update(Product product);
int delete(int id);
}复制
编写 ProductDao.xml
完整代码:
<?xml version="1.0" encoding="UTF-8"?>
<!DOCTYPE mapper PUBLIC
"-//mybatis.org//DTD Mapper 3.0//EN"
"http://mybatis.org/dtd/mybatis-3-mapper.dtd">
<mapper namespace="com.shaonaiyi.minimall.dao.ProductDao">
<resultMap id="Product" type="com.shaonaiyi.minimall.entity.Product">
<id property="id" column="id"></id>
<result property="productName" column="productName"/>
<result property="nums" column="nums"/>
</resultMap>
<select id="list" resultMap="Product">
select * from product;
</select>
<insert id="add">
insert into product
(productname,nums) values(#{productName},#{nums})
</insert>
<update id="update" parameterType="com.shaonaiyi.minimall.entity.Product">
update product set productname = #{productName},
nums = #{nums} where
id = #{id}
</update>
<delete id="delete" parameterType="int">
delete from product where
id = #{id}
</delete>
</mapper>复制
注意:到底是写 productname
还是 productName
,需要分清。写好之后,你就可以进行部署运行和测试了。
4、部署Tomcat
此步骤比较简单,可以自行搜一下资料,灵感参考如下: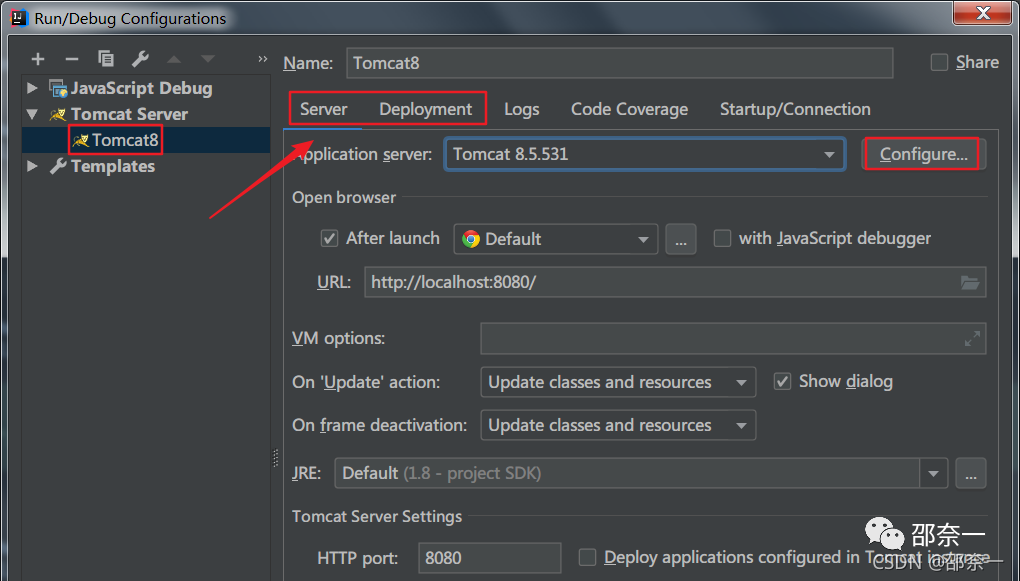
5、编写测试用例
随便新建个文件夹,然后新建一个以 http
后缀结尾的文件,然后写测试用例即可: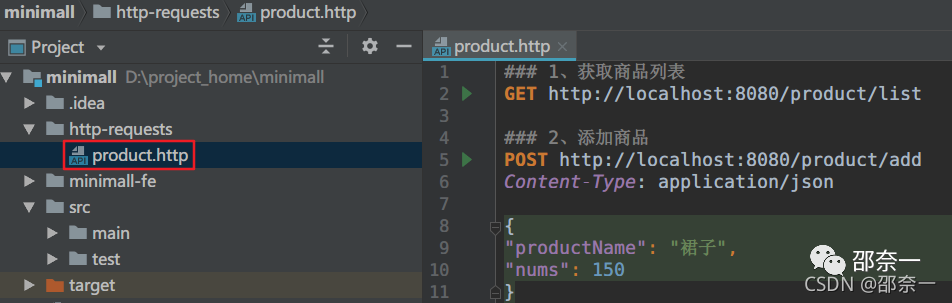 完整的测试用例
### 1、获取商品列表
GET http://localhost:8080/product/list
### 2、添加商品
POST http://localhost:8080/product/add
Content-Type: application/json
{
"productName": "裙子",
"nums": 150
}
### 3、更新商品
POST http://localhost:8080/product/update
Content-Type: application/json
{
"id":1,
"productName": "皮靴",
"nums": 88
}
### 4、删除商品
POST http://localhost:8080/product/delete
Content-Type: application/json
{
"id":30
}
### 5、添加商品(非JSON方式)
POST http://localhost:8080/product/add-test
Content-Type: application/x-www-form-urlencoded
productName=裙子&nums=150
### 6、删除商品(非JSON方式)
POST http://localhost:8080/product/delete-test
Content-Type: application/x-www-form-urlencoded
id=29
###复制
写好测试用例后,左边会有个运行按钮,当你的 Tomcat
启动后,点击绿色小三角按钮就可以测试了: 下面会有返回的结果。所以,直接使用
 IDEA
进行测试是非常方便的。
测试小技巧:
在 http
文件中,直接打 gtr
、 gtrp
、 ptr
、 ptrg
可以生成相应的代码,只需要写必要的参数就可以了,自己可以多试试。
00x2 前端代码实现
步骤总览
1、编写未对接数据库的前端代码 2、对接查询商品列表接口 3、SSM后台代码实现 4、部署Tomcat 5、编写测试用例
步骤实现
1、编写未对接数据库的前端代码
参考教程::Vue2.x案例之商品增删改查的实现。
在项目中新建一个 web
文件夹,然后新建 index.html
文件,因为代码比较简单,所以这里我使用传统的开发模式,方便大家入门: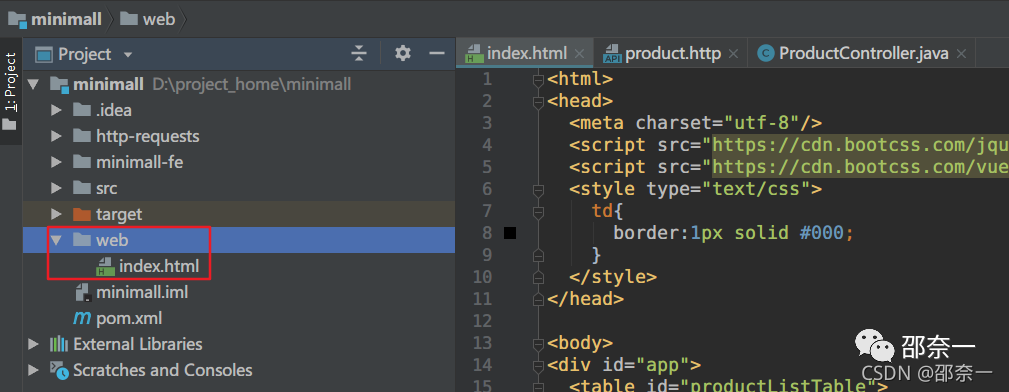 然后就可以把教程中的代码粘贴进去了,用浏览器打开
 index.html
文件,其实就可以实现增删改查了,只不过,页面都是没有对接数据库的,所以刷新页面的时候,页面会恢复原样,这当然不是我们所想要实现的效果!
2、对接查询商品列表接口
目前的商品数据是直接写死的:
var data = {
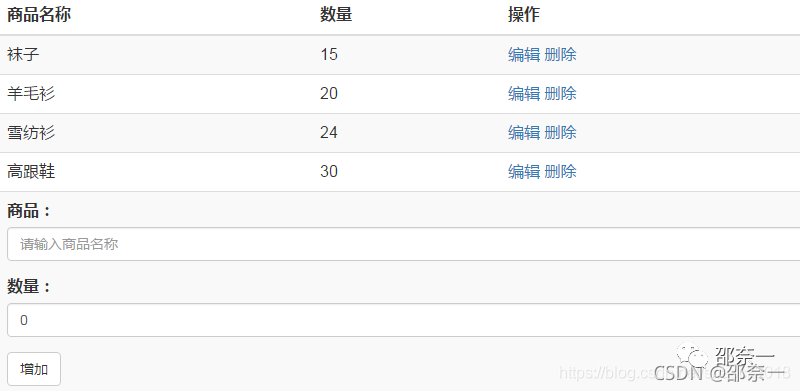
products: [
{ id: 1, productName: '袜子', nums: 15},
{ id: 2, productName: '羊毛衫', nums: 20},
{ id: 3, productName: '雪纺衫', nums: 24},
{ id: 4, productName: '高跟鞋', nums: 30}
],
product4Add: { id: 0, productName: '', nums: '0'},
product4Update: { id: 0, productName: '', nums: '0'}
};复制
并且绑定到了Vue里面的data:
var vue = new Vue({
el: '#app',
data: data,
...复制
而我们应该做的是从后台的接口里获取到数据。
步骤如下:我们将会引入 axios
,方便我们请求后台接口,然后写 list
方法对接后台的接口,查询到商品列表信息,你可以给出一个按钮,然后再执行list方法,但一般列表应该是一加载页面就去查询的。所以,我们可以使用Vue中的 mounted
钩子函数来达到这个目的。
1、引入axios
添加AJAX
<script src="https://cdn.bootcdn.net/ajax/libs/axios/0.21.1/axios.js"></script>复制
2、编写list方法对接后台接口
list() {
let _this = this;
axios.get("http://localhost:8080/product/list").then(
(response) => {
console.log("查询用户列表结果:", response);
_this.products = response.data;
}
)
},复制
3、添加 mounted
钩子函数
mounted: function () {
let _this = this;
_this.list();
},复制
4、删除初始化的商品数据
var data = {
products: [],
...
};复制
目前的完整代码如下:
<html>
<head>
<meta charset="utf-8"/>
<script src="https://cdn.bootcss.com/jquery/3.1.1/jquery.min.js"></script>
<script src="https://cdn.bootcss.com/vue/2.5.22/vue.min.js"></script>
<script src="https://cdn.bootcdn.net/ajax/libs/axios/0.21.1/axios.js"></script>
...省略部分未变代码
<script type="text/javascript">
$("#div4Update").hide();
//Model
var data = {
products: [],
product4Add: {id: 0, productName: '', nums: '0'},
product4Update: {id: 0, productName: '', nums: '0'}
};
...省略部分未变代码
//ViewModel
var vue = new Vue({
el: '#app',
data: data,
mounted: function () {
let _this = this;
_this.list();
},
methods: {
list() {
let _this = this;
axios.get("http://localhost:8080/product/list").then(
(response) => {
console.log("查询用户列表结果:", response);
_this.products = response.data;
}
)
},
add: function (event) {
...省略以下未变代码复制
代码比较多,其实没改几个地方,放出来代码,方便大家查阅。
3、对接删除商品接口
因为我们目前的 id
不是从后台获取的,所以,你可以把 id
获取到,然后显示出来,当然你也可以隐藏掉。隐藏掉操作如下,只需要加一句话就可以:
<td hidden>{{product.id}}</td>复制
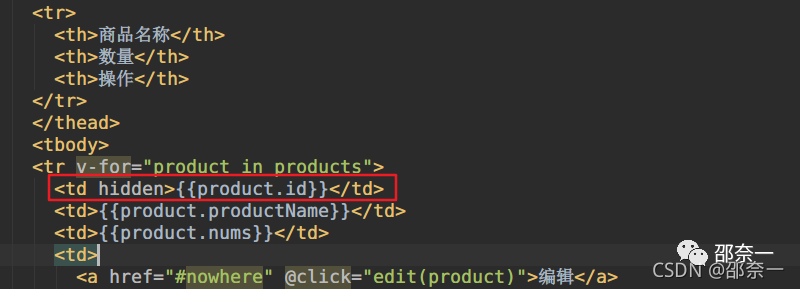 但是你不获取,其实也可以,目前我们没有涉及到,所以不操作上面的步骤。
我们可以先把这段代码删掉,因为没有意义了:
var maxId = 5;
for (var i = 0; i < data.products.length; i++) {
if (data.products[i].id > maxId)
maxId = this.products[i].id;1
}复制
然后将删除方法的代码修改为:
deleteProduct: function (id) {
let _this = this;
axios.post("http://localhost:8080/product/delete",
{
id: id
}
).then(
(response) => {
if (response.data) {
console.log("删除商品成功!");
_this.list();
}
}
)
},复制
说明:这里传参数,需要传 JSON
格式,否则无法跟后台接口对应上!(教程后面有完整代码)
4、对接增加商品接口
增加接口与删除接口类似,把数据 post
给后端就可以了。修改 product4Add
,删除初始值:
var data = {
products: [],
product4Add: {},
product4Update: {id: 0, productName: '', nums: '0'}
};复制
注意:1、这里是大括号 {}
,不是中括号 []
,不然不行!2、 []
表示一个数组, {}
表示一个对象。
修改 add
方法:
add: function (product) {
let _this = this;
axios.post("http://localhost:8080/product/add", product).then(
(response) => {
if (response.data) {
console.log("添加商品成功!");
_this.product4Add = {};
_this.list();
}
}
)
},复制
跟删除的方法非常相似,只不过这里是直接就传了一个 product
对象而已,与 JSON
格式是匹配的。注意,此时,在点击 增加
按钮的时候,需要传一个 product
参数进来,所以需要加上:
<button type="button" v-on:click="add(product4Add)">增加</button>复制
5、对接修改商品接口
修改接口与增加接口类似,修改 product4Update
,删除初始值:
var data = {
products: [],
product4Add: {},
product4Update: {}
};复制
修改 edit
和 update
方法
edit: function (product) {
$("#productListTable").hide();
$("#div4Update").show();
let _this = this;
_this.product4Update = product;
},
update: function (product) {
let _this = this;
axios.post("http://localhost:8080/product/update", product).then(
(response) => {
if (response.data) {
console.log("修改商品成功!");
_this.product4Add = {};
$("#productListTable").show();
$("#div4Update").hide();
}
}
)
},复制
需要传一个 product
参数进来,所以需要加上:
<button type="button" v-on:click="update(product4Update)">修改</button>复制
说明:虽然更新页面里没有要求输入 id
,但是当你点击 编辑
按钮之后,其实是有带了 id
进去的。
那么到这里,然后修改功能就实现了!
老规矩,下面给出完整的代码!
6、index.html 完整代码
<html>
<head>
<meta charset="utf-8"/>
<script src="https://cdn.bootcss.com/jquery/3.1.1/jquery.min.js"></script>
<script src="https://cdn.bootcss.com/vue/2.5.22/vue.min.js"></script>
<script src="https://cdn.bootcdn.net/ajax/libs/axios/0.21.1/axios.js"></script>
<style type="text/css">
td {
border: 1px solid #000;
}
</style>
</head>
<body>
<div id="app">
<table id="productListTable">
<thead>
<tr>
<th>商品名称</th>
<th>数量</th>
<th>操作</th>
</tr>
</thead>
<tbody>
<tr v-for="product in products">
<td>{{product.productName}}</td>
<td>{{product.nums}}</td>
<td>
<a href="#nowhere" @click="edit(product)">编辑</a>
<a href="#nowhere" @click="deleteProduct(product.id)">删除</a>
</td>
</tr>
<tr>
<td colspan="3">
商品名称:
<input type="text" v-model="product4Add.productName"/>
<br>
数量:
<input type="number" v-model="product4Add.nums"/>
<br>
<button type="button" v-on:click="add(product4Add)">增加</button>
</td>
</tr>
</tbody>
</table>
<div id="div4Update">
商品名称:
<input type="text" v-model="product4Update.productName"/>
<br>
数量:
<input type="number" v-model="product4Update.nums"/>
<input type="hidden" v-model="product4Update.id"/>
<br>
<button type="button" v-on:click="update(product4Update)">修改</button>
<button type="button" v-on:click="cancel">取消</button>
</div>
</div>
<script type="text/javascript">
$("#div4Update").hide();
//Model
var data = {
products: [],
product4Add: {},
product4Update: {}
};
//ViewModel
var vue = new Vue({
el: '#app',
data: data,
mounted: function () {
let _this = this;
_this.list();
},
methods: {
list() {
let _this = this;
axios.get("http://localhost:8080/product/list").then(
(response) => {
console.log("查询用户列表结果:", response);
_this.products = response.data;
}
)
},
add: function (product) {
let _this = this;
axios.post("http://localhost:8080/product/add", product).then(
(response) => {
if (response.data) {
console.log("添加商品成功!");
_this.product4Add = {};
_this.list();
}
}
)
},
deleteProduct: function (id) {
let _this = this;
console.log("id" + id);
axios.post("http://localhost:8080/product/delete",
{
id: id
}
).then(
(response) => {
if (response.data) {
console.log("删除商品成功!");
_this.list();
}
}
)
},
edit: function (product) {
$("#productListTable").hide();
$("#div4Update").show();
let _this = this;
_this.product4Update = product;
},
update: function (product) {
let _this = this;
axios.post("http://localhost:8080/product/update", product).then(
(response) => {
if (response.data) {
console.log("修改商品成功!");
_this.product4Add = {};
$("#productListTable").show();
$("#div4Update").hide();
}
}
)
},
cancel: function () {
//恢复显示
$("#productListTable").show();
$("#div4Update").hide();
}
}
});
</script>
</body>
</html>复制
当然,代码还是有可以优化的地方的,但毕竟不想改那么多,如果你觉得不服,你可以从屏幕里出来打我! 这篇文章断断续续写了快一个月才完成,好累啊!将近3w字!!!多多转发,一起学习!!感谢支持!!!
0xFF 总结
这篇文章使用SSM技术实现了后端,并且通过IDEA实现了测试,完全不依赖前端操作。然后随便建了文件夹就可以把前端给实现了,让有点前端基础的人也能轻松实现我们这一次的操作。完全打工前后端分离开发的流程!
请关注本博客,本博客很多文章都是在原博客上迭代写的,提供多种解决方案,有利于小伙伴们不迷路,感谢支持!
小伙伴们肯定觉得这个样式太难看了吧!本博客里有一篇配套的调整样式的文章,请参考:Bootstrap全局css样式的使用,效果是这样子滴,希望大家学得开心:
邵奈一 原创不易,如转载请标明出处,教育是一生的事业。
