服务配置现状
配置文件是我们再熟悉不过的,在微服务系统中,每个微服务不仅仅只有代码,还需要「连接其他资源」,例如数据库的配置或功能性的开关 MySQL、Redis 、Security 等相关的配置。除了项目运行的基础配置之外,还有一些配置是与我们业务有关系的,比如说七牛存储、短信和邮件相关,或者一些业务上的开关。
但是随着微服务系统的不断迭代,整个微服务系统可能会成为一个「网状结构」,这个时候就要考虑整个微服务系统的「扩展性、伸缩性、耦合性」等等。其中一个很重要的环节就是「配置管理」的问题。
常规配置管理解决方案缺点
硬编码(需要修改代码、繁琐、风险大) properties 或者 yml(集群环境下需要替换和重启) xml(重新打包和重启)
为什么使用 Spring Cloud Config

由于常规配置管理有很大的缺点,所以采用 Spring Cloud Config 「集中式」的配置中心来管理「每个服务」的配置信息。
Spring Cloud Config 在微服务分布式系统中,采用 「Server 服务端」和 「Client 客户端」的方式来提供可扩展的配置服务。服务端提供配置文件的存储,以接口的形式将配置文件的内容提供出去;客户端通过接口获取数据、并依据此数据初始化自己的应用。
配置中心负责「管理所有服务」的各种环境配置文件。
配置中心默认采用 Git
的方式存储配置文件,因此我们可以很容易的部署和修改,有助于环境配置进行版本管理。
Spring Cloud Config 解决了什么问题
Spring Cloud Config 解决了微服务配置的「中心化、版本控制、平台独立、语言独立」等问题。其特性如下:
提供服务端和客户端支持(Spring Cloud Config Server 和 Spring Cloud Config Client) 集中式管理分布式环境下的应用部署 属性值的加密和解密(对称加密和非对称加密) 基于 Spring 环境,无缝与 Spring 应用集成 可用于任何语言开发的程序 默认实现基于 Git ,可以进行版本管理
接下来,我们主要从以下几块来讲一下 Config 的使用。
基础版的配置中心(不集成 Eureka) 集成 Eureka 版的高可用配置中心 基于 Actuator 实现配置的自动刷新 配置中心属性值的加密和解密(对称加密和非对称加密) 基于 Spring Cloud Bus 实现配置的自动刷新 配置中心用户安全认证
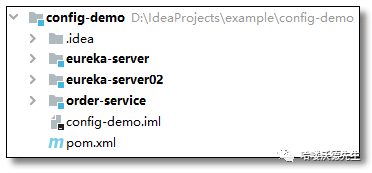
环境准备
项目
config-demo
聚合工程。SpringBoot 2.2.4.RELEASE
、Spring Cloud Hoxton.SR1
。
eureka-server
:注册中心(用于集成 Eureka 版的配置中心)eureka-server02
:注册中心(用于集成 Eureka 版的配置中心)order-service
:订单服务(用于集成 Eureka 版的配置中心)
仓库
config-repo
仓库。
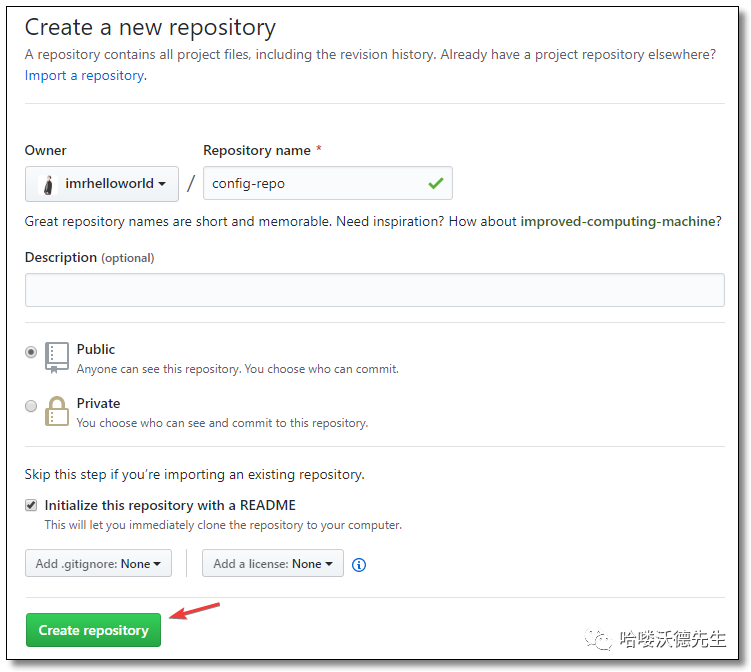
Repository name
:仓库名称Description(可选)
:仓库描述介绍Public,Private
:仓库权限(公开共享,私有或指定合作者)Initialize this repository with a README
:添加一个 README.mdAdd .gitignore
:不需要进行版本管理的文件类型,生成对应文件.gitignoreAdd a license
:证书类型,生成对应文件LICENSE
配置文件
不同环境的配置文件,上传至 config-repo
仓库。

❝配置文件的名称不是乱起的,例如
❞config-client-dev.yml
和config-client-prod.yml
这两个文件是同一个项目的不同环境,项目名称为config-client
, 一个对应开发环境,一个对应正式环境。test
表示测试环境。
config-client.yml
server:
port: 7777 # 端口
spring:
application:
name: config-client # 应用名称
# 自定义配置
name: config-client-default复制
config-client-dev.yml
server:
port: 7778 # 端口
spring:
application:
name: config-client # 应用名称
# 自定义配置
name: config-client-dev复制
config-client-test.yml
server:
port: 7779 # 端口
spring:
application:
name: config-client # 应用名称
# 自定义配置
name: config-client-test复制
config-client-prod.yml
server:
port: 7780 # 端口
spring:
application:
name: config-client # 应用名称
# 自定义配置
name: config-client-prod复制
入门案例
入门案例讲解:基础版的配置中心(不集成 Eureka)
官方文档:https://cloud.spring.io/spring-cloud-static/spring-cloud-config/2.2.2.RELEASE/reference/html/
创建服务端
在 config-demo
父工程下创建子项目 config-server
。
添加依赖
添加 spring-cloud-config-server
依赖,完整 pom.xml
文件如下:
<?xml version="1.0" encoding="UTF-8"?>
<project xmlns="http://maven.apache.org/POM/4.0.0" xmlns:xsi="http://www.w3.org/2001/XMLSchema-instance"
xsi:schemaLocation="http://maven.apache.org/POM/4.0.0 http://maven.apache.org/xsd/maven-4.0.0.xsd">
<modelVersion>4.0.0</modelVersion>
<groupId>com.example</groupId>
<artifactId>config-server</artifactId>
<version>1.0-SNAPSHOT</version>
<!-- 继承父依赖 -->
<parent>
<groupId>com.example</groupId>
<artifactId>config-demo</artifactId>
<version>1.0-SNAPSHOT</version>
</parent>
<!-- 项目依赖 -->
<dependencies>
<!-- spring cloud config server 依赖 -->
<dependency>
<groupId>org.springframework.cloud</groupId>
<artifactId>spring-cloud-config-server</artifactId>
</dependency>
<!-- spring boot test 依赖 -->
<dependency>
<groupId>org.springframework.boot</groupId>
<artifactId>spring-boot-starter-test</artifactId>
<scope>test</scope>
<exclusions>
<exclusion>
<groupId>org.junit.vintage</groupId>
<artifactId>junit-vintage-engine</artifactId>
</exclusion>
</exclusions>
</dependency>
</dependencies>
</project>复制
配置文件
server:
port: 8888 # 端口
spring:
application:
name: config-server # 应用名称
cloud:
config:
server:
git:
uri: https://github.com/imrhelloworld/config-repo # 配置文件所在仓库地址
#username: # Github 等产品的登录账号
#password: # Github 等产品的登录密码
#default-label: master # 配置文件分支
#search-paths: # 配置文件所在根目录复制
启动类
启动类添加 @EnableConfigServer
注解。
package com.example;
import org.springframework.boot.SpringApplication;
import org.springframework.boot.autoconfigure.SpringBootApplication;
import org.springframework.cloud.config.server.EnableConfigServer;
// 配置中心服务端注解
@EnableConfigServer
@SpringBootApplication
public class ConfigServerApplication {
public static void main(String[] args) {
SpringApplication.run(ConfigServerApplication.class, args);
}
}复制
访问规则
Spring Cloud Config 有一套访问规则,我们通过这套规则在浏览器上直接访问即可。
/{application}/{profile}[/{label}]
/{application}-{profile}.yml
/{label}/{application}-{profile}.yml
/{application}-{profile}.properties
/{label}/{application}-{profile}.properties复制
{application}
:应用名称(目标服务名称){profile}
:获取指定环境配置,项目有开发环境、测试环境、生产环境,对应到配置文件就是以 application-{profile}.yml 加以区分,例如 application-dev.yml、application-test.yml、application-prod.yml。默认值为 default。{label}
:表示 git 分支,默认是 master 分支,如果项目是以分支做区分也是可以的,那就可以通过不同的 label 来控制访问不同的配置文件。
「测试」
http://localhost:8888/config-client/default
http://localhost:8888/config-client/dev/master
http://localhost:8888/config-client-test.yml
http://localhost:8888/master/config-client-prod.yml
访问以上地址,如果可以正常返回数据,说明配置中心服务端一切正常。
创建客户端
在 config-demo
父工程下创建子项目 config-client
。
添加依赖
添加 spring-cloud-starter-config
依赖,完整 pom.xml
文件如下:
<?xml version="1.0" encoding="UTF-8"?>
<project xmlns="http://maven.apache.org/POM/4.0.0" xmlns:xsi="http://www.w3.org/2001/XMLSchema-instance"
xsi:schemaLocation="http://maven.apache.org/POM/4.0.0 http://maven.apache.org/xsd/maven-4.0.0.xsd">
<modelVersion>4.0.0</modelVersion>
<groupId>com.example</groupId>
<artifactId>config-client</artifactId>
<version>1.0-SNAPSHOT</version>
<!-- 继承父依赖 -->
<parent>
<groupId>com.example</groupId>
<artifactId>config-demo</artifactId>
<version>1.0-SNAPSHOT</version>
</parent>
<!-- 项目依赖 -->
<dependencies>
<!-- spring cloud starter config 依赖 -->
<dependency>
<groupId>org.springframework.cloud</groupId>
<artifactId>spring-cloud-starter-config</artifactId>
</dependency>
<!-- spring boot web 依赖 -->
<dependency>
<groupId>org.springframework.boot</groupId>
<artifactId>spring-boot-starter-web</artifactId>
</dependency>
<!-- spring boot test 依赖 -->
<dependency>
<groupId>org.springframework.boot</groupId>
<artifactId>spring-boot-starter-test</artifactId>
<scope>test</scope>
<exclusions>
<exclusion>
<groupId>org.junit.vintage</groupId>
<artifactId>junit-vintage-engine</artifactId>
</exclusion>
</exclusions>
</dependency>
</dependencies>
</project>复制
配置文件
客户端配置文件名称必须叫 bootstrap.yml
spring:
cloud:
config:
name: config-client # 配置文件名称,对应 git 仓库中配置文件前半部分
uri: http://localhost:8888 # config-server 服务端地址
label: master # git 分支
profile: default # 指定环境复制
控制层
添加一个 RestController 用于测试获取配置文件信息。
package com.example.controller;
import org.springframework.beans.factory.annotation.Value;
import org.springframework.web.bind.annotation.GetMapping;
import org.springframework.web.bind.annotation.RestController;
@RestController
public class ConfigController {
@Value("${name}")
private String name;
@GetMapping("/name")
public String getName() {
return name;
}
}复制
启动类
package com.example;
import org.springframework.boot.SpringApplication;
import org.springframework.boot.autoconfigure.SpringBootApplication;
@SpringBootApplication
public class ConfigClientApplication {
public static void main(String[] args) {
SpringApplication.run(ConfigClientApplication.class, args);
}
}复制
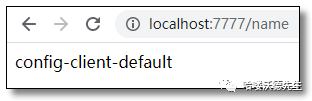
测试
访问:http://localhost:7777/name 结果如下:
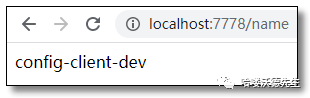
修改配置文件为 dev
环境:
spring:
cloud:
config:
name: config-client # 应用名称,对应 git 仓库中配置文件前半部分
uri: http://localhost:8888 # config-server 服务端地址
label: master # git 分支
profile: dev # 指定环境复制
访问:http://localhost:7778/name 结果如下:
Spring Cloud Config 高可用
以上讲了 Spring Cloud Config 最基础的用法,如果我们的项目中使用了 Eureka 作为服务注册发现中心,那么 Spring Cloud Config 也应该注册到 Eureka,方便其他服务使用,并且可以注册多个配置中心服务端,实现高可用。
接下来就集成 Spring Cloud Config 到 Eureka。关于 Eureka 的相关知识大家可翻阅我的历史文章进行学习。
添加配置文件
在 Github 仓库中增加配置文件。
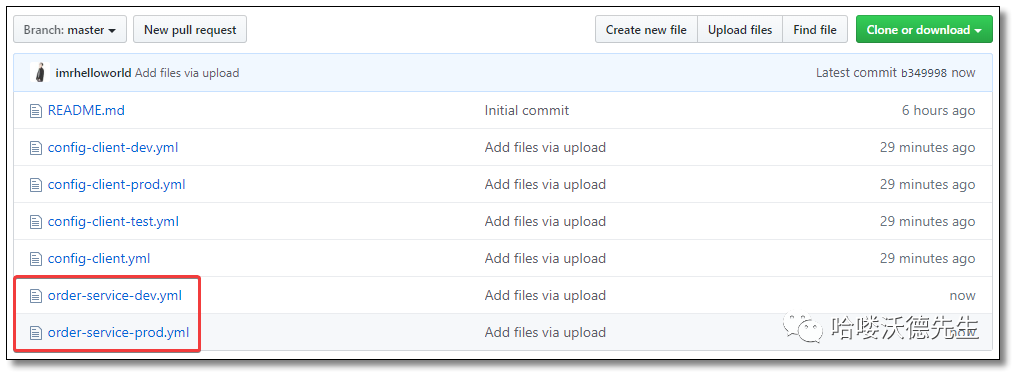
order-service-dev.yml
server:
port: 9090 # 端口
spring:
application:
name: order-service # 应用名称
# 配置 Eureka Server 注册中心
eureka:
instance:
prefer-ip-address: true # 是否使用 ip 地址注册
instance-id: ${spring.cloud.client.ip-address}:${server.port} # ip:port
client:
service-url: # 设置服务注册中心地址
defaultZone: http://localhost:8761/eureka/,http://localhost:8762/eureka/
# 自定义配置
name: order-service-dev复制
order-service-prod.yml
server:
port: 9091 # 端口
spring:
application:
name: order-service # 应用名称
# 配置 Eureka Server 注册中心
eureka:
instance:
prefer-ip-address: true # 是否使用 ip 地址注册
instance-id: ${spring.cloud.client.ip-address}:${server.port} # ip:port
client:
service-url: # 设置服务注册中心地址
defaultZone: http://localhost:8761/eureka/,http://localhost:8762/eureka/
# 自定义配置
name: order-service-prod复制
整合注册中心
案例已经给大家准备好了,无需创建注册中心直接使用即可,为了清楚,把依赖和配置信息给大家贴出来。
依赖
eureka-server
和 eureka-server02
核心依赖部分一致。
<?xml version="1.0" encoding="UTF-8"?>
<project xmlns="http://maven.apache.org/POM/4.0.0" xmlns:xsi="http://www.w3.org/2001/XMLSchema-instance"
xsi:schemaLocation="http://maven.apache.org/POM/4.0.0 http://maven.apache.org/xsd/maven-4.0.0.xsd">
<modelVersion>4.0.0</modelVersion>
<groupId>com.example</groupId>
<artifactId>eureka-server</artifactId>
<version>1.0-SNAPSHOT</version>
<!-- 继承父依赖 -->
<parent>
<groupId>com.example</groupId>
<artifactId>config-demo</artifactId>
<version>1.0-SNAPSHOT</version>
</parent>
<!-- 项目依赖 -->
<dependencies>
<!-- netflix eureka server 依赖 -->
<dependency>
<groupId>org.springframework.cloud</groupId>
<artifactId>spring-cloud-starter-netflix-eureka-server</artifactId>
</dependency>
<!-- spring boot web 依赖 -->
<dependency>
<groupId>org.springframework.boot</groupId>
<artifactId>spring-boot-starter-web</artifactId>
</dependency>
<!-- spring boot test 依赖 -->
<dependency>
<groupId>org.springframework.boot</groupId>
<artifactId>spring-boot-starter-test</artifactId>
<scope>test</scope>
<exclusions>
<exclusion>
<groupId>org.junit.vintage</groupId>
<artifactId>junit-vintage-engine</artifactId>
</exclusion>
</exclusions>
</dependency>
</dependencies>
</project>复制
配置文件
eureka-server
的 application.yml
server:
port: 8761 # 端口
spring:
application:
name: eureka-server # 应用名称(集群下相同)
# 配置 Eureka Server 注册中心
eureka:
instance:
hostname: eureka01 # 主机名,不配置的时候将根据操作系统的主机名来获取
prefer-ip-address: true # 是否使用 ip 地址注册
instance-id: ${spring.cloud.client.ip-address}:${server.port} # ip:port
client:
# 设置服务注册中心地址,指向另一个注册中心
service-url: # 注册中心对外暴露的注册地址
defaultZone: http://localhost:8762/eureka/复制
eureka-server02
的 application.yml
server:
port: 8762 # 端口
spring:
application:
name: eureka-server # 应用名称(集群下相同)
# 配置 Eureka Server 注册中心
eureka:
instance:
hostname: eureka02 # 主机名,不配置的时候将根据操作系统的主机名来获取
prefer-ip-address: true # 是否使用 ip 地址注册
instance-id: ${spring.cloud.client.ip-address}:${server.port} # ip:port
client:
# 设置服务注册中心地址,指向另一个注册中心
service-url: # 注册中心对外暴露的注册地址
defaultZone: http://localhost:8761/eureka/复制
启动类
eureka-server
和 eureka-server02
启动类核心代码一致。
package com.example;
import org.springframework.boot.SpringApplication;
import org.springframework.boot.autoconfigure.SpringBootApplication;
import org.springframework.cloud.netflix.eureka.server.EnableEurekaServer;
@SpringBootApplication
// 开启 EurekaServer 注解
@EnableEurekaServer
public class EurekaServerApplication {
public static void main(String[] args) {
SpringApplication.run(EurekaServerApplication.class, args);
}
}复制
Spring Cloud Config 服务端
服务端和基础版的配置中心相比多了 Eureka 的配置,其他地方都是一样的。
config-server
服务端构建完成以后再复刻一个 config-server02
实现高可用。
依赖
config-server
和 config-server02
核心依赖部分一致。注意是 spring-cloud-config-server
依赖。
<?xml version="1.0" encoding="UTF-8"?>
<project xmlns="http://maven.apache.org/POM/4.0.0" xmlns:xsi="http://www.w3.org/2001/XMLSchema-instance"
xsi:schemaLocation="http://maven.apache.org/POM/4.0.0 http://maven.apache.org/xsd/maven-4.0.0.xsd">
<modelVersion>4.0.0</modelVersion>
<groupId>com.example</groupId>
<artifactId>config-server</artifactId>
<version>1.0-SNAPSHOT</version>
<!-- 继承父依赖 -->
<parent>
<groupId>com.example</groupId>
<artifactId>config-demo</artifactId>
<version>1.0-SNAPSHOT</version>
</parent>
<!-- 项目依赖 -->
<dependencies>
<!-- spring cloud config server 依赖 -->
<dependency>
<groupId>org.springframework.cloud</groupId>
<artifactId>spring-cloud-config-server</artifactId>
</dependency>
<!-- netflix eureka client 依赖 -->
<dependency>
<groupId>org.springframework.cloud</groupId>
<artifactId>spring-cloud-starter-netflix-eureka-client</artifactId>
</dependency>
<!-- spring boot test 依赖 -->
<dependency>
<groupId>org.springframework.boot</groupId>
<artifactId>spring-boot-starter-test</artifactId>
<scope>test</scope>
<exclusions>
<exclusion>
<groupId>org.junit.vintage</groupId>
<artifactId>junit-vintage-engine</artifactId>
</exclusion>
</exclusions>
</dependency>
</dependencies>
</project>复制
配置文件
config-server
的 application.yml
server:
port: 8888 # 端口
spring:
application:
name: config-server # 应用名称
cloud:
config:
server:
git:
uri: https://github.com/imrhelloworld/config-repo # 配置文件所在仓库地址
#username: # Github 等产品的登录账号
#password: # Github 等产品的登录密码
#default-label: master # 配置文件分支
#search-paths: # 配置文件所在根目录
# 配置 Eureka Server 注册中心
eureka:
instance:
prefer-ip-address: true # 是否使用 ip 地址注册
instance-id: ${spring.cloud.client.ip-address}:${server.port} # ip:port
client:
service-url: # 设置服务注册中心地址
defaultZone: http://localhost:8761/eureka/,http://localhost:8762/eureka/复制
config-server02
的 application.yml
server:
port: 8889 # 端口
spring:
application:
name: config-server # 应用名称
cloud:
config:
server:
git:
uri: https://github.com/imrhelloworld/config-repo # 配置文件所在仓库地址
#username: # Github 等产品的登录账号
#password: # Github 等产品的登录密码
#default-label: master # 配置文件分支
#search-paths: # 配置文件所在根目录
# 配置 Eureka Server 注册中心
eureka:
instance:
prefer-ip-address: true # 是否使用 ip 地址注册
instance-id: ${spring.cloud.client.ip-address}:${server.port} # ip:port
client:
service-url: # 设置服务注册中心地址
defaultZone: http://localhost:8761/eureka/,http://localhost:8762/eureka/复制
启动类
config-server
和 config-server02
启动类核心代码一致。
package com.example;
import org.springframework.boot.SpringApplication;
import org.springframework.boot.autoconfigure.SpringBootApplication;
import org.springframework.cloud.config.server.EnableConfigServer;
// 开启 EurekaClient 注解,当前版本如果配置了 Eureka 注册中心,默认会开启该注解
//@EnableEurekaClient
// 配置中心服务端注解
@EnableConfigServer
@SpringBootApplication
public class ConfigServerApplication {
public static void main(String[] args) {
SpringApplication.run(ConfigServerApplication.class, args);
}
}复制
Spring Cloud Config 客户端
客户端加入 Eureka 以后,就不用直接和配置中心服务端打交道了,而是通过 Eureka 来访问。
依赖
order-service
的 pom.xml。注意是 spring-cloud-starter-config
依赖。
<?xml version="1.0" encoding="UTF-8"?>
<project xmlns="http://maven.apache.org/POM/4.0.0" xmlns:xsi="http://www.w3.org/2001/XMLSchema-instance"
xsi:schemaLocation="http://maven.apache.org/POM/4.0.0 http://maven.apache.org/xsd/maven-4.0.0.xsd">
<modelVersion>4.0.0</modelVersion>
<groupId>com.example</groupId>
<artifactId>order-service</artifactId>
<version>1.0-SNAPSHOT</version>
<!-- 继承父依赖 -->
<parent>
<groupId>com.example</groupId>
<artifactId>config-demo</artifactId>
<version>1.0-SNAPSHOT</version>
</parent>
<!-- 项目依赖 -->
<dependencies>
<!-- spring boot web 依赖 -->
<dependency>
<groupId>org.springframework.boot</groupId>
<artifactId>spring-boot-starter-web</artifactId>
</dependency>
<!-- netflix eureka client 依赖 -->
<dependency>
<groupId>org.springframework.cloud</groupId>
<artifactId>spring-cloud-starter-netflix-eureka-client</artifactId>
</dependency>
<!-- spring cloud starter config 依赖 -->
<dependency>
<groupId>org.springframework.cloud</groupId>
<artifactId>spring-cloud-starter-config</artifactId>
</dependency>
<!-- spring boot test 依赖 -->
<dependency>
<groupId>org.springframework.boot</groupId>
<artifactId>spring-boot-starter-test</artifactId>
<scope>test</scope>
<exclusions>
<exclusion>
<groupId>org.junit.vintage</groupId>
<artifactId>junit-vintage-engine</artifactId>
</exclusion>
</exclusions>
</dependency>
</dependencies>
</project>复制
配置文件
order-service
的 bootstrap.yml
spring:
cloud:
config:
name: order-service # 配置文件名称,对应 git 仓库中配置文件前半部分
label: master # git 分支
profile: dev # 指定环境
discovery:
enabled: true # 开启
service-id: config-server # 指定配置中心服务端的 service-id复制
控制层
添加一个 RestController 用于测试获取配置文件信息。
package com.example.controller;
import org.springframework.beans.factory.annotation.Value;
import org.springframework.web.bind.annotation.GetMapping;
import org.springframework.web.bind.annotation.RestController;
@RestController
public class ConfigController {
@Value("${name}")
private String name;
@GetMapping("/name")
public String getName() {
return name;
}
}复制
启动类
package com.example;
import org.springframework.boot.SpringApplication;
import org.springframework.boot.autoconfigure.SpringBootApplication;
// 开启 EurekaClient 注解,当前版本如果配置了 Eureka 注册中心,默认会开启该注解
//@EnableEurekaClient
@SpringBootApplication
public class OrderServiceApplication {
public static void main(String[] args) {
SpringApplication.run(OrderServiceApplication.class, args);
}
}复制
测试
启动注册中心 eureka-server
和 eureka-server02
。
启动配置中心服务端 config-server
。
启动配置中心客户端 order-service
。
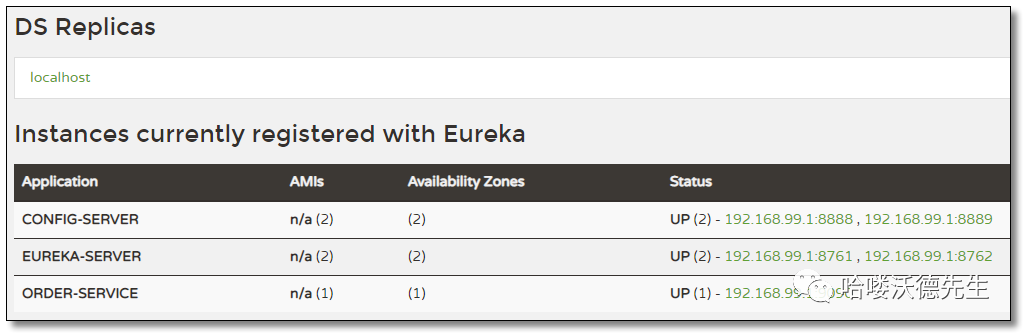
当前环境在 Eureka UI
界面中如下:
访问:http://localhost:9090/name 结果如下:

配置中心工作原理

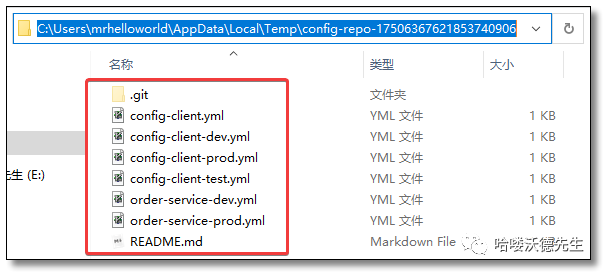
开发人员将配置文件存储至 Git 远程仓库,或后期对 Git 远程仓库的文件进行修改。如果远程仓库发生了版本改变,Config Server 会将 Git 远程仓库中的文件同步至本地仓库中。大家仔细观察 Config Server 的控制台可以看到类似如下信息。
[nio-8888-exec-1] o.s.c.c.s.e.NativeEnvironmentRepository : Adding property source: file:/C:/Users/MRHELL~1/AppData/Local/Temp/config-repo-17506367621853740906/order-service-dev.yml复制
根据控制台信息打开对应的本地目录,会发现 Git 远程仓库中的文件已同步至本地仓库中。
为什么要这么做呢?因为我们要考虑网络波动的情况下,无法访问远程仓库的问题。
❝下一篇我们讲解 Config 如何实现配置中心自动刷新,记得关注噢~
❞

微信扫描二维码(长按识别) 关注我的公众号