


配置基于RDMA的NFS服务
- 基本设置
两台配有通过 Mellanox IB 交换机连接的带有 IB 网卡的服务器。
主机名 ip 操作系统 角色
ceph02 10.10.20.152 centos7.9 NFS server
ceph01 10.10.20.151 ubuntu20.04.5 NFS client
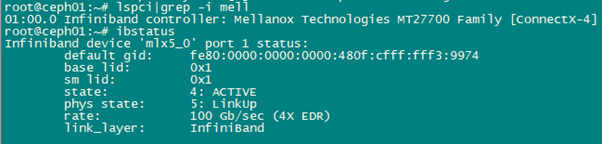
IB网卡为:Mellanox Technologies MT27700 Family [ConnectX-4]
- 先决条件
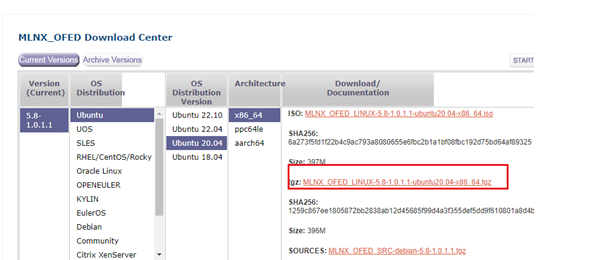
MLNX_OFED 的驱动必须按照以下命令进行安装。
驱动下载地址:https://network.nvidia.com/products/infiniband-drivers/linux/mlnx_ofed/
选择对应服务器端和客户端操作系统的驱动版本:
./mlnxofedinstall --add-kernel-support --with-nfsrdma --with-nvmf --all复制
服务器端和客户端的IP配置:
1)服务器端:centos7.9
可按nmtui起界面方式也可按修改文件方式配置IP
[root@ceph02 network-scripts]# pwd
/etc/sysconfig/network-scripts
[root@ceph02 network-scripts]# cat ifcfg-ib0
CONNECTED_MODE=no
TYPE=InfiniBand
PROXY_METHOD=none
BROWSER_ONLY=no
BOOTPROTO=static
DEFROUTE=yes
IPV4_FAILURE_FATAL=no
IPV6INIT=yes
IPV6_AUTOCONF=yes
IPV6_DEFROUTE=yes
IPV6_FAILURE_FATAL=no
IPV6_ADDR_GEN_MODE=stable-privacy
NAME=ib0
UUID=3ad8670b-17a0-4b01-9bc3-fbc845a310a2
DEVICE=ib0
ONBOOT=yes
IPADDR=10.10.20.152
NETMASK=255.255.255.0
[root@ceph02 network-scripts]# systemctl enable opensmd
opensmd.service is not a native service, redirecting to /sbin/chkconfig.
Executing /sbin/chkconfig opensmd on
[root@ceph02 network-scripts]# systemctl enable openibd
2)客户端:ubuntu20.04.5
root@ceph01:~# ip a|grep ib
4: ibs5: <BROADCAST,MULTICAST,UP,LOWER_UP> mtu 2044 qdisc mq state UP group default qlen 256
link/infiniband 00:00:0b:d8:fe:80:00:00:00:00:00:00:48:0f:cf:ff:ff:f3:99:74 brd 00:ff:ff:ff:ff:12:40:1b:ff:ff:00:00:00:00:00:00:ff:ff:ff:ff
inet 10.10.20.151/24 brd 10.10.20.255 scope global ibs5
root@ceph01:~# cat /etc/netplan/00-installer-config.yaml
network:
ethernets:
enp3s0f0:
addresses:
- 192.168.207.151/24
gateway4: 192.168.207.1
nameservers:
addresses:
- 114.114.114.114
search: []
ibs5:
addresses:
- 10.10.20.151/24
enp3s0f1:
dhcp4: true
version: 2
root@ceph01:~#
ln -s /etc/init.d/opensmd /etc/rc2.d/S01opensmd
ln -s /etc/init.d/opensmd /etc/rc3.d/S01opensmd
ln -s /etc/init.d/opensmd /etc/rc4.d/S01opensmd
ln -s /etc/init.d/opensmd /etc/rc5.d/S01opensmd
root@ceph01:~# systemctl enable openibd
Synchronizing state of openibd.service with SysV service script with /lib/systemd/systemd-sysv-install.
Executing: /lib/systemd/systemd-sysv-install enable openibd
- NFS 服务端
安装 nfs 软件
yum intall nfs-utils
配置 NFS 服务,比如将 /data 目录共享出去
mkdir /data cat >/etc/exports<<EOF /data *(rw,async,insecure,no_root_squash) EOF exportfs -av复制
加载 rdma 内核模块
modprobe xprtrdma
modprobe svcrdma
指定服务端监听 RDMA 传输端口
echo 'rdma 20049' | tee /proc/fs/nfsd/portlist cat /proc/fs/nfsd/portlist复制
启动服务
systemctl start nfs-server
systemctl enable nfs-server
- NFS 客户端
安装 nfs 软件
yum install nfs-utils
加载 rdma 内核模块
modprobe xprtrdma
rdma方式挂载共享目录
mount -o rdma,port=20049 10.10.20.152:/data /mnt复制
- 服务文件修改
由于系统重启或者 NFS 服务重启后,就会丢失加载的模块和 /proc/fs/nfsd/portlist 文件中的 rdma 端口设置,因此需要将这些内容加入到 nfs 服务的启动文件中,保证 nfs 服务启动后就可以正确的加载模块和添加端口配置。修改 /lib/systemd/system/nfs-server.service 文件,以下内容下划线部分为新添加命令:
[Unit]
Description=NFS server and services
DefaultDependencies=no
Requires= network.target proc-fs-nfsd.mount
Requires= nfs-mountd.service
Wants=rpcbind.socket network-online.target
Wants=rpc-statd.service nfs-idmapd.service
Wants=rpc-statd-notify.service
After= network-online.target local-fs.target
After= proc-fs-nfsd.mount rpcbind.socket nfs-mountd.service
After= nfs-idmapd.service rpc-statd.service
Before= rpc-statd-notify.service
#GSS services dependencies and ordering
Wants=auth-rpcgss-module.service
After=rpc-gssd.service gssproxy.service
Wants=nfs-config.service
After=nfs-config.service
[Service]
EnvironmentFile=-/run/sysconfig/nfs-utils
Type=oneshot
RemainAfterExit=yes
ExecStartPre=/sbin/modprobe xprtrdma
ExecStartPre=/sbin/modprobe svcrdma
ExecStartPre=-/usr/sbin/exportfs -r
ExecStart=/usr/sbin/rpc.nfsd $RPCNFSDARGS
ExecStartPost=-/bin/sh -c ‘if systemctl -q is-active gssproxy; then systemctl reload gssproxy ; fi’
ExecStartPost=/bin/bash -c “sleep 3 && echo ‘rdma 20049’ | tee /proc/fs/nfsd/portlist”
ExecStop=/usr/sbin/rpc.nfsd 0
ExecStopPost=/usr/sbin/exportfs -au
ExecStopPost=/usr/sbin/exportfs -f
ExecReload=-/usr/sbin/exportfs -r
[Install]
WantedBy=multi-user.target
6. 测试性能
客户端以普通方式挂载
#挂载
mount 10.10.20.152:/data /mnt
#测试
fio --rw=randread --bs=64k --numjobs=4 --iodepth=8 --runtime=30 --time_based --loops=1 --ioengine=libaio --direct=1 --invalidate=1–fsync_on_close=1 --randrepeat=1 --norandommap --exitall --name task1 --filename=/mnt/11.txt --size=10000000
#测试结果
Run status group 0 (all jobs):
READ: bw=1603MiB/s (1680MB/s), 401MiB/s-401MiB/s (420MB/s-420MB/s), io=46.0GiB (50.4GB), run=30002-30002msec
客户端以rdma方式挂载
#挂载
mount -o rdma,port=20049 10.10.20.152:/data /mnt
#测试
fio --rw=randread --bs=64k --numjobs=4 --iodepth=8 --runtime=30 --time_based --loops=1 --ioengine=libaio --direct=1 --invalidate=1–fsync_on_close=1 --randrepeat=1 --norandommap --exitall --name task1 --filename=/mnt/11.txt --size=10000000
#测试结果
Run status group 0 (all jobs):
READ: bw=1856MiB/s (1946MB/s), 464MiB/s-464MiB/s (487MB/s-487MB/s), io=54.4GiB (58.4GB), run=30002-30002msec
对比前后两种挂载方式的测试速率,可以看出rdma方式提升了约200M/s。
