作者:莫善
某互联网公司高级 DBA。
本文来源:原创投稿
*爱可生开源社区出品,原创内容未经授权不得随意使用,转载请联系小编并注明来源。
一、背景介绍
二、环境准备
1、MySQL集群
| 角色 | ip | 端口 | 版本 |
|---|---|---|---|
| master | 192.168.168.11 | 6666 | 5.7.26 |
| slave | 192.168.168.12 | 6666 | 5.7.26 |
| master | 192.168.168.14 | 23750 | 5.7.26 |
| slave | 192.168.168.11 | 23750 | 5.7.26 |
安装略
(1)6666 集群创建 exporter,exporter1 两个账户。
23750 集群没有 exporter1 用户。
CREATE USER 'exporter'@'192.168.%' identified by 'exporter';
GRANT PROCESS, REPLICATION CLIENT, SELECT ON *.* TO 'exporter'@'192.168.%';
GRANT SELECT ON mysql.* TO 'exporter'@'192.168.%';


CREATE USER 'exporter1'@'192.168.%' identified by 'exporter1';
GRANT PROCESS, REPLICATION CLIENT, SELECT ON *.* TO 'exporter1'@'192.168.%';
GRANT SELECT ON mysql.* TO 'exporter1'@'192.168.%';

set global max_connections = 3000;
(2)23750 集群创建 exporter,exporter2 两个账户。
6666 集群没有 exporter2 用户。
CREATE USER 'exporter'@'192.168.%' identified by 'exporter';
GRANT PROCESS, REPLICATION CLIENT, SELECT ON *.* TO 'exporter'@'192.168.%';
GRANT SELECT ON mysql.* TO 'exporter'@'192.168.%';

CREATE USER 'exporter2'@'192.168.%' identified by 'exporter2';
GRANT PROCESS, REPLICATION CLIENT, SELECT ON *.* TO 'exporter2'@'192.168.%';
GRANT SELECT ON mysql.* TO 'exporter2'@'192.168.%';

set global max_connections = 1000;
为了测试方便,密码比较简单
另外需要将 192.168.168.11:6666 的 max_connections 的值设置为 3000 ,192.168.168.14:23750 的 max_connections 的值设置为 1000 ,目的是加以区分,后面测试需要验证这两个值。
2、mysqld_exporter
| 角色 | ip | 端口 | 版本 |
|---|---|---|---|
| mysqld_exporter | 192.168.168.11 | 42001 | 0.14.0 |
安装略,最新的 released 版下载地址 https://github.com/prometheus/mysqld_exporter/releases/download/v0.14.0/mysqld_exporter-0.14.0.linux-amd64.tar.gz
3、prometheus
| 角色 | ip | 端口 | 版本 |
|---|---|---|---|
| prometheus | 192.168.168.11 | 9999 | 2.40.2 |
安装略,最新的released版下载地址 https://github.com/prometheus/prometheus/releases/download/v2.40.2/prometheus-2.40.2.linux-amd64.tar.gz
三、测试
1、采集多个 MySQL 实例
exporter 的配置非常简单,只需要将预先创建的 exporter 用户的账号密码配置进去即可。
# cat my.cnf
[client]
user = exporter
password = exporter
(2)启动exporter
# cd /root/mysqld_exporter-0.14.0.linux-amd64

# ./mysqld_exporter --config.my-cnf=my.cnf --web.listen-address=:42001 >> exporter.log 2>&1 &
(3)验证 exporter
可以看到,访问异常,这个语法根本没法去访问 MySQL 的监控指标,根据报错提示应该是用法不对。
# curl 'http://localhost:42001/probe?target=192.168.168.11:6666'
<html>
<head><title>MySQLd exporter</title></head>
<body>
<h1>MySQLd exporter</h1>
<p><a href='/metrics'>Metrics</a></p>
</body>
</html>
#
用法是来源于 github 的文档:https://github.com/prometheus/mysqld_exporter
Multi-target support
This exporter supports the multi-target pattern. This allows running a single instance of this exporter for multiple MySQL targets.

To use the multi-target functionality, send an http request to the endpoint /probe?target=foo:5432 where target is set to the DSN of the MySQL instance to scrape metrics from.

To avoid putting sensitive information like username and password in the URL, you can have multiple configurations in config.my-cnf file and match it by adding &auth_module=<section> to the request.

Sample config file for multiple configurations

    [client]
    user = foo
    password = foo123
    [client.servers]
    user = bar
    password = bar123
根据提示换成 metrics 去访问会发现如下报错,原因也很简单,exporter 配置文件没有配置主机名和端口,所以默认去访问 127.0.0.1:3306 ,就是说 target 参数不生效,这就很郁闷了,明明是根据 github 的文档进行操作,实际却测试不通。
curl 'http://localhost:42001/metrics?target=192.168.168.11:6666'

ts=2022-11-18T09:35:47.063Z caller=exporter.go:149 level=error msg="Error pinging mysqld" err="dial tcp 127.0.0.1:3306: connect: connection refused"
四、解决问题
通过查 exporter 的提交记录可以发现,支持多实例采集功能是在2022-07月份左右开始陆续提交更新的代码,而当前最新的 releases 版本是在2022-01-05号,所以又有了下面的测试流程。
https://github.com/prometheus/mysqld_exporter/commit/593b0095a5bd0bd852029dd2dfa5f204a15de946
1、解决exporter报错问题
下载最新代码编译安装略,下载地址如下。
https://github.com/prometheus/mysqld_exporter/archive/refs/heads/main.zip
本次测试先是按照 github 文档使用 make 进行编译,但是过程比较痛苦,没搞成功,后来直接换成 go build ,不过也遇到了如下的问题,仅供参考。
编译环境不能访问 github ,会导致依赖包下载失败,建议使用goproxy,即 go build 前先配置GOPROXY变量的配置【export GOPROXY="https://goproxy.cn"】 go版本问题,要求1.17及以上。如果版本太低编译过程中或提示如下信息
/root/golib/pkg/mod/github.com/prometheus/procfs@v0.8.0/internal/util/readfile.go:36:9: undefined: io.ReadAll
note: module requires Go 1.17
# golang.org/x/net/http2
/root/golib/pkg/mod/golang.org/x/net@v0.0.0-20220909164309-bea034e7d591/http2/transport.go:426:45: undefined: os.ErrDeadlineExceeded
note: module requires Go 1.17
go 1.19下载地址 https://dl.google.com/go/go1.19.3.linux-amd64.tar.gz
2、重新测试
(1)exporter 配置
# cat my.cnf
[client]
user = exporter
password = exporter
(2)启动新的 exporter
cd mysqld_exporter-main
./mysqld_exporter --config.my-cnf=my.cnf --web.listen-address=:42002 >> exporter.log 2>&1 &
新起一个监听端口
# curl 'http://localhost:42002/probe?target=192.168.168.11:6666' 2>/dev/null|grep mysql_global_variables_max_connections
# HELP mysql_global_variables_max_connections Generic gauge metric from SHOW GLOBAL VARIABLES.
# TYPE mysql_global_variables_max_connections gauge
mysql_global_variables_max_connections 3000
# curl 'http://localhost:42002/probe?target=192.168.168.14:23750' 2>/dev/null|grep mysql_global_variables_max_connections
# HELP mysql_global_variables_max_connections Generic gauge metric from SHOW GLOBAL VARIABLES.
# TYPE mysql_global_variables_max_connections gauge
mysql_global_variables_max_connections 1000
#
3、解决另一个问题
(1)重新配置 exporter
# cat my.cnf
[client]
user = exporter
password = exporter

[client-exporter1]
user = exporter1
password = exporter1

[client-exporter2]
user = exporter2
password = exporter2
#
必须要有 client 段,给否则会报错
ts=2022-11-18T10:55:54.807Z caller=mysqld_exporter.go:284 level=info msg="Error parsing my.cnf" file=my.cnf err="no user specified under [client] in my.cnf"
(2)启动 exporter
cd mysqld_exporter-main
./mysqld_exporter --config.my-cnf=my.cnf --web.listen-address=:42002 >> exporter.log 2>&1 &
(3)验证
# curl 'http://localhost:42002/probe?target=192.168.168.11:6666&auth_module=client' 2>/dev/null |grep mysql_up
# HELP mysql_up Whether the MySQL server is up.
# TYPE mysql_up gauge
mysql_up 1
# curl 'http://localhost:42002/probe?target=192.168.168.11:6666&auth_module=client-exporter1' 2>/dev/null |grep mysql_up
# HELP mysql_up Whether the MySQL server is up.
# TYPE mysql_up gauge
mysql_up 1
#
# curl 'http://localhost:42002/probe?target=192.168.168.11:6666&auth_module=client-exporter2' 2>/dev/null |grep mysql_up
# HELP mysql_up Whether the MySQL server is up.
# TYPE mysql_up gauge
mysql_up 0
# curl 'http://localhost:42002/probe?target=192.168.168.11:23750&auth_module=client' 2>/dev/null |grep mysql_up
# HELP mysql_up Whether the MySQL server is up.
# TYPE mysql_up gauge
mysql_up 1
# curl 'http://localhost:42002/probe?target=192.168.168.11:23750&auth_module=client-exporter1' 2>/dev/null |grep mysql_up
# HELP mysql_up Whether the MySQL server is up.
# TYPE mysql_up gauge
mysql_up 0
# curl 'http://localhost:42002/probe?target=192.168.168.11:23750&auth_module=client-exporter2' 2>/dev/null |grep mysql_up
# HELP mysql_up Whether the MySQL server is up.
# TYPE mysql_up gauge
mysql_up 1
#
auth_module=client 对应 exporter 用户 auth_module=client-exporter1 对应 exporter1 用户 auth_module=client-exporter2 对应 exporter2 用户
    - job_name: mysql # To get metrics about the mysql exporter’s targets
      params:
        # Not required. Will match value to child in config file. Default value is `client`.
        auth_module: client.servers
      static_configs:
        - targets:
          # All mysql hostnames to monitor.
          - server1:3306
          - server2:3306
      relabel_configs:
        - source_labels: [__address__]
          target_label: __param_target
        - source_labels: [__param_target]
          target_label: instance
        - target_label: __address__
          # The mysqld_exporter host:port
          replacement: localhost:9104
按照环境实际情况采用上面的配置示例启动 prometheus 会报错,根据报错提示将【params】【auth_module: client.servers】两行配置注释掉就好了,报错如下:
ts=2022-11-21T07:10:04.113Z caller=main.go:468 level=error msg="Error loading config (--config.file=prometheus.yml)" file=/root/prometheus-2.40.2.linux-amd64/prometheus.yml err="parsing YAML file prometheus.yml: yaml: unmarshal errors:\n line 25: cannot unmarshal !!str `client-...` into []string"
后来通过查阅 prometheus 文档才发现是使用语法有问题,params 的配置要求是一个列表:
# Optional HTTP URL parameters.
params:
  [ <string>: [<string>, ...] ]
prometheus配置详情参考 https://prometheus.io/docs/prometheus/latest/configuration/configuration/
下面是一份参考配置文件,仅供参考:
  - job_name: 'mysql-6666'
    params:
        # Not required. Will match value to child in config file. Default value is `client`.
      auth_module: [client]
    static_configs:
      - targets:
         - 192.168.168.11:6666
         - 192.168.168.12:6666
    metrics_path: /probe
    relabel_configs:
        - source_labels: [__address__]
          target_label: __param_target
        - source_labels: [__param_target]
          target_label: instance
        - target_label: __address__
          replacement: 192.168.168.11:42002

  - job_name: 'mysql-23750'
    params:
        # Not required. Will match value to child in config file. Default value is `client`.
      auth_module: [client-exporter1]
    static_configs:
      - targets:
         - 192.168.168.11:23750
         - 192.168.168.14:23750
    metrics_path: /probe
    relabel_configs:
        - source_labels: [__address__]
          target_label: __param_target
        - source_labels: [__param_target]
          target_label: instance
        - target_label: __address__
          replacement: 192.168.168.11:42002
那么是不是不支持将 auth_module 放在 targets 下面呢,答案当然是支持的,具体如下配置,可以通过 labels 去配置,其他配置请参考官方文档。
  - job_name: 'mysql'
    static_configs:
      - targets:
         - 192.168.168.11:6666
         - 192.168.168.12:6666
        labels:
           auth_module: client
      - targets:
         - 192.168.168.11:23750
         - 192.168.168.14:23750
        labels:
           auth_module: client-exporter2
    metrics_path: /probe
    relabel_configs:
      - source_labels: [__address__]
        target_label: __param_target
      - source_labels: [__param_target]
        target_label: instance
      - target_label: __address__
        replacement: 192.168.168.11:42002
      - source_labels: [auth_module]
        target_label: __param_auth_module
      - action: labeldrop
        regex: auth_module
这样看起来就比较简洁一些。
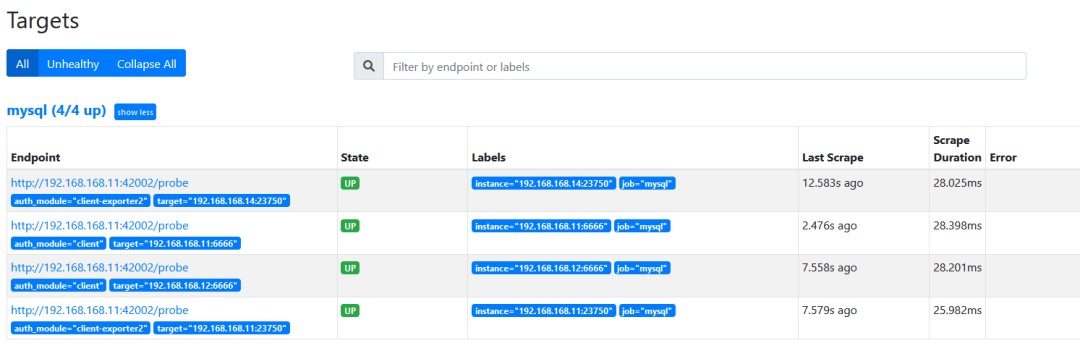
下图就是 prometheus 的展示图,可以看到能正常采集到两个测试集群的监控数据,至此测试结束。
五、总结
六、写在最后
本文所有内容仅供参考,因各自环境不同,并非通用方案,且在使用文中操作时可能碰上未知的问题。如有线上环境操作需求,请在测试环境充分测试。
本文关键字:#mysqld-exporter# #multiple-instance#
相关推荐:
技术分享 | 基于 Alertmanager 告警系统的改造
MySQL binlog 分析工具 analysis_binlog 的使用介绍
爱可生开源社区的 SQLE 是一款面向数据库使用者和管理者,支持多场景审核,支持标准化上线流程,原生支持 MySQL 审核且数据库类型可扩展的 SQL 审核工具。
| 类型 | 地址 |
|---|---|
| 版本库 | https://github.com/actiontech/sqle |
| 文档 | https://actiontech.github.io/sqle-docs-cn/ |
| 发布信息 | https://github.com/actiontech/sqle/releases |
| 数据审核插件开发文档 | https://actiontech.github.io/sqle-docs-cn/3.modules/3.7_auditplugin/auditplugin_development.html |
更多关于 SQLE 的信息和交流,请加入官方QQ交流群:637150065...