


在服务器上安装的各种中间件,为了防止意外宕机重启导致的后果,一般都需要配置成开机自启动。但是有些中间件的安装过程中并没有提供相关配置开机自启动的说明文档。今天跟各位大朋友们聊一聊Centos上配置服务开机自启动的几种方式。
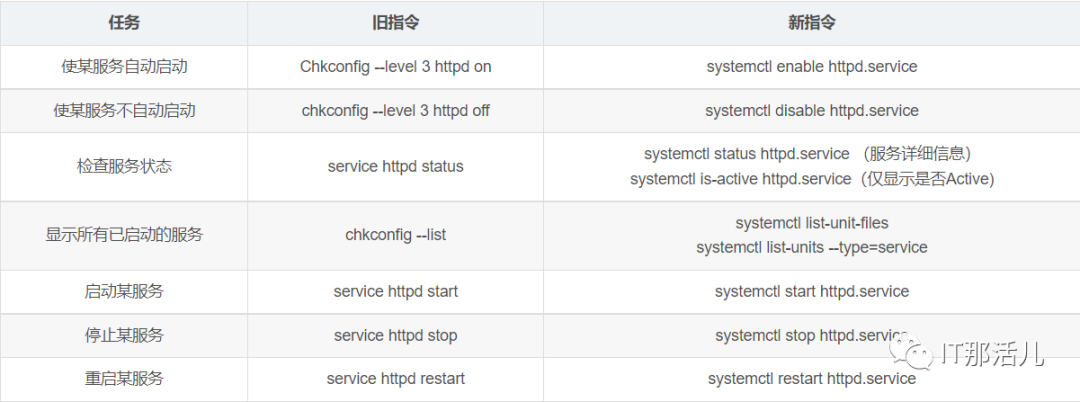
方式一:直接在/etc/rc.d/rc.local中添加服务启动命令; 方式二:通过chkconfig配置服务自启动; 方式三:Centos7通过systemctl enble配置服务自启动。
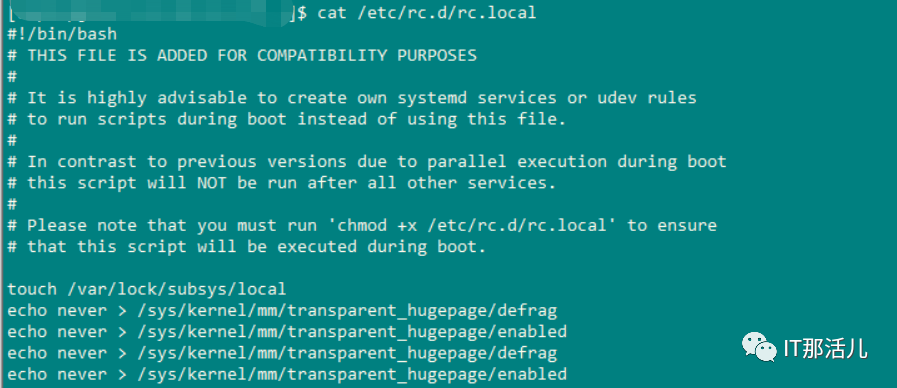
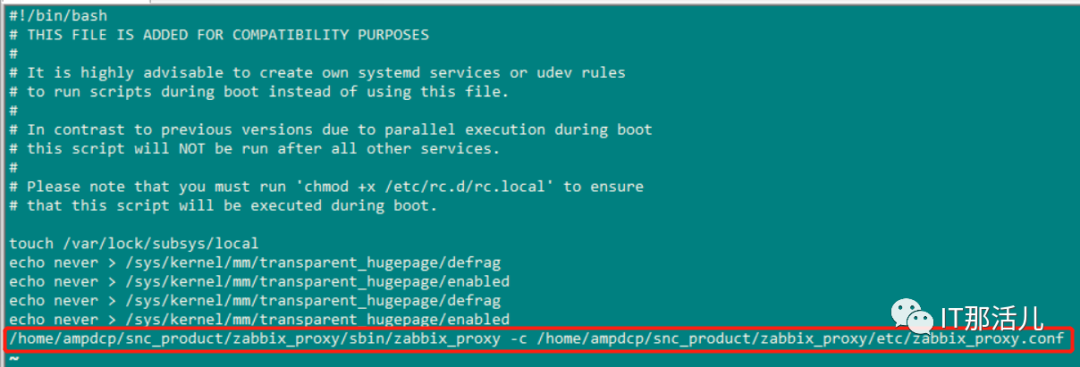
1. 在/etc/rc.d/rc.local中添加服务启动命令
#vi etc/rc.d/rc.local
#vi /opt/script/zabbixstart.sh
#!/bin/bash
/home/ampdcp/snc_product/zabbix_proxy/sbin/zabbix_proxy -c
/home/ampdcp/snc_product/zabbix_proxy/etc/zabbix_proxy.conf
#chmod +x /opt/script/zabbixstart.sh
#/opt/script/autostart.sh
#chmod +x /etc/rc.d/rc.local
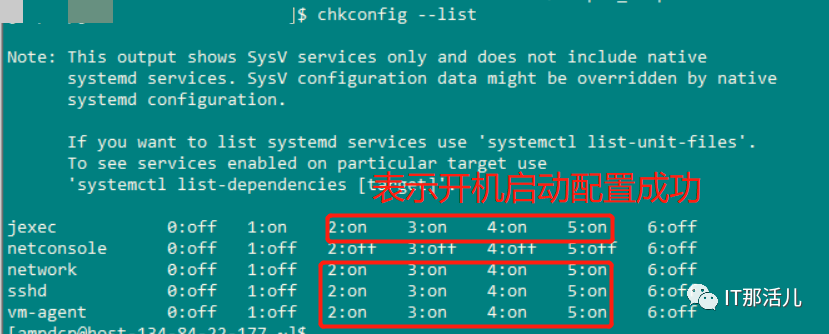
chkconfig –-add xxx //把服务添加到chkconfig列表; chkconfig --del xxx //把服务从chkconfig列表中删除; chkconfig xxx on //开启开机自动启动; chkconfig xxx off //关闭开机自动启动; chkconfig --list //查看所有chklist中服务; chkconfig --list xxx 查看指定服务。
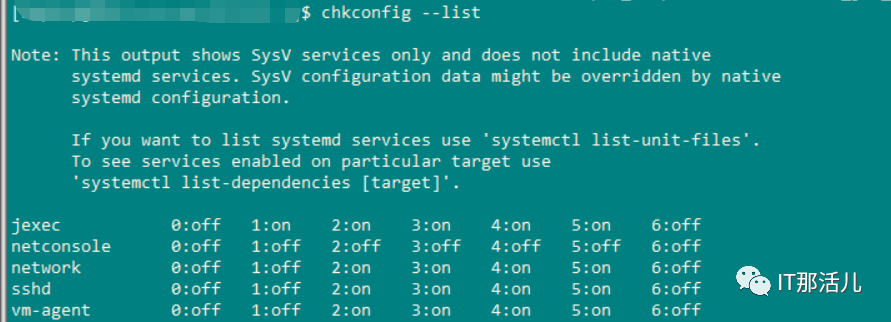
等级0表示:表示关机; 等级1表示:单用户模式; 等级2表示:无网络连接的多用户命令行模式; 等级3表示:有网络连接的多用户命令行模式; 等级4表示:不可用; 等级5表示:带图形界面的多用户模式; 等级6表示:重新启动。
chkconfig --level 35 mysqld on
chkconfig network on
#!/bin/bash

# chkconfig: 2345 98 02
# description: kibana
KIBANA_HOME=/usr/local/kibana-6.2.4-linux-x86_64
case $1 in
 start)
         $KIBANA_HOME/bin/kibana &
         echo "kibana start"
         ;;
 stop)
    kibana_pid_str=`netstat -tlnp |grep 5601 | awk '{print $7}'`
    kibana_pid=`echo ${kibana_pid_str%%/*}`
    kill -9 $kibana_pid
    echo "kibana stopped"
    ;;
 restart)
    kibana_pid_str=`netstat -tlnp |grep 5601 | awk '{print $7}'`
    kibana_pid=${kibana_pid_str%%/*}
    kibana_pid=`echo ${kibana_pid_str%%/*}`
    kill -9 $kibana_pid
    echo "kibana stopped"

    $KIBANA_HOME/bin/kibana &
    echo "kibana start"
    ;;
 status)
    kibana_pid_str=`netstat -tlnp |grep 5601 | awk '{print $7}'`
    if test -z $kibana_pid_str; then
       echo "kibana is stopped"
    else
       pid=`echo ${kibana_pid_str%%/*}`
       echo "kibana is started,pid:"${pid}
    fi
    ;;
*)
    echo "start|stop|restart|status"
    ;;
esac
#chmod +x kibana
#chkconfig --list
#chkconfig --add kibana
#cd /etc/systemd/system/
#vim kibana.service
[Unit]
Description=kibana
After=network.target
[Service]
Type=forking
User=root
Group=root
ExecStart=/etc/init.d/kibana start
ExecReload=/etc/init.d/kibana restart
ExecStop=/etc/init.d/kibana stop
PrivateTmp=true
[Install]
WantedBy=multi-user.target
[Service]的启动、重启、停止命令全部要求使用绝对路径。 [Install]服务安装的相关设置,可设置为多用户。
Description:描述服务; After:描述服务类别; [Service]服务运行参数的设置; Type=forking是后台运行的形式; User 服务启动用户; Group 服务启动用户组; ExecStart 为服务的具体运行命令; ExecReload 为重启命令; ExecStop 为停止命令; PrivateTmp=True表示给服务分配独立的临时空间。
#chmod 754 kibana.service
#systemctl daemon-reload
//查看服务状态
#systemctl status kibana.service


本文作者:陈竹彬(上海新炬中北团队)
本文来源:“IT那活儿”公众号

文章转载自IT那活儿,如果涉嫌侵权,请发送邮件至:contact@modb.pro进行举报,并提供相关证据,一经查实,墨天轮将立刻删除相关内容。
