pg流复制可以是一主多从架构,类似Oracle ADG,都是采用物理复制,从库可提供实时查询业务,流复制在不借助插件的情况下,本身并不提供自动failover等功能。
PGPOOL是一款较流行的Postgres的数据库中间件,提供了连接池、自动故障转移、负载均衡、看门狗等功能。在基于流复制架构下,架构图如下(转自官方文档):
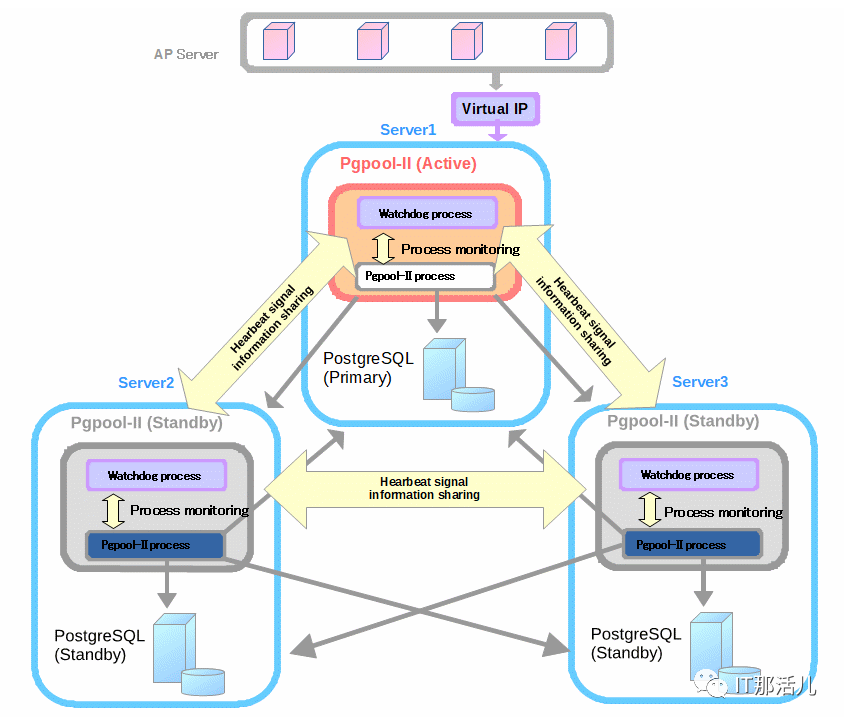
注:本文采用3个主机,进行一主两从架构部署示例。
提前安装好Postgres数据库,并搭建好流复制架构,本文不再做描述。
pgpool最新版本为4.2.2,本文采用4.1.2版作为示例。可选用rpm或者源码包安装,本文采用源码编译的方式安装
软件安装
插件安装
安装pgpool_recovery
▼▼▼cd pgpool-II-4.1.2/src/sql/pgpool-recoverymake make install psql \c template1create extension pgpool_recovery;Installing pgpool-regclasscd pgpool-II-4.1.2/src/sql/pgpool-regclassmakemake installpsql template1CREATE EXTENSION pgpool_regclass;Creating insert_lock tablecd pgpool-II-4.1.2/src/sql$ psql -f insert_lock.sql template1复制
修改PG数据库参数文件
pgpool.pg_ctl = '/usr/local/postgres/bin/pg_ctl'
配置SSH等效性
▼▼▼ssh-keygen -t rsa -f ~/.ssh/id_rsa_pgpoolcd ~/.sshssh-copy-id -i id_rsa_pgpool.pub postgres@host01ssh-copy-id -i id_rsa_pgpool.pub postgres@host02ssh-copy-id -i id_rsa_pgpool.pub postgres@host03ssh postgres@host01 -i ~/.ssh/id_rsa_pgpool复制
配置Pgpool参数
▼▼▼cp -p usr/local/pgpool412/etc/pgpool.conf.sample-stream usr/local/pgpool412/etc/pgpool.conf##以下为所有节点通用配置listen_addresses = '*'pid_file_name = '/usr/local/pgpool412/pgpool.pid'sr_check_user = 'pgpool'sr_check_password = ''health_check_period = 5health_check_timeout = 30health_check_user = 'pgpool'health_check_password = ''health_check_max_retries = 3backend_hostname0 = 'host01'backend_port0 = 5432backend_weight0 = 1backend_data_directory0 = '/pgdata'backend_flag0 = 'ALLOW_TO_FAILOVER'backend_hostname1 = 'host02'backend_port1 = 5432backend_weight1 = 1backend_data_directory1 = '/pgdata'backend_flag1 = 'ALLOW_TO_FAILOVER'backend_hostname2 = 'host03'backend_port2 = 5432backend_weight2 = 1backend_data_directory2 = '/pgdata'backend_flag2 = 'ALLOW_TO_FAILOVER' backend_application_name0 = 'host01'backend_application_name1 = 'host02'backend_application_name2 = 'host03'failover_command = '/usr/local/pgpool412/etc/failover.sh %d %h %p %D %m %H %M %P %r %R %N %S'follow_master_command = '/usr/local/pgpool412/etc/follow_master.sh %d %h %p %D %m %H %M %P %r %R'recovery_user = 'postgres'recovery_password = ''recovery_1st_stage_command = 'recovery_1st_stage'enable_pool_hba = on##看门狗通用配置use_watchdog = ondelegate_IP = '192.168.56.5'if_cmd_path = '/usr/sbin'if_up_cmd = '/usr/bin/sudo usr/sbin/ip addr add $_IP_$/24 dev enp0s3 label enp0s3:0'if_down_cmd = '/usr/bin/sudo usr/sbin/ip addr del $_IP_$/24 dev enp0s3'arping_path = '/usr/sbin'arping_cmd = '/usr/bin/sudo usr/sbin/arping -U $_IP_$ -w 1 -I enp0s3'复制
##以下不同主机分别配置
#host02
#host03
#host01
#host02
#host03
#心跳检测相关配置
#host01
#host02
#host03
编辑failover和follow脚本
▼▼▼cd /usr/local/pgpool412/etc/cp failover.sh.sample failover.shcp follow_master.sh.sample follow_master.shchmod 755 *.shvi failover.shPGHOME=/usr/local/postgresvi follow_master.shPGHOME=/usr/local/postgresARCHIVEDIR=/pgdata/archivelogREPLUSER=replPCP_USER=pgpoolPGPOOL_PATH=/usr/local/pgpool412PCP_PORT=9898复制
配置pcp.conf文件
▼▼▼echo 'pgpool:'`pg_md5 Welcome2021` >> /usr/local/pgpool412/etc/pcp.conf复制
配置pcppass文件
▼▼▼su - postgresecho 'localhost:9898:pgpool:Welcome2021' > ~/.pcppasschmod 600 ~/.pcppass复制
配置recover文件 ---这两个文件要放到$PGDATA目录中
▼▼▼cp -p /usr/local/pgpool412/etc/recovery_1st_stage.sample pgdata/recovery_1st_stagecp -p /usr/local/pgpool412/etc/pgpool_remote_start.sample pgdata/pgpool_remote_startchown postgres:postgres /pgdata/{recovery_1st_stage,pgpool_remote_start}vi /pgdata/recovery_1st_stage...PGHOME=/usr/local/postgresvi /pgdata/pgpool_remote_startPGHOME=/usr/local/postgreschmod 755 {recovery_1st_stage,pgpool_remote_start}复制
配置pool_hba.conf文件
▼▼▼host all pgpool 0.0.0.0/0 scram-sha-256host all postgres 0.0.0.0/0 scram-sha-256复制
配置pgpool密码文件
▼▼▼[all servers]$ pg_enc -m -k ~/.pgpoolkey -u pgpool -pdb password: [pgpool user's password][all servers]$ pg_enc -m -k ~/.pgpoolkey -u postgres -pdb password: [postgres user's passowrd]# cat usr/local/pgpool412/etc/pool_passwd pgpool:AESheq2ZMZjynddMWk5sKP/Rw==postgres:AESHs/pWL5rtXy2IwuzroHfqg==复制
为Postgres用户配置sudo权限
vi etc/sudoers
postgres ALL=(ALL) NOPASSWD: ALL
配置将pgpool日志存放到syslog
▼▼▼vi pgpool.conflog_destination = 'syslog'syslog_facility = 'LOCAL1'mkdir var/log/pgpooltouch var/log/pgpool pgpool.logvi etc/rsyslog.conf...*.info;mail.none;authpriv.none;cron.none;LOCAL1.none /var/log/messagesLOCAL1.* /var/log/pgpool /pgpool.log##配置logrotatevi /etc/logrotate.d/syslog.../var/log/messages/var/log/pgpool/pgpool.log ---新增此行/var/log/secure#重启服务systemctl restart rsyslog复制
nohup pgpool -D -n & --启动
pgpool -m fast stop --停止
##显示pg节点相关信息
psql -h 10.25.247.99 -p 9999 -U pgpool postgres -c "show pool_nodes"

##pg发生failover并恢复后,show pool_nodes显示状态仍然是down,需要重新attach
pcp_attach_node -h 192.168.56.33 -U pgpool 1
##查看pgpool参数
psql -h 192.168.56.5 -p 9999 -U pgpool postgres -c "pgpool show all" --看所有参数
或者
psql -h 192.168.56.5 -p 9999 -U pgpool postgres -c "pgpool show max_pool " --看指定参数
##查看看门狗节点信息
pcp_watchdog_info -h 10.25.247.99 -U pgpool
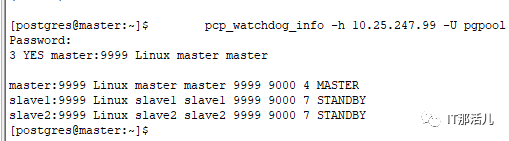
上图说明pgpool的主节点是hostname为master的节点,注意的是pgpool的主节点可能跟pg的主节点并不是同一个节点。
###检查pgpool的连接数
pcp_proc_info -U pgpool -h 10.25.247.99 |awk '{if (NF==13 && $11==1) print $1,$2,$11,$12}'|uniq -c|wc -l
ps -ef|grep pgpool|grep idle|grep -v grep |wc -l
##需注意的参数
num_init_children --指定pgpool可开启的子进程数
max_pool可以缓存的连接数
——注意pgpool最大会产生num_init_children*max_pool个pg数据库连接,所以pg参数max_connections需大于num_init_children*max_pool
reserved_connections --此参数为非0值时,当连接超过num_init_children时,会报错退出,否则连接会被hang住,直到连接数下降可以连接为止
load_balance_mode --开启复制均衡
memory_cache_enabled --是否开启内存缓存

更多精彩干货分享
点击下方名片关注
IT那活儿