


概述
MHA(Master High Availability)是一款对mysql高可用环境进行故障切换和主从提升的高可用软件。在MySQL故障切换过程中,MHA能做到在0~30秒之内自动完成数据库的故障切换操作,并且在进行故障切换的过程中,MHA能在最大程度上保证数据的一致性,以达到真正意义上的高可用。
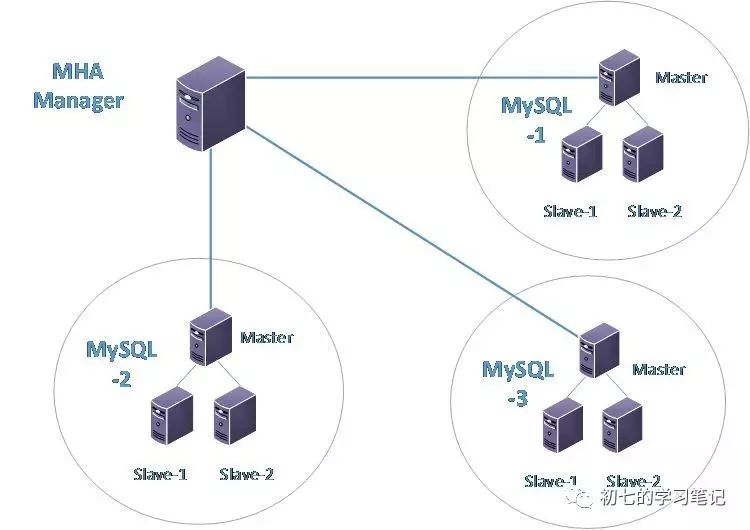
该软件由两部分组成:MHA Manager(管理节点)和MHA Node(数据节点)。MHA Manager可以单独部署在一台独立的机器上管理多个master-slave集群,也可以部署在一台slave节点上。MHA Node运行在每台MySQL服务器上,MHA Manager会定时探测集群中的master节点,当master出现故障时,它可以自动将最新数据的slave提升为新的master,然后将所有其他的slave重新指向新的master。
架构图
MHA工作原理总结为以下几条:
1.从宕机崩溃的master保存二进制日志事件(binlog events);
2.识别含有最新更新的slave;
3.应用差异的中继日志(relay log) 到其他slave;
4.应用从master保存的二进制日志事件(binlog events);
5.提升一个slave为新master;
6.使用其他的slave连接新的master进行复制。
实验环境:(centos6.5 MySQL版本5.5.49)
server01 192.168.6.220 监控复制组
server02 192.168.6.221 写数据
server03 192.168.6.222 读数据
server04 192.168.6.223 读数据
server03和server04是server02的slave,复制环境搭建后面会简单演示,其中master对外提供写服务,备选master(实际的slave,主机名server03)提供读服务,slave也提供相关的读服务,一旦master宕机,将会把备选master提升为新的master,slave指向新的master
1、部署MHA过程:
(1)在所有节点都要安装MHA node所需的perl模块(DBD:mysql),可以通过yum安装,如果没epel源,先安装epel源(下面以server02为例,记得server01,server03和server04也一样的操作)
[root@master~]# rpm -ivh http://dl.fedoraproject.org/pub/epel/6/x86_64/epel-release-6-8.noarch.rpm
Retrieving http://dl.fedoraproject.org/pub/epel/6/x86_64/epel-release-6-8.noarch.rpm
warning: var/tmp/rpm-tmp.HW2H9b: Header V3 RSA/SHA256 Signature, key ID 0608b895: NOKEY
Preparing... ########################################### [100%]
1:epel-release ########################################### [100%]
[root@db ~]# yum install perl-DBD-MySQL -y
(2)在所有节点安装MHA node:(下面以server02为例,记得server01,server03和server04也一样的操作),MHA node和MHA Manager软件下载链接: https://pan.baidu.com/s/1gfs1crD 密码: 5j14
[root@master opt]# tar xf mha4mysql-node-0.57.tar.gz
[root@master opt]# cd mha4mysql-node-0.57
[root@master mha4mysql-node-0.57]# perl Makefile.PL
*** Module::AutoInstall version 1.06
*** Checking for Perl dependencies...
Can't locate CPAN.pm in @INC (@INC contains: inc usr/local/lib64/perl5 usr/local/share/perl5 usr/lib64/perl5/vendor_perl usr/share/perl5/vendor_perl usr/lib64/perl5 usr/share/perl5 .) at inc/Module/AutoInstall.pm line 304.
[root@master mha4mysql-node-0.57]# yum install -y perl-devel perl-CPAN
[root@master mha4mysql-node-0.57]# perl Makefile.PL
*** Module::AutoInstall version 1.06
*** Checking for Perl dependencies...
[Core Features]
- DBI ...loaded. (1.609)
- DBD::mysql ...loaded. (4.013)
*** Module::AutoInstall configuration finished.
Checking if your kit is complete...
Looks good
Writing Makefile for mha4mysql::node
[root@master mha4mysql-node-0.57]# make && make install
安装完成后会在/usr/local/bin目录下生成以下脚本文件:
save_binary_logs 保存和复制master的二进制日志
apply_diff_relay_logs //识别差异的中继日志事件并将其差异的事件应用于其他的slave
filter_mysqlbinlog 去除不必要的ROLLBACK事件(MHA已不再使用这个工具)
purge_relay_logs 清除中继日志(不会阻塞SQL线程)
(2)安装MHA Manager。首先安装MHA Manger依赖的perl模块(我这里使用yum安装):
[root@manager mha4mysql-node-0.57]# yum install -y perl-DBD-MySQL perl-Config-Tiny perl-Log-Dispatch perl-Parallel-ForkManager perl-Time-HiRes
[root@manager mha4mysql-node-0.57]# cd ..
[root@manager opt]# tar xf mha4mysql-manager-0.57.tar.gz
[root@manager opt]# cd mha4mysql-manager-0.57
[root@manager mha4mysql-manager-0.57]# perl Makefile.PL
*** Module::AutoInstall version 1.06
*** Checking for Perl dependencies...
[Core Features]
- DBI ...loaded. (1.609)
- DBD::mysql ...loaded. (4.013)
- Time::HiRes ...loaded. (1.9721)
- Config::Tiny ...loaded. (2.12)
- Log::Dispatch ...loaded. (2.26)
- Parallel::ForkManager ...loaded. (0.7.9)
- MHA::NodeConst ...loaded. (0.57)
*** Module::AutoInstall configuration finished.
Checking if your kit is complete...
Looks good
Writing Makefile for mha4mysql::manager
[root@manager mha4mysql-manager-0.57]# make && make install
(3)安装完成后,复制安装包的脚本到/usr/local/bin,这些脚本不是必须,可以通过简单的shell脚本自行实现相关功能
[root@manager scripts]# pwd
/opt/mha4mysql-manager-0.57/samples/scripts
[root@manager scripts]# ll
total 32
-rwxr-xr-x 1 1001 1001 3648 May 31 2015 master_ip_failover 自动切换时vip管理的脚本
-rwxr-xr-x 1 1001 1001 9870 May 31 2015 master_ip_online_change //在线切换时vip的管理
-rwxr-xr-x 1 1001 1001 11867 May 31 2015 power_manager //故障发生后关闭主机的脚本
-rwxr-xr-x 1 1001 1001 1360 May 31 2015 send_report //因故障切换后发送报警的脚本
[root@manager scripts]$ cp * usr/local/bin/
(4)配置SSH登录无密码验证
server01
ssh-keygen -t rsa
ssh-copy-id -i root/.ssh/id_rsa.pub root@192.168.6.221
ssh-copy-id -i root/.ssh/id_rsa.pub root@192.168.6.222
ssh-copy-id -i root/.ssh/id_rsa.pub root@192.168.6.223
server02
ssh-keygen -t rsa
ssh-copy-id -i root/.ssh/id_rsa.pub root@192.168.6.223
ssh-copy-id -i root/.ssh/id_rsa.pub root@192.168.6.222
server03
ssh-keygen -t rsa
ssh-copy-id -i root/.ssh/id_rsa.pub root@192.168.6.223
ssh-copy-id -i root/.ssh/id_rsa.pub root@192.168.6.221
server04
ssh-keygen -t rsa
ssh-copy-id -i root/.ssh/id_rsa.pub root@192.168.6.221
ssh-copy-id -i root/.ssh/id_rsa.pub root@192.168.6.222
(5)搭建主从环境
注意:binlog-do-db 和 replicate-ignore-db 设置必须相同。 MHA 在启动时候会检测过滤规则,如果过滤规则不同,MHA 不启动监控和故障转移。
a、三台数据库节点(server02,server03,server04)修改/etc/my.cnf,保证[mysqld]下的server-id不重复
[root@master ~]# cat etc/my.cnf | grep server-id
server-id = 1
b、备份Master(server02)
[root@master ~]# mysqldump -uroot -p123456 --master-data=2 --single-transaction -R --triggers -A > 1.sql
c、在Master(server02)上创建复制用户
mysql> grant replication slave on *.* to 'repl'@'192.168.6.%' identified by '123456';
Query OK, 0 rows affected (0.10 sec)
mysql> flush privileges;
Query OK, 0 rows affected (0.07 sec)
d、查看主库备份时的binlog名称和位置,MASTER_LOG_FILE和MASTER_LOG_POS
[root@master ~]# head -n 30 1.sql | grep 'CHANGE MASTER TO'
-- CHANGE MASTER TO MASTER_LOG_FILE='mysql-bin.0000010', MASTER_LOG_POS=107;
e、向server03,server04传输备份文件
[root@master ~]# scp 1.sql 192.168.6.223:/root/
1.sql 100% 540KB 540.4KB/s 00:00
[root@master ~]# scp 1.sql 192.168.6.222:/root/
1.sql
f、分别在两台服务器(server03,server04)上导入备份,执行复制相关命令
[root@slave ~]# mysql -uroot -p123456 < ./1.sql
h、分别在两台数据库(server03,server04)建立主从关系,repl用户自行创建并授予权限
mysql> stop slave;
Query OK, 0 rows affected (0.01 sec)
mysql> CHANGE MASTER TO MASTER_HOST='192.168.6.221',MASTER_USER='repl', MASTER_PASSWORD='123456',MASTER_LOG_FILE='mysql-bin.000010',MASTER_LOG_POS=107;
Query OK, 0 rows affected (0.01 sec)
mysql> start slave;
Query OK, 0 rows affected (0.01 sec)
mysql> show slave status \G;
*************************** 1. row ***************************
Slave_IO_State: Waiting for master to send event
Master_Host: 192.168.6.221
Master_User: repl
Master_Port: 3306
Connect_Retry: 60
Master_Log_File: mysql-bin.000010
Read_Master_Log_Pos: 107
Relay_Log_File: mysql-relay-bin.000002
Relay_Log_Pos: 253
Relay_Master_Log_File: mysql-bin.000010
Slave_IO_Running: Yes
Slave_SQL_Running: Yes
i、两台slave服务器(server03,server04)设置read_only(从库对外提供读服务,之所以没有写进配置文件,是因为随时slave会提升为master)
[root@slave ~]$ mysql -uroot -p123456 -e "set global read_only=1"
j、在server02创建监控用户
mysql> grant all privileges on *.* to 'root'@'192.168.6.%' identified by '123456';
Query OK, 0 rows affected (0.00 sec)
mysql> flush privileges;
Query OK, 0 rows affected (0.01 sec)
到这里整个集群环境已经搭建完毕,剩下的就是配置MHA软件了。
(6)配置MHA
a、创建MHA的工作目录,并且创建相关配置文件
[root@manager ~]# mkdir -p etc/masterha
[root@manager ~]# cp opt/mha4mysql-manager-0.57/samples/conf/app1.cnf etc/masterha/
b、修改app1.cnf配置文件,修改后的文件内容如下
[root@manager ~]# cat etc/masterha/app1.cnf
[server default]
manager_log=/var/log/masterha/app1/manager.log
manager_workdir=/var/log/masterha/app1.log
master_binlog_dir=/usr/local/mysql/data
master_ip_failover_script=/usr/local/bin/master_ip_failover
master_ip_online_change_script=/usr/local/bin/master_ip_online_change
password=123456
ping_interval=1
remote_workdir=/tmp
repl_password=123456
repl_user=repl
report_script=/usr/local/bin/send_report
secondary_check_script=/usr/local/bin/masterha_secondary_check -s server03 -s server02 --user=root --master_host=server02 --master_ip=192.168.6.221 --master_port=3306
shutdown_script=""
ssh_user=root
user=root
[server1]
hostname=192.168.6.221
port=3306
[server2]
hostname=192.168.6.222
port=3306
candidate_master=1
check_repl_delay=0
[server3]
hostname=192.168.6.223
port=3306
c、在server03,server04设置relay log的清除方式(在每个slave节点上)
[root@slave ~]# mysql -uroot -p123456 -e "set global relay_log_purge=0"
d、在server03,server04设置定期清理relay脚本
[root@slave ~]# cat purge_relay_log.sh
#!/bin/bash
user=root
passwd=123456
port=3306
log_dir='/usr/local/mysql/data/masterha/log'
work_dir='/usr/local/mysql/data/'
purge='/usr/local/bin/purge_relay_logs'
if [ ! -d $log_dir ]
then
mkdir $log_dir -p
fi
$purge --user=$user --password=$passwd --disable_relay_log_purge --port=$port --workdir=$work_dir >> $log_dir/purge_relay_logs.log 2>&1
[root@slave ~]# crontab -l
0 4 * * * bin/bash root/purge_relay_log.sh
(7)在server01检查SSH配置
[root@manager ~]# masterha_check_ssh --conf=/etc/masterha/app1.cnf
Tue Sep 19 11:01:42 2017 - [warning] Global configuration file etc/masterha_default.cnf not found. Skipping.
Tue Sep 19 11:01:42 2017 - [info] Reading application default configuration from etc/masterha/app1.cnf..
Tue Sep 19 11:01:42 2017 - [info] Reading server configuration from etc/masterha/app1.cnf..
Tue Sep 19 11:01:42 2017 - [info] Starting SSH connection tests..
Tue Sep 19 11:01:45 2017 - [debug]
Tue Sep 19 11:01:42 2017 - [debug] Connecting via SSH from root@192.168.6.221(192.168.6.221:22) to root@192.168.6.222(192.168.6.222:22)..
Tue Sep 19 11:01:44 2017 - [debug] ok.
Tue Sep 19 11:01:44 2017 - [debug] Connecting via SSH from root@192.168.6.221(192.168.6.221:22) to root@192.168.6.223(192.168.6.223:22)..
Tue Sep 19 11:01:45 2017 - [debug] ok.
Tue Sep 19 11:01:45 2017 - [debug]
Tue Sep 19 11:01:42 2017 - [debug] Connecting via SSH from root@192.168.6.222(192.168.6.222:22) to root@192.168.6.221(192.168.6.221:22)..
Tue Sep 19 11:01:44 2017 - [debug] ok.
Tue Sep 19 11:01:44 2017 - [debug] Connecting via SSH from root@192.168.6.222(192.168.6.222:22) to root@192.168.6.223(192.168.6.223:22)..
Tue Sep 19 11:01:45 2017 - [debug] ok.
Tue Sep 19 11:01:51 2017 - [debug]
Tue Sep 19 11:01:43 2017 - [debug] Connecting via SSH from root@192.168.6.223(192.168.6.223:22) to root@192.168.6.221(192.168.6.221:22)..
Tue Sep 19 11:01:45 2017 - [debug] ok.
Tue Sep 19 11:01:45 2017 - [debug] Connecting via SSH from root@192.168.6.223(192.168.6.223:22) to root@192.168.6.222(192.168.6.222:22)..
Tue Sep 19 11:01:51 2017 - [debug] ok.
Tue Sep 19 11:01:51 2017 - [info] All SSH connection tests passed successfully.
(8)在server01检查复制环境
[root@manager ~]# masterha_check_repl --conf=/etc/masterha/app1.cnf
......
Can't exec "mysqlbinlog": No such file or directory at usr/local/share/perl5/MHA/BinlogManager.pm line 106.
mysqlbinlog version command failed with rc 1:0, please verify PATH, LD_LIBRARY_PATH, and client options
at usr/local/bin/apply_diff_relay_logs line 493
Tue Sep 19 11:51:58 2017 - [error][/usr/local/share/perl5/MHA/MasterMonitor.pm, ln208] Slaves settings check failed!
Tue Sep 19 11:51:58 2017 - [error][/usr/local/share/perl5/MHA/MasterMonitor.pm, ln416] Slave configuration failed.
Tue Sep 19 11:51:58 2017 - [error][/usr/local/share/perl5/MHA/MasterMonitor.pm, ln427] Error happened on checking configurations. at usr/local/bin/masterha_check_repl line 48
Tue Sep 19 11:51:58 2017 - [error][/usr/local/share/perl5/MHA/MasterMonitor.pm, ln525] Error happened on monitoring servers.
Tue Sep 19 11:51:58 2017 - [info] Got exit code 1 (Not master dead).
MySQL Replication Health is NOT OK!
出现如上错误,在所有数据库节点上执行
[root@manager ~]# ln -s usr/local/mysql/bin/mysqlbinlog usr/local/bin/mysqlbinlog
[root@manager ~]# ln -s usr/local/mysql/bin/mysql usr/local/bin/mysql
再进行检查
[root@manager ~]# masterha_check_repl --conf=/etc/masterha/app1.cnf
......
Tue Sep 19 11:55:02 2017 - [info] usr/local/bin/master_ip_failover --command=status --ssh_user=root --orig_master_host=192.168.6.221 --orig_master_ip=192.168.6.221 --orig_master_port=3306
Bareword "FIXME_xxx" not allowed while "strict subs" in use at /usr/local/bin/master_ip_failover line 93.
Execution of /usr/local/bin/master_ip_failover aborted due to compilation errors.
Tue Sep 19 11:55:02 2017 - [error][/usr/local/share/perl5/MHA/MasterMonitor.pm, ln229] Failed to get master_ip_failover_script status with return code 255:0.
Tue Sep 19 11:55:02 2017 - [error][/usr/local/share/perl5/MHA/MasterMonitor.pm, ln427] Error happened on checking configurations. at /usr/local/bin/masterha_check_repl line 48
Tue Sep 19 11:55:02 2017 - [error][/usr/local/share/perl5/MHA/MasterMonitor.pm, ln525] Error happened on monitoring servers.
Tue Sep 19 11:55:02 2017 - [info] Got exit code 1 (Not master dead).
MySQL Replication Health is NOT OK!
出现如上错误,先暂时注释master_ip_failover_script= /usr/local/bin/master_ip_failover这个选项。后面引入keepalived后和修改该脚本以后再开启该选项
[root@manager ~]$ grep master_ip_failover /etc/masterha/app1.cnf
#master_ip_failover_script= /usr/local/bin/master_ip_failover
再进行检查
[root@manager ~]# masterha_check_repl --conf=/etc/masterha/app1.cnf
......
Tue Sep 19 11:53:55 2017 - [info]
192.168.6.221(192.168.6.221:3306) (current master)
+--192.168.6.222(192.168.6.222:3306)
+--192.168.6.223(192.168.6.223:3306)
Tue Sep 19 11:53:55 2017 - [info] Checking replication health on 192.168.6.222..
Tue Sep 19 11:53:55 2017 - [info] ok.
Tue Sep 19 11:53:55 2017 - [info] Checking replication health on 192.168.6.223..
Tue Sep 19 11:53:55 2017 - [info] ok.
Tue Sep 19 11:53:55 2017 - [warning] master_ip_failover_script is not defined.
Tue Sep 19 11:53:55 2017 - [warning] shutdown_script is not defined.
Tue Sep 19 11:53:55 2017 - [info] Got exit code 0 (Not master dead).
MySQL Replication Health is OK.
没有明显报错,只有两个警告而已,复制也显示正常了。
(9)配置VIP
使用keepalived来进行管理虚拟IP的漂移
a、在server02和server03安装keepalived
[root@master ~]# yum -y install keepalived
b、配置keepalived的配置文件
server02——master
[root@db ~]# cat /etc/keepalived/keepalived.conf
! Configuration File for keepalived
global_defs {
notification_email {
123@163.com
}
notification_email_from 123@163.com
smtp_server 127.0.0.1
smtp_connect_timeout 30
router_id MySQL-HA
}
vrrp_instance VI_1 {
state BACKUP //都为backup
interface eth0 //注意网卡是eth0还是eth1
virtual_router_id 68 //默认51,这里改为大于51的数字,两边要一致,默认51会出错,不知道为什么
priority 150 //优先级
advert_int 1
nopreempt //非抢占模式,两边都是backup
authentication {
auth_type PASS
auth_pass 1111
}
virtual_ipaddress {
192.168.6.248
}
}
server03——候选master
[root@master ~]# cat /etc/keepalived/keepalived.conf
! Configuration File for keepalived
global_defs {
notification_email {
123@163.com
}
notification_email_from 123@163.com
smtp_server 127.0.0.1
smtp_connect_timeout 30
router_id MySQL-HA
}
vrrp_instance VI_1 {
state BACKUP
interface eth0
virtual_router_id 68
priority 140
advert_int 1
nopreempt
authentication {
auth_type PASS
auth_pass 1111
}
virtual_ipaddress {
192.168.6.248
}
}
c、启动keepalived服务(server02,server03)
[root@master ~]#service keepalived start
d、查看绑定情况
[root@master ~]# ip a
1: lo: <LOOPBACK,UP,LOWER_UP> mtu 16436 qdisc noqueue state UNKNOWN
link/loopback 00:00:00:00:00:00 brd 00:00:00:00:00:00
inet 127.0.0.1/8 scope host lo
inet6 ::1/128 scope host
valid_lft forever preferred_lft forever
2: eth0: <BROADCAST,MULTICAST,UP,LOWER_UP> mtu 1500 qdisc pfifo_fast state UP qlen 1000
link/ether 00:0c:29:45:47:5a brd ff:ff:ff:ff:ff:ff
inet 192.168.6.221/31 brd 192.168.6.231 scope global eth0
inet 192.168.6.248/32 scope global eth0
inet6 fe80::20c:29ff:fe45:475a/64 scope link
valid_lft forever preferred_lft forever
发现已经将虚拟IP 192.168.6.248绑定了master02 192.168.6.221的网卡eth0上了
从上面的信息可以看到keepalived已经配置成功
(10)MHA引入keepalived(MySQL服务进程挂掉时通过MHA停止keepalived):
a、在server01修改/usr/local/bin/master_ip_failover
[root@manager ~]# cat /usr/local/bin/master_ip_failover
#!/usr/bin/env perl
use strict;
use warnings FATAL => 'all';
use Getopt::Long;
my (
$command, $ssh_user, $orig_master_host, $orig_master_ip,
$orig_master_port, $new_master_host, $new_master_ip, $new_master_port
);
my $vip = '192.168.6.248';
my $ssh_start_vip = "/etc/init.d/keepalived start";
my $ssh_stop_vip = "/etc/init.d/keepalived stop";
GetOptions(
'command=s' => \$command,
'ssh_user=s' => \$ssh_user,
'orig_master_host=s' => \$orig_master_host,
'orig_master_ip=s' => \$orig_master_ip,
'orig_master_port=i' => \$orig_master_port,
'new_master_host=s' => \$new_master_host,
'new_master_ip=s' => \$new_master_ip,
'new_master_port=i' => \$new_master_port,
);
exit &main();
sub main {
print "\n\nIN SCRIPT TEST====$ssh_stop_vip==$ssh_start_vip===\n\n";
if ( $command eq "stop" || $command eq "stopssh" ) {
my $exit_code = 1;
eval {
print "Disabling the VIP on old master: $orig_master_host \n";
&stop_vip();
$exit_code = 0;
};
if ($@) {
warn "Got Error: $@\n";
exit $exit_code;
}
exit $exit_code;
}
elsif ( $command eq "start" ) {
my $exit_code = 10;
eval {
print "Enabling the VIP - $vip on the new master - $new_master_host \n";
&start_vip();
$exit_code = 0;
};
if ($@) {
warn $@;
exit $exit_code;
}
exit $exit_code;
}
elsif ( $command eq "status" ) {
print "Checking the Status of the script.. OK \n";
exit 0;
}
else {
&usage();
exit 1;
}
}
sub start_vip() {
`ssh $ssh_user\@$new_master_host \" $ssh_start_vip \"`;
}
# A simple system call that disable the VIP on the old_master
sub stop_vip() {
`ssh $ssh_user\@$orig_master_host \" $ssh_stop_vip \"`;
}
sub usage {
"Usage: master_ip_failover --command=start|stop|stopssh|status --orig_master_host=host --orig_master_ip=ip --orig_master_port=port --new_master_host=host --new_master_ip=ip --new_master_port=port\n";
}
b、把#master_ip_failover_script= /usr/local/bin/master_ip_failover打开
[root@manager ~]# grep 'master_ip_failover_script' /etc/masterha/app1.cnf
master_ip_failover_script=/usr/local/bin/master_ip_failover
c、执行MHA检测
[root@manager ~]# masterha_check_repl --conf=/etc/masterha/app1.cnf
......
MySQL Replication Health is OK.
(11)配置邮件报警
直接上代码
[root@manager ~]# cat /usr/local/bin/send_report
#!/usr/bin/perl
# Copyright (C) 2011 DeNA Co.,Ltd.
#
# This program is free software; you can redistribute it and/or modify
# it under the terms of the GNU General Public License as published by
# the Free Software Foundation; either version 2 of the License, or
# (at your option) any later version.
#
# This program is distributed in the hope that it will be useful,
# but WITHOUT ANY WARRANTY; without even the implied warranty of
# MERCHANTABILITY or FITNESS FOR A PARTICULAR PURPOSE. See the
# GNU General Public License for more details.
#
# You should have received a copy of the GNU General Public License
# along with this program; if not, write to the Free Software
# Foundation, Inc.,
# 51 Franklin Street, Fifth Floor, Boston, MA 02110-1301 USA
## Note: This is a sample script and is not complete. Modify the script based on your environment.
use strict;
use warnings FATAL => 'all';
use Mail::Sender;
use Getopt::Long;
#new_master_host and new_slave_hosts are set only when recovering master succeeded
my ( $dead_master_host, $new_master_host, $new_slave_hosts, $subject, $body );
my $smtp='smtp.163.com'; //smtp地址
my $mail_from='xxx@163.com'; //发件人
my $mail_user='xxx@163.com'; //邮件用户名
my $mail_pass='xxx'; //客户端授权密码
my $mail_to=['xxx@qq.com']; //收件人
GetOptions(
'orig_master_host=s' => \$dead_master_host,
'new_master_host=s' => \$new_master_host,
'new_slave_hosts=s' => \$new_slave_hosts,
'subject=s' => \$subject,
'body=s' => \$body,
);
mailToContacts($smtp,$mail_from,$mail_user,$mail_pass,$mail_to,$subject,$body);
sub mailToContacts {
my ( $smtp, $mail_from, $user, $passwd, $mail_to, $subject, $msg ) = @_;
open my $DEBUG, "> /tmp/monitormail.log"
or die "Can't open the debug file:$!\n";
my $sender = new Mail::Sender {
ctype => 'text/plain; charset=utf-8',
encoding => 'utf-8',
smtp => $smtp,
from => $mail_from,
auth => 'LOGIN',
TLS_allowed => '0',
authid => $user,
authpwd => $passwd,
to => $mail_to,
subject => $subject,
debug => $DEBUG
};
$sender->MailMsg(
{ msg => $msg,
debug => $DEBUG
}
) or print $Mail::Sender::Error;
return 1;
}
# Do whatever you want here
exit 0
(11)MHA Manage监控启停操作
a、开启MHA Manager监控
[root@manager ~]$ mkdir -p /var/log/masterha/app1/
[root@manager ~]$ nohup masterha_manager --conf=/etc/masterha/app1.cnf --remove_dead_master_conf --ignore_last_failover < /dev/null > /var/log/masterha/app1/manager.log 2>&1 &
b、关闭MHA Manager监控
[root@manager ~]$ masterha_stop --conf=/etc/masterha/app1.cnf
c、查看MHA Manager监控状态
[root@manager ~]$ masterha_check_status --conf=/etc/masterha/app1.cnf
app1 (pid:2711) is running(0:PING_OK), master:192.168.6.221
此状态说明MHA监控状态正常
d、MHA监控日志/var/log/masterha/app1/manager.log
(12)切换测试
[root@master ~]$ service mysqld stop
观察server03有没有接管server02,vip是否漂移,是否有邮件预警
