


微信搜索“coder-home”或扫一扫下面的二维码,关注公众号,
第一时间了解更多干货分享,还有各类视频教程资源。扫描它,带走我

前言
准备CentOS环境
使用yum来安装MySQL
下载并安装MySQL的yum源
修改yum源的MySQL版本
禁用Linux系统自带的MySQL
使用yum安装MySQL
查看MySQL安装的目录
启停MySQL数据库服务
登录MySQL数据库
验证MySQL的可用性
准备Ubuntu环境
关于Ubuntu
使用apt-get来安装MySQL
修改系统的apt-get源
下载MySQL的apt-get源
安装MySQL的apt-get源
查看MySQL的apt-get源
安装MySQL数据库
启动MySQL数据库
验证MySQL数据库
总结
前言
在前的几篇文章中,我们分享了MySQL数据库使用编译好的二进制安装文件来安装MySQL数据库,同时还分享了使用MySQL的源码进行编译安装MySQL数据库。
在今天的文章中,我们来看一下另外一种安装方式:使用yum或者apt-get来安装MySQL数据库。
通过yum来安装MySQL5.7是基于centos系统来实验,而通过apt-get来安装MySQL5.7是基于Ubuntu系统来实验。
准备CentOS环境
我们使用docker运行了一个centos的镜像文件,运行容器的时候,使用的命令如下所示:
docker run -it -d --name centos-mysql --hostname centos.mysqlserver --privileged=true -v sys/fs/cgroup:/sys/fs/cgroup centos:latest usr/sbin/init复制
启动的时候使用参数--privileged
的目的是为了在容器中可以使用systemctl
或者service
命令来管理容器总的各种服务,如果不增加这个参数,启动容器后,如果在容器内部尝试时候用systemctl
或者service
命令来管理服务的时候,会出现如下的错误:
[root@centos ~]# service mysql start
Redirecting to bin/systemctl start mysql.service
System has not been booted with systemd as init system (PID 1). Can't operate.
Failed to connect to bus: Host is down
[root@centos ~]# systemctl start mysqld
System has not been booted with systemd as init system (PID 1). Can't operate.
Failed to connect to bus: Host is down
[root@centos ~]#复制
而参数-v sys/fs/cgroup:/sys/fs/cgroup
是为了解决启动MySQL服务的时候出现如下的错误才配置的:
Feb 04 07:45:04 centos.mysqlserver systemd[1]: Starting MySQL Server...
Feb 04 07:45:09 centos.mysqlserver systemd[1]: mysqld.service: New main PID 353 does not belong to service, and PID file is not owned by root. Refusing.
Feb 04 07:45:09 centos.mysqlserver systemd[1]: mysqld.service: New main PID 353 does not belong to service, and PID file is not owned by root. Refusing.
[root@centos ~]#复制
启动centos镜像后,查看启动的结果如下:
➜ ~ docker ps
CONTAINER ID IMAGE COMMAND CREATED STATUS PORTS NAMES
0a8412a5e3a1 centos:latest "/bin/bash" 6 seconds ago Up 5 seconds centos-mysql
➜ ~复制
进入容器内的命令如下,进入容器之后,我们就可以像登录到一个Linux服务器一样操作就OK了。
➜ ~ docker exec -it centos-mysql bin/bash复制
使用yum来安装MySQL
检查是否已经安装了yum命令,因为我们要使用yum来安装MySQL,所以要保证系统中已经安装了yum命令,如果这个命令没有安装,先安装上yum,然后再按照下面的步骤进行。
下载并安装MySQL的yum源
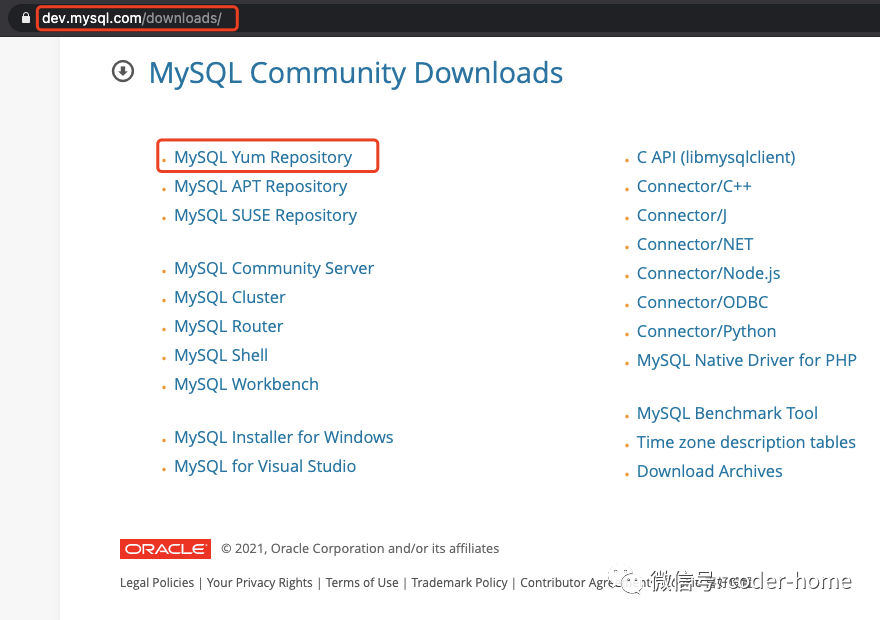
访问MySQL的官方网站,打开如下链接:https://dev.mysql.com/downloads ,点击红色框选MySQL Yum Repository
连接。
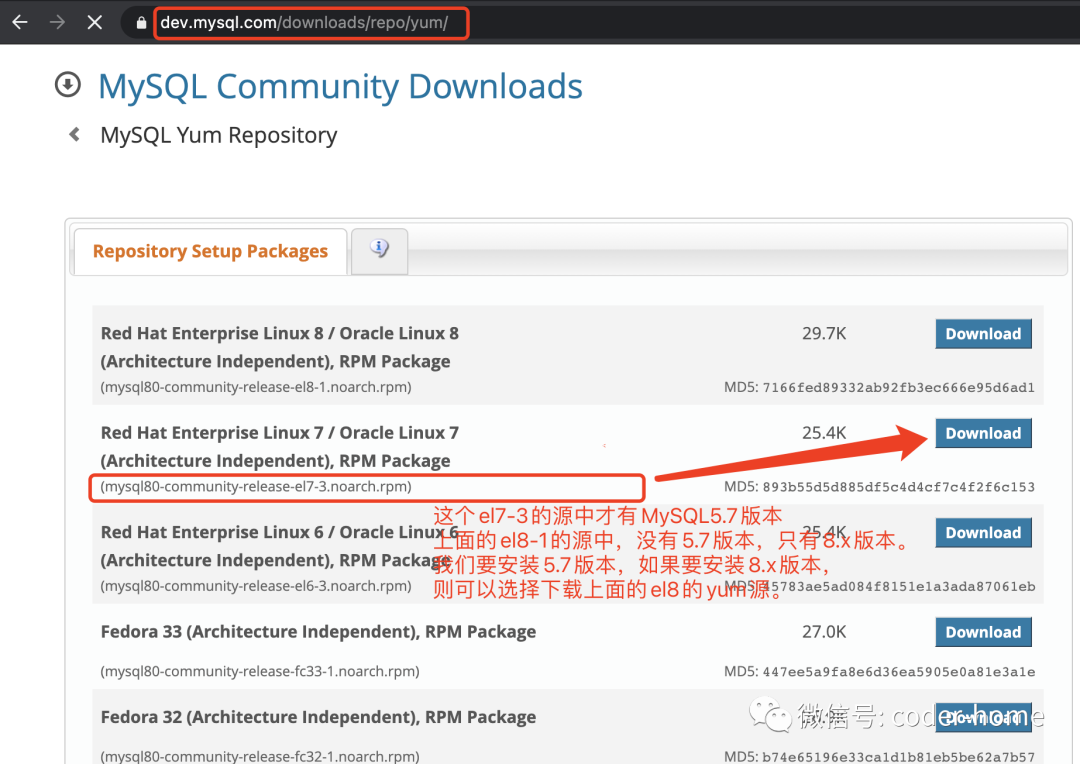
进入如下页面:https://dev.mysql.com/downloads/repo/yum/,根据自己想安装的MySQL版本,来选择对应的yum源,这里我们选择5.7版本MySQL对应的yum源。点击下面箭头指向的Download
链接。
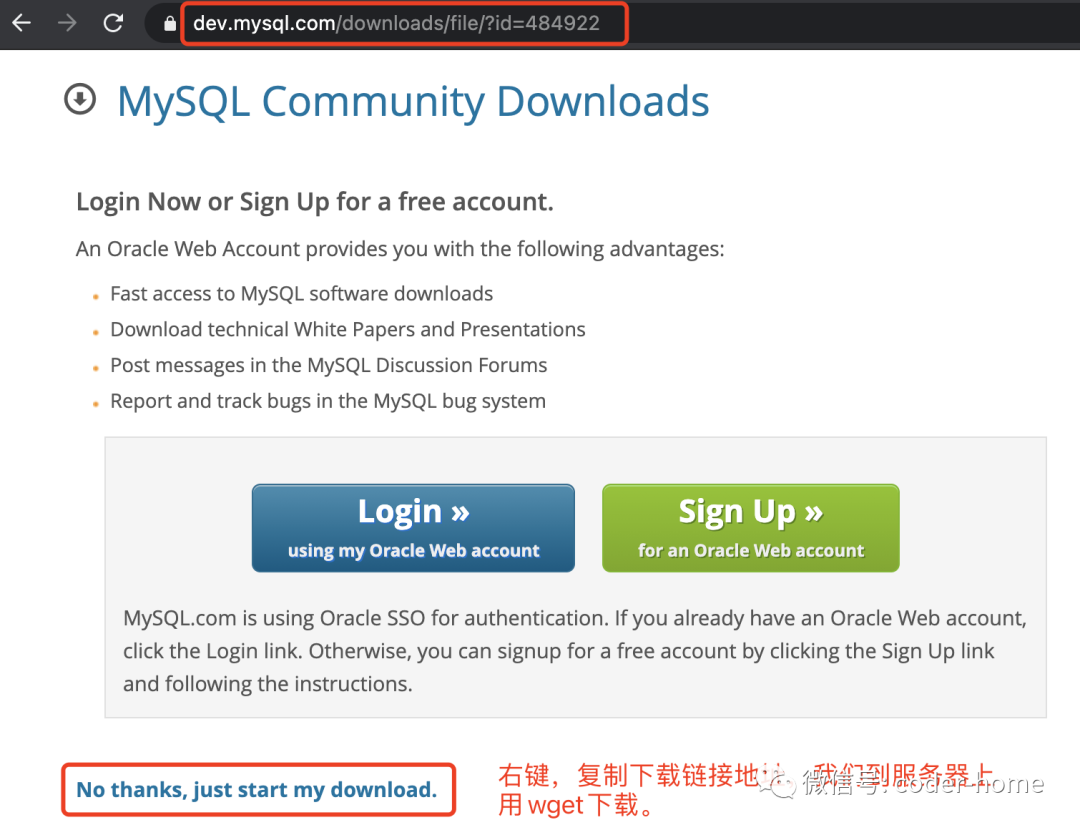
进入如下页面,地址为:https://dev.mysql.com/downloads/file/?id=484922,然后我们找到No thanks, just start my download
,接着右键复制链接地址,我们到需要安装MySQL的服务器上面使用wget
命令去下载。
复制链接地址,使用wget
命令下载MySQL的yum源,如果没有安装wget
命令,使用yum来安装wget
命令,如下:
[root@centos ~]# wget https://dev.mysql.com/get/mysql80-community-release-el7-3.noarch.rpm
bash: wget: command not found
[root@centos ~]# yum install -y wget复制
下载MySQL的yum源:
[root@centos ~]# wget https://dev.mysql.com/get/mysql80-community-release-el7-3.noarch.rpm
[root@centos ~]# ls -lstr mysql*
28 -rw-r--r-- 1 root root 26024 Apr 24 2019 mysql80-community-release-el7-3.noarch.rpm
[root@centos ~]#复制
安装MySQL的yum源,使用如下命令安装。
[root@centos ~]# rpm -ivh mysql80-community-release-el7-3.noarch.rpm
warning: mysql80-community-release-el7-3.noarch.rpm: Header V3 DSA/SHA1 Signature, key ID 5072e1f5: NOKEY
Verifying... ################################# [100%]
Preparing... ################################# [100%]
Updating installing...
1:mysql80-community-release-el7-3 ################################# [100%]
[root@centos ~]#复制
安装完成之后,可以在/etc/yum.repos.d
目录下面看到安装后的yum源,如下所:
[root@centos ~]# ls -lstr etc/yum.repos.d/*mysql*
4 -rw-r--r-- 1 root root 2108 Apr 24 2019 etc/yum.repos.d/mysql-community-source.repo
4 -rw-r--r-- 1 root root 2076 Apr 24 2019 etc/yum.repos.d/mysql-community.repo
[root@centos ~]#复制
这里我们需要注意一个问题:随着时间的推移,MySQL官方网站页面中直接提供下载的yum源默认都是他们最新发布的版本。所以如果我们要安装比较老一点的版本,那么根据上面步骤下载的yum源中可能没有包含你想要的MySQL版本。但是我们可以从下面的链接中去查找历史版本的yum源。
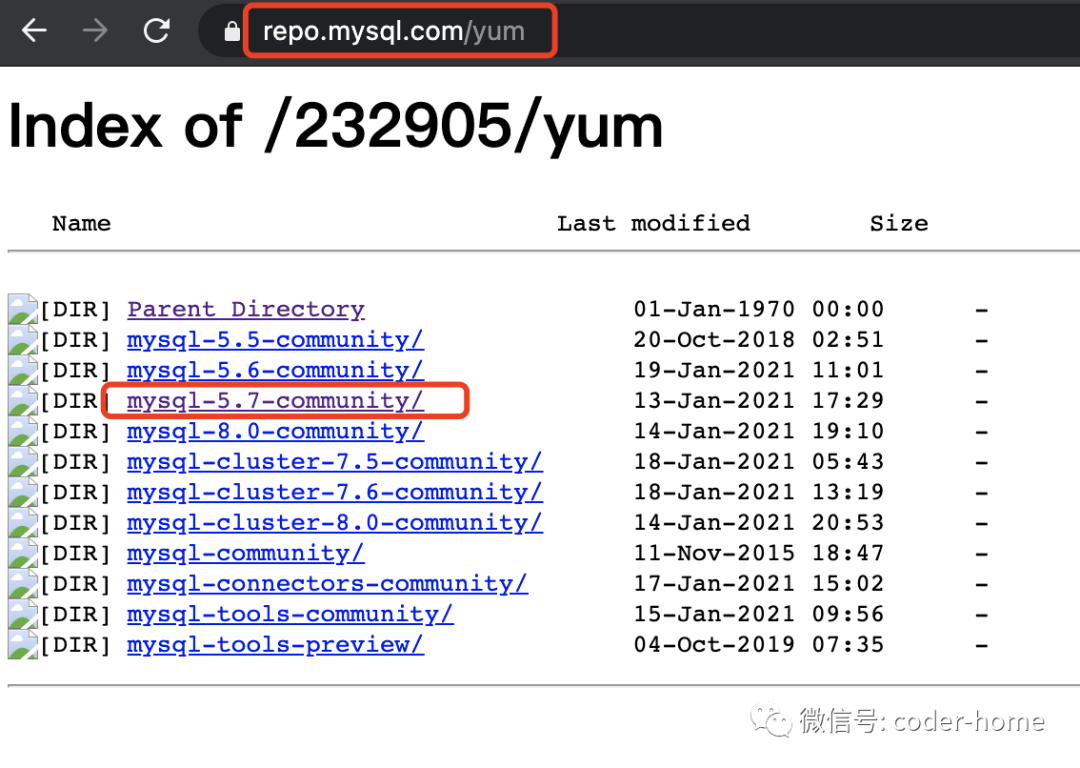
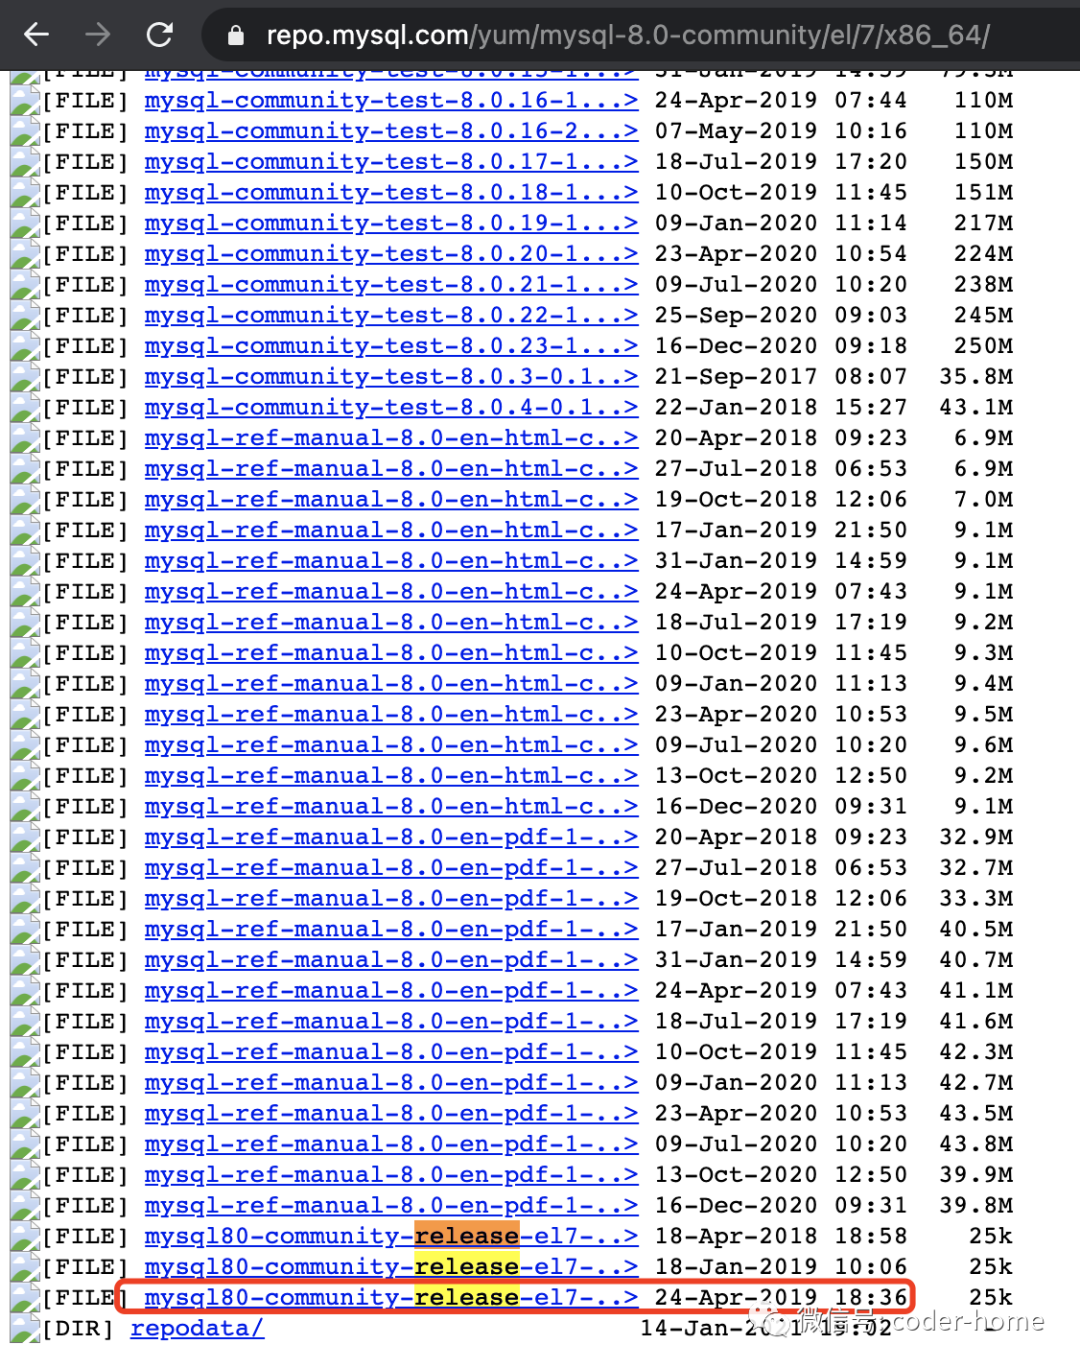
MySQL历史版本的yum源下载地址:https://repo.mysql.com/yum,如下所示,根据你要的版本,然后依次选择你的操作系统、系统版本、务器架构,就可以进入到具体的下载界面。
例如:https://repo.mysql.com/yum/mysql-8.0-community/el/7/x86_64/ 这个页面:el(Enterprise Linux),7(系统的版本),x86_64(CPU的架构),在界面中提供了各种的rpm
文件安装文件,我们只要找到包含release
关键字的rpm
文件就可以了,这个文件的大小在几KB,不会太大。然后下载这个rpm。把这个几KB的rpm文件,下载到服务器中,然后安装上就可以参考下面的安装步骤了。
备注:el6,el7,el8
的含义是什么?el
是Enterprise Linux
的简写,然后6,7,8
代表的是Linux的版本,分别表示Red Hat 6.x、CentOS 6.x
,Red Hat 7.x、CentOS 7.x
,Red Hat 8.x、CentOS 8.x
等版本。
修改yum源的MySQL版本
在我们安装上MySQL的yum源之后,通过这个yum源安装的MySQL版本默认是8,如果我们要安装MySQL5.7版本,则需要修改一下yum源的默认MySQL版本。使用如下命令查看当前MySQL的yum源启用的是什么版本的MySQL,如下所示:
[root@centos ~]# yum repolist all | grep mysql
mysql-cluster-7.5-community MySQL Cluster 7.5 Community disabled
mysql-cluster-7.5-community-source MySQL Cluster 7.5 Community - Source disabled
mysql-cluster-7.6-community MySQL Cluster 7.6 Community disabled
mysql-cluster-7.6-community-source MySQL Cluster 7.6 Community - Source disabled
mysql-cluster-8.0-community MySQL Cluster 8.0 Community disabled
mysql-cluster-8.0-community-source MySQL Cluster 8.0 Community - Source disabled
mysql-connectors-community MySQL Connectors Community enabled
mysql-connectors-community-source MySQL Connectors Community - Source disabled
mysql-tools-community MySQL Tools Community enabled
mysql-tools-community-source MySQL Tools Community - Source disabled
mysql-tools-preview MySQL Tools Preview disabled
mysql-tools-preview-source MySQL Tools Preview - Source disabled
mysql55-community MySQL 5.5 Community Server disabled
mysql55-community-source MySQL 5.5 Community Server - Source disabled
mysql56-community MySQL 5.6 Community Server disabled
mysql56-community-source MySQL 5.6 Community Server - Source disabled
mysql57-community MySQL 5.7 Community Server disabled
mysql57-community-source MySQL 5.7 Community Server - Source disabled
mysql80-community MySQL 8.0 Community Server enabled
mysql80-community-source MySQL 8.0 Community Server - Source disabled
[root@centos ~]#复制
通过上面的命令输出结果可以看出目前启用的是MySQL8.0的版本。而此时我们想要安装5.7版本的MySQL都是处于disable
的状态。我们需要通过如下的yum-config-manager
命令来启用MySQL5.7版本, 同时禁用MySQL8.0版本。但是我们发现系统中目前没有yum-config-manager
命令。我们可以通过yum provides
命令查看那个包里包含这个命令,然后再使用yum install
来安装yum-config-manager
命令,然后我们再去用yum-config-manager
去启用MySQL5.7和禁用MySQL8.0的yum源。
[root@centos ~]# yum-config-manager --disable mysql80-community
bash: yum-config-manager: command not found
[root@centos ~]# yum provides yum-config-manager
Last metadata expiration check: 0:04:20 ago on Tue 02 Feb 2021 09:02:25 AM UTC.
yum-utils-4.0.17-5.el8.noarch : Yum-utils CLI compatibility layer
Repo : baseos
Matched from:
Filename : usr/bin/yum-config-manager
[root@centos ~]# yum install yum-utils -y复制
启用MySQL5.7,禁用MySQL8.0的yum源,参考如下命令:
[root@centos ~]# yum-config-manager --disable mysql80-community
[root@centos ~]# yum-config-manager --enable mysql57-community复制
然后我们在验证一下修改后的MySQL的yum源是什么样子的,此时我们使用yum来安装的MySQL才是5.7版本的MySQL。
[root@centos ~]# yum repolist all | grep mysql
mysql-cluster-7.5-community MySQL Cluster 7.5 Community disabled
mysql-cluster-7.5-community-source MySQL Cluster 7.5 Community - Source disabled
mysql-cluster-7.6-community MySQL Cluster 7.6 Community disabled
mysql-cluster-7.6-community-source MySQL Cluster 7.6 Community - Source disabled
mysql-cluster-8.0-community MySQL Cluster 8.0 Community disabled
mysql-cluster-8.0-community-source MySQL Cluster 8.0 Community - Source disabled
mysql-connectors-community MySQL Connectors Community enabled
mysql-connectors-community-source MySQL Connectors Community - Source disabled
mysql-tools-community MySQL Tools Community enabled
mysql-tools-community-source MySQL Tools Community - Source disabled
mysql-tools-preview MySQL Tools Preview disabled
mysql-tools-preview-source MySQL Tools Preview - Source disabled
mysql55-community MySQL 5.5 Community Server disabled
mysql55-community-source MySQL 5.5 Community Server - Source disabled
mysql56-community MySQL 5.6 Community Server disabled
mysql56-community-source MySQL 5.6 Community Server - Source disabled
#下面的MySQL57是enable的状态了
mysql57-community MySQL 5.7 Community Server enabled
mysql57-community-source MySQL 5.7 Community Server - Source disabled
#下面的MySQL80是disable的状态了
mysql80-community MySQL 8.0 Community Server disabled
mysql80-community-source MySQL 8.0 Community Server - Source disabled
[root@centos ~]#复制
禁用Linux系统自带的MySQL
这步的操作仅适用于Linux el8版本,el7版本的Linux不需要这个操作。如果不禁用系统自带的MySQL模块,则使用yum来安装MySQL的时候,还是会使用系统自带的模块,不会使用我们上面自己安装的yum源。
[root@centos ~]# yum module disable mysql复制
使用yum安装MySQL
经过了我们前面的一系列前置的铺垫,现在终于可以安装MySQL的,其实安装的命令特别简单,就一条yum命令,如下所示:
[root@centos ~]# yum install mysql-server -y复制
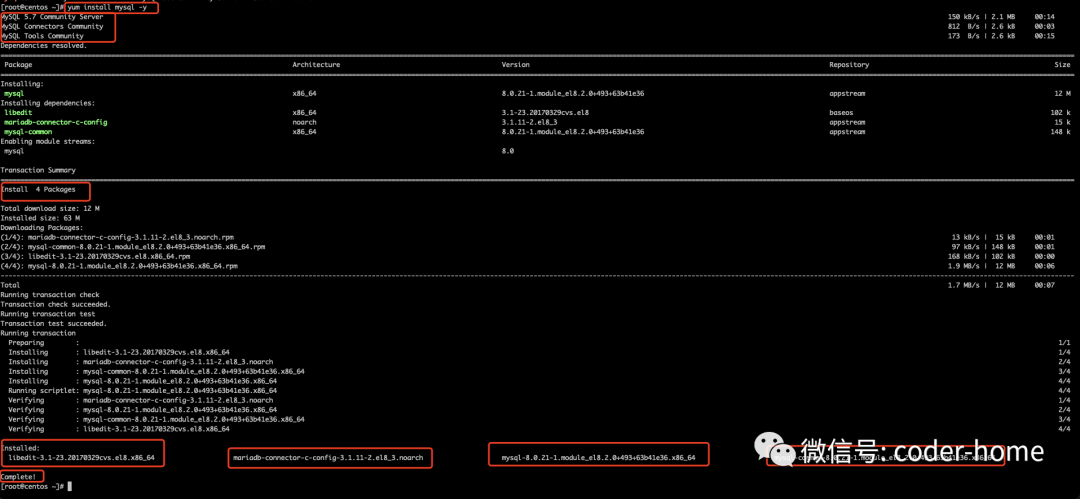
如果我们只是需要在某一个服务器上面安装MySQL客户端,不需要安装MySQL数据库,则可以参考如下的命令来安装,注意:安装客户端和安装服务端的命令是不一样的,一个是mysql-server
,一个是mysql
。
[root@centos ~]# yum install mysql -y复制
安装完成MySQL客户端的截图如下所示:
查看MySQL安装的目录
在上一步中,我们使用yum安装了MySQL数据库软件,那么这些软件都被安装在哪了呢?我们可以使用rpm -qa
命令来查看,如下所示:
[root@centos etc]# rpm -qa | grep -i mysql
#下面列出的5个包就是我们安装过的所有和MySQL有关系的包
mysql-community-common-5.7.33-1.el7.x86_64
mysql-community-client-5.7.33-1.el7.x86_64
mysql80-community-release-el7-3.noarch
mysql-community-libs-5.7.33-1.el7.x86_64
mysql-community-server-5.7.33-1.el7.x86_64
[root@centos ~]#复制
接着,我们来看一下,这5个包都分别被安装在了哪些目录下面。此时,我们需要使用rpm -ql <your package name>
,如下所示,由于输出的内容太多,这里就只贴出查看的命令不列出具体的安装目录了。
#这个是MySQL错误信息和字符集的安装包
rpm -ql mysql-community-common-5.7.33-1.el7.x86_64
#下面是查看MySQL客户端命令工具和帮助信息安装目录
rpm -ql mysql-community-client-5.7.33-1.el7.x86_64
#下面这个是我们在最前面安装的MySQL的yum源的时候,安装的包,它被安装在/etc/yum.repos.d目录下面
rpm -ql mysql80-community-release-el7-3.noarch
#MySQL依赖的库文件安装目录。
rpm -ql mysql-community-libs-5.7.33-1.el7.x86_64
#下面是MySQL数据库软件的安装目录
rpm -ql mysql-community-server-5.7.33-1.el7.x86_64复制
启停MySQL数据库服务
启动和关闭MySQL服务的相关命令如下:
# 启动MySQL服务
systemctl start mysqld
# 停止MySQL服务
systemctl stop mysqld
# 查看MySQL服务的状态
systemctl status mysqld
# 重启MySQL服务
systemctl restart mysqld复制
登录MySQL数据库
安装完成MySQL5.7并且启动MySQL5.7数据库之后,会在/var/log/mysql.log
中生成初始化的root
账号的密码。我们可以使用下面的命令来查看初始化的密码是什么。MySQL8.0在使用yum安装并且启动之后,root
的密码是空。不需要下面的操作去查找初始化的密码是什么。
[root@centos ~]# cat var/log/mysqld.log | grep password
2021-02-04T07:45:05.607322Z 1 [Note] A temporary password is generated for root@localhost: SGG5AL&,j)s:
[root@centos ~]#复制
拿到初始化的密码之后,我们登录MySQL数据库,使用如下的命令
[root@centos ~]# mysql -uroot -p"SGG5AL&,j)s:"
mysql: [Warning] Using a password on the command line interface can be insecure.
Welcome to the MySQL monitor. Commands end with ; or \g.
Your MySQL connection id is 2
Server version: 5.7.33
Copyright (c) 2000, 2021, Oracle and/or its affiliates.
Oracle is a registered trademark of Oracle Corporation and/or its
affiliates. Other names may be trademarks of their respective
owners.
Type 'help;' or '\h' for help. Type '\c' to clear the current input statement.
mysql> select version();
ERROR 1820 (HY000): You must reset your password using ALTER USER statement before executing this statement.
mysql>复制
通过上面的提示,我们发现,在使用初始化密码第一次登录MySQL数据库之后,需要修改root用户的密码,才可以进行其他的操作。修改root用户的密码命令如下,我们在尝试将密码修改一个简单的密码的时候,MySQL会提示我们设置的密码不符合规则,当然这个策略是可以修改的,但是在我们修改为一个符合规则的密码之前,我们是没有办法来修改这个密码复杂度验证规则的。所以,这里我们把密码修改为原先初始化的密码。然后再去尝试修改密码复杂度验证规则,之后在去修改为一个我们可以记得住的密码。
mysql> alter user 'root'@'localhost' identified by 'root';
ERROR 1819 (HY000): Your password does not satisfy the current policy requirements
mysql> alter user 'root'@'localhost' identified by 'SGG5AL&,j)s:';
Query OK, 0 rows affected (0.03 sec)
mysql>复制
查看当前MySQL设置的密码复杂度配置参数如下:
mysql> show variables like 'validate_password%';
+--------------------------------------+--------+
| Variable_name | Value |
+--------------------------------------+--------+
| validate_password_check_user_name | OFF |
| validate_password_dictionary_file | |
| validate_password_length | 8 |
| validate_password_mixed_case_count | 1 |
| validate_password_number_count | 1 |
| validate_password_policy | MEDIUM |
| validate_password_special_char_count | 1 |
+--------------------------------------+--------+
7 rows in set (0.01 sec)
mysql>复制
修改为简单的验证规则如下。注意:在生产环境上,不建议修改这个规则,还是用复杂的密码规则。自己弄个MySQL数据库来玩玩可以这么干,密码简单好记。
mysql> set global validate_password_policy = 'low';
Query OK, 0 rows affected (0.00 sec)
mysql> set global validate_password_length = 4;
Query OK, 0 rows affected (0.00 sec)
mysql>复制
此时我们再次去尝试修改root的密码,改为一个简单的密码如下,发现可以修改成功了。注意:在修改root的密码的时候,不能仅仅指定用户名root,还需要把root账号对应的host ip地址也一并指定,在MySQL中,用户是通过name和host来决定一个唯一的账号的,而我们的root用户,默认只能在本机登录,也就是它的ip段是localhost
,所以这里要使用'root'@'localhost'
。
mysql> alter user 'root'@'localhost' identified by 'root';
Query OK, 0 rows affected (0.03 sec)
mysql>复制
验证MySQL的可用性
下面我们来验证一下安装的MySQL是否可以正常提供服务。通过下面的示例,我们可以看出,安装的MySQL数据库版本为5.7.33,可以创建数据库、表、插入数据、查询数据等操作。数据库是可以正常提供服务的。
mysql> select version();
+-----------+
| version() |
+-----------+
| 5.7.33 |
+-----------+
1 row in set (0.02 sec)
mysql> show databases;
+--------------------+
| Database |
+--------------------+
| information_schema |
| mysql |
| performance_schema |
| sys |
+--------------------+
4 rows in set (0.09 sec)
mysql> create database db1 default charset utf8mb4;
Query OK, 1 row affected (0.04 sec)
mysql> use db1;
Database changed
mysql> create table t1(id int);
Query OK, 0 rows affected (0.16 sec)
mysql> insert into t1 values (1);
Query OK, 1 row affected (0.13 sec)
mysql> select * from t1;
+------+
| id |
+------+
| 1 |
+------+
1 row in set (0.01 sec)
mysql>复制
准备Ubuntu环境
使用docker来运行一个Ubuntu镜像,如下:
docker run -it -d --name ubuntu-mysql --hostname ubuntu.mysqlserver -v sys/fs/cgroup:/sys/fs/cgroup --privileged=true ubuntu:latest复制
容器启动后,如下所示:
➜ ~ docker ps
CONTAINER ID IMAGE COMMAND CREATED STATUS PORTS NAMES
714b1baa3875 ubuntu:latest "/bin/bash" 28 hours ago Up 28 hours ubuntu-mysql
➜ ~复制
使用如下命令进入容器:
➜ ~ docker exec -it ubuntu-mysql bin/bash复制
关于Ubuntu
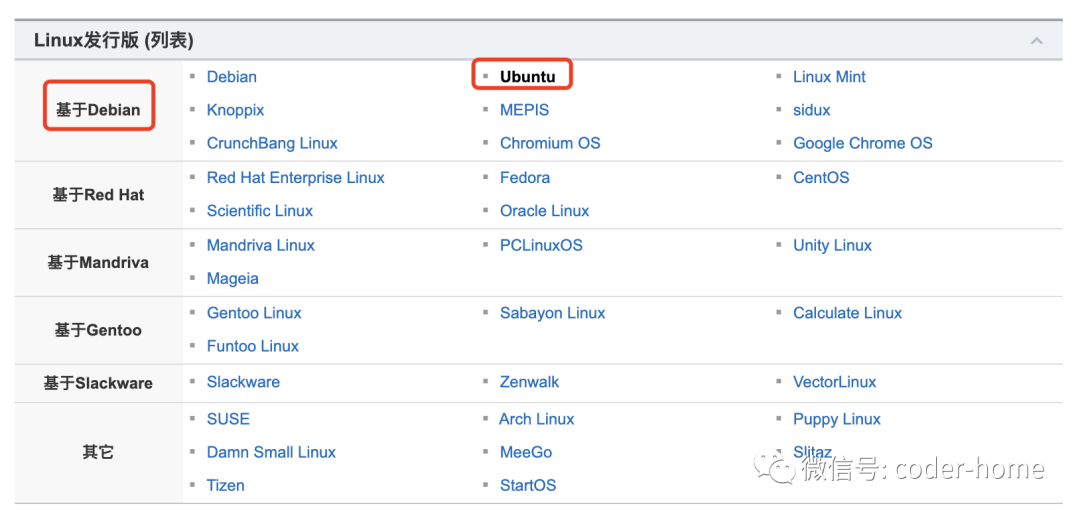
Ubuntu是Debian的一个衍生版本,所以它和Debian安装软件的方式一样,使用apt-get命令来安装。如下所示是Linux系统发行版列表:
Ubuntu系统的版本是以年和月作为版本号的。比如Ubuntu 20.10
,代表是2020年10月份发布的。Ubuntu 19.04
代表的是2019年4月份发布的。Ubuntu 18.10
代表的是2018年10月份发布的。它每年发布2个版本,分别是每年的4月份和10月份。
另外一个是每一个Ubuntu发布的系统版本都有一个别名,也叫做代号。是以动物的名称来命名的,由一个形容词+一个动词组成,并且形容词和动词的第一个字母都相同,从Ubuntu 6.06开始,两个词的首字母按照英文字母表的排列顺序取用。
下面是Ubuntu发布的版本列表:

查看你的Ubuntu的版本,使用如下的方式来查看,从下面的输出可以看出,我们目前使用容器启动的这个Ubuntu系统它的版本是20.04
,它的别名是focal
,架构是X86_64
。
root@ubuntu:~# cat etc/issue
Ubuntu 20.04.1 LTS \n \l
root@ubuntu:~# cat proc/version
Linux version 4.19.76-linuxkit (root@4abe09437d05) (gcc version 8.3.0 (Alpine 8.3.0)) #1 SMP Tue May 26 11:42:35 UTC 2020
root@ubuntu:~# uname -a
Linux ubuntu.mysqlserver 4.19.76-linuxkit #1 SMP Tue May 26 11:42:35 UTC 2020 x86_64 x86_64 x86_64 GNU/Linux
root@ubuntu:~# lsb_release -a
No LSB modules are available.
Distributor ID: Ubuntu
Description: Ubuntu 20.04.1 LTS
Release: 20.04
Codename: focal
root@ubuntu:~#复制
注意:如果提示找不到lsb_release
命令,则可以使用apt-get install lsb_release -y
命令来安装lsb_release
命令,然后再尝试使用这个命令来查看Ubuntu系统的版本。
使用apt-get来安装MySQL
前面我们准备了一个Ubuntu最新的容器镜像,现在我们就基于这个运行容器镜像,来安装MySQL数据库。
修改系统的apt-get源
在安装之前,我们首先来修改一下Ubuntu的apt-get软件源。如果使用Ubuntu默认的apt-get源,由于是国外的网站,所以比较慢,我们把它修改为国内的几个镜像源。比如:中科大镜像源、清华大学镜像源、网易镜像源、阿里云镜像源。这里我们选择阿里的镜像源。
Ubuntu系统的apt-get软件源,在/etc/apt/sources.list
配置文件中配置。我们需要修改这个配置文件中的内容来替换镜像源,在修改之前可以备份一下这个文件。
root@ubuntu:~# cp etc/apt/sources.list etc/apt/sources.list.bak复制
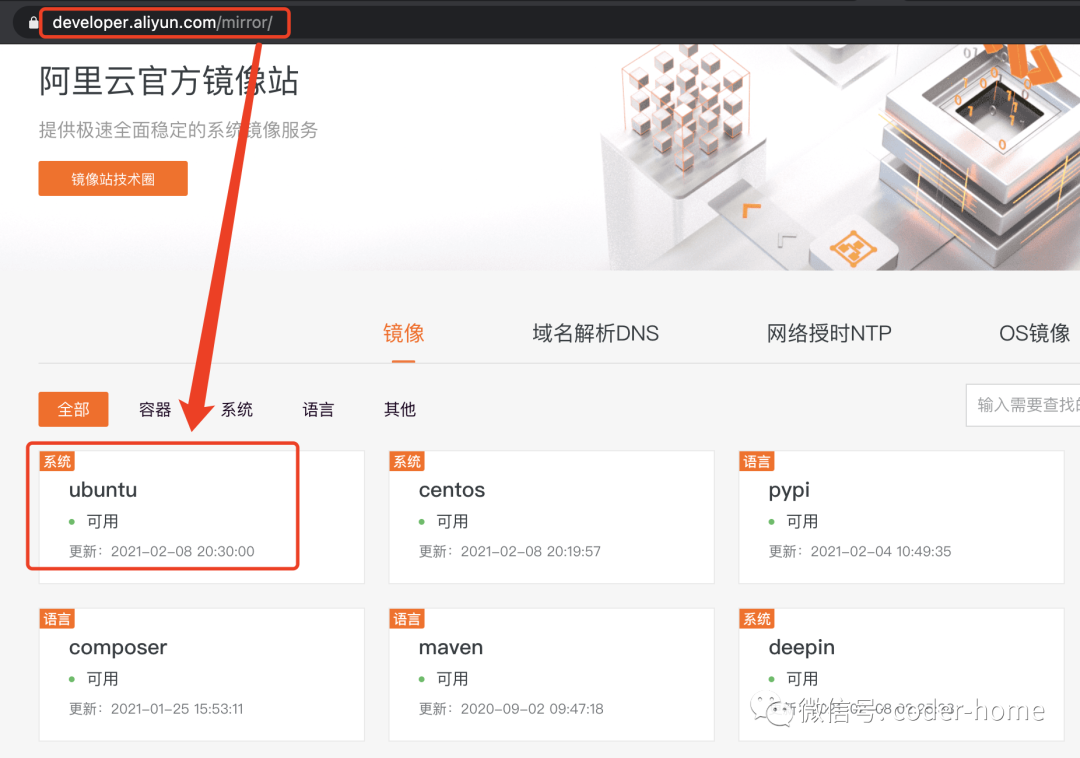
备份完成之后,我们去找阿里云的镜像源到底是什么,可以通过地址:https://developer.aliyun.com/mirror/ 来查找,参考如下截图看查看阿里云的镜像源。
阿里云的Ubuntu的apt-get源详细配地址参考下面的连接:
https://developer.aliyun.com/mirror/ubuntu?spm=a2c6h.13651102.0.0.3e221b11KGYWPl
根据自己的Ubuntu系统的版本来选择对应的配置,因为我的Ubuntu系统版本是20.04(focal),所以我采用如下的配置,你根据自己的系统版本选择正确的配置源就可以了。因为我的Ubuntu连vim都没有安装,所以我采用echo xxx > etc/apt/sources.list
的方式把下的文件写入到source.list
文件中,如果你的Ubuntu中有vim命令,你可以直接编辑vim中的文件,把里面的内容从全部删除,然后替换成下面的内容。
deb http://mirrors.aliyun.com/ubuntu/ focal main restricted universe multiverse
deb-src http://mirrors.aliyun.com/ubuntu/ focal main restricted universe multiverse
deb http://mirrors.aliyun.com/ubuntu/ focal-security main restricted universe multiverse
deb-src http://mirrors.aliyun.com/ubuntu/ focal-security main restricted universe multiverse
deb http://mirrors.aliyun.com/ubuntu/ focal-updates main restricted universe multiverse
deb-src http://mirrors.aliyun.com/ubuntu/ focal-updates main restricted universe multiverse
deb http://mirrors.aliyun.com/ubuntu/ focal-proposed main restricted universe multiverse
deb-src http://mirrors.aliyun.com/ubuntu/ focal-proposed main restricted universe multiverse
deb http://mirrors.aliyun.com/ubuntu/ focal-backports main restricted universe multiverse
deb-src http://mirrors.aliyun.com/ubuntu/ focal-backports main restricted universe multiverse复制
这里针对配置的源码的信息简单说明一下,ubuntu 软件源 main,restricted,universe,multiverse 的区别:
main:完全的自由软件。
restricted:不完全的自由软件。
universe:ubuntu官方不提供支持与补丁,全靠社区支持。
muitiverse:非自由软件,完全不提供支持和补丁。
修改完成apt-get源之后,记得执行如下的命令更新apt-get源,这样才会使用到新的apt-get 源。
root@ubuntu:/etc/apt# apt-get update复制
更完成之后,我们使用apt-get来安装wget
命令,然后我们通过这个命令去下载MySQL官方的apt-get源。
root@ubuntu:/etc/apt# apt-get install wget -y复制
下载MySQL的apt-get源
从MySQL官网上下载MySQL使用的apt-get源,参考如下截图,地址为:https://dev.mysql.com/downloads/
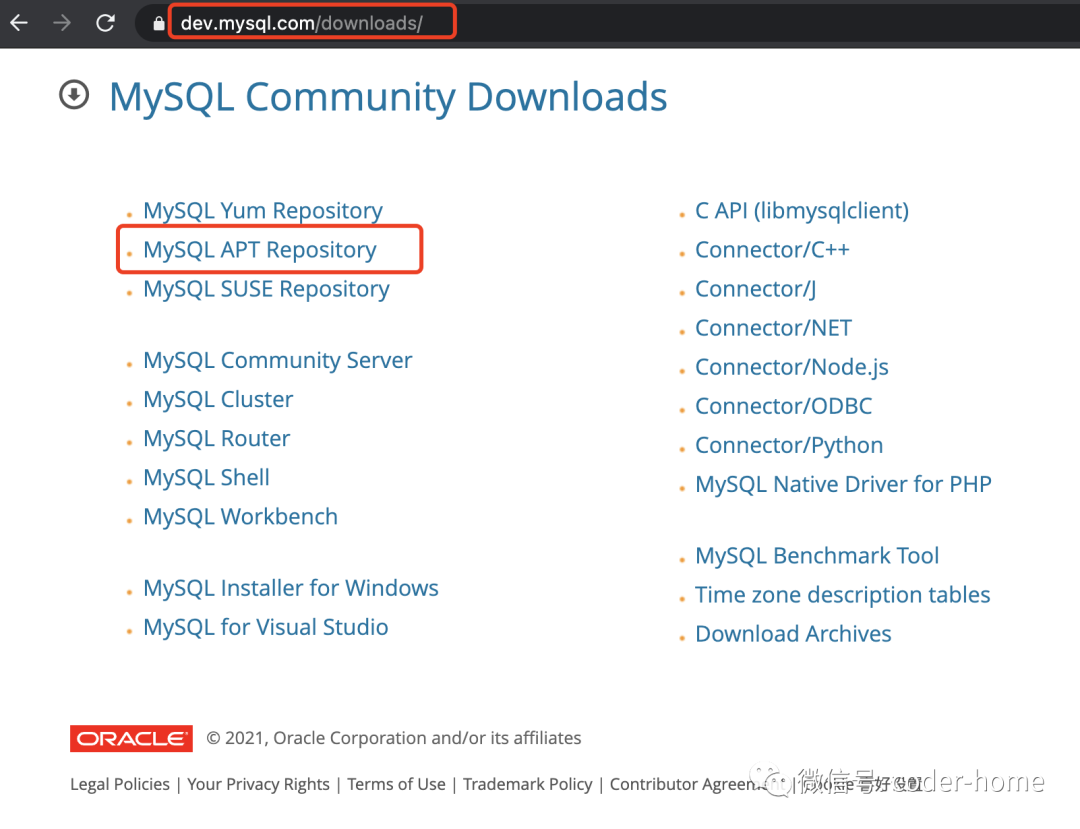
然后进入如下页面,接着点击页面中的Download
连接。
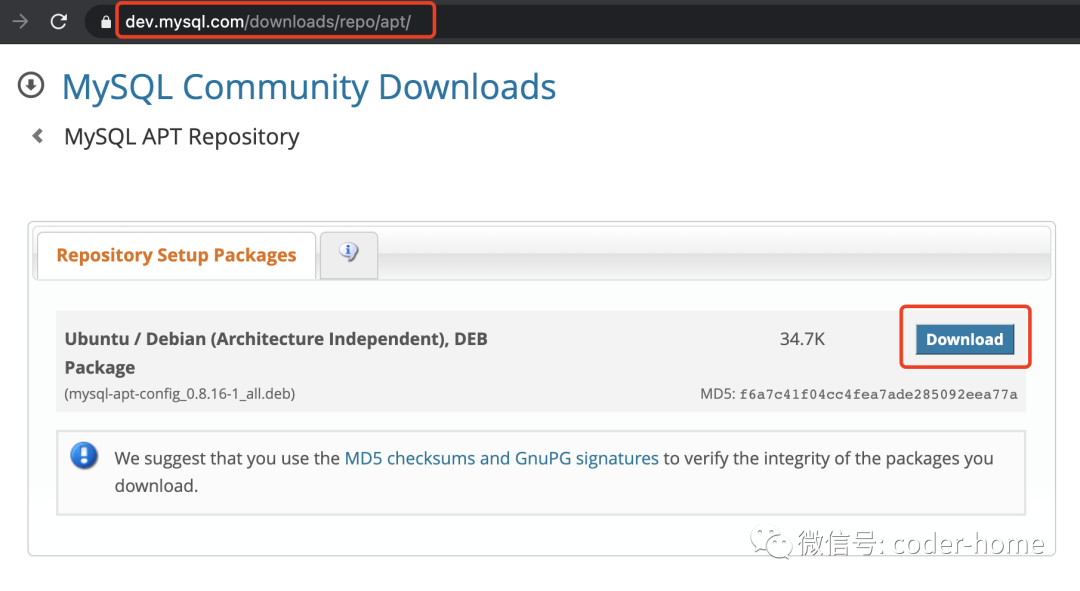
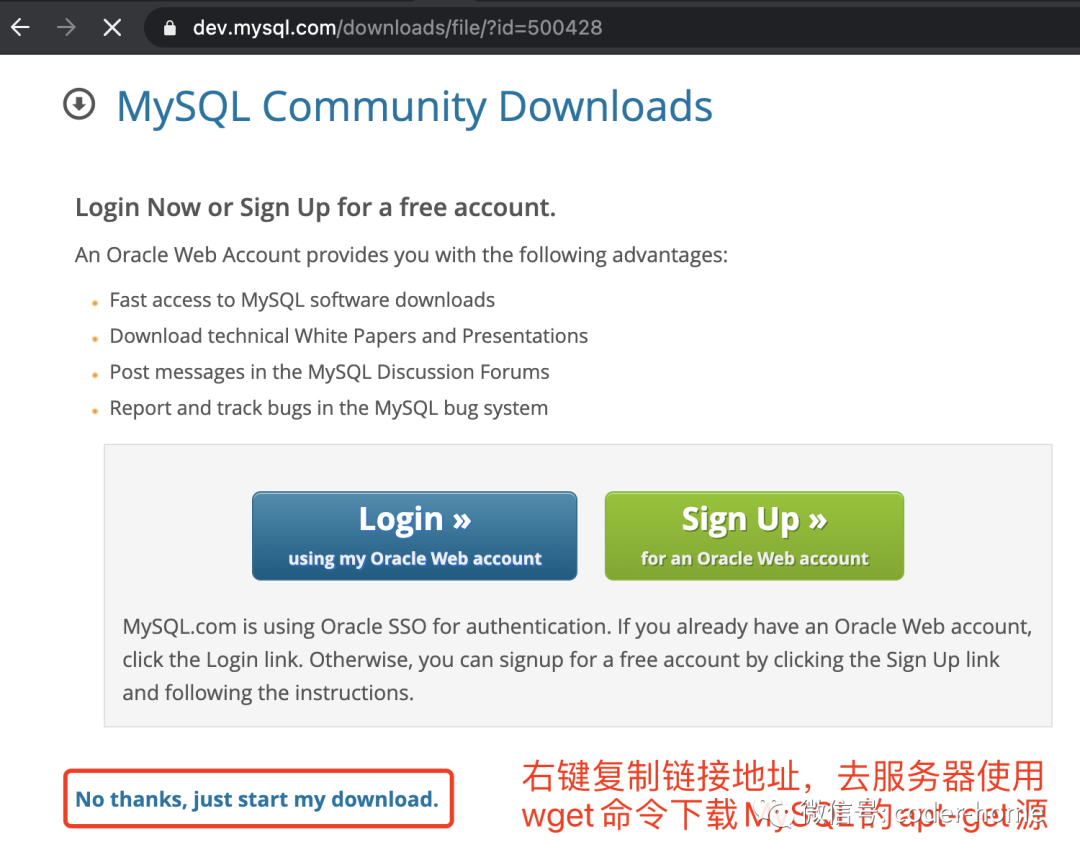
点解完Download
之后,进入如下页面,我们不直接下载,复制链接地址,然后我们去安装MySQL的容器中去使用wget
命令下载MySQL的apt-get源。
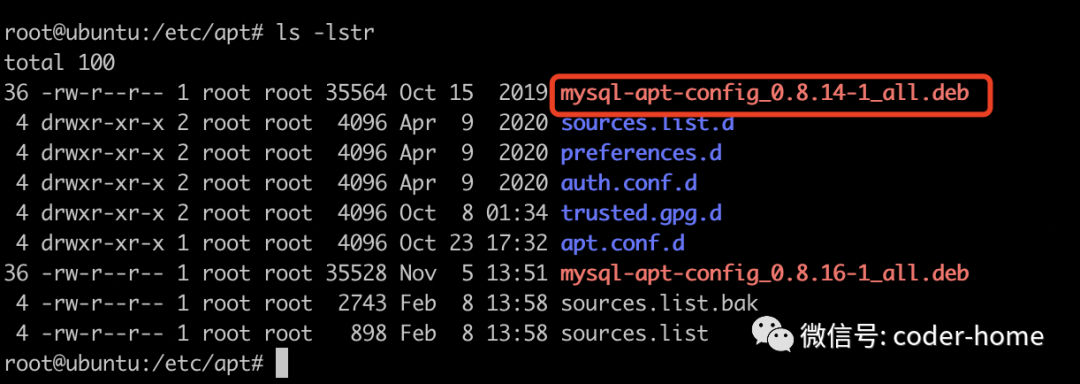
下载如下所示:
root@ubuntu:/etc/apt# wget https://dev.mysql.com/get/mysql-apt-config_0.8.16-1_all.deb复制
上面下载apt-get源文件中,默认是没有MySQL5.7版本的,这个apt-get源中只有8.0版本。所以如果你安装的不是MySQL8.0版本,那么你就需要去下面的连接中去下载历史版本的apt-get源。访问地址为:http://repo.mysql.com/apt/ubuntu/pool/mysql-apt-config/m/mysql-apt-config/,页面如下所示:
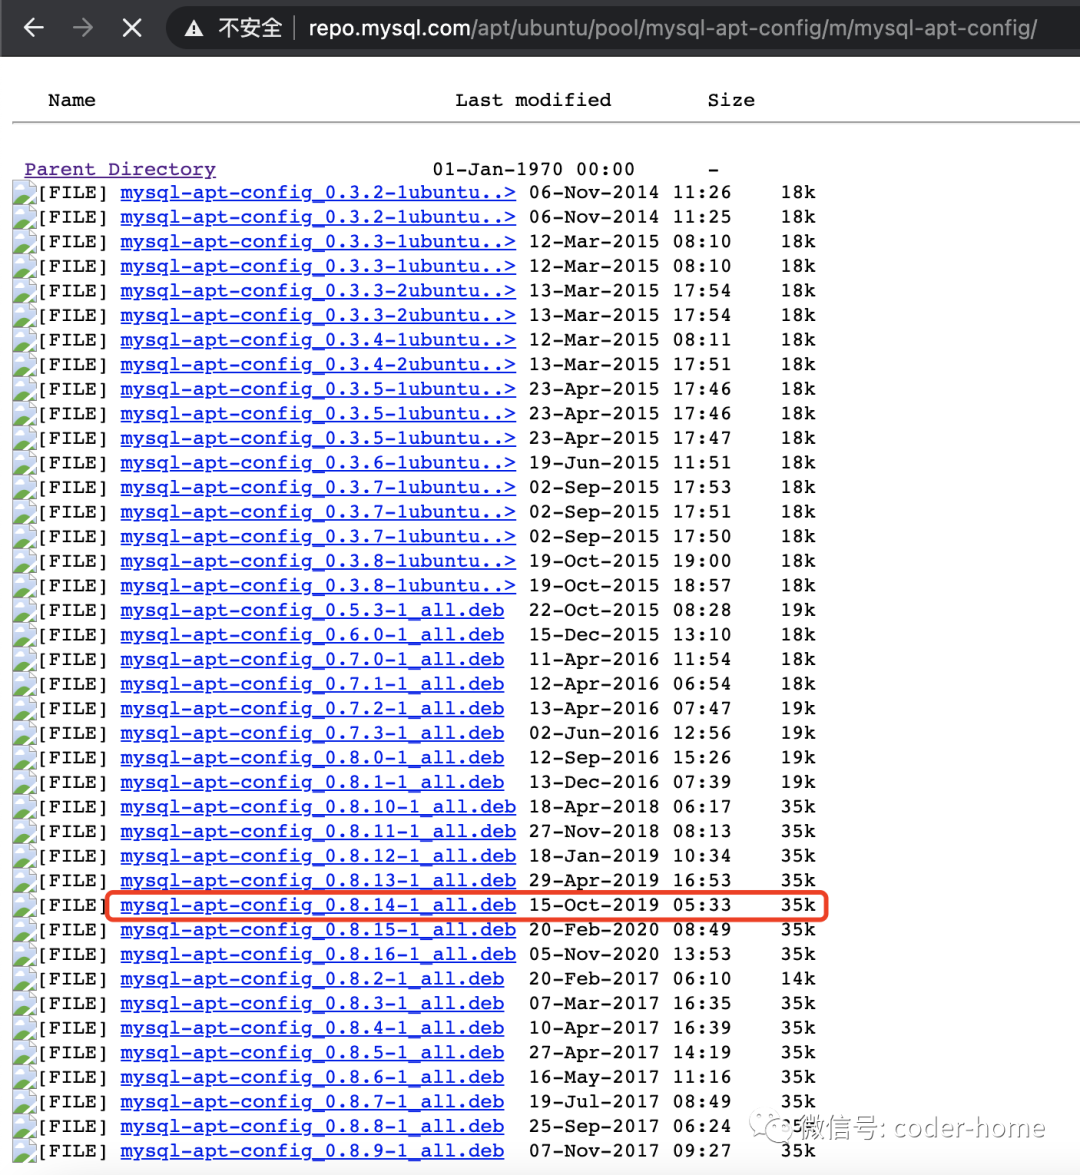
这里之所以选择8.14的这个apt-get源是因为我尝试了8.16和8.15,直到8.14才发现有MySQL5.7版本的apt-get源。8.16和8.15中都是默认使用的MySQL8.0版本。最终我为了安装MySQL5.7版本,所下载的MySQL5.7源如下:
root@ubuntu:/etc/apt# wget http://repo.mysql.com/apt/ubuntu/pool/mysql-apt-config/m/mysql-apt-config/mysql-apt-config_0.8.14-1_all.deb复制
安装MySQL的apt-get源
我们下载好MySQL的apt-get源之后,现在采用如下的命令来安装上它。然后才能基于这个源来安装MySQL数据库软件。
root@ubuntu:/etc/apt# dpkg -i mysql-apt-config_0.8.14-1_all.deb
Selecting previously unselected package mysql-apt-config.
dpkg: regarding mysql-apt-config_0.8.14-1_all.deb containing mysql-apt-config, pre-dependency problem:
mysql-apt-config pre-depends on lsb-release
lsb-release is not installed.
dpkg: error processing archive mysql-apt-config_0.8.14-1_all.deb (--install):
pre-dependency problem - not installing mysql-apt-config
Errors were encountered while processing:
mysql-apt-config_0.8.14-1_all.deb
root@ubuntu:/etc/apt#复制
发现遇到上面的错误之后,我们使用apt-get install lsb-release -y
来安装这个软件包。
root@ubuntu:/etc/apt# apt-get install lsb-release -y复制
此时,当我们再次像是来安装MySQL的apt-get源文件的时候,又发现出现如下的错误:
root@ubuntu:/etc/apt# dpkg -i mysql-apt-config_0.8.14-1_all.deb
dpkg: regarding mysql-apt-config_0.8.14-1_all.deb containing mysql-apt-config, pre-dependency problem:
mysql-apt-config pre-depends on gnupg
gnupg is not installed.
dpkg: error processing archive mysql-apt-config_0.8.14-1_all.deb (--install):
pre-dependency problem - not installing mysql-apt-config
Errors were encountered while processing:
mysql-apt-config_0.8.14-1_all.deb
root@ubuntu:/etc/apt#复制
我们使用命令apt-get install gnupg -y
来安装上面提示确实的软件包,如下所示:
root@ubuntu:/etc/apt# apt-get install gnupg -y复制
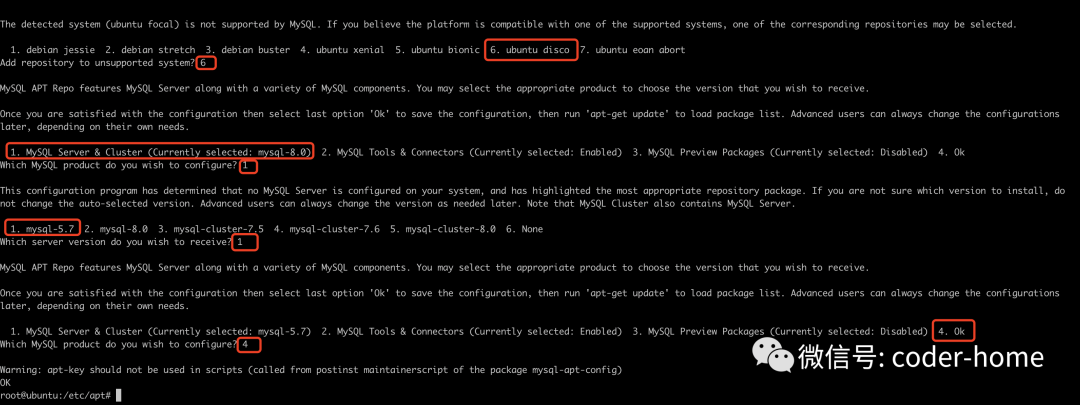
然后我们再次尝试安装MySQL的apt-get源,会出现如下的安装页面,我们选自6 ubuntu disco
这个系统版本。
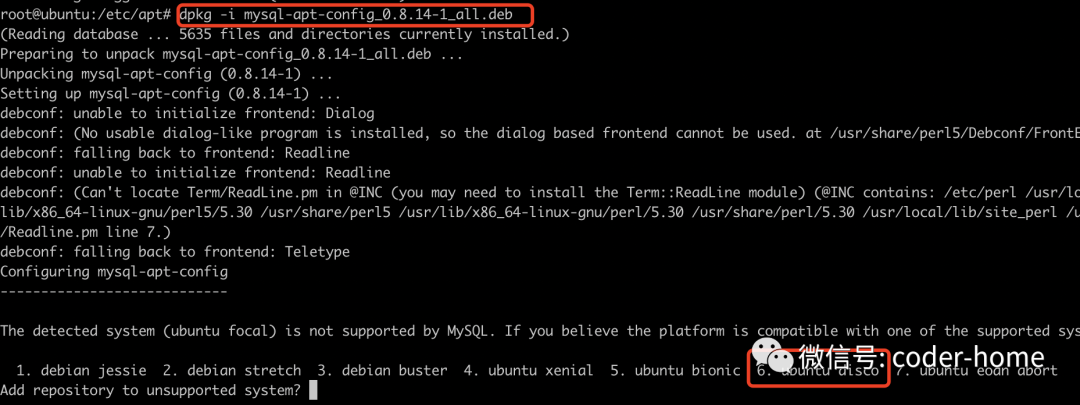
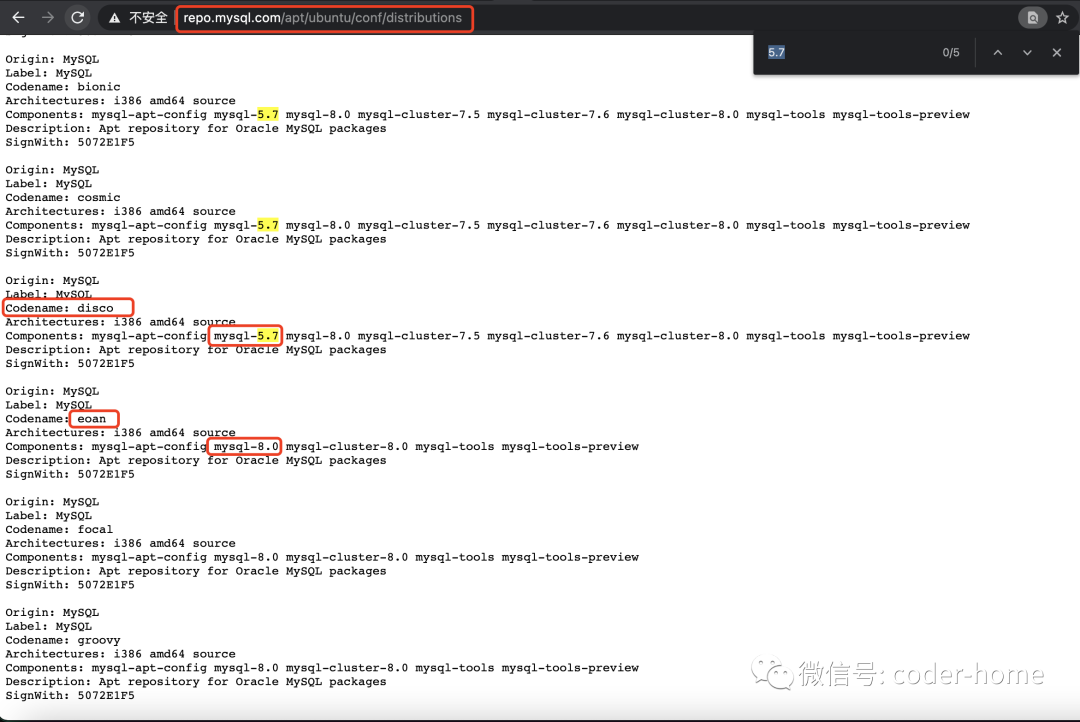
上面我们之所以选择6 ubuntu disco
,是因为目前apt-get源,支持MySQL5.7的最新的Ubuntu系统是disco版本。所以这里,我们选择了这个版本。参考页面地址为:http://repo.mysql.com/apt/ubuntu/conf/distributions,通过这个连接,可以查看MySQL官方给准备的apt-get源中每一个源中包含的MySQL版本和对应的Ubuntu系统版本之间的关系。
我们选择6之后,会进入选择MySQL版本页面,这里我们选择1,然后在d1的子菜单中,选择MySQL5.7的版本。在选择4。这里贴出选择的过程如下:
安装配置好MySQL的apt-get源之后,我们这里要更新一下apt-get的源。如下所示:
root@ubuntu:/etc/apt# apt-get update
Hit:1 http://mirrors.aliyun.com/ubuntu focal InRelease
Get:2 http://mirrors.aliyun.com/ubuntu focal-security InRelease [109 kB]
Get:3 http://mirrors.aliyun.com/ubuntu focal-updates InRelease [114 kB]
Get:4 http://mirrors.aliyun.com/ubuntu focal-proposed InRelease [267 kB]
Get:5 http://mirrors.aliyun.com/ubuntu focal-backports InRelease [101 kB]
Get:6 http://mirrors.aliyun.com/ubuntu focal-security/main Sources [153 kB]
Get:7 http://repo.mysql.com/apt/ubuntu disco InRelease [19.2 kB]
Get:8 http://mirrors.aliyun.com/ubuntu focal-security/universe amd64 Packages [663 kB]
Get:9 http://mirrors.aliyun.com/ubuntu focal-security/main amd64 Packages [603 kB]
Get:10 http://mirrors.aliyun.com/ubuntu focal-updates/universe amd64 Packages [923 kB]
Get:11 http://mirrors.aliyun.com/ubuntu focal-updates/main amd64 Packages [1007 kB]
Get:12 http://mirrors.aliyun.com/ubuntu focal-proposed/main Sources [48.9 kB]
Get:13 http://repo.mysql.com/apt/ubuntu disco/mysql-5.7 Sources [903 B]
Get:14 http://mirrors.aliyun.com/ubuntu focal-proposed/restricted Sources [7420 B]
Get:15 http://mirrors.aliyun.com/ubuntu focal-proposed/restricted amd64 Packages [51.3 kB]
Get:16 http://mirrors.aliyun.com/ubuntu focal-proposed/main amd64 Packages [154 kB]
Get:17 http://repo.mysql.com/apt/ubuntu disco/mysql-tools amd64 Packages [1922 B]
Get:18 http://repo.mysql.com/apt/ubuntu disco/mysql-apt-config amd64 Packages [564 B]
Get:19 http://repo.mysql.com/apt/ubuntu disco/mysql-5.7 amd64 Packages [5681 B]
Fetched 4230 kB in 4s (1001 kB/s)
Reading package lists... Done
root@ubuntu:/etc/apt#复制
查看MySQL的apt-get源
我们在前面配置好了MySQL的apt-get源,接下来验证一下配置是否正确。参考如下命令来查看:
root@ubuntu:/etc/apt# apt-cache policy mysql-server
mysql-server:
Installed: (none)
Candidate: 8.0.23-0ubuntu0.20.04.1
Version table:
8.0.23-0ubuntu0.20.04.1 500
500 http://mirrors.aliyun.com/ubuntu focal-security/main amd64 Packages
500 http://mirrors.aliyun.com/ubuntu focal-updates/main amd64 Packages
8.0.19-0ubuntu5 500
500 http://mirrors.aliyun.com/ubuntu focal/main amd64 Packages
5.7.28-1ubuntu19.04 500
500 http://repo.mysql.com/apt/ubuntu disco/mysql-5.7 amd64 Packages
root@ubuntu:/etc/apt#复制
可以看到此时的apt-get源中,包含了5.7的版本。这里需要注意一下:此时我们安装的MySQL5.7版本的小版本号是5.7.28,如果要安装MySQL5.7.33版本,需要在上面安装MySQLapt-get源的时候,在选择系统的版本的时候,需要选择ubuntu bionic
版本就可以了。
如果此时你发现不想安装这个版本的MySQL,你可以通过执行如下的命令来情况MySQL的apt-get源,然后重新执行dpkg -i xx
的命令来安装或选择新的apt-get文件。
apt-get purge mysql-apt-config复制
安装MySQL数据库
现在可以安装MySQL数据库了,使用如下命令来安装MySQL数据库,因为此时的apt-get源中,既有基于阿里的镜像源总的8.0版本的MySQL,又有既有MySQL官网的5.7版本的MySQL源,所以此时我们在安装的时候,需要指定一个我们要安装的5.7版本的镜像源的名称5.7.28-1ubuntu19.04
root@ubuntu:/etc/apt# apt-get install mysql-server=5.7.28-1ubuntu19.04 mysql-community-server=5.7.28-1ubuntu19.04 mysql-client=5.7.28-1ubuntu19.04 -y复制
此时会去MySQL官网下载MySQL安装文件,我们静静的等待10-20分钟就可以下载成功了。
下次成功后它会自动安装,在安装的过程中,它会弹出输入MySQL数据库中root用户的密码窗口,此时我们看到弹出对话框之后,输入数据库的root用户的密码即可,需要输入两次密码。输入完成之后,就会马上安装成功。
启动MySQL数据库
使用如下的命令来启动、查看、停止、重启MySQL数据库:
service mysql start
service mysql status
service mysql stop
service mysql restart复制
启动和查看结果如下:
root@ubuntu:/etc/apt# service mysql start
/etc/init.d/mysql: line 70: lib/apparmor/profile-load: No such file or directory
..
* MySQL Community Server 5.7.28 is started
root@ubuntu:/etc/apt# service mysql status
* MySQL Community Server 5.7.28 is running
root@ubuntu:/etc/apt#复制
验证MySQL数据库
现在我们登录MySQL数据库看能否正常访问,同下面的输出可以看到MySQL可以正常提供服务,并且版本使我们安装的5.7.28版本。
root@ubuntu:/etc/apt# mysql -uroot -p
Enter password:
Welcome to the MySQL monitor. Commands end with ; or \g.
Your MySQL connection id is 3
Server version: 5.7.28 MySQL Community Server (GPL)
Copyright (c) 2000, 2019, Oracle and/or its affiliates. All rights reserved.
Oracle is a registered trademark of Oracle Corporation and/or its
affiliates. Other names may be trademarks of their respective
owners.
Type 'help;' or '\h' for help. Type '\c' to clear the current input statement.
mysql> select version();
+-----------+
| version() |
+-----------+
| 5.7.28 |
+-----------+
1 row in set (0.00 sec)
mysql> create database mydb1 default charset utf8mb4;
Query OK, 1 row affected (0.00 sec)
mysql> use mydb1;
Database changed
mysql> create table tb1(id int);
Query OK, 0 rows affected (0.02 sec)
mysql> insert into tb1 values(1),(3),(5),(7),(9);
Query OK, 5 rows affected (0.02 sec)
Records: 5 Duplicates: 0 Warnings: 0
mysql> select * from tb1;
+------+
| id |
+------+
| 1 |
| 3 |
| 5 |
| 7 |
| 9 |
+------+
5 rows in set (0.00 sec)
mysql>复制
总结
到这里,我们就使用yum在centos上面安装了MySQL5.7,采用apt-get的方式在Ubuntu上面来安装MySQL5.7。希望这个对你能有帮助。
微信搜索“coder-home”或扫一扫下面的二维码,关注公众号,
第一时间了解更多干货分享,还有各类视频教程资源。扫描它,带走我
