暂无图片
暂无图片
暂无图片
暂无图片
暂无图片

从注解与反射到代理模式再到 IoC 与 AOP

剽悍的派森先生 2021-06-24
892

本文意在介绍 Spring 中的两个最重要的编程思想 IoC 和 AOP。因为无论是用 SSM 开发项目还是使用 Spring boot 乃至 Spring cloud 生态开发,都离不开对 IoC 和 AOP 的使用,所以对它们的理解一定程度上决定代码质量。

考虑到在 Spring 中大量使用注解的方式来简化开发,所以本文开始会先介绍注解相关的基础知识。通常注解又是跟反射配合实现相关逻辑的,所以也会介绍反射相关内容。之后会介绍代理模式,因为 AOP 的底层原理用的是动态代理方式实现的。

特别说明,文中的代码运行环境均为 JDK 1.8,包管理工具使用 Maven。

1. 注解

注解的作用:对程序做出解释,这一点和 comment 注释类似;不同的是注解还可以被其他程序识别读取,通常配合反射机制使用。

注解格式:@Override
, @FunctionalInterface

元注解(java.lang.annotation):负责解释注解的注解

  • @Target:定义Annotation
    能够被应用于源码的哪些位置

    public enum ElementType {
    /** Class, interface (including annotation type), or enum declaration */
    TYPE,


    /** Field declaration (includes enum constants) */
    FIELD,


    /** Method declaration */
    METHOD,


    /** Formal parameter declaration */
    PARAMETER,


    /** Constructor declaration */
    CONSTRUCTOR,


    /** Local variable declaration */
    LOCAL_VARIABLE,


    /** Annotation type declaration */
    ANNOTATION_TYPE,


    /** Package declaration */
    PACKAGE,


    /**
    * Type parameter declaration
    *
    * @since 1.8
    */
    TYPE_PARAMETER,


    /**
    * Use of a type
    *
    * @since 1.8
    */
    TYPE_USE
    }
    • @Retention:定义Annotation
      的生命周期

      public enum RetentionPolicy {
      /**
      * Annotations are to be discarded by the compiler.
      */
      SOURCE,


      /**
      * Annotations are to be recorded in the class file by the compiler
      * but need not be retained by the VM at run time. This is the default
      * behavior.
      */
      CLASS,


      /**
      * Annotations are to be recorded in the class file by the compiler and
      * retained by the VM at run time, so they may be read reflectively.
      *
      * @see java.lang.reflect.AnnotatedElement
      */
      RUNTIME
      }
      • @Documented:使用 javadoc 工具为类生成帮助文档时是否要保留其Annotation
        信息

      • @Inherited:定义子类是否可继承父类定义的Annotation

      看一个实例,Spring 中 @Bean 注解的定义:

            @Target({ElementType.METHOD, ElementType.ANNOTATION_TYPE})
        @Retention(RetentionPolicy.RUNTIME)
        @Documented
        public @interface Bean {
         
        @AliasFor("name")
        String[] value() default {};

        @AliasFor("value")
        String[] name() default {};

        Autowire autowire() default Autowire.NO;

        String initMethod() default "";

        String destroyMethod() default AbstractBeanDefinition.INFER_METHOD;

        }

        注解解析:

        JDK 中是通过AnnotatedElement
        (package java.lang.reflect)接口实现对注解的解析,Class 类实现了AnnotatedElement
        接口。

        2. 反射

        反射就是 Reflection,Java 的反射是指程序在运行期可以拿到一个对象的所有信息。

        除了int
        等基本类型外,Java 的其他类型全部都是class
        (包括interface
        )。例如:

        • String

        • Object

        • Runnable

        • Exception

        class
        (包括interface
        )的本质是数据类型(Type
        )。无继承关系的数据类型无法赋值:(多态)

          Number n = new Double(123.456); // OK
          String s = new Double(123.456); // compile error!

          class
          是由 JVM 通过 ClassLoader 在执行过程中动态加载的。JVM 在第一次读取到一种class
          类型时,将其加载进内存。

          每加载一种class
          ,JVM 就为其创建一个Class
          (类似 Python 中 type 对象)类型的实例,并关联起来。Class
          类的构造方法是private
          的,只有 JVM 能创建Class
          实例。JVM 持有的每个Class
          实例都指向一个数据类型(class
          interface
          )。一个Class
          实例包含了该class
          的所有完整信息。
          有三个方法获取一个class
          Class
          实例:

          • 直接通过一个class
            的静态变量class
            获取:

            Class cls = String.class;
            • 如果我们有一个实例变量,可以通过该实例变量提供的getClass()
              方法获取:

              String s = "Hello";
              Class cls = s.getClass();
              • 如果知道一个class
                的完整类名,可以通过静态方法Class.forName()
                获取:

                Class cls = Class.forName("java.lang.String")

                因为Class
                实例在 JVM中是唯一的,所以,上述方法获取的Class
                实例是同一个实例。


                看一下 Class 类中常用的方法:

                  // 获取类加载器
                  public ClassLoader getClassLoader();


                  // 获取父类
                  public native Class<? super T> getSuperclass();


                  // 获取直接实现的接口
                  public Class<?>[] getInterfaces();


                  // 获取属性
                  public Field getField(String name); // 本类+父类的
                  public Field[] getFields();
                  public Field getDeclaredField(String name); 本类全部
                  public Field[] getDeclaredFields();


                  // 获取方法
                  public Method getMethod(String name, Class<?>... parameterTypes);
                  public Method[] getMethods();
                  public Method getDeclaredMethod(String name, Class<?>... parameterTypes);
                  public Method[] getDeclaredMethods();


                  // 获取构造器
                  public Constructor<T> getConstructor(Class<?>... parameterTypes);
                  public Constructor<?>[] getConstructors();
                  public Constructor<T> getDeclaredConstructor(Class<?>... parameterTypes);
                  public Constructor<?>[] getDeclaredConstructors();


                  // 获取注解
                  public <A extends Annotation> A getAnnotation(Class<A> annotationClass);
                  public Annotation[] getAnnotations();
                  public <A extends Annotation> A[] getAnnotationsByType(Class<A> annotationClass);
                  public <A extends Annotation> A getDeclaredAnnotation(Class<A> annotationClass);
                  public Annotation[] getDeclaredAnnotations();
                  public <A extends Annotation> A[] getDeclaredAnnotationsByType(Class<A> annotationClass);
                  public Map<Class<? extends Annotation>, Annotation> getDeclaredAnnotationMap();


                  // 获取 resource 资源
                  public java.net.URL getResource(String name);
                  public InputStream getResourceAsStream(String name);

                  通过自定义注解实现简易 ORM 实例:

                  1. 定义注解

                    import java.lang.annotation.ElementType;
                    import java.lang.annotation.Retention;
                    import java.lang.annotation.RetentionPolicy;
                    import java.lang.annotation.Target;


                    @Target(ElementType.TYPE)
                    @Retention(RetentionPolicy.RUNTIME)
                    public @interface Table {
                    String name();
                    }
                      import java.lang.annotation.ElementType;
                      import java.lang.annotation.Retention;
                      import java.lang.annotation.RetentionPolicy;
                      import java.lang.annotation.Target;


                      @Target(ElementType.FIELD)
                      @Retention(RetentionPolicy.RUNTIME)
                      public @interface Column {
                      String name();
                      String type();
                      int length();
                      }
                      1. 定义 pojo 类

                        import cn.xyf.config.Column;
                        import cn.xyf.config.Table;


                        @Table(name = "student")
                        public class Student {
                        @Column(name = "id", type = "int", length = 10)
                        private int id;
                        @Column(name = "name", type = "varchar", length = 32)
                        private String name;
                        @Column(name = "age", type = "int", length = 10)
                        private int age;


                        public Student(){}


                        public Student(int id, String name, int age) {
                        this.id = id;
                        this.name = name;
                        this.age = age;
                        }


                        public int getId() {
                        return id;
                        }


                        public void setId(int id) {
                        this.id = id;
                        }


                        public String getName() {
                        return name;
                        }


                        public void setName(String name) {
                        this.name = name;
                        }


                        public int getAge() {
                        return age;
                        }


                        public void setAge(int age) {
                        this.age = age;
                        }


                        @Override
                        public String toString() {
                        return "Student{" +
                        "id=" + id +
                        ", name='" + name + '\'' +
                        ", age=" + age +
                        '}';
                        }
                        }
                        1. 使用注解获取信息

                          public static void main(String[] args) throws ClassNotFoundException {
                          Class cls = Class.forName("cn.xyf.pojo.Student");


                          Table table = (Table) cls.getAnnotation(Table.class);
                          System.out.println("table.name="+table.name());


                          Field[] fields = cls.getDeclaredFields();
                          for (Field field : fields) {
                          Column col = field.getAnnotation(Column.class);
                          System.out.println("col.name="+col.name()
                          +",col.type="+col.type()
                          +",col.length="+col.length());
                          }
                          }

                          输出结果:

                            table.name=student
                            col.name=id,col.type=int,col.length=10
                            col.name=name,col.type=varchar,col.length=32
                            col.name=age,col.type=int,col.length=10

                            3. 代理模式

                            所谓代理模式是指客户端并不直接调用实际的对象,而是通过调用代理,来间接的调用实际的对象。


                            代理模式可以有两种实现的方式,一种是静态代理,另一种是动态代理。
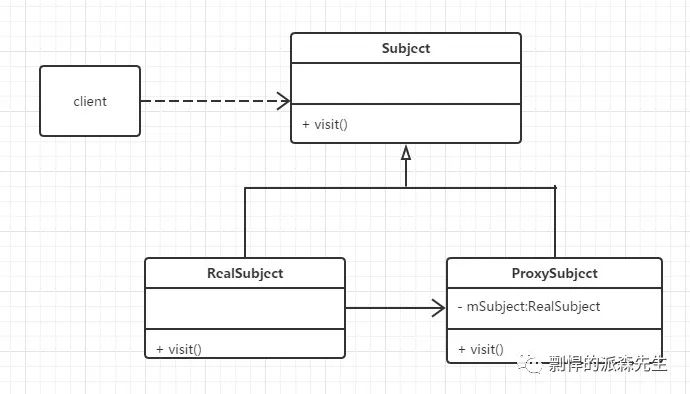
                            1. 静态代理

                            实现步骤如下:

                            1. 定义 Subject 接口:        

                              public interface Subject {
                              void visit();
                              }
                              1. 实现 Subject 接口的两个类:

                                public class RealSubject implements Subject {


                                private String name = "real subject";
                                @Override
                                public void visit() {
                                System.out.println(name);
                                }
                                }
                                  public class ProxySubject implements Subject{


                                  private Subject subject;


                                  public ProxySubject(Subject subject) {
                                  this.subject = subject;
                                  }


                                  @Override
                                  public void visit() {
                                  doSomethingBefore();
                                  subject.visit();
                                  doSomethingAfter();
                                  }

                                  public void doSomethingBefore() {
                                  //doSomethingBefore
                                  }

                                  public void doSomethingAfter() {
                                  //doSomethingAfter
                                  }
                                  }
                                  1. 具体的调用如下:

                                    public class Client {


                                    public static void main(String[] args) {
                                    RealSubject realSubject = new RealSubject();
                                    ProxySubject subject = new ProxySubject(realSubject);
                                    subject.visit();
                                    }
                                    }

                                    通过上面的代理代码,我们可以看出代理模式的特点,代理类接受一个 Subject 接口的对象,任何实现该接口的对象,都可以通过代理类进行代理,增加了通用性。但是也有缺点,每一个代理类都必须实现一遍委托类的接口,如果接口增加方法,则代理类也必须跟着修改。其次,一个代理类只能代理一个或几个委托类的接口,如果委托接口非常多,则静态代理类要么很多要么很臃肿。

                                    2. 动态代理

                                    动态代理有别于静态代理,是根据代理的对象,动态创建代理类。这样,就可以避免静态代理中代理类接口过多的问题。一个动态代理 , 一般代理某一类业务 , 一个动态代理可以代理多个类!动态代理是是通过反射来实现的,通过固定的规则生成。动态代理分为两类 :

                                    • 基于接口的动态代理:JDK 动态代理;

                                    • 基于类的动态代理:CGLIB。

                                    JDK 动态代理实现如下:

                                    1. 编写一个委托类的接口,即静态代理的(Subject接口)(代码同上)

                                    2. 实现一个真正的委托类,即静态代理的(RealSubject类)(代码同上)

                                    3. 创建一个动态代理类,实现InvocationHandler
                                      接口,并重写该invoke
                                      方法

                                      public class DynamicProxy implements InvocationHandler {
                                      private Object object;

                                      public DynamicProxy() {}

                                      public DynamicProxy(Object object) {
                                      this.object = object;
                                      }

                                      public void setObject(Object object) {
                                      this.object = object;
                                      }


                                      @Override
                                      public Object invoke(Object proxy, Method method, Object[] args) throws Throwable {
                                      doSomethingBefore();
                                      Object result = method.invoke(object, args);
                                      doSomethingAfter();
                                      return result;
                                      }

                                      public void doSomethingBefore() {
                                      //doSomethingBefore
                                      }

                                      public void doSomethingAfter() {
                                      //doSomethingAfter
                                      }
                                      }
                                      1. 生成动态代理对象

                                        public class Client {
                                        public static void main(String[] args) {
                                        ClassLoader classLoader = realSubject.getClass().getClassLoader();

                                        Subject realSubject = new RealSubject();

                                        Subject subject = (Subject) Proxy.newProxyInstance(classLoader, new Class[]{Subject.class}, new DynamicProxy(realSubject));

                                        subject.visit();
                                        }
                                        }

                                        创建动态代理的对象,需要借助Proxy.newProxyInstance
                                        。该方法的三个参数分别是:

                                        • ClassLoader loader:表示被代理对象的 Classloader;

                                        • Class<?>[] interfaces:表示目标对象实现的一组接口

                                        • InvocationHandler h:表示当前的 InvocationHandler 实现实例对象。

                                        4. Spring framework 之 IOC 与 AOP

                                        关于 Spring 的介绍可以查看 Spring 官网。从广义上来说,Sping 对应的是 Spring prejects 全家桶,包括 Spring boot、Spring data 以及 Spring cloud 生态等;从狭义上来说,Spring 是指 Spring framework,主要包括 Spring core、Spring context 以及 Spring MVC 等。

                                        在 Spring 中有两个非常基础并且很重要的概念:

                                        • IoC (Inversion of Control) :控制反转;

                                        • AOP(Aspect Oriented Programming):面向切面编程。

                                        1. IoC

                                        在开始介绍 IoC 之前,我们先来看一段代码:

                                        1. 定义 UserDao 接口

                                          public interface UserDao {    
                                          public void getUser();
                                          }
                                          1. 定义 UserDao 的实现类

                                            public class UserDaoImpl implements UserDao {    
                                            public void getUser() {
                                            System.out.println("获取用户数据");
                                            }
                                            }
                                            1. 定义 UserService 的接口

                                              public interface UserService {    
                                              public void getUser();
                                              }
                                              1. 定义 UserService 的实现类

                                                public class UserServiceImpl implements UserService {    
                                                private UserDao userDao = new UserDaoImpl();

                                                @Override
                                                public void getUser() {
                                                userDao.getUser();
                                                }
                                                }

                                                    5. 测试

                                                  @Test 
                                                  public void test(){
                                                  UserService service = new UserServiceImpl();
                                                  service.getUser();
                                                   }

                                                  以上代码虽然实现了所需要的功能,即 service 层可以调用 dao 接口,但是实现方式有一个弊端,即设计的耦合性太高。在涉及需求变更时,会涉及大量代码改动,比如新增了一个 UserDao 实现类,对应的 Service 的实现类也需要修改大量代码。而为了解决这种问题,Spring 引入了 IoC 的思想。

                                                  所谓 IoC 就是一种使用描述(XML 或注解)并通过第三方去生产或获取特定对象的方式。具体来说,应用程序中的对象不在是由应用本身控制创建,而是由 Spring 来负责创建,应用程序本身只负责被动的接收创建好的对象。

                                                  关于 IoC 的详细介绍可以查看官网。IoC 实现方式简单来看由两部组成:Bean 和 ApplicationContext。Bean 代表程序中的对象,通过 BeanFactory 生成。ApplicationContext 为 Bean 的容器,负责盛放所有 Bean 以及提供构造 Bean 所依赖的资源。

                                                  在构造 Bean 的过程中,依赖的资源通过 DI(Dependency Injection,依赖注入)方式实现。DI 可以简单理解为:Bean 对象的创建依赖容器进行资源注入。DI 有多种实现方式,包括构造器注入,setter 注入,p 命名空间注入以及 c 命名空间注入,其中最常用的有构造器注入和 setter 注入。官网上关于如何选择这两种注入方式有一段介绍:

                                                  Constructor-based or setter-based DI?

                                                  Since you can mix constructor-based and setter-based DI, it is a good rule of thumb to use constructors for mandatory dependencies and setter methods or configuration methods for optional dependencies. Note that use of the @Required annotation on a setter method can be used to make the property be a required dependency; however, constructor injection with programmatic validation of arguments is preferable.

                                                  The Spring team generally advocates constructor injection, as it lets you implement application components as immutable objects and ensures that required dependencies are not null. Furthermore, constructor-injected components are always returned to the client (calling) code in a fully initialized state. As a side note, a large number of constructor arguments is a bad code smell, implying that the class likely has too many responsibilities and should be refactored to better address proper separation of concerns.

                                                  Setter injection should primarily only be used for optional dependencies that can be assigned reasonable default values within the class. Otherwise, not-null checks must be performed everywhere the code uses the dependency. One benefit of setter injection is that setter methods make objects of that class amenable to reconfiguration or re-injection later. Management through JMX MBeans is therefore a compelling use case for setter injection.

                                                  Use the DI style that makes the most sense for a particular class. Sometimes, when dealing with third-party classes for which you do not have the source, the choice is made for you. For example, if a third-party class does not expose any setter methods, then constructor injection may be the only available form of DI.

                                                  根据个人经验,在实际开发中 setter 注入方式使用起来更灵活方便一点。

                                                  Spring 容器是如何实现 Bean 依赖的呢?主要有三种方式:

                                                  • 在 XML 中显式配置;

                                                  • 在 Java 中显式配置;

                                                  • 隐式的 Bean 发现机制和自动装配。

                                                  其中比较重要也比较常用的方式就是自动装配。自动装配有两个必要的步骤:

                                                  • 组件扫描(component scanning):自动发现应用上下文中所创建的 Bean;

                                                  • 自动装配(autowiring):自动满足 Bean 之间的依赖;

                                                  下面通过一个例子演示一下 setter 注入以及自动装配。

                                                  1. 添加 pom 依赖,由于 Spring 更新非常快,在这里查看版本,尽量选择 GA 版。

                                                    <dependency>
                                                    <groupId>org.springframework</groupId>
                                                    <artifactId>spring-context</artifactId>
                                                    <version>5.1.14.RELEASE</version>
                                                    </dependency>
                                                    1. dao 层

                                                      public interface UserDao {
                                                      void getUser();
                                                      }

                                                        public class UserDaoImpl implements UserDao{
                                                        public void getUser() {
                                                        System.out.println("Get user");
                                                        }
                                                        }
                                                        1. service 层

                                                          public interface UserService {
                                                          void getUser();
                                                          }

                                                            import cn.xyf.dao.UserDao;
                                                            import org.springframework.beans.factory.annotation.Autowired;
                                                            import org.springframework.stereotype.Service;


                                                            @Service
                                                            public class UserServiceImpl implements UserService{
                                                            private UserDao userDao;


                                                            @Autowired
                                                            public void setUserDao(UserDao d) {
                                                            userDao = d;
                                                            }


                                                            public void getUser() {
                                                            userDao.getUser();
                                                            }
                                                            }
                                                            1. config 层

                                                              import cn.xyf.dao.UserDao;
                                                              import cn.xyf.dao.UserDaoImpl;
                                                              import org.springframework.context.annotation.Bean;
                                                              import org.springframework.context.annotation.ComponentScan;
                                                              import org.springframework.context.annotation.Configuration;


                                                              @Configuration
                                                              @ComponentScan(basePackages = {"cn.xyf.service"})
                                                              public class ApplicationConfig {


                                                              @Bean
                                                              public UserDao userDaoImpl() {
                                                              return new UserDaoImpl();
                                                              }
                                                              }

                                                              1. 主程序

                                                                import cn.xyf.config.ApplicationConfig;
                                                                import cn.xyf.service.UserServiceImpl;
                                                                import org.springframework.context.ApplicationContext;
                                                                import org.springframework.context.annotation.AnnotationConfigApplicationContext;


                                                                public class Application {
                                                                public static void main(String[] args) {
                                                                ApplicationContext context = new AnnotationConfigApplicationContext(ApplicationConfig.class);
                                                                UserServiceImpl service = context.getBean("userServiceImpl", UserServiceImpl.class);
                                                                service.getUser();
                                                                }
                                                                }

                                                                2. AOP

                                                                下面来介绍 AOP,详细内容可以看官网

                                                                理解 AOP 可以通过类比 OOP 的方式学习。在 OOP 编程中,类与对象是基本编程对象;对应在 AOP 中,通过切面 Aspect 操作实现各种逻辑。

                                                                如果想统计一些方法或者函数的运行时长,或者需要事务,一般的做法是修改原有代码,直接添加逻辑,但是这与高内聚低耦合原则相违背。如果使用 AOP 的思想,那么就应该保持原有代码不变,动态的在需要扩展的方法上添加额外的逻辑。AOP 是通过预编译方式和运行期动态代理实现在不修改源代码的情况下给程序动态统一添加功能的一种技术,主要用于日志记录,性能统计,安全控制,事务处理,异常处理等。

                                                                Talk is cheap, show you the code.

                                                                1. 引入依赖

                                                                  <dependency>
                                                                  <groupId>org.aspectj</groupId>
                                                                  <artifactId>aspectjweaver</artifactId>
                                                                  <version>1.9.5</version>
                                                                  </dependency>
                                                                  <dependency>
                                                                  <groupId>org.springframework</groupId>
                                                                  <artifactId>spring-context</artifactId>
                                                                  <version>5.1.14.RELEASE</version>
                                                                  </dependency>

                                                                  1. 定义注解,用于标记要切入的位置

                                                                    @Target(ElementType.METHOD)
                                                                    @Retention(RetentionPolicy.RUNTIME)
                                                                    @Documented
                                                                    public @interface LogReport {
                                                                    String value() default "";
                                                                    }
                                                                    1. 定义场景,统计 service 层函数的运行时长

                                                                      public interface UserService {
                                                                      void query();
                                                                      }
                                                                        import cn.xyf.aspect.LogReport;
                                                                        import org.springframework.stereotype.Service;


                                                                        import java.util.concurrent.TimeUnit;


                                                                        @Service
                                                                        public class UserServiceImpl implements UserService{
                                                                        @LogReport
                                                                        public void query() {
                                                                        System.out.println("Query user");
                                                                        try {
                                                                        TimeUnit.SECONDS.sleep(2);
                                                                        } catch (InterruptedException e) {
                                                                        e.printStackTrace();
                                                                        }
                                                                        }
                                                                        }
                                                                        1. 定义切面

                                                                          import org.aspectj.lang.ProceedingJoinPoint;
                                                                          import org.aspectj.lang.annotation.*;
                                                                          import org.springframework.stereotype.Component;


                                                                          @Component
                                                                          @Aspect
                                                                          public class LogAspect {
                                                                          @Pointcut("@annotation(cn.xyf.aspect.LogReport)")
                                                                          public void aspect() {}


                                                                          @Before("aspect()")
                                                                          public void before() {
                                                                          System.out.println("---------方法执行前---------");
                                                                          }


                                                                          @After("aspect()")
                                                                          public void after() {
                                                                          System.out.println("---------方法执行后---------");
                                                                          }


                                                                          @Around("aspect()")
                                                                          public Object around(ProceedingJoinPoint jp) throws Throwable {
                                                                          long begin = System.currentTimeMillis();
                                                                          // 执行目标方法proceed
                                                                          Object proceed = jp.proceed();
                                                                          long end = System.currentTimeMillis();
                                                                          System.out.println(jp.getSignature()+"执行时长="+(end-begin));
                                                                          return proceed;
                                                                          }
                                                                          }
                                                                          1. 定义配置类

                                                                            import org.springframework.context.annotation.ComponentScan;
                                                                            import org.springframework.context.annotation.Configuration;
                                                                            import org.springframework.context.annotation.EnableAspectJAutoProxy;


                                                                            @Configuration
                                                                            @ComponentScan(basePackages = {"cn.xyf.aspect", "cn.xyf.service"})
                                                                            @EnableAspectJAutoProxy
                                                                            public class AppConfig {


                                                                            }
                                                                            1. 测试

                                                                              import cn.xyf.config.AppConfig;
                                                                              import cn.xyf.service.UserService;
                                                                              import org.springframework.context.ApplicationContext;
                                                                              import org.springframework.context.annotation.AnnotationConfigApplicationContext;


                                                                              public class Application {
                                                                              public static void main(String[] args) {
                                                                              ApplicationContext context = new AnnotationConfigApplicationContext(AppConfig.class);
                                                                              UserService service = context.getBean("userServiceImpl", UserService.class);
                                                                              service.query();
                                                                              }
                                                                              }

                                                                              有几个注意的点需要说明一下:

                                                                              1. 在配置类 AppConfig
                                                                                中要添加 @EnableAspectJAutoProxy
                                                                                注解来开启 AO P功能,并可是说明使用 JDK 动态代理还是使用 CGLIB 。

                                                                                @Target(ElementType.TYPE)
                                                                                @Retention(RetentionPolicy.RUNTIME)
                                                                                @Documented
                                                                                @Import(AspectJAutoProxyRegistrar.class)
                                                                                public @interface EnableAspectJAutoProxy {


                                                                                /**
                                                                                * Indicate whether subclass-based (CGLIB) proxies are to be created as opposed
                                                                                * to standard Java interface-based proxies. The default is {@code false}.
                                                                                */
                                                                                boolean proxyTargetClass() default false;


                                                                                /**
                                                                                * Indicate that the proxy should be exposed by the AOP framework as a {@code ThreadLocal}
                                                                                * for retrieval via the {@link org.springframework.aop.framework.AopContext} class.
                                                                                * Off by default, i.e. no guarantees that {@code AopContext} access will work.
                                                                                * @since 4.3.1
                                                                                */
                                                                                boolean exposeProxy() default false;
                                                                                }
                                                                                1. 由于 AOP 实现使用的动态代理的方式,默认为 JDK 的动态代理,所有在 getBean
                                                                                  的时候要使用接口类型;

                                                                                配合以上案例介绍下 AOP 中的基本概念:

                                                                                1. Joinpoint:连接对象,用于切面与被切入点的通信;

                                                                                2. Pointcut:Joinpoint 的表达式,表示拦截哪些方法;

                                                                                3. Advice: 通知/增强,要切入的逻辑,或者需要增强的逻辑;

                                                                                4. Before Advice:在方法(连接点)前切入

                                                                                5. After Advice:在方法(连接点)后切入,抛出异常时也会切入

                                                                                6. After Returning Advice:在方法(连接点)返回后切入,抛出异常则不会切入

                                                                                7. After Throwing Advice:在方法(连接点)抛出异常时切入

                                                                                8. Around Advice 在方法(连接点)执行前后切入,可以中断或忽略原有流程的执行

                                                                                9. Aspect:切面,整个切入逻辑的抽象

                                                                                简单总结为:在什么地点(切入位置 Pointcut,连接对象 Joinponit)什么时间(Before/After/Around)做什么(Advice)。

                                                                                5. 小结

                                                                                由于笔者资历尚浅,使用的 Spring 经验也不够丰富,所以难免理解上有很多不足的地方,欢迎大家指教。最后想说,编程语言发展了这么多年,新语言层出不穷,但是编程范式也不过 POP(Procedure-Oriented programming)、OOP(Object Oriented Programming) 和 FP(Functional Programming)。Java 在 1.8 中引入 lambda 表达式、函数式接口以及 stream 流,在一定程度上支持了 FP,而 Spring 引入的 BOP(Bean oriented Programming)与 AOP(Aspect Oriented Programming) 编程思想也是对 Java 的极大补充。

                                                                                文章转载自剽悍的派森先生,如果涉嫌侵权,请发送邮件至:contact@modb.pro进行举报,并提供相关证据,一经查实,墨天轮将立刻删除相关内容。

                                                                                评论