


使用感受:
pgbackrest:功能比较多(从他用户手册和配置参数详解里面可以看出来,有兴趣或者需要可以多研究一下),可以对本地和远程进行备份
pg_rman:配置简单;使用方便 ;但是需要和数据节点安装在一起
pg_probackup:是基于pg_rman扩展而来。可以对本地和远程进行备份;并且可以将数据在远端进行恢复(靓点);但是有个较大的缺点,寻址范围只有4G,也就是如果数据库的segment_size改为4G+(默认1G)将会出现问题。
pgbackrest 安装和使用
参考:
https://github.com/pgbackrest/pgbackrest
https://pgbackrest.org/configuration.html
https://pgbackrest.org/user-guide.html
https://www.migops.com/blog/2021/04/09/pgbackrest-the-best-postgres-backup-tool-with-a-very-active-community/
http://www.postgres.cn/v2/news/viewone/1/669
https://blog.csdn.net/weixin_46199817/article/details/115167166
安装
cd /usr/local/src mkdir pgbackrest wget https://github.com/pgbackrest/pgbackrest/archive/release/2.34.tar.gz tar -zxvf 2.34.tar.gz -C pgbackrest yum install make gcc openssl-devel libxml2-devel lz4-devel libzstd-devel bzip2-devel postgresql-libs -y cd /usr/local/src/pgbackrest/pgbackrest-release-2.34/src ./configure && make && make install复制
[root@localhost src]# mkdir /pgbackrest ; chown postgres:postgres /pgbackrest [root@localhost src]# chmod 0700 /pgbackrest [root@localhost src]# mkdir -p -m 770 /var/log/pgbackrest [root@localhost src]# chown postgres:postgres /var/log/pgbackrest [root@localhost src]# mkdir -p /etc/pgbackrest [root@localhost src]# mkdir -p /etc/pgbackrest/conf.d [root@localhost src]# touch /etc/pgbackrest/pgbackrest.conf [root@localhost src]# chmod 640 /etc/pgbackrest/pgbackrest.conf --或者配置环境变量:config-path=/conf/pgbackrest 或者 config=/conf/pgbackrest/pgbackrest.conf 来进行特定环境变量的额配置 [root@localhost src]# chown postgres:postgres /etc/pgbackrest/pgbackrest.conf [root@localhost src]# su - postgres [postgres@localhost pgbackrest]$ initdb -D /data/pg_data -E utf8 [postgres@localhost pgbackrest]$ cat /etc/pgbackrest/pgbackrest.conf [demo] pg1-path=/data/pg_data pg1-socket-path=/tmp #这个值需要设定为/data/pg_data/postgresql.conf中unix_socket_directories的值,这是由于在pg里面这个参数已经替换了unix_socket_directory,但是在工具pgbackrest中仍然在使用,否则的会去默认路径/var/run/postgresql 去找socket文件 [global] repo1-retention-full=2 repo1-path=/pgbackrest/pgbackrest_repol/ [global:archive-push] compress-level=3复制
数据库端的配置:
[postgres@localhost pgbackrest]$ vim data/postgresql.conf archive_mode = on archive_command = 'pgbackrest --stanza=demo archive-push %p' logging_collector = on log_filename = 'postgresql-%u.log' max_wal_senders = 10 wal_level = replica复制
###设置postgres用户的环境变量
[postgres@localhost ~]$ vim .bash_profile # .bash_profile # Get the aliases and functions if [ -f ~/.bashrc ]; then . ~/.bashrc fi # User specific environment and startup programs export PATH=$PATH:/usr/local/pgsql/bin/ #export config-path=/conf/pgbackrest #可以设置配置文件的路径 #export PGBACKREST_LOG_PATH=/pgbackrest/log/ #可以设置log日志,默认是/var/log/pgbackrest/复制
– 查看pgbackrest 的相关操作帮助项
[postgres@localhost pg_data]$ pgbackrest help复制
– 查看 pgbackrest backup 的相关帮助项:
例如:
[postgres@localhost pg_data]$ pgbackrest help backup复制
#######Create the stanza and check the configuration
[postgres@localhost ~]$ pgbackrest --stanza=demo --log-level-console=info stanza-create
2021-07-08 21:16:51.332 P00 INFO: stanza-create command begin 2.34: --exec-id=122825-bce35444 --log-level-console=info --log-path=/pgbackrest/log --pg1-path=/data/pg_data --pg1-socket-path=/tmp --repo1-path=/pgbackrest/pgbackrest_repol --stanza=demo
2021-07-08 21:16:51.939 P00 INFO: stanza-create for stanza ‘demo’ on repo1
2021-07-08 21:16:51.940 P00 INFO: stanza ‘demo’ already exists on repo1 and is valid
2021-07-08 21:16:51.940 P00 INFO: stanza-create command end: completed successfully (608ms)
**######Check the configuration **
[postgres@localhost ~]$ pgbackrest --stanza=demo --log-level-console=info check
2021-07-08 21:22:41.720 P00 INFO: check command begin 2.34: --exec-id=122972-2602afd1 --log-level-console=info --log-path=/pgbackrest/log --pg1-path=/data/pg_data --pg1-socket-path=/tmp --repo1-path=/pgbackrest/pgbackrest_repol --stanza=demo
2021-07-08 21:22:42.329 P00 INFO: check repo1 configuration (primary)
2021-07-08 21:22:43.439 P00 INFO: check repo1 archive for WAL (primary)
2021-07-08 21:22:43.540 P00 INFO: WAL segment 000000010000000000000006 successfully archived to ‘/pgbackrest/pgbackrest_repol/archive/demo/13-1/0000000100000000/000000010000000000000006-c9340dd47944205d84037f6d31b5648790dad46f.gz’ on repo1
2021-07-08 21:22:43.541 P00 INFO: check command end: completed successfully (1827ms)
#####Backup the demo cluster
[postgres@localhost ~]$ pgbackrest --stanza=demo --log-level-console=info backup
2021-07-08 21:25:21.562 P00 INFO: backup command begin 2.34: --exec-id=123050-e31545ad --log-level-console=info --log-path=/pgbackrest/log --pg1-path=/data/pg_data --pg1-socket-path=/tmp --repo1-path=/pgbackrest/pgbackrest_repol --repo1-retention-full=2 --stanza=demo
WARN: no prior backup exists, incr backup has been changed to full
2021-07-08 21:25:22.575 P00 INFO: execute non-exclusive pg_start_backup(): backup begins after the next regular checkpoint completes
2021-07-08 21:25:23.692 P00 INFO: backup start archive = 000000010000000000000008, lsn = 0/8000028
2021-07-08 21:25:26.223 P01 INFO: backup file /data/pg_data/base/12711/16386 (38MB, 62%) checksum f3bf07bcbc620511252b9c133f627fd3fdad0b03
2021-07-08 21:25:26.272 P01 INFO: backup file /data/pg_data/base/12711/1255 (648KB, 63%) checksum d81bec4ad33283694f28535b94b8717c3712d71c
2021-07-08 21:25:26.310 P01 INFO: backup file /data/pg_data/base/12710/1255 (648KB, 64%) checksum d81bec4ad33283694f28535b94b8717c3712d71c
…
…
2021-07-08 21:25:32.067 P01 INFO: backup file /data/pg_data/base/1/1417 (0B, 100%)
2021-07-08 21:25:32.069 P01 INFO: backup file /data/pg_data/base/1/12578 (0B, 100%)
2021-07-08 21:25:32.070 P01 INFO: backup file /data/pg_data/base/1/12573 (0B, 100%)
2021-07-08 21:25:32.071 P01 INFO: backup file /data/pg_data/base/1/12568 (0B, 100%)
2021-07-08 21:25:32.174 P01 INFO: backup file /data/pg_data/base/1/12563 (0B, 100%)
2021-07-08 21:25:32.175 P00 INFO: full backup size = 60.7MB
2021-07-08 21:25:32.175 P00 INFO: execute non-exclusive pg_stop_backup() and wait for all WAL segments to archive
2021-07-08 21:25:32.384 P00 INFO: backup stop archive = 000000010000000000000008, lsn = 0/8000138
2021-07-08 21:25:32.407 P00 INFO: check archive for segment(s) 000000010000000000000008:000000010000000000000008
2021-07-08 21:25:32.539 P00 INFO: new backup label = 20210708-212522F
2021-07-08 21:25:32.565 P00 INFO: backup command end: completed successfully (11004ms)
2021-07-08 21:25:32.566 P00 INFO: expire command begin 2.34: --exec-id=123050-e31545ad --log-level-console=info --log-path=/pgbackrest/log --repo1-path=/pgbackrest/pgbackrest_repol --repo1-retention-full=2 --stanza=demo
2021-07-08 21:25:32.568 P00 INFO: expire command end: completed successfully (3ms)
######## Differential backup of the demo cluster
######## This time there was no warning because a full backup already existed.
######## While incremental backups can be based on a full or differential backup,
######## differential backups must be based on a full backup. A full backup can be performed by running the backup command with --type=full.
[postgres@localhost ~]$ pgbackrest --stanza=demo --type=diff --log-level-console=info backup
2021-07-08 21:28:25.391 P00 INFO: backup command begin 2.34: --exec-id=123148-c3db19df --log-level-console=info --log-path=/pgbackrest/log --pg1-path=/data/pg_data --pg1-socket-path=/tmp --repo1-path=/pgbackrest/pgbackrest_repol --repo1-retention-full=2 --stanza=demo --type=diff
2021-07-08 21:28:26.174 P00 INFO: last backup label = 20210708-212522F, version = …
…
…
2021-07-08 21:31:11.036 P00 INFO: expire command begin 2.34: --exec-id=123148-c3db19df --log-level-console=info --log-path=/pgbackrest/log --repo1-path=/pgbackrest/pgbackrest_repol --repo1-retention-full=2 --stanza=demo
2021-07-08 21:31:11.218 P00 INFO: expire command end: completed successfully (182ms)
#获取备份信息
[postgres@localhost pg_data]$ pgbackrest --stanza=demo info复制
stanza: demo
status: ok
cipher: none
db (current) wal archive min/max (13): 000000010000000000000001/000000010000000000000015 full backup: 20210720-233120F timestamp start/stop: 2021-07-20 23:31:20 / 2021-07-20 23:31:31 wal start/stop: 000000010000000000000003 / 000000010000000000000003 database size: 22.4MB, database backup size: 22.4MB repo1: backup set size: 2.7MB, backup size: 2.7MB diff backup: 20210720-233120F_20210720-233438D timestamp start/stop: 2021-07-20 23:34:38 / 2021-07-20 23:37:22 wal start/stop: 000000010000000000000008 / 000000010000000000000008 database size: 64.0MB, database backup size: 43.7MB repo1: backup set size: 6.7MB, backup size: 4.2MB backup reference list: 20210720-233120F复制
#造数据
postgres=# select count(1) from t1; count ------- 900 (1 row) postgres=# select now(); now ------------------------------- 2021-07-20 23:40:26.275236-04 (1 row) postgres=# delete from t1 where id > 700; DELETE 200 postgres=# select now(); now ------------------------------- 2021-07-20 23:40:31.658822-04 (1 row) postgres=# select count(1) from t1; count ------- 700 (1 row)复制
数据恢复:
[postgres@localhost pg_data]$ pgbackrest --stanza=demo --log-level-console=info --delta --set=20210720-233120F --type=time "--target=2021-07-20 23:40:26" --config=/etc/pgbackrest/pgbackrest.conf_restore restore [postgres@localhost pg_data]$ vim postgresql.auto.conf #改端口5433 [postgres@localhost pg_data]$ pg_ctl -D /pgbackrest/pg_data start waiting for server to start....2021-07-21 00:26:31.486 EDT [67023] LOG: redirecting log output to logging collector process 2021-07-21 00:26:31.486 EDT [67023] HINT: Future log output will appear in directory "log". . done server started [postgres@localhost pg_data]$ psql -p5433 psql (13.3) Type "help" for help. postgres=# select count(1) from t1; count ------- 900 (1 row)复制
pg_rman:
参考:
https://www.jianshu.com/p/db2b6d218e37
https://www.cnblogs.com/lottu/p/7490615.html
下载地址:Releases · ossc-db/pg_rman · GitHub (https://github.com/ossc-db/pg_rman/releases )
安装:
[root@localhost pg_rman-1.3.12]# tar -zxvf pg_rman-1.3.12.tar.gz
[root@localhost pg_rman-1.3.12]# make && make install
[postgres@localhost ~]$ pg_rman --help
pg_rman manage backup/recovery of PostgreSQL database.
Usage:
pg_rman OPTION init
pg_rman OPTION backup
pg_rman OPTION restore
pg_rman OPTION show [DATE]
pg_rman OPTION show detail [DATE]
pg_rman OPTION validate [DATE]
pg_rman OPTION delete DATE
pg_rman OPTION purge
Common Options:
-D, --pgdata=PATH location of the database storage area
-A, --arclog-path=PATH location of archive WAL storage area
-S, --srvlog-path=PATH location of server log storage area
-B, --backup-path=PATH location of the backup storage area
-c, --check show what would have been done
-v, --verbose show what detail messages
-P, --progress show progress of processed files
Backup options:
-b, --backup-mode=MODE full, incremental, or archive
-s, --with-serverlog also backup server log files
-Z, --compress-data compress data backup with zlib
-C, --smooth-checkpoint do smooth checkpoint before backup
-F, --full-backup-on-error switch to full backup mode
if pg_rman cannot find validate full backup
on current timeline
NOTE: this option is only used in --backup-mode=incremental or archive.
–keep-data-generations=NUM keep NUM generations of full data backup
–keep-data-days=NUM keep enough data backup to recover to N days ago
–keep-arclog-files=NUM keep NUM of archived WAL
–keep-arclog-days=DAY keep archived WAL modified in DAY days
–keep-srvlog-files=NUM keep NUM of serverlogs
–keep-srvlog-days=DAY keep serverlog modified in DAY days
–standby-host=HOSTNAME standby host when taking backup from standby
–standby-port=PORT standby port when taking backup from standby
Restore options:
–recovery-target-time time stamp up to which recovery will proceed
–recovery-target-xid transaction ID up to which recovery will proceed
–recovery-target-inclusive whether we stop just after the recovery target
–recovery-target-timeline recovering into a particular timeline
–hard-copy copying archivelog not symbolic link
Catalog options:
-a, --show-all show deleted backup too
Delete options:
-f, --force forcibly delete backup older than given DATE
Connection options:
-d, --dbname=DBNAME database to connect
-h, --host=HOSTNAME database server host or socket directory
-p, --port=PORT database server port
-U, --username=USERNAME user name to connect as
-w, --no-password never prompt for password
-W, --password force password prompt
Generic options:
-q, --quiet don’t show any INFO or DEBUG messages
–debug show DEBUG messages
–help show this help, then exit
–version output version information, then exit
Read the website for details. http://github.com/ossc-db/pg_rman
Report bugs to http://github.com/ossc-db/pg_rman/issues.
1,初始化:
[postgres@localhost pgrman]$ pg_rman init -D /data/pg_data -B /pgrman/backupdata
INFO: ARCLOG_PATH is set to ‘/data/archive’
INFO: SRVLOG_PATH is set to ‘/data/pg_data/log’
[postgres@localhost pgrman]$ cat backupdata/pg_rman.ini
ARCLOG_PATH=’/data/archive’
SRVLOG_PATH=’/data/pg_data/log’

2,全量备份:
[postgres@localhost pgrman]$ pg_rman backup -b full -D /data/pg_data/ -B /pgrman/backupdata/
INFO: copying database files
INFO: copying archived WAL files
INFO: backup complete
INFO: Please execute ‘pg_rman validate’ to verify the files are correctly copied.

3,验证备份:
[postgres@localhost pgrman]$ pg_rman validate -B /pgrman/backupdata/
INFO: validate: “2021-07-21 22:45:11” backup and archive log files by CRC
INFO: backup “2021-07-21 22:45:11” is valid

4,查看备份:
[postgres@localhost pgrman]$ pg_rman show -B /pgrman/backupdata/

5,增量备份:
[postgres@localhost pgrman]$ pg_rman backup -b incremental -D /data/pg_data/ -B /pgrman/backupdata/
INFO: copying database files
INFO: copying archived WAL files
INFO: backup complete
INFO: Please execute ‘pg_rman validate’ to verify the files are correctly copied.

6,备份归档日志:
[postgres@localhost pgrman]$ pg_rman backup -b archive -D /data/pg_data/ -B /pgrman/backupdata/
INFO: copying archived WAL files
INFO: backup complete
INFO: Please execute ‘pg_rman validate’ to verify the files are correctly copied.

查看:

7,删除备份:
[postgres@localhost pgrman]$ pg_rman delete -B /pgrman/backupdata/ “2021-07-21 22:54:52”
–当然也可以采用备份策略来自动删除,这个自动删除的动作发生在每次备份的时候,以下配置可以写在pg_rman.ini文件中
KEEP_DATA_GENERATIONS = 3 – 备份集冗余度是3,比如做了3次全备份,做第4次全备份的时候会自动把第1次的备份从catalog里面删除,第四次备份的时候会出现这样的信息INFO: delete the backup with start time:“第1次备份的时间点”
KEEP_DATA_DAYS = 10 – 备份集保留日期10天
8,删除每次物理备份的目录,基于上面7的基础,即只有执行了delete的才会被purge掉
[postgres@localhost pgrman]$ pg_rman purge -B /pgrman/backupdata/
–delete的时候保留了每次备份的物理目录,执行purge后会把delete残留下来的物理目录比如/pgdata/backup/20200115删除了
–没有执行步骤7的delete,直接执行步骤8的purge不会删除任何东西
9,恢复:

[postgres@localhost pgrman]$ pg_rman restore -B /pgrman/backupdata/ --recovery-target-time=‘2021-07-21 23:16:34’ -D /pgrman/pgrmandatarest/ --hard-copy


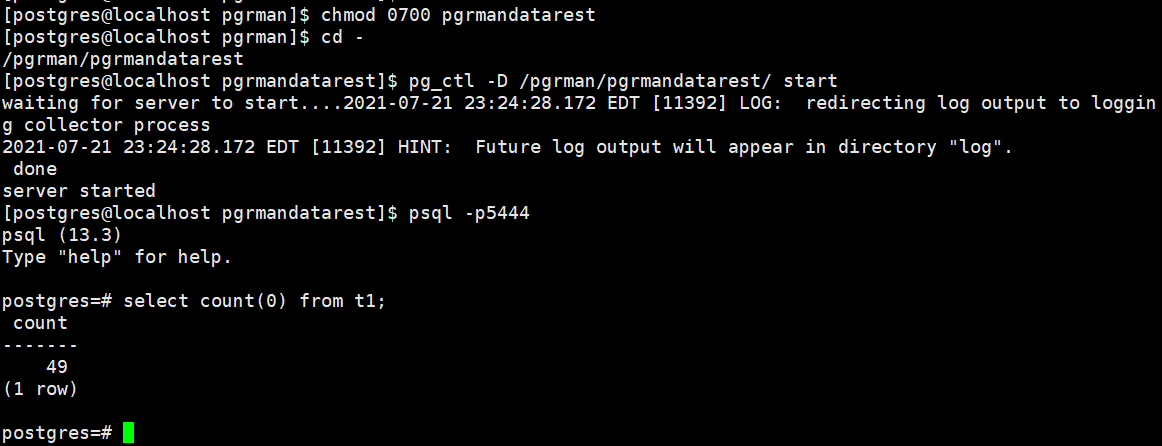
恢复的一些备注:
9.1、恢复好后,如果遇到数据库启动后变成了只读模式ERROR: cannot execute XX in a read-only transaction,请检查数据目录下的recovery.conf文件里的信息,把它改名或删除再重新启动
9.2、正常情况数据目录没有recovery.conf文件的,备份目录里也没有recovery.conf文件的,这个文件是每次执行恢复后自动生成的,存放在数据目录中,可以删除或改名。
9.3、恢复时,可以选择原地恢复(覆盖式),也可以使用新的PGDATA作为恢复目标。原地恢复(覆盖式)时pg_rman会覆盖原有的数据文件,arch, pg_wal目录中的文件,所以,如果你要保留原数据,建议先将原数据目录重命名。
9.4、恢复除了recovery-target-time和hard-copy两个参数外,还有recovery-target-timeline和recovery-target-xid两个参数
--recovery-target-timeline TIMELINE
如果不指定时间线,则使用PGDATA/global/pg_control,如果没有$PGDATA/global/pg_control,则使用最新的全量备份集的时间线。
pg_probackup简介
pg_probackup是由俄罗斯PG社区组织Postgres Professional发布的一个用于管理PostgreSQL数据库备份和恢复的工具。
目前支持:
PostgreSQL 9.5, 9.6, 10, 11, 12, 13, 14;
优点:支持并行、一致性校验和备份压缩 远程备份等
缺点:
其寻址范围最大只支持4GB;
参数block_size 和wal_block_size备份和恢复服务器要一致
增量备份要在同一个时间线(timeline)下
PG版本 9.6+ 可以从standby备份;备库配置 hot_standby = on;主库配置 full_page_writes = on
下载地址:https://github.com/postgrespro/pg_probackup
全量备份:完整备份包含从头开始恢复数据库集群所需的所有数据文件。
增量备份:
PAGE backup:在这种模式下,pg_probackup 从上一次完整备份或增量备份开始扫描存档中的所有 WAL 文件。新创建的备份仅包含 WAL 记录中提到的页面。这需要 WAL 存档中存在自上次备份以来的所有 WAL 文件。备份占用较少的空间。
DELTA backup:在这种模式下,pg_probackup 读取 PGDATA 目录中的所有数据文件,并且只复制自上次备份以来更改的那些页面。它的运行不需要连续归档。此外,此模式和完全备份的只读 I/O 压力相当。
PTRACK backup:在这种模式下,PostgreSQL 动态跟踪页面更改。它的运行不需要连续归档。每次更新关系页面时,都会在此关系的特殊 PTRACK 位图中标记此页面。由于一页只需要 PTRACK fork 中的一位,所以这样的位图非常小。跟踪意味着数据库服务器操作上的一些小开销,但显着加快了增量备份。
PTRACK backup support provided via following options:
vanilla PostgreSQL 11, 12, 13, 14 with ptrack extension
Postgres Pro Standard 9.6, 10, 11, 12, 13
Postgres Pro Enterprise 9.6, 10, 11, 12, 13
环境:
主机 :192.168.254.128
备份机:192.168.254.129
128和129都需要编译安装:
格式:make USE_PGXS=1 PG_CONFIG=<path_to_pg_config> top_srcdir=<path_to_PostgreSQL_source_tree>
例:
[root@localhost pg_probackup-master]# make USE_PGXS=1 PG_CONFIG=/usr/local/pgsql/bin/pg_config top_srcdir=/usr/local/src/postgresql-13.3/
[root@localhost pg_probackup-master]# make USE_PGXS=1 PG_CONFIG=/usr/local/pgsql/bin/pg_config top_srcdir=/usr/local/src/postgresql-13.3/ install
查看版本:
[root@localhost pg_probackup-master]# /usr/local/pgsql/bin/pg_probackup -V复制

1,互信配置
先要设定postgres账户的密码,可以在root账户下:
[root@localhost ~]# passwd postgres
Changing password for user postgres.
New password:
BAD PASSWORD: The password fails the dictionary check - it is based on a dictionary word
Retype new password:
passwd: all authentication tokens updated successfully.
1.1在远程备份实例主机上:
[root@localhost ~]# su - postgres
[postgres@localhost ~]$ ssh-keygen
[postgres@localhost ~]$ ssh-copy-id postgres@192.168.254.129
1.2在远程备份实例主机上:
[root@localhost ~]# su - postgres
[postgres@localhost ~]$ ssh-keygen
[postgres@localhost ~]$ ssh-copy-id postgres@192.168.254.128
测试互信:
[postgres@localhost ~]$ ssh ‘postgres@192.168.254.129’
Last login: Thu Jul 22 17:45:50 2021
[postgres@localhost ~]$ ssh postgres@192.168.254.128
Last login: Thu Jul 22 17:44:18 2021
2,数据库认证配置文件pg_hba.conf对备库进行认证
4,初始化:
[postgres@localhost pgprobackup]$ /usr/local/pgsql/bin/pg_probackup init -B /pgprobackup/pgdata
5,添加备份实例:
5.1 添加本地实例:
[postgres@localhost pgprobackup]$ /usr/local/pgsql/bin/pg_probackup add-instance -B /pgprobackup/pgdata -D /home/postgres/basebackup/ --instance local_5666
INFO: Instance ‘local_5666’ successfully inited
5.2 添加远程备份实例:
此处的-D 后面是远端的数据目录
[postgres@localhost pgprobackup]$ /usr/local/pgsql/bin/pg_probackup add-instance -B /pgprobackup/pgdata -D /home/pg_data/ --instance remote128_5432 --remote-proto=ssh --remote-host=192.168.254.128 --remote-port=22 --remote-user=postgres --remote-path=/usr/local/src/pg_probackup-master
INFO: Instance ‘remote128_5432’ successfully inited
6,修改需要备份实例的配置文件
6.1 本地备份实例:
$ vim /home/postgres/basebackup/postgresql.conf
max_wal_senders 设置合理值
wal_level = ‘replica’
archive_mode = ‘on’
archive_command = ‘/usr/local/pgsql/bin/pg_probackup archive-push -B /pgprobackup/pgdata --instance local_5666 --wal-file-path=%p --wal-file-name=%f’
6.2 远程备份实例:
max_wal_senders 设置合理值
wal_level = ‘replica’
archive_mode = ‘on’
archive_command = ‘/usr/local/pgsql/bin/pg_probackup archive-push -B /pgprobackup/pgdata --instance remote128_5432 --wal-file-path=%p --wal-file-name=%f --remote-proto=ssh --remote-host=192.168.254.129 --remote-port=22 --remote-user=postgres --remote-path=/usr/local/src/pg_probackup-master’
7,数据备份(全/增 备)
7.1 本机实例数据备份:
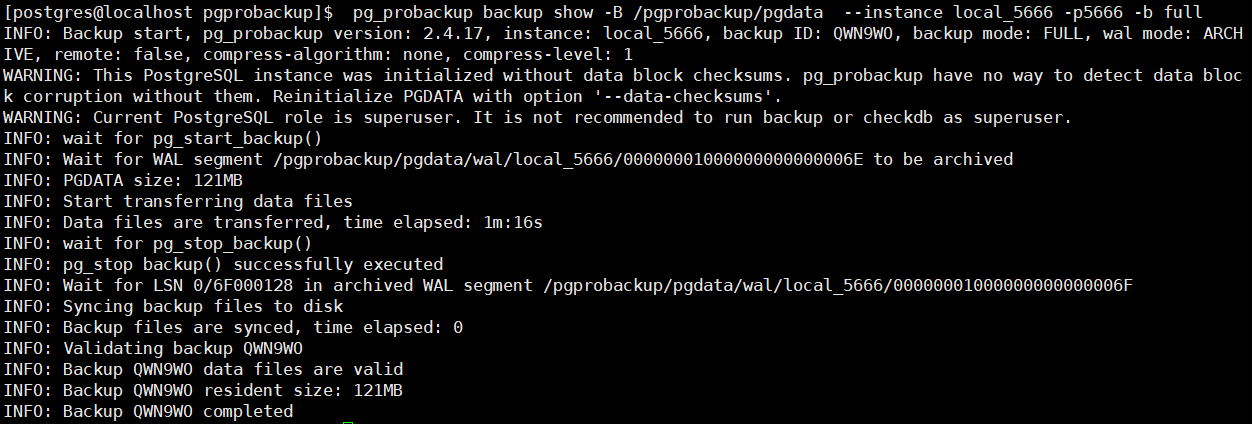
7.1.1 进行第一次全备:
[postgres@localhost pgprobackup]$ /usr/local/pgsql/bin/pg_probackup backup show -B /pgprobackup/pgdata --instance local_5666 -p5666 -b full (备注:如果不是使用的默认端口5432 需要加上-p指定端口)
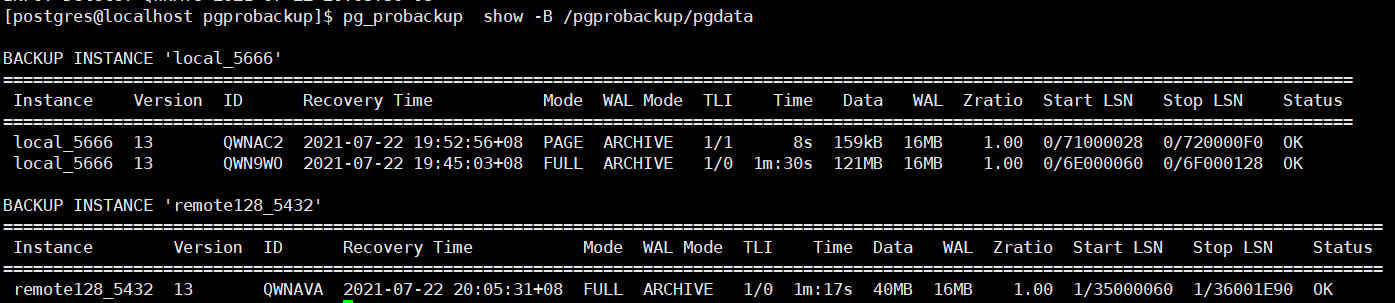
7.1.2 查看备份信息:
[postgres@localhost pgprobackup]$ /usr/local/pgsql/bin/pg_probackup show -B /pgprobackup/pgdata

7.1.3 增量备以及查看对应状态
[postgres@localhost/usr/local/pgsql/bin/pgprobackup]$ pg_probackup backup show -B /pgprobackup/pgdata --instance local_5666 -p5666 -b page

7.2 远程实例备份:
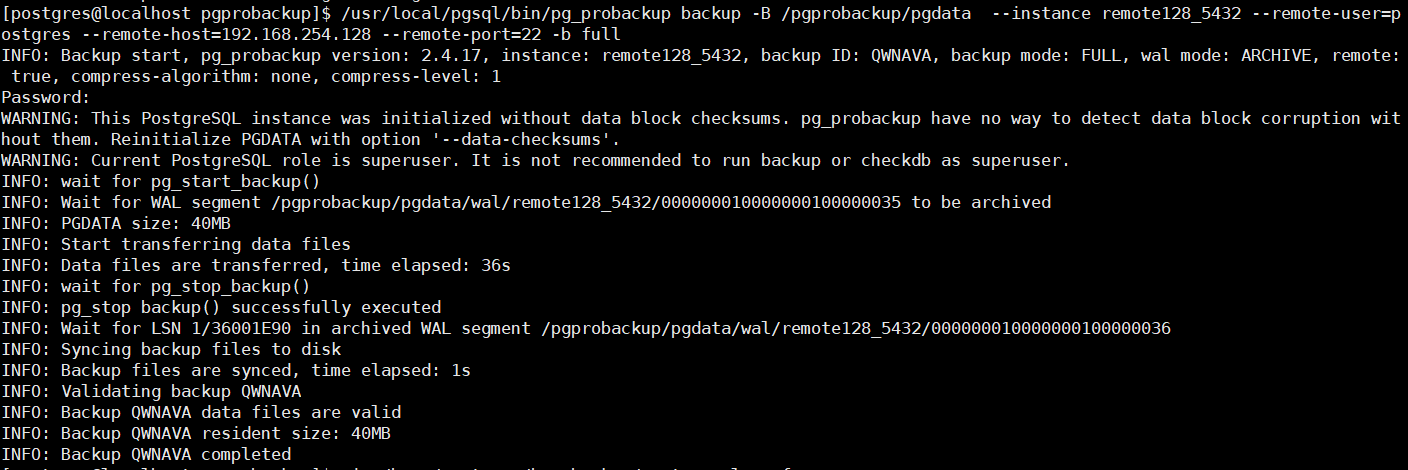
7.2.1 远程实例全量备份:
/usr/local/pgsql/bin/pg_probackup backup -B /pgprobackup/pgdata --instance remote128_5432 --remote-user=postgres --remote-host=192.168.254.128 --remote-port=22 -b full
7.2.2 查看备份信息
7.3 备份文件可用性校验:
[postgres@localhost pgprobackup]$ /usr/local/pgsql/bin/pg_probackup validate -B /pgprobackup/pgdata --instance local_5666
INFO: Validate backups of the instance ‘local_5666’
INFO: Validating backup QWNAC2
INFO: Backup QWNAC2 data files are valid
INFO: Backup QWNAC2 WAL segments are valid
INFO: Validating backup QWN9WO
INFO: Backup QWN9WO data files are valid
INFO: Backup QWN9WO WAL segments are valid
INFO: All backups are valid
[postgres@localhost pgprobackup]$ /usr/local/pgsql/bin/pg_probackup validate -B /pgprobackup/pgdata --instance remote128_5432
INFO: Validate backups of the instance ‘remote128_5432’
INFO: Validating backup QWNAVA
INFO: Backup QWNAVA data files are valid
INFO: Backup QWNAVA WAL segments are valid
INFO: All backups are valid
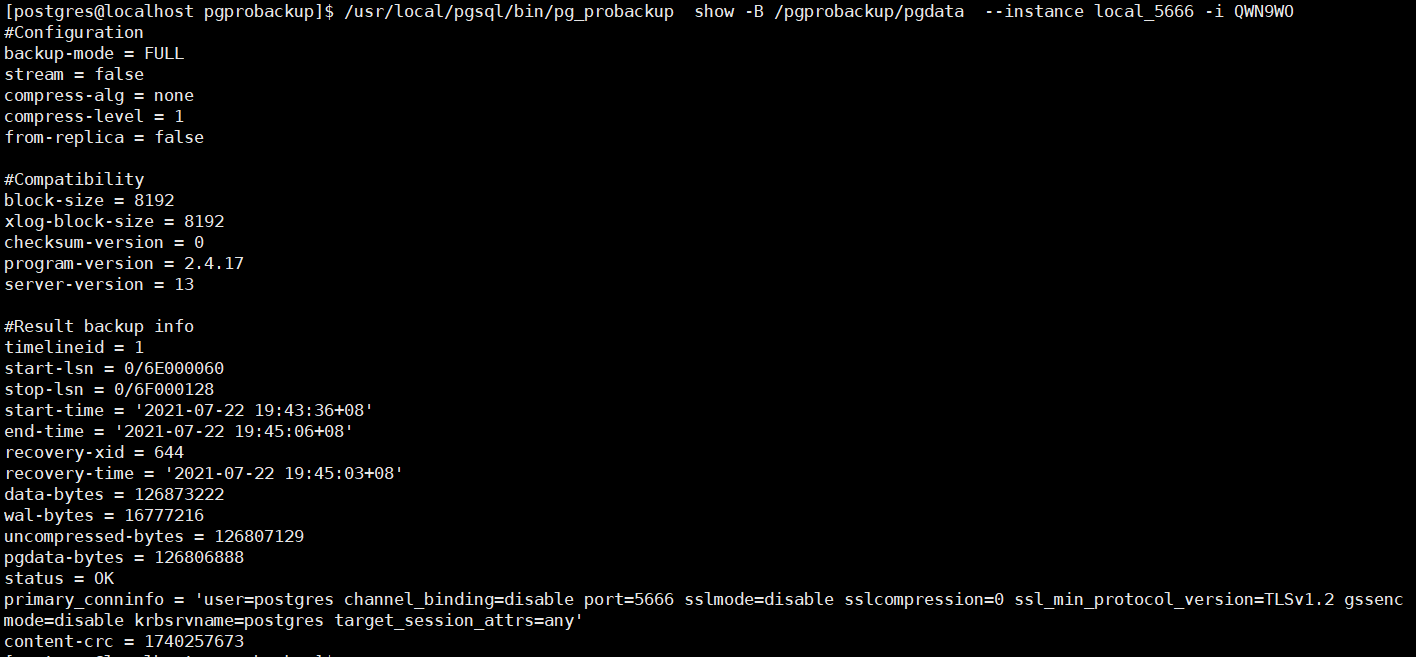
7.4 查看单个备份详情:
[postgres@localhost pgprobackup]$ /usr/local/pgsql/bin/pg_probackup show -B /pgprobackup/pgdata --instance local_5666 -i QWN9WO
8,配置 Retention Policy
[postgres@localhost pgprobackup]$ /usr/local/pgsql/bin/pg_probackup set-config -B /pgprobackup/pgdata --instance remote128_5432 –retention-redundancy=20 --retention-window=7
**[postgres@localhost pgprobackup]$ cat /pgprobackup/pgdata/backups/remote128_5432/pg_probackup.conf **
Backup instance information
pgdata = /home/pg_data
system-identifier = 6972081536210436901
xlog-seg-size = 16777216
Retention parameters
retention-redundancy = 20
retention-window = 7
–retention-redundancy=redundancy : 保留备份多少天 FULL
–retention-window=window : 可恢复多少天之前备份
9,删除
9.1 删除某一个备份:
[postgres@localhost pgprobackup]$ /usr/local/pgsql/bin/pg_probackup delete -B /pgprobackup/pgdata --instance=‘remote128_5432’ -i QWNAC2
9.2 删除过期的数据和过期的wal,并使用新策略覆盖:
[postgres@localhost pgprobackup]$ /usr/local/pgsql/bin/pg_probackup delete -B /pgprobackup/pgdata --instance=‘remote128_5432’ --delete-expired --delete-wal --retention-window=3 --retention-redundancy=5

10,恢复
10.1 恢复远程数据(意思是将数据恢复到远端)
[postgres@localhost pgprobackup]$ /usr/local/pgsql/bin/pg_probackup restore -B /pgprobackup/pgdata -D /home/postgres/pgrestdata/ --instance remote128_5432 --remote-user=postgres --remote-host=192.168.254.128 --remote-port=22 --archive-host=192.168.254.129 --archive-port=22 --archive-user=postgres -T ‘/data/pgtest/pgtesttsp’=’/home/postgres/pgtsptest/’
最后在128上恢复了数据

恢复在本地:
[postgres@localhost pgrestdata]$ /usr/local/pgsql/bin/pg_probackup restore -B /pgprobackup/pgdata -D /pgprobackup/pgrestdata/ --instance remote128_5432 -T
‘/data/pgtest/pgtesttsp’=’/home/postgres/pgtsptest/’
在129上进行恢复


