


系统架构
openGauss是单机系统,在这样的系统架构中,业务数据存储在单个物理节点上,数据访问任务被推送到服务节点执行,通过服务器的高并发,实现对数据处理的快速响应。同时通过日志复制可以把数据复制到备机,提供数据的高可靠和读扩展。
软件架构
openGauss属于单机系统,但是支持主备部署,主备架构如图:
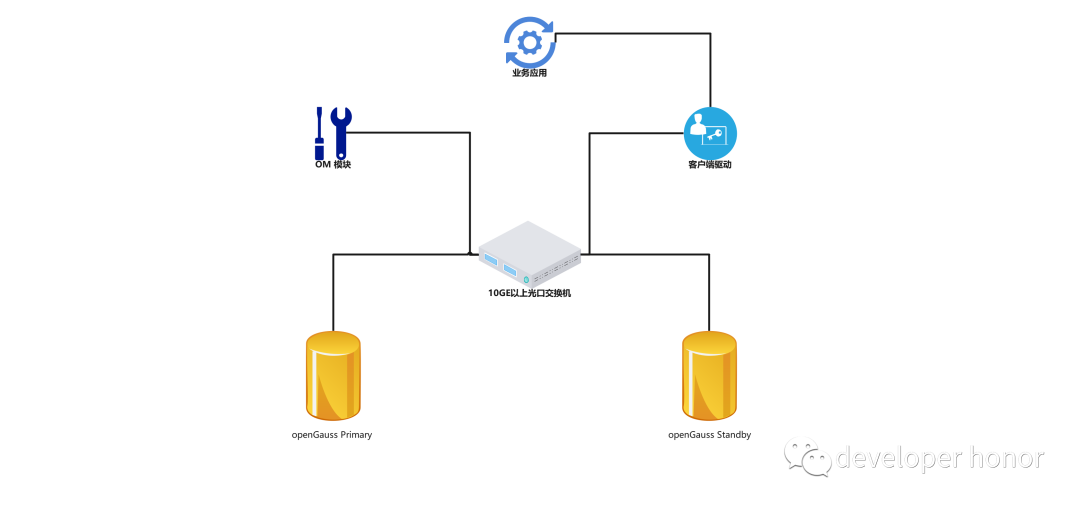
主要模块说明:
OM 运维管理模块(Operation Manager)。提供数据库日常运维、配置管理的管理接口、工具
客户端驱动 客户端驱动(Client Driver)。负责接收来自应用的访问请求,并向应用返回执行结果。客户端驱动负责与openGauss实例通信,发送应用的SQL命令,接收openGauss实例的执行结果。
openGauss主备 openGauss主备(Datanode)。负责存储业务数据、执行数据查询任务以及向客户端返回执行结果。 openGauss实例包含主、备两种类型,支持一主多备。建议将主、备openGauss实例分散部署在不同的物理节点中。 主备模块中应包含持久化的本地存储服务器,用来将业务数据进行持久化
应用场景
交易型应用 大并发、大数据量、以联机事务处理为主的交易型应用,例如电商、金融、O2O、电信CRM/计费等,应用可以按需选择不同的主备部署模式。
物联网数据 在工业监控和远程控制、智慧城市的延展、智能家居、车联网等物联网场景下,传感监控设备多,采样率高,数据存储为追加模型,操作和分析并重的场景。
支持的运行环境
支持的硬件平台
openGauss支持运行在鲲鹏服务器和通用的x86服务器上:
支持鲲鹏服务器和基于x86_64的通用PC服务器
支持本地存储(SATA、SAS、SSD)
支持千兆、万兆Ethernet网络
支持的操作系统
ARM
openEuler 20.3LTS(推荐采用此操作系统)
麒麟V10
X86
openEuler 20.3LTS
CentOS 7.6
数据库限制
| 技术指标 | 最大限制 |
|---|---|
| 数据库容量 | 受限于操作系统与硬件 |
| 单表大小 | 32TB |
| 单行数据大小 | 1GB |
| 每条记录单个字段的大小 | 1GB |
| 单表记录数量 | 2^48 |
| 单表列数 | 250~1600(随字段类型不同会有变化) |
| 单表中的索引个数 | 无限制 |
| 复合索引包含列数 | 32 |
| 单表约束个数 | 无限制 |
| 并发连接数 | 10000 |
| 分区表的分区个数 | 32768(范围分区)/64(哈希分区/列表分区) |
| 分区表的单个分区大小 | 32TB |
| 分区表的单个分区记录数 | 2^55 |
CentOS 7.9.2009 单机安装
虽然openGauss限制CentOS操作系统版本为7.6,但是依然可以通过修改操作系统版本信息或者openGauss安装包来安装到CentOS7.6版本以上的操作系统中。
openGauss支持单节点和HA两种部署方式。但单机部署依然支持多个数据库实例的部署,通常为了数据安全, openGauss不建议在单节点服务器上部署多个openGauss实例。同时,也可以在同一个节点上部署HA ,在 openGauss HA环境中,备节点最多支持8个节点。
NOTE: 通过openGauss提供的脚本安装时,只允许在单台物理机只部署一个数据库系统。如果您需要在单台物理机部署多个数据库系统,建议您通过命令行安装,不需要通过openGauss提供安装脚本执行安装。
节点规划
操作系统配置| 操作系统版本 | 7.9.2009 |
| 网卡接口数量 | 三块网卡ens33 ens34 ens35(ens34 和 ens35 可做 bond) |
| 数据访问IP 地址 | 172.10.20.70 |
| 网络传输速率 | 2.5Gbps(约312.5MB/s) |
| 硬盘接口类型 | M2 接口(传输速率约为32Gbps/s) |
| 主机名称 | node01 |
| 内存 | 8GB(建议至少8G,内存不够可能会导致无法启动,需要手动修改脚本或配置 postgresql.conf 文件) |
| 磁盘大小 | 300GB |
| 管理网络 IP 地址 | 10.10.20.70 |
操作步骤
配置操作系统
#关闭 防火墙[root@node01 ~]# systemctl stop firewalld[root@node01 ~]# systemctl disable firewalld#关闭 Selinux[root@node01 ~]# cat /etc/selinux/config | egrep -v "^#|^$" |grep SELINUX=disabledSELINUX=disabled#配置hosts解析[root@node01 ~]# cat /etc/hosts | head -3 | tail -110.10.20.70 node01.com node01#配置 yum 仓库环境[root@node01 ~]# cat /etc/yum.repos.d/CentOS-Base.repo | grep -vE "^#|^$"[base]name=CentOS-$releasever - Base - repo.huaweicloud.combaseurl=https://repo.huaweicloud.com/centos/$releasever/os/$basearch/gpgcheck=1gpgkey=https://repo.huaweicloud.com/centos/RPM-GPG-KEY-CentOS-7[updates]name=CentOS-$releasever - Updates - repo.huaweicloud.combaseurl=https://repo.huaweicloud.com/centos/$releasever/updates/$basearch/gpgcheck=1gpgkey=https://repo.huaweicloud.com/centos/RPM-GPG-KEY-CentOS-7[extras]name=CentOS-$releasever - Extras - repo.huaweicloud.combaseurl=https://repo.huaweicloud.com/centos/$releasever/extras/$basearch/gpgcheck=1gpgkey=https://repo.huaweicloud.com/centos/RPM-GPG-KEY-CentOS-7#安装相应的软件依赖包[root@node01 ~]# yum install -y libaio-devel \flex \bison \ncurses-devel \glibc-devel \patch \redhat-lsb-core \readline-devel \python3#关闭 swap 交换内存(可选)[root@node01 ~]# swapoff -a#设置 网卡 MTU 值,推荐值为1500(X86服务器),如果是ARM服务器,推荐8192[root@node01 ~]# ifconfig ens33 mtu 1500[root@node01 ~]# ifconfig ens34 mtu 1500[root@node01 ~]# ifconfig ens35 mtu 1500#关闭 RemoveIPC[root@node01 ~]# sed -i 's/\#RemoveIPC=no/RemoveIPC=no/g' /etc/systemd/logind.conf [root@node01 ~]# cat /etc/systemd/logind.conf | grep RemoveIPCRemoveIPC=no
上传安装包至 opt/software 目录下
[root@node01 software]# lsopenGauss-2.0.1-CentOS-64bit-all.tar.gz
切换至 opt/software 目录并解压
[root@node01 software]# tar -zxf openGauss-2.0.1-CentOS-64bit-all.tar.gz [root@node01 software]# lsopenGauss-2.0.1-CentOS-64bit-all.tar.gz openGauss-2.0.1-CentOS-64bit.tar.bz2openGauss-2.0.1-CentOS-64bit-om.sha256 upgrade_sql.sha256openGauss-2.0.1-CentOS-64bit-om.tar.gz upgrade_sql.tar.gzopenGauss-2.0.1-CentOS-64bit.sha256#解压 om 包[root@node01 software]# tar -zxf openGauss-2.0.1-CentOS-64bit-om.tar.gz[root@node01 software]# lslib openGauss-2.0.1-CentOS-64bit-om.sha256 openGauss-2.0.1-CentOS-64bit.sha256 script upgrade_sql.sha256 version.cfgopenGauss-2.0.1-CentOS-64bit-all.tar.gz openGauss-2.0.1-CentOS-64bit-om.tar.gz openGauss-2.0.1-CentOS-64bit.tar.bz2 simpleInstall upgrade_sql.tar.gz
创建用户和用户组
#创建用户组dbgrp[root@node01 ~]# groupadd -g 2001 dbgrp#创建用户[root@node01 ~]# useradd -u 2001 -g dbgrp omm#配置用户密码(不推荐使用该方式)[root@node01 ~]# echo 'Bigdata@123' | passwd --stdin ommChanging password for user omm.passwd: all authentication tokens updated successfully.
配置单机 XML 配置文件
<?xml version="1.0" encoding="UTF-8"?><ROOT> <!-- openGauss整体信息 --> <CLUSTER> <!-- 数据库名称 --> <PARAM name="clusterName" value="singlenode" /> <!-- 数据库节点名称(hostname) --> <PARAM name="nodeNames" value="node01" /> <!-- 数据库安装目录--> <PARAM name="gaussdbAppPath" value="/opt/huawei/install/app" /> <!-- 日志目录--> <PARAM name="gaussdbLogPath" value="/opt/huawei/log" /> <!-- 临时文件目录--> <PARAM name="tmpMppdbPath" value="/opt/huawei/tmp" /> <!-- 数据库工具目录--> <PARAM name="gaussdbToolPath" value="/opt/huawei/install/om" /> <!-- 数据库core文件目录--> <PARAM name="corePath" value="/opt/huawei/corefile" /> <!-- 节点IP,与数据库节点名称列表一一对应 --> <PARAM name="backIp1s" value="172.10.20.70"/> </CLUSTER> <!-- 每台服务器上的节点部署信息 --> <DEVICELIST> <!-- 节点1上的部署信息 --> <DEVICE sn="1000001"> <!-- 节点1的主机名称 --> <PARAM name="name" value="node01"/> <!-- 节点1所在的AZ及AZ优先级 --> <PARAM name="azName" value="AZ1"/> <PARAM name="azPriority" value="1"/> <!-- 节点1的IP,如果服务器只有一个网卡可用,将backIP1和sshIP1配置成同一个IP --> <PARAM name="backIp1" value="172.10.20.80"/> <PARAM name="sshIp1" value="172.10.20.70"/> <!--dbnode--> <PARAM name="dataNum" value="1"/> <PARAM name="dataPortBase" value="15400"/> <PARAM name="dataNode1" value="/data/dn"/> <PARAM name="dataNode1_syncNum" value="0"/> </DEVICE> </DEVICELIST></ROOT>
创建配置文件中的相关目录
[root@node01 ~]# mkdir -p /opt/huawei/{install,corefile,tmp,log}[root@node01 ~]# chown omm.dbgrp -R /opt/huawei/[root@node01 script]# mkdir -p /data/dn[root@node01 script]# chown omm.dbgrp -R /data
将上面创建的配置文件存放于 opt/gaussdbconf 目录下
[root@node01 gaussdbconf]# pwd/opt/gaussdbconf[root@node01 gaussdbconf]# lsconfig.xml
执行安装前基础环境检查
[root@node01 script]# ./gs_preinstall -U omm -G dbgrp -X /opt/gaussdbconf/config.xml --non-interactiveTraceback (most recent call last): File "/opt/software/script/gspylib/os/gsplatform.py", line 1941, in getCurrentPlatForm distName.lower(), version[0:3]))Exception: [GAUSS-51900] : The current OS is not supported. The current system is: centos7.9During handling of the above exception, another exception occurred:Traceback (most recent call last): File "/opt/software/script/gspylib/os/gsplatform.py", line 1993, in __init__ self.userPlatform.getCurrentPlatForm() File "/opt/software/script/gspylib/os/gsplatform.py", line 1943, in getCurrentPlatForm raise Exception(str(e))Exception: [GAUSS-51900] : The current OS is not supported. The current system is: centos7.9During handling of the above exception, another exception occurred:Traceback (most recent call last): File "./gs_preinstall", line 32, in <module> from gspylib.common.DbClusterInfo import dbClusterInfo, \ File "/opt/software/script/gspylib/common/DbClusterInfo.py", line 36, in <module> from gspylib.os.gsfile import g_file File "/opt/software/script/gspylib/os/gsfile.py", line 68, in <module> from gspylib.os.gsplatform import g_Platform, findCmdInPath File "/opt/software/script/gspylib/os/gsplatform.py", line 1999, in <module> g_Platform = UserPlatform().userPlatform File "/opt/software/script/gspylib/os/gsplatform.py", line 1995, in __init__ raise Exception(str(e))Exception: [GAUSS-51900] : The current OS is not supported. The current system is: centos7.9
ERROR 出现上述错误是由于操作系统版本不符合 openGauss 建议的要求。此处只需要将 /etc/redhat-release 中的 7.9.2009 修改为 7.6.2009 即可。
修改后重新执行安装前检查
[root@node01 script]# cat /etc/redhat-release CentOS Linux release 7.6.2009 (Core)
[root@node01 script]# ./gs_preinstall -U omm -G dbgrp -X /opt/gaussdbconf/config.xml --non-interactiveParsing the configuration file.Successfully parsed the configuration file.Installing the tools on the local node.Successfully installed the tools on the local node.Setting pssh pathSuccessfully set core path.Preparing SSH service.Successfully prepared SSH service.Checking OS software.Successfully check os software.Checking OS version.Successfully checked OS version.Creating cluster's path.Successfully created cluster's path.Setting SCTP service.Successfully set SCTP service.Set and check OS parameter.Setting OS parameters.Successfully set OS parameters.Warning: Installation environment contains some warning messages.Please get more details by "/opt/software/script/gs_checkos -i A -h node01 --detail".Set and check OS parameter completed.Preparing CRON service.Successfully prepared CRON service.Setting user environmental variables.Successfully set user environmental variables.Setting the dynamic link library.Successfully set the dynamic link library.Setting Core fileSuccessfully set core path.Setting pssh pathSuccessfully set pssh path.Set ARM Optimization.No need to set ARM Optimization.Fixing server package owner.Setting finish flag.Successfully set finish flag.Preinstallation succeeded.
Note 上述执行结果可以看到,安装前检查通过。
切换到 omm 用户执行安装
[root@node01 ~]# su - ommLast login: Fri Aug 6 17:17:00 CST 2021 on pts/0[omm@node01 ~]$ gs_install -X /opt/gaussdbconf/config.xml Parsing the configuration file.Check preinstall on every node.Successfully checked preinstall on every node.Creating the backup directory.Successfully created the backup directory.begin deploy..Installing the cluster.begin prepare Install Cluster..Checking the installation environment on all nodes.begin install Cluster..Installing applications on all nodes.Successfully installed APP.begin init Instance..encrypt cipher and rand files for database.Please enter password for database:Please repeat for database:begin to create CA cert filesThe sslcert will be generated in /opt/huawei/install/app/share/sslcert/omCluster installation is completed.Configuring.Deleting instances from all nodes.Successfully deleted instances from all nodes.Checking node configuration on all nodes.Initializing instances on all nodes.Updating instance configuration on all nodes.Check consistence of memCheck and coresCheck on database nodes.Configuring pg_hba on all nodes.Configuration is completed.Successfully started cluster.Successfully installed application.end deploy..
验证安装结果
[omm@node01 ~]$ gsql -U omm -d postgres -p 15200gsql ((openGauss 2.0.1 build d97c0e8a) compiled at 2021-06-02 19:37:17 commit 0 last mr )Non-SSL connection (SSL connection is recommended when requiring high-security)Type "help" for help.postgres=# show port; port ------- 15200(1 row)
CentOS 7.9.2009 多节点集群安装
集群安装实际上依赖于配置文件,下面步骤来安装集群,集群安装最小节点数量2台,即一主一备,可以执行一主多节点安装。
节点规划
| 节点名称 | 节点属性 | 节点 IP | 节点内存 |
|---|---|---|---|
| node01 | 主节点 | 10.10.20.70 | 8GB |
| node02 | 备用节点1 | 10.10.20.71 | 8GB |
| node03 | 备用节点2 | 10.10.20.72 | 8GB |
安装过程
Note 基础操作系统环境配置过程此处略过
所有节点安装必要的依赖包
[root@node01 ~]#for ip in 10.10.20.{70,71,72};do ssh $ip "yum install -y libaio-devel \flex \bison \ncurses-devel \glibc-devel \patch \redhat-lsb-core \readline-devel \python3"done
上传安装包到 node01 节点上的 opt/software 目录下
[root@node01 ~]# cd /opt/software/[root@node01 software]# lsopenGauss-2.0.1-CentOS-64bit-all.tar.gz[root@node01 software]# tar -zxf openGauss-2.0.1-CentOS-64bit-all.tar.gz [root@node01 software]# tar -zxf openGauss-2.0.1-CentOS-64bit-om.tar.gz
将解压后的包拷贝到另外两个节点
[root@node01 ~]# for ip in 10.10.20.{71,72};do scp -r /opt/software/ $ip:/opt/done
编辑 XML 安装配置文件
<?xml version="1.0" encoding="UTF-8"?><ROOT> <!-- openGauss整体信息 --> <CLUSTER> <!-- 数据库名称 --> <PARAM name="clusterName" value="gussdb" /> <!-- 数据库节点名称(hostname) --> <PARAM name="nodeNames" value="node01,node02,node03" /> <!-- 数据库安装目录--> <PARAM name="gaussdbAppPath" value="/opt/huawei/install/app" /> <!-- 日志目录--> <PARAM name="gaussdbLogPath" value="/opt/huawei/log" /> <!-- 临时文件目录--> <PARAM name="tmpMppdbPath" value="/opt/huawei/tmp"/> <!-- 数据库工具目录--> <PARAM name="gaussdbToolPath" value="/opt/huawei/install/om" /> <!-- 数据库core文件目录--> <PARAM name="corePath" value="/opt/huawei/corefile"/> <!-- 节点IP,与数据库节点名称列表一一对应 --> <PARAM name="backIp1s" value="172.10.20.70,172.10.20.71,172.10.20.72"/> </CLUSTER> <!-- 每台服务器上的节点部署信息 --> <DEVICELIST> <!-- 节点1上的部署信息 --> <DEVICE sn="10001"> <!-- 节点1的主机名称 --> <PARAM name="name" value="node01"/> <!-- 节点1所在的AZ及AZ优先级 --> <PARAM name="azName" value="AZ1"/> <PARAM name="azPriority" value="1"/> <!-- 节点1的IP,如果服务器只有一个网卡可用,将backIP1和sshIP1配置成同一个IP --> <PARAM name="backIp1" value="172.10.20.70"/> <PARAM name="sshIp1" value="10.10.20.70"/> <!--dn--> <PARAM name="dataNum" value="1"/> <PARAM name="dataPortBase" value="25600"/> <PARAM name="dataNode1" value="/data/dn,node02,/data/dn,node03,/data/dn"/> <PARAM name="dataNode1_syncNum" value="0"/> </DEVICE> <!-- 节点2上的部署信息 --> <DEVICE sn="10002"> <!-- 节点2的主机名称 --> <PARAM name="name" value="node02"/> <!-- 节点2所在的AZ及AZ优先级 --> <PARAM name="azName" value="AZ1"/> <PARAM name="azPriority" value="1"/> <!-- 节点2的IP,如果服务器只有一个网卡可用,将backIP1和sshIP1配置成同一个IP --> <PARAM name="backIp1" value="172.10.20.71"/> <PARAM name="sshIp1" value="10.10.20.71"/> </DEVICE> <!-- 节点3上的部署信息 --> <DEVICE sn="10003"> <!-- 节点3的主机名称 --> <PARAM name="name" value="node03"/> <!-- 节点3所在的AZ及AZ优先级 --> <PARAM name="azName" value="AZ1"/> <PARAM name="azPriority" value="1"/> <!-- 节点3的IP,如果服务器只有一个网卡可用,将backIP1和sshIP1配置成同一个IP --> <PARAM name="backIp1" value="172.10.20.72"/> <PARAM name="sshIp1" value="10.10.20.72"/> </DEVICE> </DEVICELIST></ROOT>
将配置文件放置于 opt/gaussdbconf 目录下
[root@node01 ~]# mkdir -p /opt/gaussdbconf[root@node01 ~]# vi /opt/gaussdbconf/config.xml[root@node01 ~]# ls /opt/gaussdbconf/config.xml /opt/gaussdbconf/config.xml
创建用户和用户组
[root@node01 script]# for ip in 10.10.20.{70,71,72};dossh $ip "groupadd -g 2001 dbgrp;useradd -u 2001 -g dbgrp omm"ssh $ip "echo omm | passwd --stdin omm"done
执行安装前检查
[root@node01 script]# ./gs_preinstall -U omm -G dbgrp -X /opt/gaussdbconf/config.xml --non-interactiveParsing the configuration file.Successfully parsed the configuration file.Installing the tools on the local node.Successfully installed the tools on the local node.Setting pssh pathSuccessfully set core path.Distributing package.Begin to distribute package to tool path.Successfully distribute package to tool path.Begin to distribute package to package path.Successfully distribute package to package path.Successfully distributed package.Preparing SSH service.Successfully prepared SSH service.Installing the tools in the cluster.Successfully installed the tools in the cluster.Checking hostname mapping.Successfully checked hostname mapping.Checking OS software.Successfully check os software.Checking OS version.Successfully checked OS version.Creating cluster's path.Successfully created cluster's path.Setting SCTP service.Successfully set SCTP service.Set and check OS parameter.Setting OS parameters.Successfully set OS parameters.Warning: Installation environment contains some warning messages.Please get more details by "/opt/software/script/gs_checkos -i A -h node01,node02,node03 --detail".Set and check OS parameter completed.Preparing CRON service.Successfully prepared CRON service.Setting user environmental variables.Successfully set user environmental variables.Setting the dynamic link library.Successfully set the dynamic link library.Setting Core fileSuccessfully set core path.Setting pssh pathSuccessfully set pssh path.Set ARM Optimization.No need to set ARM Optimization.Fixing server package owner.Setting finish flag.Successfully set finish flag.Preinstallation succeeded.
Warning 看上面有个警告,执行一下提示的命令查看仅是操作系统层面关于内核参数、SWAP、和网络MTU值的一些警告,重新配置一下即可
切换到 omm 用户执行安装
[root@node01 script]# su - omm[omm@node01 ~]$ gs_install -X /opt/gaussdbconf/config.xmlParsing the configuration file.Check preinstall on every node.Successfully checked preinstall on every node.Creating the backup directory.Successfully created the backup directory.begin deploy..Installing the cluster.begin prepare Install Cluster..Checking the installation environment on all nodes.begin install Cluster..Installing applications on all nodes.Successfully installed APP.begin init Instance..encrypt cipher and rand files for database.Please enter password for database:Please repeat for database:begin to create CA cert filesThe sslcert will be generated in /opt/huawei/install/app/share/sslcert/omCluster installation is completed.Configuring.Deleting instances from all nodes.Successfully deleted instances from all nodes.Checking node configuration on all nodes.Initializing instances on all nodes.Updating instance configuration on all nodes.Check consistence of memCheck and coresCheck on database nodes.Successful check consistence of memCheck and coresCheck on all nodes.Configuring pg_hba on all nodes.Configuration is completed.Successfully started cluster.Successfully installed application.end deploy..
查看集群状态
[omm@node01 ~]$ gs_om -t status --detail[ Cluster State ]cluster_state : Normalredistributing : Nocurrent_az : AZ_ALL[ Datanode State ]node node_ip instance state | node node_ip instance state | node node_ip instance state---------------------------------------------------------------------------------------------------------------------------------------------------------------------------------------------1 node01 172.10.20.70 6001 /data/dn P Primary Normal | 2 node02 172.10.20.71 6002 /data/dn S Standby Normal | 3 node03 172.10.20.72 6003 /data/dn S Standby Normal
Note 本次安装中,数据库的访问端口为 25600
数据库的基本访问和启停状态信息
访问数据库
openGauss使用gsql作为客户端工具,gsql是openGauss提供在命令行下运行的数据库连接工具,可以通过此工具连接服务器并对其进行操作和维护,除了具备操作数据库的基本功能,gsql还提供了若干高级特性,便于用户使用。数据库的默认超级用户为 omm ,默认数据库为 postgres 数据库,不指定用户,默认以超级用户 omm数据库登录,并访问omm 数据库,由于数据库中没有默认的 omm 数据库,因此在初始化完成后,第一次登录时如果不指定用户名,必须要指定默认的数据库postgres,如下:
#由于默认的端口为 5342 ,因此如果在 XML 安装配置文件中指定了新的端口,请使用新定义的端口号,上面定义的端口为 25600[omm@node01 ~]$ gsqlfailed to connect Unknown:5432.#首次登录不指定用户和数据库,会使用 omm 数据库默认登录而报错[omm@node01 ~]$ gsql -p 25600gsql: FATAL: database "omm" does not exist#正确登录方式(如果有其他数据库,也可以指定其他数据库)[omm@node01 ~]$ gsql -d postgres -p 25600gsql ((openGauss 2.0.1 build d97c0e8a) compiled at 2021-06-02 19:37:17 commit 0 last mr )Non-SSL connection (SSL connection is recommended when requiring high-security)Type "help" for help.postgres=#
数据库的启停和状态查看
openGauss提供了gs_om工具帮助对openGauss进行维护,包括启动openGauss、停止openGauss、查询openGauss状态、查询静态配置、生成静态配置文件、查询openGauss状态详细信息、生成动态配置文件、SSL证书替换、显示帮助信息和显示版本号信息等功能, 具体使用如下:
查看数据库的状态和详细状态
#一般状态[omm@node01 ~]$ gs_om -t status -----------------------------------------------------------------------cluster_name : gussdbcluster_state : Normalredistributing : No-----------------------------------------------------------------------#详细状态[omm@node01 ~]$ gs_om -t status --detail[ Cluster State ]cluster_state : Normalredistributing : Nocurrent_az : AZ_ALL[ Datanode State ]node node_ip instance state | node node_ip instance state | node node_ip instance state---------------------------------------------------------------------------------------------------------------------------------------------------------------------------------------------1 node01 172.10.20.70 6001 /data/dn P Primary Normal | 2 node02 172.10.20.71 6002 /data/dn S Standby Normal | 3 node03 172.10.20.72 6003 /data/dn S Standby Normal
停止数据库
#默认停止方式[omm@node01 ~]$ gs_om -t stopStopping cluster.=========================================Successfully stopped cluster.=========================================End stop cluster.#使用 -m 的快速停止模式[omm@node01 ~]$ gs_om -t stop -mfStopping cluster.=========================================Successfully stopped cluster.=========================================End stop cluster.#使用 -m 的立即停止模式[omm@node01 ~]$ gs_om -t stop -mfStopping cluster.=========================================Successfully stopped cluster.=========================================End stop cluster.
启动数据库
[omm@node01 ~]$ gs_om -t start Starting cluster.=========================================[SUCCESS] node01[SUCCESS] node02[SUCCESS] node03=========================================Successfully started.
创建用户和数据库
创建用户
[omm@node01 ~]$ gsql -d postgres -p 25600gsql ((openGauss 2.0.1 build d97c0e8a) compiled at 2021-06-02 19:37:17 commit 0 last mr )Non-SSL connection (SSL connection is recommended when requiring high-security)Type "help" for help.postgres=# CREATE USER deveuser WITH PASSWORD 'Bigdata@123';CREATE ROLE
创建数据库devedb并指定所属用户为deveuser
postgres=# CREATE DATABASE devedb WITH OWNER = deveuser;CREATE DATABASE
以deveuser登录devedb数据库
[omm@node01 ~]$ gsql -U deveuser -d devedb -p 25600Password for user deveuser: gsql ((openGauss 2.0.1 build d97c0e8a) compiled at 2021-06-02 19:37:17 commit 0 last mr  )
Non-SSL connection (SSL connection is recommended when requiring high-security)
Type "help" for help.
devedb=>
结语
openGauss具有关系型数据库的基本功能以及数据分区等具有企业特性的功能。不仅仅支持标准 SQL,也支持表空间,事务 ACID 特性,单节点故障恢复,双机数据同步,双机故障切换等功能。而且提供了供java使用的 JDBC 的应用程序接口和一系列管理工具。
欢迎访问openGauss官方网站

openGauss开源社区官方网站:
https://opengauss.org
openGauss组织仓库:
https://gitee.com/opengauss
openGauss镜像仓库:
https://github.com/opengauss-mirror

扫码关注我们
微信公众号|openGauss
微信社群小助手|openGauss-bot
